Showing posts with label Love is in the Air. Show all posts

Sunday, 20 December 2020

PA Blog 2020 Year in Review {Topics 1-5}

 PaperArtsy Blog 2020 Year in Review - Part 1/4
 
Hello from PaperArtsy HQ,

This is the time on year that we reflect on the year past. Despite the turmoil and upheaval that a virus has wreaked across our globe, to me, time seems to have passed in a flash. Maybe that is because we managed to move country within the year too, which certainly sucked up more recent months. I can certainly understand, that for many people, perhaps this year has dragged. It seems people are aching to move forward into 2021!
 
We have much to be thankful for. Crafting has brought relief to many people this year. It is a good form of escape. To get lost in the process of creating art helps put to the back of your mind other daily concerns. It also gives an opportunity to express feelings and frustrations too. Despite the unusual circumstances, did you find time to create more this year? Did you learn something new or pick up a new hobby? 
 
Many of us have been challenged in ways we least expected? Making ends meet, paying bills, keeping our jobs. To have your job-security and ability to function questioned so unexpectedly from an event beyond your control has been a pretty stressful set of circumstances to face. I hope that you can see the light at the end of the tunnel, and I am sure that when things do start to get back to normal, that we all will appreciate more our environment, the opportunity to travel and appreciate other cultures, and the relationships we enjoy with colleagues, friends and family, or even meeting up with fellow crafters again!

Tonight we are sharing highlights from Topics 1-5: Love is in the Air, A Hint of Spring, On this Tag, Mighty Mica and Mark Making.

Leandra 

Topic 1: Love is in the Air

My first pick is this amazing beauty. If Valentine tends to make us think of cards, Jenny  Marples has repackaged all the classics of love (pink, hearts, lace) in this gorgeous box  (link to the original post).


I adored how clean and simple this book cover is, with great colour impact. Ellie Knol really has an eye for the details that make the difference, like the tiny cut-out numbers (link)


Additionally we saw all often associate love with warm colours and cute patterns. Helen Chilton went another route with this colorful and quirky heart (link).
 

What about a love project with no heart? Check the layers on this beautiful inspirational card. Claire Snowdon manages to project the feelings even without the usual imagery (link).


Topic 2: A Hint of Spring
 
Spring traditionally heralds the rebirth of nature. Jennie Atkinson perfectly encapsulated this feeling in soft purples and deep greens (link to original blog post).

 
I love how Lotte Kristensen also went with the "new leaves" idea but hers remind us that Spring also often brings back color after a drab winter. So bright and funky! (link)


Look how the big Jofy blooms fill the space on this small notebook by Chris Dark. The black background really make the colours pop, even with soft blues and greens.(link).


Additionally, Josefine Fouarge made great use of her stamps (Gwen Lafleur's circles) to build coordinated background, pattern papers and focus elements in this striking tag. (link)


Topic 3 : On this Tag

My first pick is this bright and quirky series by Etsuko Noguchi. Tags and minis pair perfectly and she really brought the Zinski characters to life with popping colours while grounding them with textured backgrounds (link).


I loved how Corrie Herriman mixed Scrapcosy's vintage images with bright colours. Her use of stark script and subtle texture grounds the focus images while letting them pop  beautifully (link).


And I hope you didn't miss Nikki Acton's concertina book. The tag shape mimics book pages while providing just a little bit more interest.  (link)


I adored how  Amanda Pink included the tag in her composition. Still a key feature yet also an element among others, brought together by a clever use of colour (link).


Topic 4 : Mighty Mica

I hope you didn't miss this abstract piece, a rare treat on our blog! Helen Chilton cleverly used the micas shifting and shine to reveal the texture in all her layers(link to original blog post)


I adored how Lynn Good did not hesitate to mix micas and bright colours. She broke out her sparkly pens to give shiny highlights to her flowers with great effect (and a lot less mess!) (link).


Additionally the long time crafters among us remember mica sheets. Autumn Clark surely does and included fragments everywhere in her journal, creating subtle texture and shine (link).


Topic 5 : Mark Making

I think these tags by Autumn Clark are a beautiful example of how fun and creative mark making can be. Lots of layers mixing to make new texture or reveal little stamp details! (link)


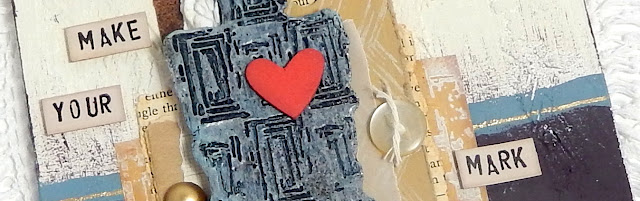
I love how Jenny Marples decided to do her marks in relief. The careful composition and contrasting colours really make that red heart stand out. (link)


For her marks, Keren Baker's stamping in bleach and thread effects produce a striking result! The embroidery on the bee makes it look alive. (link)


It is fabulous to look back on what our superb bloggers have shared with us over the course of the year.  Don't forget to save the posts that float your boat on pinterest. You'll hit the New Year with a dozen ideas to crack on with!

Leandra


Saturday, 18 January 2020

2020 #1 Love is in the air: Follow Your Heart with ESC {by Claire Snowdon}

2020 Topic 1: Love is in the Air


I really love the mix of old and new in this card by Claire. An old vintage style rose stamp, and new bright mixed media techniques with hot colours. This creates a gorgeous vibrant card that totally resonates with having a splash of valentine fun!
~ Leandra

Hi everyone, it's Claire Snowdon with you today, and I'd like to share with you a traditional style Valentine's Day card.

The card style is traditional in the colours I have chosen and the use of the roses however I've given it a modern twist by adding a couple of pops of contrasting colours and bold stencilling.


The background started off with a couple of pieces of Tim Holtz tissue tape and then I added the Fresco Finish paints in: Blah Mange, Sorbet, Red Lipstick, Cerise, Coral, Green Patina and Yellow Submarine.


The next step was stencilling, stamping and splattering!  This stage is my favourite :)
I stamped in the background using Blah Mange and the script stamp from ESC04


A little more stamping with the script stamp from ESN11 using Archival Potting Soil.


I stencilled the dots with a Tim Holtz stencil and Little Black Dress.  


And finally to finish it off it was splattered with Chalk, Yellow Submarine and some gold Posca Pen too - for good measure!


I used the left over pink paints from my craft mat to brayer a scrap of Smoothy heavyweight card and then stamped the roses from ESC04 using Versafine in Onyx Black.


I added an extra bit of definition to the roses using coloured pencils before fussy cutting the image and adding to the card with foam squares. I then added the metallic sentiment stickers which are by Tim Holtz.


To finish the card off nicely I mounted it on black card then added to the card blank again using the foam squares.


I really enjoyed making this card - it's good to throw in a few contrasting colours now and then to mix things up a bit.  There is tons of inspiration on Pinterest and Instagram - especially for Valentine's Day ideas so do go and take a look.


Thanks, Claire xx


Thursday, 16 January 2020

2020 #1 Love is in the Air: LOVE hearts with EGL {by Ellie Knol}

2020 Topic 1: Love is in the Air
Using non-Valentine stamps for this love theme is a challenge that Ellie has risen well to. I think finding hearts from those leaves is a stroke of genius! 
~Keren

Creating these the way I did was a process I had to go through. It took me some time to think about using non-valentine stamps for the theme and also enhance their beauty to their full. LOVE is normally expressed in RED and HEARTs , and of course ROSES. 

I came to this as the contrast of the white, black and color is so striking... 


I created two stamped collages. As they were too big for a card, I decided they were going to make for beautiful covers of two books-to-be. 


I adhered both to some black cardstock from a recycled (ancient) photo book. I love to pick these up in thrift-stores inexpensively. 


I played with the beautiful stamps from the EGL05 stamp set.


I created a stencil from sticky paper with the use of the PM001 mask to be able to sponge within the heart shape. 


I particularly like this one, as I did not think it would turn out this beautiful.. simple, but striking. 


A close-up. I like the effect of the 
MINI 23 numbers in the background. It sort of ties the collaged stamping.
I adhered a 1 and a 4 to the heart, they were cut from MINI 23; stamped onto a separate piece of cardstock. .. Why 14? Valentines day of course; 14th of February!


The flower pops more against the red heart because of the white acrylic marker edge around it. 


To finish off the stamping collage, I adhered some numbers that were stamped onto a scrap piece of watercolour paper to add to the collage where the stamping did not reach the white leaf-hearts.


This was the first card I created on some lower quality paper, just to see that whether what I wanted to achieve would work. When I showed this one to my husband, he said : "that's a simple card". Apparently he thinks everything I create must be complicated, LOL.
At this stage I decided to keep the leaf-hearts white on the 'real' project. 


This was another trial-and-error project.. I decided to create a rather rectangular shaped one. 


I love how this one has turned out; the white leaf-hearts, the bleach-changed-color, the white splatters and last but not least, the birdie being part of the heart shape. The doodling around the heart adds to it all!

It always takes some thinking about when you start with blank paper, a stencil and a stamp; how to enhance it to its full beauty, and in this case using stamps that are not particularly valentine type of stamps to fit the theme. 
I thought to myself: mission accomplished! :)

As far as I am concerned stamping and playing with colour is so relaxing. So if you need some me-time, just go create!


Tuesday, 14 January 2020

2020 #1 Love is in the Air: Layers and Poetry with ESA minis {by Lotte Kristensen}

2020 Topic 1: Love is in the Air


I adore this kind of journaling spread. The bravery it takes to follow your instinct and go with the flow. As Lotte says herself in this post, it can be hard to identify what it needs, and sometimes, if you just step away, when you come back you will instantly see what needs to happen next. I love how she knocks it back with Grunge paste, and then stamps with the infusions. All the layers end up the perfect setting for the stamped words! Nice one Lotte, and thanks for sharing your creative process so perfectly!
~ Leandra

Hey everyone, Lotte here and *my* love in the air is the delicious new selection of Seth Apter mini stamps, together with lots of lovely layers of (also) new Fresco Finish paint, plus Grunge Paste, *and* Infusions - oh yes!!  You know, I never really got why they use a 3rd century martyred saint to celebrate St. Valentine's Day...... 


Okay, so first off, I used a brayer to put on a coat of Gold Rush Fresco Finish onto my journal pages - I have loads of them prepared with strips of old magazine and book pages, bits of masking tape etc, to make the page a bit heavier and textured, so it can take loads and loads of paint and water and everything else I prolly throw at it.  Before it was completely dry, I used a baby wipe to rub off some of the paint for a mottled effect:


Next, I used a bit of sequin waste to stipple some Blue Bayou Fresco Finish around the edges:


Next, I used a small gel plate to brayer on some Blue Bayou - you can either dip the stamp in the paint, or brayer it on, but DO make sure to clean it off instantly!!


Then I stamped randomly onto the pages:


Next, I used Orange Blossom Archival Ink pad to stamp more random impresssions:


And a little close up:


So, at this point I thought it looked a bit too bright, so decided to add some Grunge Paste, some through sequin waste, and some just with a palette knife:


And *then* I got another of my favourites out - a Stabilo All pencil, which I used to scribble around the (dry) grunge paste:


Then it was time for some spritzing with water, to let the Stabilo pencil colour run (use a small brush to move it around if it doesn't go quite where you want it) 


...at this point I also sprinkled on some Golden Sand Infusions:


As there are a lot of circles in the Apter stamps, I decided to make some of my own by using my fingertips with the Infusion and pencil:


I remembered that you can also stamp with Infusions - I think it was Ruth Mescall who I first saw do this technique - so I spritzed some water on the gelli plate, sprinkled some Infusions on and stamped randomly (again!!) onto the pages:


After this was all throroughly dry, I used some of my ancient alphabet stamp sets to set out the quote from Emily Bronte's poem 'Spellbound' - I think the wintery colours suit the words perfectly: 'The night is darkening round me // The wild winds coldly blow // But a tyrant spell has bound me// and I cannot, cannot go'.


Well, that's it from me - one thing I thought I'd mention is that when you do multiple layers like these, half way through it *always* looks like a dog's dinner (poor dog!) but the beauty about doing pages like these is that you can re-work them until you're (as) happy (as can be) - sometimes it's good to leave the spread for a couple of hours or even a day, and come back to it with fresh eyes.

Until next time!

Lotte 

Instagram: Alice Overground