Monday, 29 April 2019

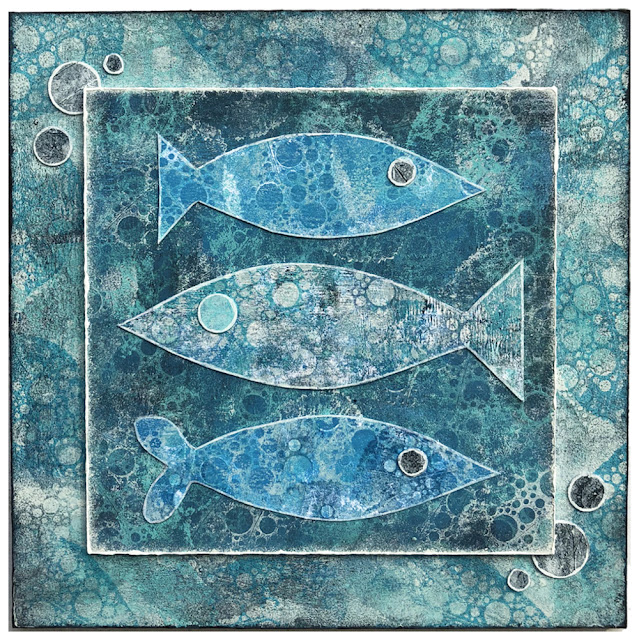
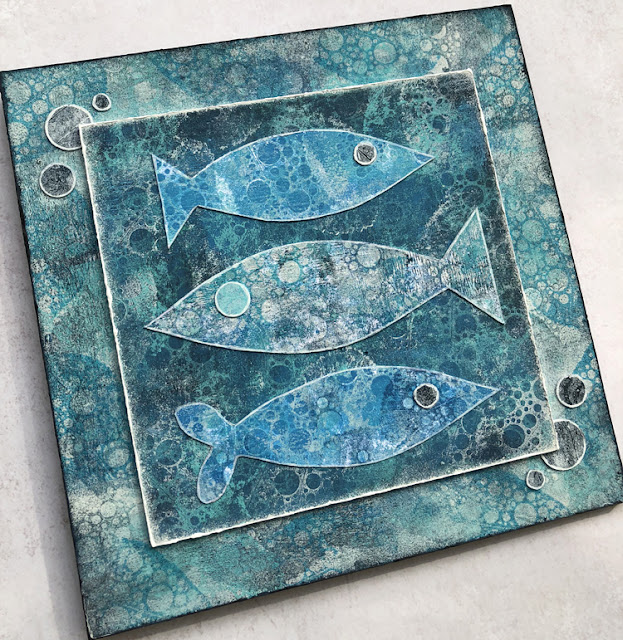
2019 #6 Fish: One Stamp, Three Fish with ECF {by Nikki Acton}

2019 Topic 6: Fish

Stamping on a Gelli Plate - with PaperArtsy Fresco Paints and ECF06

Beautiful positive and negative use of an image by Nikki, plus gelli printing and more in exploring all the blues for her fishy creation! ~ Leandra

Hi everyone, it's Nikki from Addicted to Art here with you today, sharing my fish themed project. 

When the scheduling for this theme was taking place I had a vague idea and said I would use stamps from Courtney Franich (ECF) and Seth Apter (ESA). I planned to create lots of fish with the fabulous texture stamps they have both released recently. But when I got going I got carried away just using one stamp! 


Stamping on a Gelli Plate - with PaperArtsy Fresco Paints and ECF06
The leaves on Courtney's recent stamp release (ECF06) are wonderful and the one with the 'bubble' seemed perfect. I have used this on my gelli plate using both the positive and negative image.


Stamping on a Gelli Plate - with PaperArtsy Fresco Paints and ECF06

Hopefully you can see on this close up how I have used the stamp in two different ways. The first is stamping directly onto the gelli plate once the colours have been brayered onto it. I then take a print of this. This process itself loads the stamp with paint which I then also stamped directly onto card. One is the positive image, the other the negative image.


If you are with me so far you have probably realised I must be working on more than one surface at a time! I actually had 5 or 6 going - all using similar blue colours, sometimes working dark to light and sometimes light to dark.


I used PaperArtsy Fresco Finish Acrylics - Chalk, China, Pea Coat and Caribbean Sea. I added some additional stamping using Archival Ink in Forgot Me Not and Cobalt.

Stamping on a Gelli Plate - with PaperArtsy Fresco Paints and ECF06

Having created 5 or 6 pieces I selected my base layers and fish layers. For the latter I drew a couple of fish like shapes and cut them out - adding a little Chalk paint to the edges to highlight.

Stamping on a Gelli Plate - with PaperArtsy Fresco Paints and ECF06

I really enjoyed this process and how it came together. So often I use a lot of stamps and colours - but this really was 4 colours and 1 stamp. It was a little messy and my stamp needed a good clean afterwards to remove the paint but stamping onto (and then off) the gelli plate does create some wonderful effects.

Nikki

Blog: Addicted to Art
Instagram: @A2Acardscraft
Pinterest: nikacton

Sunday, 28 April 2019

2019 #6 Fish: Origami fish with ETS {by Dounia Large}

2019 Topic 6: Fish


Well I didn't expect this post, and what a brilliant idea! who doesn't like a bit of paper folding!  I don't think I've ever made a fish before!! Excited to have a go! ~ Leandra

Hi everyone, it's Dounia with you tonight with some folded paper fishes.

When I saw this topic, I was a bit stumped. PaperArtsy's collections of course contain some fabulous fish stamps but they are not images I use often. I then though of mixing stamping with an other of my crafting loves, origami, the art of folding paper. It was a joy to be able to make custom papers for my fishes!


Origami paper is available in a wide range of colours, textures and patterns but making your own give a project that special personal touch, and doubles the fun!
As the paper is going to be folded, the patterns you use on it do not need to match the future origami, you can play with pretty much any of your stamps and stencils. I love graphic and stylised images as they give good rhythm and contrast. I particularly like this stamp set by Tracy Scott, ETS18 with its spiky flowers and flowing branches.

https://shop.paperartsy.co.uk/ekmps/shops/paperartsy/images/eclectica-tracy-scott-18-7554-1-p.jpg

Most papers can be used as the base, so you can start from scratch or take advantage of the situation to use scraps or half finished backgrounds from other projects. Here I repurposed foiled backgrounds for some bling fishes. Little details added with Fresco Acrylic paints really make the patterns pop.


A pretty simple angel fish origami lets the pattern do most of the work (here are the video instructions). I love how the round leaves contrast with the straight lines of the folding.


Another "shortcut" is to use already printed paper as base. I find wallpaper or art supplies publications are great sources of lovely background images.


Here I used the cover of a pamphlet for watercolors. I love playing with the differences in opacity in Fresco Acrylic paints. Translucents are perfect for colouring stamps and opaques for adding bright details. No need to be perfect for a effective result! I love how the koi origami model (video instructions by Riccardo Foschi) redistributes the pattern. You never know what you are going to get!

You're not limited to paper either! As Fresco paints works on non porous surfaces without preparation, plastic is a another possibility! Recycled packaging is easy to pretty up, again alternating translucents and opaques.


The folding is admittedly a bit more fiddly but the transparency of the material adds depth and complexity to the finished origami. Also, it's so shiny!


Of course you can also pattern your paper with stencils, especially if your background is already busy. The large ones from Tracy, that fit in a square, such as PS089, are perfect for that.

https://shop.paperartsy.co.uk/ekmps/shops/paperartsy/images/089-pa-stencil-mask-tracy-scott--7540-p.jpg

 Just a little bit of doodling and you're good to go...


I got lucky and the origami model works perfectly with a central pattern:


If you use a water-resistant material, like waxed paper or plastic, you can even place your fishes in/on water!


This is another way, fun and easy, to use backgrounds and master-boards. You are of course not limited to fishes, lots of different models can easily be found, from beginner to master level! Classic flat origamis make great card elements and 3D ones can be used as decorations. It's so versatile! I hope you give it a try.

Stay curious and crafty!
Dounia

Blog :Doudoulina

Saturday, 27 April 2019

2019 #6 Fish: Shakin' that Bass with Zinkski Art {by Chris Dark}

2019 Topic 6: Fish


Fantastic background technique here from Chris usng Fresco paints and infusions. Always fun to blend more than one colour medium together. Lovely effect she has created!

Hi everyone, it's Chris Dark with you today and I'd like to share a project using the gorgeous Zinski Art ZA28 stamp set! As soon as this topic came up I knew I wanted to use this set and if you're a fan of the band Groove Armada you'll know where the sentiment comes from, it makes me laugh every time.  I had an idea for the new PaperArtsy Brayer and paint tool to make a textured background with Fresco Finish Chalk Acrylics over which I'd add Infusions  so that it would sit in all the texture for an underwater scene.


I started by putting out some shades of Blue Fresco Finish Acrylics in stripes which I picked up and brayered over the canvas for my first layer. Here I've used Jade, Blue Lagoon, Pea Coat, Blue Oyster, and Beach Hut.


I added subsequent layers of paint and moved them about while wet with the texture scraper, I've gone for vertical lines followed by horizontal wavy lines. The colours here are Tangerine Twist, Prawn and Mustard Pickle.


You can see the random sprinklings of Infusions powders and I've used a bit more than I would normally as I have a very textured surface.


Nice pools of colour after applying a generous amount of water. Infusions here are Frankly Scarlet, Sleight Blue, Violetta, Raspberry, A Bit Jaded and Terracotta.


I mopped some off with paper towel and you can see how the pigment has settled into the grooves made with the scraper.


Next I've sprinkled Infusions onto some Smoothy heavyweight card, spritzed with water and dried off. I used this piece to stamp the fish which have been fussy cut out afterwards.


I also used the Infusions powders as watercolours to underpaint the Bass Man image! I added coloured pencils when dry.


Colouring progression and where I tested out the colour on the side of the Smoothy heavyweight card for the shade. The card works incredibly well for watercolouring, it doesn't pill up and allows you to move the colour around and blend out easily.


I popped one of the bass under the hat, I think this is the bass he'll be shaking later :-)


Everything is outlined with black watercolour pen for definition.


I really love how all the paints melded into each other when I dragged the scraper tool through them and in places revealed the colours underneath. The texture adds interest and even more so when the Infusions powders were added and settled into some of the grooves. The  walnut crystals also leave their own texture which is perfect for this kind of background to go with the fish theme. You can try this out on a small canvas initially if you want to use just a little paint to get the feel of it it and you can always dry off and paint over if you aren't happy with the results.

Thanks for joining me today and I have you have some creative time this week.
Chris x

Blog: www.sketchingstamper.blogspot.co.uk
Facebook: https://www.facebook.com/christine.dark.7
Instgram: @chrisd999
Pinterest: https://uk.pinterest.com/cdark4163/

Friday, 26 April 2019

2019 #6 Fish: Journal with LPC {by Kate Yetter}

2019 Topic 6: Fish


I love Kate's journal cover layers, and this one is very fishy and beachy with shades of gold and blue ~Leandra

Hi everyone, it's Kate with you today, and I'd like to share a layout that I made for my daughter's art journal.

Art journaling is something I love because I love layering stamped images to create depth.


Backgrounds are the bare bones of your project. A background can either add or detract from the finished piece. I prefer to spend a lot of time adding as much color and texture as possible so that when I start layering, I don't feel pressure to pick the perfect embellishments. It all just comes together because my background is eye-catching no matter what I put on top. Or at least I hope it is.


I used grunge paste and a stencil in the background before adding, PA Infusions, PA Fresco Finish Paints and sprays.


PA Fresco Finish Paints were used to color the images that I chose to work with.


Scraps of ripped fabric,an old tea bag, book paper and fiber add texture. I literally used the scraps on my table.


Stamps are my favorite embellishments to use on my layouts. Not only can you customize them to your project but they are an embellishment that keeps on giving. I love that you only have to buy them once. I encourage you to reach for those stamps instead of your store bought embellishments. Get out your scraps, discarded layouts, stamps and and start creating.

I hope you are inspired to create a journal layout featuring only stamps as your embellishments.
Kate

Blog: https://kateyetter.com/
Facebook: https://www.facebook.com/katesscrapyard/
Twitter: https://twitter.com/katesscrapyard
Instagram: https://www.instagram.com/kateeyetter/
Pinterest: https://www.pinterest.com/katesscrapyard/pins/

Wednesday, 24 April 2019

2019 #6 Fish: Sand in My Toes with Hot Picks {by Jennie Atkinson}

2019 Topic 6: Fish


Adorable beachy  tones in this seaside project from Jennie, where she remembers her childhood days of splashing and sandcastles. As always, her finishing touches are sublime. ~Leandra

Hi everyone, it's Jennie (Live the Dreamwith you today, and I am sharing a journal page reminiscent of my childhood days by the beach. 

I have been very lucky to have always lived within a few miles of the sea and I have so many happy childhood memories of our beach hut at Mersea Island and days spent fishing, swimming in the shallow waters, dodging jellyfish and building huge sandcastles. It was my natural habitat.

So for our current "fishy" challenge I thought I would celebrate these memories by pulling together a number of elements for my page using one of my very first PaperArtsy purchases (Zeppelfish Poste).


I have used both of these stamp sets to create tickets and labels and to adorn my "fishy girl" and a Scrapcosy sentiment to sum up my page.
ESC17


I do like to create my project from a simple set of colours and chose Fresco Finish Chalk Acylics Lake Wanaka, Seaglass and South Pacific to get the seaside/ocean feel. And nothing better than to create with these gorgeous paints with my Gelli Plate and Smoothy Cardstock which gave me papers to work with.


My pages started with some washi tape which was then covered with Crackle Paste and some Texture Paste dots through a stencil when this had dried. This is my favourite technique at the moment - I just love the randomness of it!


I then started working with the Fresco Finish paint onto the page, sloshing watery bits here and there on the crackle and giving the pages a splattering of colours. 


Although the text stamp from HP1306 is quite large it is possible to stamp small areas by using the edge of the stamp. I have used Archival Watering Can ink to get an image over all the textures which also allows me to go in with more water if I feel the colour is too strong.


I am a sucker for small ticket punches and this is one of my favourites. I have been able to punch out some tickets from the gelli plate papers and also from the stamped images. I have cropped the large stamp to form an ATC which fitted the scale of my page.


I have used Crackle Glaze over Lake Wanaka to get this lovely distressed wood feel on the mannequinn.


And the fishy stamps were just perfect for decorating the dress. I had to experiment by using just about every blue and green inkpad in my stash to get the right colour to match! 


My journal pages tend to be two opposing collages and the little tickets have fitted in well with the ATC sized background. Again I have cut as much as possible from the gelli plate papers.


And finally some sand ....... I remember it was almost a strange feeling in winter NOT to have sandy feet in my shoes! 

As usual I have created with many small parts of the larger stamps in these sets. What I absolutely love about PaperArtsy Hot Picks stamp sets are the tiny little words, swirls, numbers, etc. within each of the larger stamps. They are just perfect for tickets and labels and background stamping. Also, by limiting my whole spread to just three colours of Fresco Finish paint I feel I have managed to maintain the seaside/beach feel of my page.

I do hope this layout inspires you to look into your Hot Picks stamp sets and see all those wonderful little bits and pieces just waiting to be used in your next project!

As always, thank you for joining me.

Jennie x