Saturday, 31 August 2019

2019 #13 Mushrooms: Mushrooms That Are Out of this World with HP {by Kate Yetter}

2019 Topic 13: Mushrooms


Telescopes for mushroom stalks...need I say more?? Take a look!! ~Leandra

Hi everyone, it's Kate (https://kateyetter.com) with you today, and I'd like to share with you some mail art featuring mushrooms.

When choosing these stamps I knew it would be a bit of a challenge as none of the images are remotely close to a mushroom. But I thought the shape would be similar so I decided to go with it and let my creativity take me wherever it chose to go.


I am on a bit of a mail art kick as of late so I thought a postcard and envelope would be perfect for this theme. 


I started with a postcard sized piece of paper and added some kraft grocery paper that I painted with black gesso. I added a layer of book paper and then some card stock that I stamped in red.


Two stamps were used to make the mushrooms. I used Fresco Finish Chalk paints and some clear embossing liquid for color. Don't these telescopes make the perfect mushroom stems?


I am not much on flat backgrounds so of course I needed some black thread and gold embossing powder to add some dimension and texture.


At the bottom of the mushrooms, I added some red mirco-beads and covered them with green metallic paint to try and simulate moss.


Infusions were sprayed in the background and a TH paper doll was added. I think the little girl looks adorable sitting on top of that mushroom.


For the envelope, I did my best to dress it up without a lot of dimension. Keeping envelopes simple is a must if it is going to make it through the post undamaged. I stamped the envelope and then sprayed infusions. I was surprised to find that the infusions not only added the perfect amount of color but also added some texture.


To finish off the envelope, I added a few stamped images. 

I really like how this set of mail art turned out but I am even more pleased with the mushroom transformation. I challenge you  to create a project where you think out of the box and try turning a stamped image into something completely different than its original state. And I would love to see it, so don't forget to share your project with us.

Until Next Time,
Kate 

Blog: Kate Yetter
Facebook: Kate's Scrap Yard
Twitter: Kate Yetter
Instagram: Kate Yetter
Pinterest: Kate Yetter

Friday, 30 August 2019

2019 #13 Mushrooms: Recycled Night light Jar with ESC/ EAB {by Carol Fox}

2019 Topic 13: Mushrooms


Perfect for those balmy evenings outside, I am tempted to do giant versions of these to match our outdoor area too!! We upped the action this year (I blame instagram), but I'm very glad we did as the weather has been superb, and many a birthday or pizza party where these beauties are ideal!!! ~ Leandra

Hi everyone, it's Carol with you today, and I'd like to share with you An Up-Cycled glass jar that I have tuned into a night light to use in the garden. when we are out there in the dusky evenings.
I had done similar technique to this before using ready made napkins, but never with hand stamped images, so I thought I would try this out with ScrapCosy's lovely mushrooms for this theme. The tissue gives a lovely translucent effect and an inner light really gives it all a lovely glow. I have a photo of it lit as the last picture on this post.


My Stamped Acorns  on acrylic made lovely embellishments to finish off my night light.


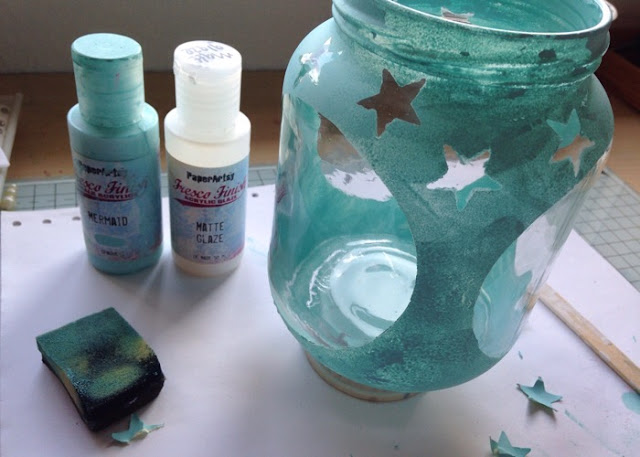
Circles cut to the approximate size of the image and these with star cut outs attached a masks.


Mermaid Fresco Paint pounced onto my jar using a bit of cut and dry foam. Yes Frescos do stick to glass easily as they are chalk paint, and a true chalk paint will stick to pretty much any surface, but another top tip is if you apply FROSTING GLAZE first, you will get a rough clear layer that gives even more grip for the paint to grab to.


Masks all removed and then given a coat of Matt Glaze to seal it all.


I stamped my Mushroom image from ESC05 using black achival ink onto Tissue paper circles and painted them them using Freco Paints in shades of Toffee, Magic Moss, Cherry red and Buff.


I painted the images on the reverse side as that way you don't lose any of the stamped detail. You can see a comparison to the painted front and back here.


Once these were on my jar I felt it needed a quote, and I decided on one from EAB07.


I felt the star quote worked well due to my star shapes holes for the light to emit from. I stamped the quote using archival ink onto white tissue paper, and cut it into strips to add around the bottom of my jar.


I added some hand drawn circles and some stars stars using Stencil PS018 and Banana Paint.


I added some hairy string to add around the rim of the jar and used the little Acorns from ESC05 to make embellishments for the ends of the string. I stamped the images onto some Acrylic Fragments for these.


I coloured these with Alcohol pens, sealed with some glossy accents and then when dry added them to my string ends.


A photo showing my jar alight in the garden at night.


This is a fairly simple project with not many supplies needed and I think it is something I will add to my list of projects I do with my After School Children's Craft club as they do love a bit of rubber stamping, and colouring onto the back of the stamped image on the tissue paper as you do with this project, there is no need to be too fussy as when you flip it to the right side it all looks ok. so it's a nice easy way to make something pretty.
I see a few of these jars in my future.

Wednesday, 28 August 2019

2019 #13 Mushrooms: Hidden by the Shadows with Zinski Art {by Helen Chilton}

2019 Topic 13: Mushrooms


Mushrooms come in all shapes and sizes, and Helen has repurposed Zinski Christmas trees into mushrooms wonderfully, and of course there is some infusion madness going on too!! ~ Leandra

Hi everyone, it's Helen with you today, and I'd like to share with you some mushroom art.

I haven't actually used images of mushrooms per se for this, but taken some Christmas tree designs from a Zinski set that work really well.
The whole idea of mushrooms makes me think of grungy colours and mottled fleshy tones for the mushroom cap, so what better to use than Infusions. I've combined mine with bleach on glossy cardstock and you get fantastic bleached areas that retain some of their colour - this is partly due to the walnut crystals in the Infusions but also to the glossy coating on the cardstock. It's unpredictable, which I like, and no two mushrooms look the same which is true to nature.


You can sprinkle the Infusions on quite liberally and then leave to soak for a while. If you blot too soon most of the colour will come off. I also wanted the walnut crystals to activate.


It looks quite dark here but don't despair!


Get out the bleach and start painting with it.


I've tried various different colourways  and stamped groupings here.


I cut out a couple that had got a little too dark; problem solved.


I had a lot of fun playing around with a background. In the end I chose a very lightly spritzed green/blue Infusions panel.


I couldn't stop there though! The card on the left is cut out and layered up like the main project, but the one on the right just uses the bleached panel as it is; really quick.


I varied the background on this one - some heavy covering of Infusions and some light, splattery coverage. For this one I also used a Ink & The Dog Mini stamp to add some script. Mini 74 is a really useful little stamp as it's got several different fonts going.


This uses the same script stamp but I've put my mushrooms directly onto Kraft card.


Finally I had enough left for a couple of tags.

This just goes to show that you don't have to take your stamp designs literally - you can have a lot of fun seeing what else they can be. There's some JOFY flowers that would make great mushrooms, Darcy flowers and trees, upside down Lin Brown tulips, flip over some of the heart designs or cut circles in half and so on.
As for Infusions, well they're endlessly versatile, not only in how much you sprinkle on but how you spray them, whether you blot or leave to dry, type of card, colour of card, colour combination etc.etc. I love the fact that you never know quite what you're going to get which just adds to the magic and the fun.

Helen

Blog: A Splash of Colour

Monday, 26 August 2019

2019 #13 Mushrooms: Autumn with EKC {by Chris Dark}

2019 Topic 13: Mushrooms


Well you will be shocked when you see the source of this mushroom! Chris is too clever for words and it is fabulous to see how the mushrooms grew to be! ~Leandra

Hi everyone, it's Chris Dark with you today, and I'd like to share my card for the current mushroom topic.

I always enjoy the spectacular colours of autumn, the bright red, gold, citrus yellow and copper leaves are a welcome shot of colour before Winter sets in. There is a big hit of these colours in mid October at my local natural trust garden because of the variety of tree species they have and I always try to make the most of this time.

Lately we've been trying to think of alternative ways to use our stamps which I'm a big fan of as I like to have lots of options with a stamp set. I was looking at one of Kay Carley's gorgeous older Sets EKC 03 and one of the flowers with down turned seemed ideal for turning into a toadstool. Sorry Kay, I've obliterated all those gorgeous twiddly doodles I love again! So in effect the stamp gave me the base shape for the top of the toadstools therefore no drawing skills are required. Painting the stalk is easy, just two very slightly curved lines filled in with paint, I didn't even draw any lines, I did that part just with the brush and n
o-one would ever know the toadstools started out as flowers which is the fun part of the process.

I made an autumn stenciled gel print background courtesy of Sara's lovely PS027 stencil and used Fresco Finish Chalk Acrylics in 
Autumn Fire, Limelight, Stone, Cherry Red, London Bus, Caramel, Mustard Pickle, Zesty Zing, Magic Moss, Claret, and Snowflake throughout.


I brayered on some paint first of all and took a few prints which left some remnants of paint on the plate and I used the stencil over the top.


I've Sponged various colours and mixes of colours through the stencil with cut and dry foam to build up layers turning the stencil as I went.


Here I allowed the paint to dry completely.


Then I brayered over a thin layer of a light coloured paint and took a print before it dried.


The flower head is stamped in distress oxide ink, using a water based ink allows mistakes to be wiped away if necessary.


I've painted outside the border at the top of one of the flowers to make it a bit larger than the others, angling the stamp in different directions also helps to give the impression that each one is slightly different even though the same stamp has been used.


I've filled in the stamped images with paint using a fine brush to paint the underside line. On the bottom toadstool I completely filled in the shape for variety.


Stone is the base for my stalk with watered down Caramel for shadow and Snowflake for highlights. 


I've added some grasses using paint with a rigor brush but I also used the grass stamp from the set with inks.


The white spots are added with a white gel pen.


There's some dot hatching for shadow and some white paint splatter too.


The card is finished off by adding the sentiment from the set and a doodled dot border.


Love that texture in the background and the subtle effect of the stenciled leaves.

It's a really nice feeling when you create something completely different from a stamp and this technique can help with mapping out a shape if drawing isn't your thing. I'm sure there are lots of other flowers in many other stamp sets that could double up as mushrooms or toadstools for this topic, I hope you'll join in with us if you have a stamp that will work. 

Hope you have some creative time this week.
Chris x