Thursday 30 November 2023

2023 Topic 12: Designer Focus: JoFY {by Renata Peley}


Hi everyone, it’s Peley Renata with you today with a fun and crafty little project. A long time ago, when I just started doing mixed media, very soon I realized how beautiful and magical this world is. And instead of being a responsible grownup, I spent many nights browsing the internet for some amazing stencils and stamps. Even now I remember seeing the PaperArtsy line the first time, but the first designer that draw my eyes was JoFY, with her whimsical and colorful designs. And that’s when I started assembling my early Christmas wish list. Luckily my husband fulfilled my desires and bought me two gorgeous stamp sets. And those two stamp sets were some of the first ones that I got in my now beautiful collection. So, I thought it was fitting that I make a project highlighting some of Jo Firth-Young’s beautiful stamp sets, that she released this year.

You know that feeling, when you feel like crafting, but don’t have the mood or time to commit to a whole art journal page, or any larger mixed media project? Well, for such occasions, what’s better than creating tags or artist trading cards. Though it is also a really fun format to work in and a perfect format for experimenting. This time I won’t be experimenting much, but I do promise some fun and good time.  


Recently we visited my husband’s parents and that place is like a treasure trove. I almost always find something that inspires me to create a project. They have some amazing vintage items, just laying around the house and collecting dust, but also some items that they got as an advertisement. And that’s precisely how I found my substrate and inspiration. On one of the shelves, they had an incomplete deck of cards with some company logo on the back. They weren’t vintage, or too pretty, but you know we crafters always find a way to make stuff look more interesting.

Now the two things came together for me: an old ugly deck of cards and new, gorgeous JoFY’s stamps.


Now that I had my main items for this project, I just had to figure out how to make them work together. But also, not to forget this quarterly topic: Typography. To be honest, the whole idea developed really fast, but soon I will tell you more about it.


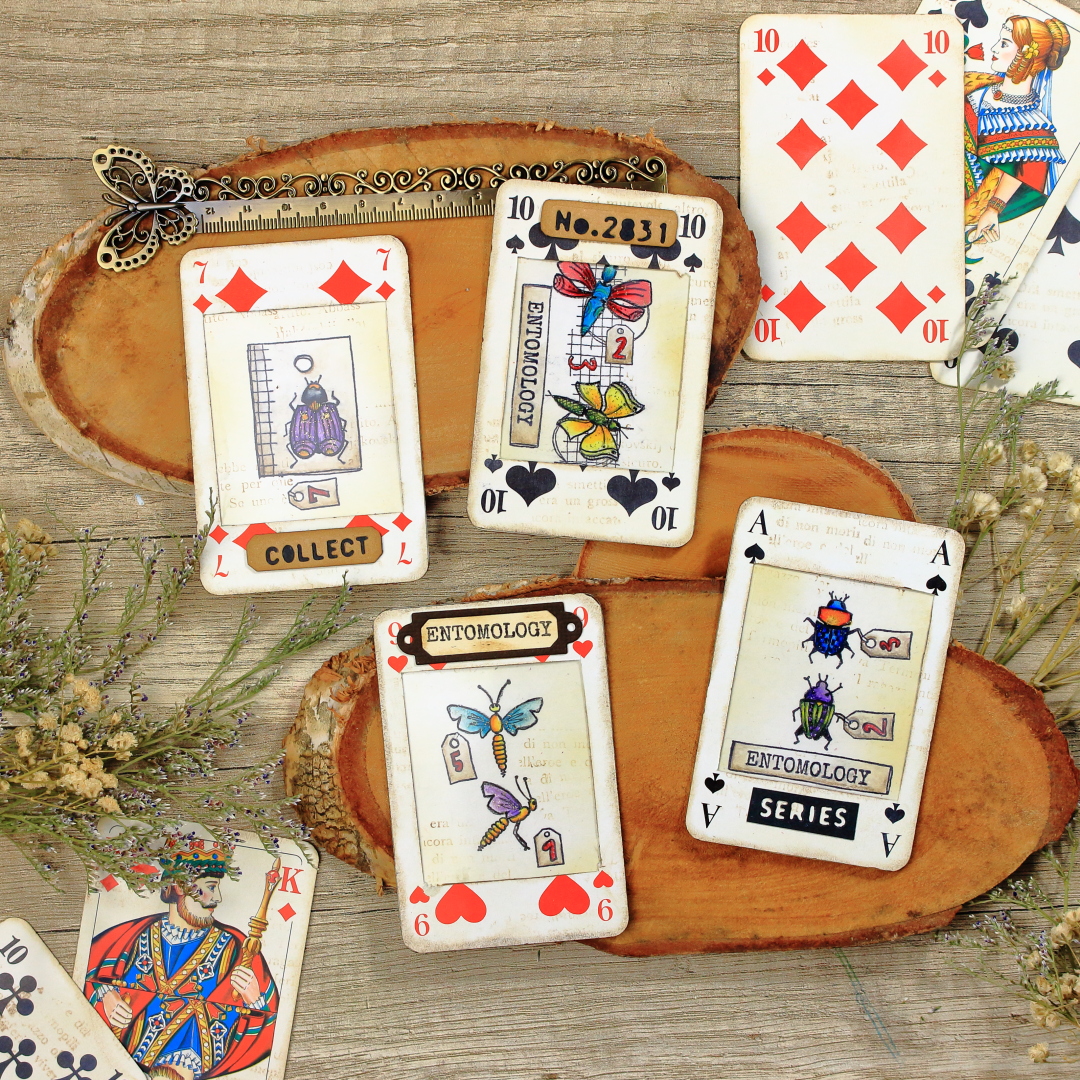
Not long ago, in my previous blog, I was talking about my junk journaling crafting phase. That was the time when I was searching for ideas to make all sorts of fun pocket inserts. And one of my favorites was making something like specimen windows…or at least I think that’s how they are called. Anyway, that is what I have planned for this project, just in an artist trading card format.
The first step for this was to make windows in my cards. This took a couple of attempts as first I tested making windows with some of my cutting dies. None of them really fit my imagination so at the end I decided to create my own custom windows.


Those three cards on the left are the ones I cut using cutting dies, but the rest were the ones with my own measurements. I already said that my cards had an ugly back, so I decided to take two cards and adhere them back-to-back. In between two cards I would put JoFY’s stamped designs. To help the cards’ windows fit well and stay in place, using blue masking tape, I attached two cards to each other and cut them at the same time using a craft knife.


I cut out altogether ten cards, creating five atc bases this way. I planned to make three or four only, but you know the saying: “Two is one and one is none.”, and I was expecting to mess up up at least one. 😊

Anyway, now the basic frame for my cards was done. Simple enough, right? But now on to the second stage: making the middle layer and focal interest.

I originally intended to stamp on a plain thin paper or vellum (which I still think would look gorgeous), but then the typography topic came to my mind. So, I thought of a paper pad that I had for ages. This one is from Docrafts – Papermania: Bookprint. It is a very old paper pad and I can’t find it anymore for sale, but it looks something like this: one side has usually text in various fonts and languages with or without images, but the other side is plain white. Which was perfect as I needed one side to be blank so I could do some stamping. If you don’t have such paper pad, there are alternatives. Either book pages (sometimes if there is an end of a chapter, the other side of the page can be blank) or take a paper and stamp text on one side.


 For each card, I chose a different paper, just for fun. Of course, the next thing to do was stamping. My chosen stamps were PaperArtsy stamp sets by Jo Firth-Young (JOFY125 and JOFY126).


I cut the papers from the paper pad roughly to the size of the atc’s and drew in the outline of my window with light lines and graphite pencils, so that I would know where to stamp precisely. I stamped most of the stamps with a stamping platform and Ranger Archival Ink in Jet Black color, but again, there were some stamps that I didn’t want to stamp fully. For those cases I used Pigma Micron brush pen in black color.


As you can see on the image above, I really liked the stamp with those two insects on a tag, but I didn’t want the tag outline. Of course, you can solve that either like me, with partial stamping, or with some masking tape. Two ways but the same result.

Additionally, I stamped those two mini tags, and drew in some numbers using Pigma Micron pen again. I did try to imitate the style of Jofy’s numbers, but I’m not really sure how successful I was. :) 


Very soon, all four papers were stamped in the same way and it looked something like this:


Obviously, the next step was to color my images. As the paper on which I stamped was very thin, I didn’t dare to go with any heavy medium, so I opted for Prisma Premier colored pencils.


I always enjoy adding some subtle touches to my images so I thought to add a bit of shine to my colored insects using Art by Marlene Special Effects Glamour Glitter in Gold color.


I was happy with how the images turned out with bright and bold colors, but also with that touch of shine. Now obviously it was time to start making my artist trading card sandwich.


Originally, I imagined the cards with clean designs and bright and bold colours. I don’t know why, but at this point I started feeling attracted to an idea of adding just a tint of brown and making my cards look…not so neat and new. Anyway, let me show you what I mean.

First, I applied just a touch of the Antique Linen Distress Oxide ink by Ranger, using an ink blending brush. I applied the color on both sides of my paper but also on the cards.


After that, using Vintage Photo Distress Oxide ink I added some discrete interest using a text stamp from the PaperArtsy stamp set by Jo Firth-Young (JoFY102). The effect was very subtle, but I really liked it this way. Also, I added a bit of the same ink on the edges of my cards and windows.


Now was the time to assemble my sandwich, going something like this: on the back of one of the cards, I adhered the paper with the stamped image, over that the acetate and finally I adhered the second card.


I repeated the process for all the cards and in my opinion, they looked really pretty. But I still felt like something was missing.


For better or worse, very often I can’t resist adding small details. This time, one of those details was adding some more texture and interest using cutting dies. The die set that I found perfect for this set of cards was from Sizzix and Tim Holtz, called Specimen.


For each card, I made one embellishment and adhered it using a paper glue.


This was the moment when I decided to stop before I spoil the cards. Though I was considering adding some more interest using either dry, pressed flowers or some die cut florals. Maybe even a piece of thread…but not for me this time. 😊

Oh and a bonus fun fact, as the paper that I used for stamping is very thin, when I turn my cards towards a light source it becomes semitransparent and I can see the both sides of the paper. 


So cool, right? :) 


This was one of the projects where the idea and inspiration came easily. It all went smoothly and I was happy with the result. But when I try to make something like this next time, I will try either stamping directly on acetate, or use vellum paper. Also, I might really go for using pressed flowers and threads. Perhaps even add a metal charm as well. These are just some ideas for you or me to play with next time.

Anyway, this was my last blog post for this year, so I will use this opportunity to in advance wish you all a Merry Christmas and Happy New Year!

Renata 💜

If you enjoyed this process, but some technicalities are still not clear, or if you are a more visual type (like me), I have also prepared a full step by step tutorial for this project on my YouTube channel.


Wednesday 29 November 2023

NEW PaperArtsy Products: Mattints & Just Walnut {November/December 2023}


A note from Leandra:

WE'RE SO EXCITED ...... we have been cooking up these products for so long, and choosing when to release was not easy! If you saw Raquel' and Alison's lives earlier this week, they both shared details on these new products: Mattints and Just Walnut.

Dounia and I decided it made sense to create a dedicated post to this new line for you future reference, so pin this post as you will want to refer back to it I am sure!

We asked Mags Woodcock to do some samples for us, so those are also here so you get some fresh ideas, and Dounia has also made some reference content so you really get a sense of the Mattints and their versatility

Look, let's cut to the chase and explain this NEW LINE of wonderfulness!!

Tuesday 28 November 2023

NEW PaperArtsy Products: Alison Bomber {November-December 2023}


A note from Leandra:

Hi everyone, so happy to share with you these designs from Alison! She has worked so hard to create mini stamps with maximum options! I do love to see how our designers bring an idea to fruition, and I did not expect Alison to create stamps that can be used both at face value, plus the elements can be used independently as embellishments. This adds value and fun to the ideas you can explore.
 
Alison will be along to share with you LIVE her new products and ideas over in our Facebook Group, PaperArtsy People shortly after this post publishes. I hope you can drop by for the live, or try to catch the replay. It's really nice to hear direct from the designer about the new release and put a face to the name and see their ideas first hand!
 
For the next few months, these stamps are available EXCLUSIVELY from our approved stockists. Please check the list at the foot of this post to find a retailer online or geographically near you, it makes sense to order within your country wherever possible.
 
Hi everyone, Alison here from 'Words and Pictures'.  I'm so excited to share with you my newest release for PaperArtsy - my first ever Mini stamps!  Although these are definitely geared to the festive season, they can be used year round to celebrate the glories of nature, music, and storytelling.

I wanted to create Minis which would be little cousins to my main botanical sets, so naturally there are nature sketches.  Each sketch is collaged onto a theatrical, literary or musical ephemera background.  And then there are also some words (of course!).  I was inspired by the botanical flavours of the festive season too... the invitation is definitely to "eat, drink, and be merry".  


I think they'll be really versatile and super useful - from making the simplest gift tags to zhuzh up your gift-wrapping, to more detailed projects, perfect for creating by the fire on a winter's night over the holiday season... and they might even inspire some last-minute gift ideas along the way.

So here they are, my botanical Minis for the festive season - a collection of eight tiny bites of delight (except don't eat the mistletoe berries!).  

Mix up the hot toddy of your choice and enjoy them... 

Price: RRP €4.90 +VAT   Size:approx credit card size images
All stamps are individually trimmed onto cling foam, with a laminated storage/index sheet


Tasty Kraft Gift Tags
EM89, EM90, EM91, EM92, EM93, EM94

I've been mixing and matching as I was creating with these Minis - so you'll see lots of them in action in each of these projects.  Let's start with some simple gift tags showcasing the six Minis with botanical imagery on them.
 

Alison Bomber Eclectica³ Mini 89 (EM89)

These are stamped on kraft tags (using a stamping platform), painted with Fresco Finish Chalk Acrylic paints, and then re-stamped for clarity.  I love that even the names of the paints are tasty(!), as well as how vibrant they are on the kraft background.


Alison Bomber Eclectica³ Mini 90 (EM90)

There's some simple doodled pen work to frame the tags... and you can see the little food and drink labels on some of these with that lovely chalky highlight behind the words.  Those little labels have inspired some of those gift ideas I mentioned, but more of that shortly...  Lots of these botanical images are chosen especially for their presence in festive food and drinks - so they're perfect for augmenting any food or drink gifts you are giving this holiday season.


Alison Bomber Eclectica³ Mini 96 (EM96)

A Musical Tin
EM93 and EM96

You'll have noticed that two out of the eight Minis are dedicated to words... well, I am known as "Words and Pictures"!  Thinking about festive botanicals, the words of The Holly and the Ivy for EM96 seemed an obvious choice - and it's a carol which is full of other seasonal imagery.  Here's a little altered sardine can celebrating the holly, the ivy, and the running of the deer!
 

Alison Bomber Eclectica³ Mini 93 (EM93)

I trimmed the holly from the centre of the EM93 stamp to create some extra decoration to frame the words of the carol, along with those adorable Idea-ology deer, and some die-cut ivy.


And around on the back of the tin, here's that Holly Mini in full, with the music for the carol as its ephemera collage background.  It's almost unbelievable how detailed the music score is, given how tiny it had to be to fit the Mini format!  But that's the brilliance of PaperArtsy's deep cut red rubber stamps... exquisite detail.  Since the fish tin was already gold, I decided not to do anything to alter it, other than a bit of tape around the walls... making it a really simple but charming gift to create for someone you love.


Food and Drink Gift Tags
EM89 and EM90
 
Speaking of gifts, here are a couple of possibilities which were actually inspired by these stamps!  They'd be great as presents for teachers, or those last-minute stocking stuffers you suddenly remember you need, and perfect for any food and/or drink-loving friends and family members. The gift tags themselves are as simple as simple can be - every little bit of time-saving helps at this time of year, after all.


EM89 has the cinnamon sticks and orange slices you'll want for plenty of festive drinks, and the label "Hot Toddy" (the labels are in the same font as all the Culpeper prescriptions from the main botanical stamp series).  And EM90 adds the star anise, not only flavourful but so decorative, which will offer that extra something to your "Mulled Wine" (or Spiced Apple Cider, or Whiskey Mac).


You can add as many extra elements to your gift as you like for festive fun and flavour.  In this recycled jar, I've popped some dried clementine slices (done in the oven), cinnamon sticks, star anise, and some pretty mulling tea bags, intended for adding to hot wine, or for creating a spicy chai.  And the simple stamping of the tag took literally seconds, even with the ink-blending added around the edge.


Or the gift could be as easy as a bottle of their favourite tipple - whether wine or whiskey or whatever.  I added extra decorative elements to the simple tag and twine around the neck - a little pine cone and some star anise - but you could also add a little "spice sachet" with similar ingredients as are in the jar.  See, you didn't know you were getting gift inspiration as well as crafting inspiration today, did you?!


Alison Bomber Eclectica³ Mini 95 (EM95)

Midwinter Candle Lantern
EM95
 
While we're on recycled jars, here's one of my favourite things to do with them... creating candle lanterns.  Christmas wouldn't be Christmas for me without candlelight.  (We'll get to the tags later, don't worry.)


In the Bleak Midwinter is probably my absolute favourite Christmas carol (not Christmas song - that would be Judy Garland's Have Yourself a Merry Little Christmas) though it has to be the Darke setting, not the Holst.  The words are by one of my favourite poets, Christina Rossetti, so I'm thrilled to have the lyrics available as a stamp - and in that lovely font again.


This first verse isn't specifically Christmassy, so the words can be used throughout the winter season.  It's stamped in Uncharted Mariner Distress Ink here so that it can tone in with the inks I've used around the die-cut Sizzix snowflakes on the jar.  It's one of the joys of having words on stamps rather than printing them out - you can stamp them to coordinate perfectly with whatever you are making, and on any surface.


Collaged Cards and Gift Envelopes
 EM91, EM92, EM94, EM96

These Minis also work beautifully as focal points in larger collages. I'm really looking forward to using them in some art journalling too (that's one thing I didn't get round to for this post), but for now here they are taking pride of place on some collaged cards, as well as adorning some little gift envelopes, perfect for popping gift vouchers or a cash gift into.
 

I found some old card to stamp on (they are the backs of some pieces from an old memory game) for these focal points on the cards, so that the stamps get that lovely vintage look for free.  Here's EM96 with the lyrics from The Holly and the Ivy again.  Obviously, you can use any ephemera elements you have around for the collaging, or create your own with stamps and papers.  Given the vintage style of the Minis, they work really well with the Idea-ology range.


Alison Bomber Eclectica³ Mini 94 (EM94)

I water-coloured the pinecone from EM94, and gave it a coat of Fresco Finish Gloss Glaze to make it pop a little more at the heart of the card.


Alison Bomber Eclectica³ Mini 91 (EM91)

These simple collages are done on some little cash envelopes (available in most pound shops or dollar stores), so they are ready and waiting for you to slide in the gift voucher of your recipient's choice.  You'll see there's absolutely no need to stay inside the lines when you are colouring the intricate needles on this pine sprig from EM91!


The backgrounds on these panels use a technique which is one of my old favourites - PaperArtsy Crackle Glaze applied over a dark layer of paint (I think it was London Night here), and then a coat of a paler tone over the top (Chalk in this case).  But I also had a first play with some of the exciting new Mattints here.


Alison Bomber Eclectica³ Mini 92 (EM92)

The subtle brown sheen of Nutty Mattint creeping in from the edges gives an even more effective rustic aged look to the crackled panels.  The leaves of the mistletoe are tinted with Fern Mattint - I love its grey green tone, and because it's transparent you still get to see the cracks.  And the Mattints can also be used as a seal, so they'll give your project longevity too.


Grungy Giftwrap
EM89, EM90, EM91, EM92, EM93, EM94 

For these grungy giftwrap toppers, I had a wonderful time playing with another brand new addition to the PaperArtsy line - a new powder related to the infusions family - Just Walnut.  As a lover of neutrals, and especially cool tones, this could have been made just for me!

 
I white-embossed the six picture Minis onto card scraps, and had a glorious time sprinkling and spritzing my Just Walnut Infusions on and around the images. I just love this grungy look.  I layered them up over some corrugated cardboard, smeared with crackle paste and dipped in some more of the Just Walnut, which I'd sprinkled and spritzed into a puddle on the craft mat.
 

Those card panels would be brilliant just as they are for journalling or as tag or card toppers, but I decided on a bit more dimension, adding twigs and little pine cones to create giftwrap toppers which make a real statement.
 

With some simple white tissue paper and twine, I think they look pretty special.  I wish someone would wrap my presents like this!!


Frosted Botanicals
 EM91, EM92, EM95

Embossing powder also plays a big role in this tag trio, allowing the words and pictures to pop, even against a really busy inky background.
 

The backgrounds are done with Distress Sprays, texture paste through a stencil with added white embossing powder, and a little touch of mica shimmer in there too.  With all that going on, these intricate Mini stamps needed a bit of a boost to make sure they would catch the eye.  I'm thrilled that the deep dark brown embossing powder I used (Wow's Primary Bark, not black - as you know, I hardly ever work with black!) did the trick beautifully.  The frontispiece of Dickens' A Christmas Carol peeks perfectly between the needles of the EM91 pine twig.


I think it's incredible how the tiny detailing is perfect, even with the embossing powder on.  When I'm embossing finely detailed stamps - and these are really detailed and really fine! - I find it's much better to stamp with Archival Ink rather than Embossing Ink or Distress Ink.  The Archival gives a finer line on the stamping, where embossing ink pads can be a bit squidgy and sticky, holding on to so much powder that the image or words can become a bit blurred.  And I want to be able to read every word of my favourite carol on EM95.


You do have to work that little bit more quickly to get the powder onto your stamped image, but I think it's absolutely worth it to get all those subtle intricate details clear against the background.  Behind the mistletoe in EM92, you have the theatre poster for a version of Shakespeare's The Winter's Tale.  (The sharper-eyed amongst you may remember that poster has appeared in larger format in EAB28 Juniper Edition.)


Cosy Candle Lantern
 EM89, EM90, EM94

Back to candlelight, and maybe the cosiest candle lantern I've ever created!  The warmth of the glow of this one is really magical... watch out for the Reel I'll be posting soon on Instagram!
 

It all started with a piece of good old tracing paper - this is quite a nice, thick quality one.  I wrapped the blank sheet around the jar I'd pulled out of the glass recycling to measure the width I needed.  Then I stamped and painted each of the selected Minis in turn, using the stamping platform again, until I had my images all in a row.

Just look at those tasty paint names again - this project is delicious in every way!  Naturally, I used Fresco Finish Chalk Acrylic in Cinnamon to paint my cinnamon, but sadly it's been discontinued.  However, the Toffee and French Roast add extra flavour/shading... and used with a hint of Smoked Paprika, you can mix up a lovely Cinnamon alternative.  And Tangerine Twist is perfect for the orange slices - again with a little bit of Smoked Paprika to add depth (and spice!).

 
The pinecone from EM94 has also got all three colours of brown creating its depth and detail, but I was putting the paint on fairly randomly and fairly loosely until I got as far as seeing where I wanted the really dark shadows of the French Roast to be.
 

When you glue the tracing paper onto the jar (with some gel medium, or any spreadable acrylic glue), you do get the odd wrinkle and crinkle, especially at the top and bottom.  But you know me... I embrace that as extra texture!  Despite the wrinkles, I doodled the lines on to frame each stamp after I'd lit the lantern for the first time... it just needed that extra little detail.  I adore that you can see the images from inside when you look in the top of the lantern.
 

Of course, if you've only bought one of the Minis (such restraint!), then it would also be lovely to have the same repeated image all the way round the lantern.  Wouldn't this make a lovely gift set combined with the hot toddy jar?  The perfect little extra for someone at this festive season.  And you could add a coordinating gift tag too, of course, like the kraft tags at the very start.


Botanical Wreath
 EM89, EM90, EM91, EM92, EM93, EM94
(and EM95 and EM96 are on the background paper)

I've saved this one to last because - unlike the others which are all fairly quick to make (some of them very quick!), this is more of a project to savour... one to make by the fireside over the festive season, or create together with family and friends.  It's not hugely complicated, but it does take a little longer to do...
 

The twiggy wreath which serves as the base is something you can pick up at a garden centre, or you can probably get something similar at a pound shop/dollar store type of place.  If you're feeling really crafty, you could fashion a base yourself.  (You could also do a completely flat paper version of this on a journal page - that's one of the next things I'm going to try.)
 
 
I stamped the Minis on a large sheet of watercolour paper multiple times each, and painted them with my Daniel Smith watercolour paints.  You can of course use Fresco paints instead - and it needn't be watercolour paper.  But it will have to be a fairly sturdy weight of paper, whatever you use, because the next step is lots of fussy-cutting.
 

Mostly, I simply trimmed the background ephemera away from the images.  These Minis are designed with a little halo of space around the images so that you can get a pretty clean cut without having the words and music coming right up to the sketch lines.  But you can also choose to make further trims - for instance, in one of these bundles I've trimmed the orange slices away, so that I just have the cinnamon sticks.
 

I had a lovely time gathering the elements into different little bundles - pinecone + holly + mistletoe, or cinnamon + star anise + fir branch - balancing them on the wreath as I played. That meant I could get a good idea of what would work as an arrangement, and also work out the positioning within the bundle to suit the curve of the wreath.  Once I was sure, I glued each bundle together, and then used some heavy gel medium to glue them onto the twigs.  Some shiny red ribbon wound round between the bundles also allows me to hang the wreath up later.
 
 
You may have noticed in the background of these photos that I've also created a whole sheet of ephemera labels ready for cutting out.  Again, I just stamped the Minis repeatedly on a large sheet of watercolour paper, and then painted over them with grey and buff watercolour paints to create the impression of "aged paper" around each stamp.  Now that the sheet has done its duty as a photo backdrop, I'm looking forward to cutting it up and using the pieces in journalling pages and on tags as focal points or layering elements.
 

I'm guessing you can tell that I've been having a lot of fun with these Minis.  I know they're being released quite close to Christmas, but I hope I've shown you that they can actually help out with all those last-minute presents, gift-wrapping and card-making tasks.  You can create something extra special and handmade in very little time - and that's always wonderful to receive.  I hope you'll find them as useful and beautiful as I do.

I'll be sharing more photos and details of all these creations on my Instagram and blog over the next few weeks, so hopefully you'll find even more inspiration to help you out at this busy, busy time.  Thanks so much for stopping by, and happy festive crafting, all!

Alison xx

Below is a list of the retailers who have already got these new releases in stock ready for you to buy NOW!

 PaperArtsy Stockist List

Our stockists are your go-to  source for all PaperArtsy products, and we suggest that you also use the PaperArtsy People Facebook group to source a retailer in your country. Many are members of our FB group and will happily share links to their online stores.

Australia
Bev's Cross Crafts, Spreyton, Tasmania https://www.bevscrosscrafts.com.au/
Crafters Cupboard, Berwick, Victoria www.crafterscupboard.com.au
Memories on the Murray, Murray Bridge, SA  https://www.memoriesonthemurray.net/
Natalie May Scrapbooking, Dover Gardens, SA https://nataliemay.com.au/
Scrapbook Superstore & More, South Penrith, NSW https://www.scrapbooksuperstore.com.au/
The Scrapbooker's Confetti Box, Swansea, NSW https://thescrapbookersconfettibox.com/
The Scrapbook Store, North Perth,WA http://thescrapbookstore.com.au/ 

Belgium
Cart N Scrap Art, Antwerp, www.cartnscrapart.be
Créatelier Caracolle, Liège, www.createliercaracolle.be

Canada
Paper Art Creations Inc, Leduc, Alberta, www.paperartcreations.com/
Scrapbook Centrale, Dollard Des Ormeaux, Quebec www.scrapbookcentrale.ca
Scrap Addicts, Edmonton, Alberta www.scrapaddicts.ca/
Scrap and Bean, Edmonton, Alberta scrapandbean.com/ 
Scrapbooking Fairies, Drayton Valley, Alberta www.scrapbookingfairies.com/
The Paper & ink Boutique, Calgary, Alberta www.paperandinkboutique.com/
The Scrap Yard, Calgary, Alberta, www.thescrapyardcalgary.com/ 

Denmark
Hobbyboden Scrapworld Samso www.hobbyboden.dk

France
Eirl Bancon Cartoscrap, Midi Pyrenees, www.cartoscrap.com
Fée Du Scrap, Saint Sébastien-Sur-Loire, www.feeduscrap.fr/
Horizon Créatif, Ste Jalle www.horizon-creatif.fr
Instant Créatif, La Possession, La Réunion, www.icreatif.re
Katzelkraft, Ingwiller www.katzelkraft.fr/en/
Kerudoc Creation, St Yvi www.kerudoccreation.com
Le Grenier des filles, Pierre Benite
Page de scrap, Saint Pavace, www.pagedescrap.fr/
Scrap Déco Home, Goutrens, www.scrapdecohome.fr/
Toutencolle, Dun sur Auron www.toutencolle.fr

Finland
Heidin Korttipaja, Istunmaki, www.korttipaja.fi/fi
Piia Paper, Kittiläwww.piiapaper.com/fi

Germany
Stempelbar, Berlin, www.stempelbar.de
Stempeloase Munich, Munich www.stempeloase.de
Stempelfee Shop, Hilden www.stempelfee-shop.de
Stempellaedle, Stuttgart, www.stempellaedle.de/shop

Greece
Scraps N Pieces, Kallithea www.scrapsnpieces.gr

Italy
Immagine SAS di Rapaccini, Rome, www.immaginelab.com
Il Negozio Della Mamma Di Cle, Torino, www.ilnegoziodellamammadicle.com
Marte Savona, Savona, www.martesavona.it
Pezze E Colori, Lissone, www.pezzeecolori.it/ 
Piccole Passioni, Siena, www.piccolepassioni.it

Japan
La Wadao, Odawara, Kanagawa, www.lawadao.com
Tiny Dots, Funabashi-shi, Chiba www.tinydots.shop-pro.jp

Netherlands
De Hobbystudio, Genemuiden, www.dehobbystudio.nl/
Doe@ding,Spijkenisse doeading.nl/
Hobbycompleet de Duif, Leeuwarden www.hobbycompleet.nl
Stampingcorner, Capelle Aan Den Ijssel www.stampingcorner.nl

Norway
Hobbygarasjen, Kopervik, www.Hobbygarasjen.no

Spain
Cien por Cien Manualidades, Barcelona,  www.100x100manualidades.es
Ideas 10 Manualidades Y Scrapbook, Bilbao ideas10manualidades.com/
Marakiscrap, Tarragona, www.marakiscrap.com
Scrap & Papers Experiences, Barcelona, www.scrappapersexperiences.com
The Paradise Corner, Barcelona, www.theparadisecorner.com

Sweden
Butik Elva, Staffanstorp, www.butikelva.se

Taiwan
Mandy's Cards, Taipei www.facebook.com/mandy.card.77

United Kingdom
Amelia's Creative Crafts, Studley, Warwickshire  www.ameliascreativecrafts.co.uk
Art from the Heart, Harrogate, Yorkshire www.afth.co.uk
Crafts at The Malthouse, Herstmonceux,  East Sussex, www.themalthouse.co.uk/
Loobi Crafts, Leighton Buzzard, Bedfordshire, www.loobicrafts.co.uk
Stampers Grove, Springbank, Lilliesleaf, Melrose,Scotland www.stampersgrove.co.uk
The Artistic Stamper Craft Store, Faversham, Kent www.theartisticstamper.com
The Forget me not Kraft KabinRochford, Essex, www.TheForgetMeNotKraftKabin.co.uk

USA
Artistic Artifacts, Alexandria, VA www.artisticartifacts.com/
Artistic Studio Creations, Fayetteville, Georgia www.facebook.com/ASCbyCrystal
Craftiness, Chatsworth, CA, www.craftinessonline.com/
Everything Scrapbook & Stamps, Lake Worth, Florida https://everythingmixedmedia.com/
Frantic Stamper, Oregon www.franticstamper.com
Free Heart LLC, Denver, Colarado, www.freeheartllc.com/
Joggles, Coventry, Rhode Island, www.joggles.com
PaperCraft Clubhouse, Westbrook, Connecticut, papercraftclubhouse.com/
Qingquing's Stamp Shop, Portland, Oregon
Roadtique Boutique, Rochester, New York Facebook Page
Runaway, Art & Craft Studio, NE Salem, Oregon www.runawayart.com/
Simon Says Stamp, Columbus, Ohio www. simonsaysstamp.com
Topflight Stamps, Irmo, South Carolina topflightstamps.com/

If you are interested in becoming a PaperArtsy stockist contact Dounia@paperartsy.com for more information

PaperArtsy Links
Facebook Group PaperArtsy People
Facebook Page PaperArtsy