Showing posts with label Hearts. Show all posts

Sunday, 22 December 2024

With 3 Things : Lovely Packaging {by Victoria Wilding}

Hi friends, introduction it's Victoria here with you today for another With 3 Things post.

This feature on the PaperArtsy Blog is where 3 bloggers are sent 3 items in the post. We have no clue what PaperArtsy HQ is going to send us, there might be a slight variation (for example on this round we each were sent slightly different stamps) but generally 2 of the 3 things will be identical.

In my package I received PaperArtsy Eclectica stamp set (ESN32and PaperArtsy stencil PS092, both by Sara Naumann, as well as PaperArtsy Fresco Finish Chalk Acrylic Paint in Candy Floss (FF70) and Electric Violet (FF201).


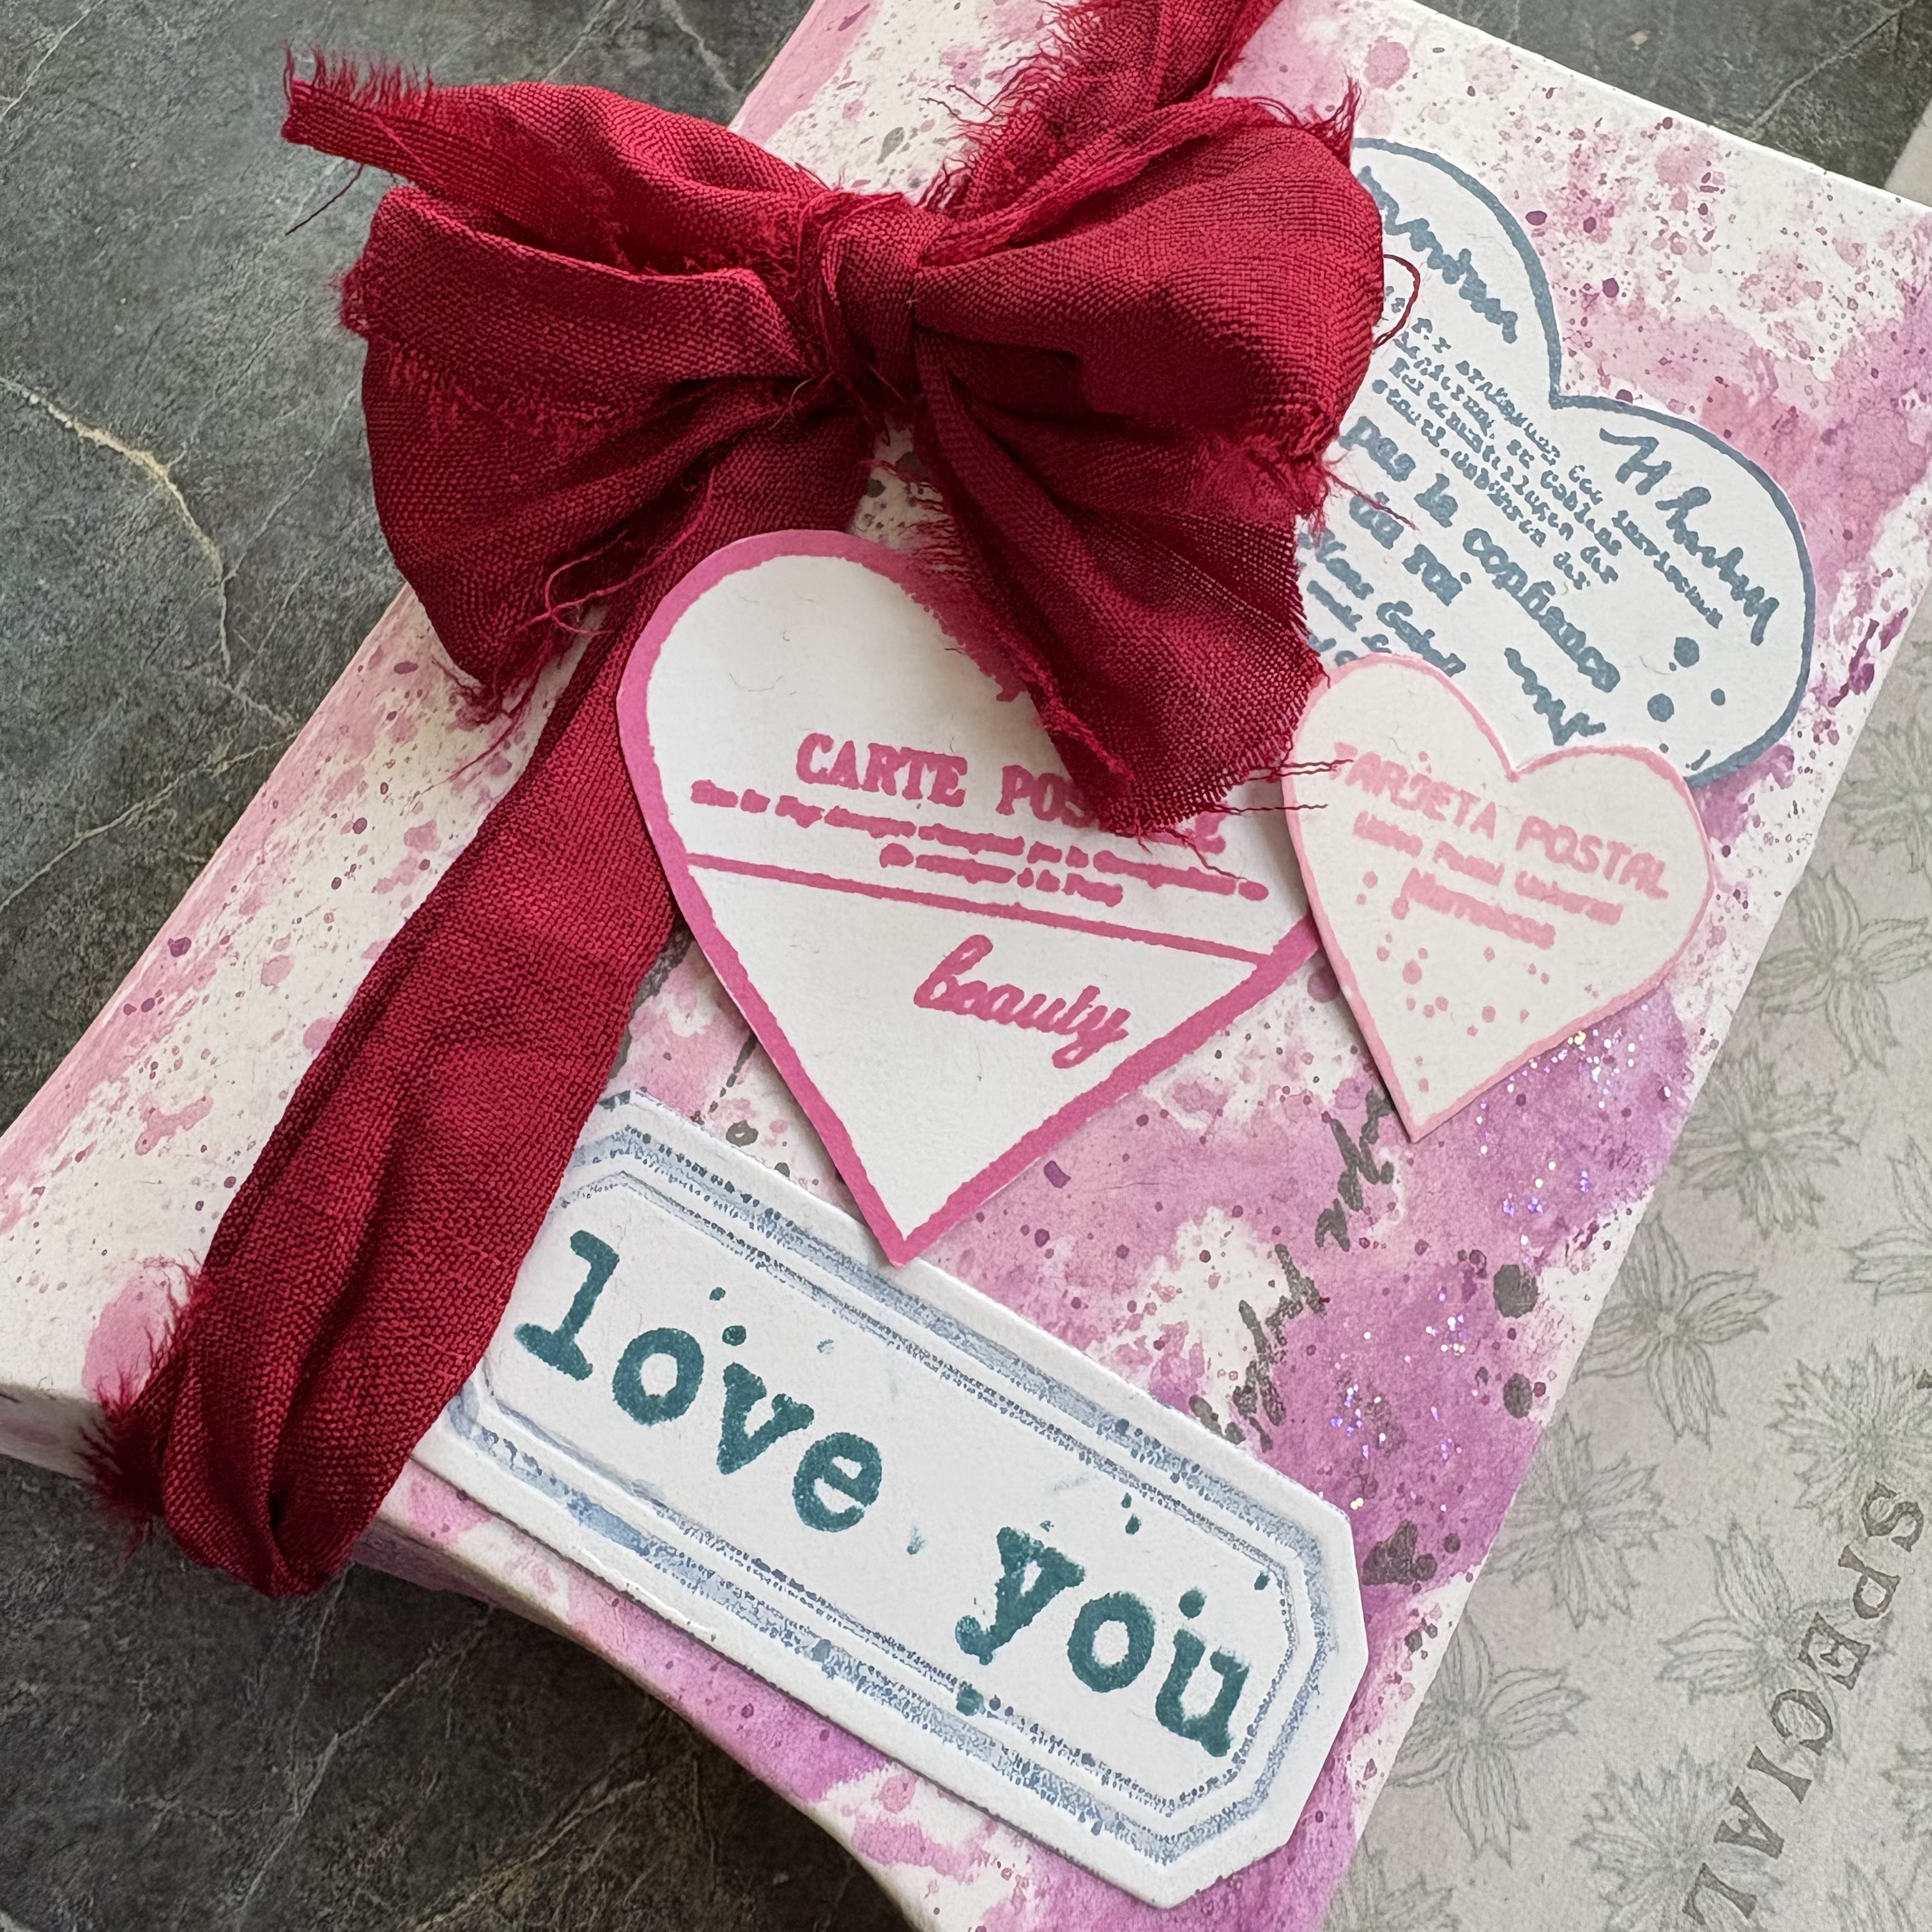
The three focal images in this set feature a heart and give plenty of options for layering, using them either as the intended design suggests, or using individual elements to create something a little different. I decided to do the later and take elements from the designs to create a gift box, let's take a closer look.

I’ve been meaning to make use of this Tim Holtz Pillow Box Die that I’ve had in my stash for the longest time. With the gift giving season upon us, nothing says ‘I love you’ quite like something handmade and the love theme of the stamps plays perfectly with that sentiment. 

Using the dies, I cut front and back elements to form the pillow box and a label from the set with PaperArtsy Smoothy Heavyweight Cardstock (SCA4H). 

I then put a blob of each of the PaperArtsy Fresco Finish Chalk Acrylic Paint colours on my craft mat and sprayed with water, before brayering it randomly onto the card. Watering the paint down gives a more subtle colour finish and helps the two colours to blend slightly on the card. 

I then added some splatters using PaperArtsy Fresco Finish Acrylic in Electric Violet, the darker colour. 


Next, the leftover paint was sponged through PaperArtsy stencil 
PS092 for some extra background texture. 


Once dry I added some Stickles glitter over the top of the diamond pattern, to create some shimmer and opulence in the finished project.


Time to add some contrast stamping in grey, using the texture from the Carte Postale Heart stamp in 
PaperArtsy Eclectica stamp set ESN32.


Then I stamped out each of the three heart images and cut them out.


And stamped the 'love you' sentiment from the bottom of the heart stamp onto the label. 


With all the different elements prepared it was time to assemble the project. I started by securing the front and back sections of the pillow box die together using double sided tape. 


And then added the hearts and label on the front.


To bring one final touch of opulence to the pillow gift, I added a red sari silk ribbon, tying it off in a bow.


I love how the finished gift box turned out. It would be perfect for either Christmas or Valentines gifts, for that special person in your life.


It’s a simple project to put together with easy elements to create. The contrast of the hearts against the background is really effective and reminds me of the love heart sweets you can buy in the UK.


I hope you enjoyed this practical papercraft project. Until next time, wishing you a happy creative week!

Victoria


Friday, 20 December 2024

With 3 Things : Altered " Love " Spools {by Mi Mii}

Bonjour everyone, it is Mi Mii (@themy32) with you today for another 'with 3 things' project.

This feature on the PaperArtsy Blog is where 3 bloggers are sent 3 items in the post. We have no clue what PaperArtsy HQ is going to send us, there might be a slight variation but generally 2 of the 3 things will be identical.

Bonjour à tous, c'est Mi Mii (@themy32 ) ici avec vous pour un autre projet 'With 3 Things'

Ce concept sur le blog PaperArtsy permet à 3 blogueurs de recevoir 3 articles mystères. Nous n'avons aucune idée de ce que PaperArtsy va nous envoyer, il peut y avoir une légère variation (par exemple, sur ce tour, nous avons chacun reçu des tampons différents) mais généralement 2 des 3 articles seront identiques.


There is always a touch of excitement when opening the mystery package! This time, I was sent this pretty stamp set by Sara Naumann (ESN23), with a grungy checker stencil, also by Sara Nauman (PS092) and two Fresco Finish paints in soft colours: Candy Floss (FF70), a tender opaque pink, and Tango (FF72), a translucent peppy orange.

Thinking mode engaged... let's go! Here is what I came up with, let's take a closer look:

Toujours une pointe d'excitation à l'ouverture et la découverte de ce que contient le colis surprise ! Cette fois-ci, on m'a envoyé ce joli set de tampons de Sara Naumann (ESN23) et un stencil damier grunge, toujours de Sara Naumann (PS092), ainsi que 2 peintures Paperartsy Fresco Finish aux couleurs douces, la Candy Floss (FF70), un joli rose tendre et opaque et la Tango (FF72), un orange translucide, qui forment à elles 2 un parfait combo couleur.
Mode réflexion et cogitation enclenché !! Allez c'est parti ! 

Voici ce que je vous propose avec ces 3 produits ..... regardons ça plus en détail !


In addition to 'the 3 things' I used some PaperArtsy Grunge Paste (GP190), a water spray, and a black StazOn ink pad. My substrates are a bit unusual: a few old empty thread spools, some long scraps of white cotton fabric, wooden skewers and mini safety pins! I also needed some stuffing for the little hearts, a bit of glue and my sewing machine...

En plus du matériel qui m'a été envoyé, j'ai utilisé la PaperArtsy Grunge Paste (GP190), un spray d'eau, et un pad d'encre StazOn noire. Mes bases sont un peu originals: d'anciennes bobines de fils vides, des bandes de tissus cotons blanc, des piques à brochette et des minis épingles à nourrice! J'ai aussi eu besoin de coton pour rembourrer mes petits cœurs, de colle et de ma machine à coudre...

I started by braying roughly my Candy Floss (FF70) and Tango (FF72) paints on the fabric (I made the fabric a bit damp with misted water first so that the paint seeped in more easily).

J'ai commencé par colorer mon tissu, en étalant grossièrement au rouleau les peintures PaperArtsy Candy Floss (FF70) et Tango (FF72) (J'ai préalablement mouillé mon tissu afin que la peinture pénètre plus facilement).

Once the fabric was thoroughly dry, I then stamped the different hearts from the Sara Nauman stamp set (ESN23). To make the stuffed hearts, you need 2 mirrored copies of each, to have one on both side when the fabric is folded in half.

J'ai ensuite tamponné les différents motifs "cœur" de la planche de tampons PaperArtsy de Sara Naumann (ESN23). Afin de fabriquer les cœurs rembourrés qui ornent la bobine, il faut 2 exemplaires de chaque motif, en miroir, afin d'avoir l'image recto verso du cœur une fois le tissus plié en 2.

When they are all stamped and heat-set, it is time to break out the sewing machine! I sewed all around the hearts, leaving a little open to insert the padding.

Une fois tous mes motifs tamponnés, je suis passée à l'étape machine à coudre. J'ai cousu tout autour de mon motif en prenant soin de laisser une petite ouverture sur le bas afin de pouvoir y insérer le rembourrage. 

Here I used make-up removal pads, shredding them to make my padding. I then cut away the excess fabric around the heart.

Ici j'ai utilisé du coton à démaquiller que j'ai effiloché pour faire mon rembourrage. J'ai ensuite coupé l'excédent de tissu tout autour du cœur.

To finish my padded heart, I inserted the skewer and helped attached it with golden threads as a nice touch. My fist ornament is ready for its spool base!

Pour finaliser mon motif rembourré, j'ai insèré un pic à brochette et j'ai rajouté quelques fils dorés noués à la base pour parfaire le tout. Mon premier pic est prêt pour orner ma bobine !

Or not... I felt a little something was missing from the skewer. So I decided to stamp some of the sentiments on Sara Nauman's set (ESN23) on scraps of fabric to male little labels...

Je trouvais qu'il manquait un petit détail pour agrémenter le pic en bois ... J'ai donc décidé de tamponner les petits textes présents sur la planche PaperArtsy de Sara Naumann (ESN23) sur de petits bouts de tissus afin de créer de jolies étiquettes...

 
... that I coloured with PaperArtsy Fresco Finish Tango (FF72)

... que je colore avec la peinture PaperArtsy Fresco Finish Tango (FF72)


And my first skewer is finally done! The other two were done in the same way.

et voilà mon premier pic est fin prêt ! j'ai procédé de même pour les 2 autres.


I then moved onto the alteration of my spools. I started by cutting three 4.5cm strips in the rest of my Fresco painted fabric. Remember the colours were Candy Floss (FF70) and Tango (FF72).

Je suis alors passé à la déco de mes bobines. J'ai commencé par découper 3 bandes de 4.5cm de large dans mon tissu coton coloré aux Frescos Finish Candy Floss (FF70) et Tango (FF72).


I added a bit of texture with PaperArtsy Grunge Paste (GP190) and the Sara Nauman Stencil (PS092).Yes! you can use Grunge Paste on fabric!

J'ai ajouté un peu de texture avec la Grunge Paste PaperArtsy (GP190) et le Pochoir PaperArtsy de  Sara Naumann (PS092)


A bit more stamping on the strips and some stitching as a finishing touch and my spools are ready!

Quelques tamponnages sur ma bande de tissu, un peu de couture pour finaliser et mes bobones sont prêtes !


And here is the finished project! A little home décor that can be use as table decorations for the end of year festivities, or as a gift for your Valentine on February 14th ;)

et voilà le projet final terminé ! un petit home déco qui peut tout aussi bien être utilisé en déco de table pour les fêtes de fin d'année, ou encore en guise de cadeau pour votre valentin ou valentine au 14 février prochain ;)


I really liked working on this project. I love reusing, recycling, and altering objects like the spools in my makes. The sentiments and patterns this stamp set by Sara Nauman (ESN23), with their grungy touch, are great for this kind of project.

J'ai vraiment apprécié faire et travailler sur ce projet. J'aime beaucoup l'idée de la récupération, du détournement et recyclage d'objets, ici les bobines et des chutes de tissus, dans mes créations. Les motifs, textes et police d'écriture de cette planche de tampons PaperArtsy de Sara Naumann (ESN23), avec ce côté grunge, sont top pour ce genre de projet.


I am using this post to also wish you all very Happy Holiday season. May your December be festive, full of warmth and precious family/friend moments. May January bring you joy, love and sharing. I will see you next year with a head full of creative projects!

See you soon... Mi Mii xx

Je profite de ce projet, pour vous souhaiter de joyeuses fêtes de fin d'année. Que votre mois de décembre soit festif, rempli de chaleur, de bons et précieux moments en famille et/ou entre amis. Que ce mois de janvier à venir soit synonyme de joie, amour, partage et vous apporte le meilleur. Au plaisir de vous retrouver ici l'année prochaine avec des projets créatifs plein la tête.
A très vite ...

Mi Mii xx


Facebook :  Mi Mii
Instagram : @themy32

Wednesday, 25 January 2023

NEW PaperArtsy Products: Sara Naumann {January 2023}


A note from Leandra:
Sara's release is bold and beautiful! Bold phrases and quotes that speak to the heart, gorgeous collage elements and creative collage stamps, plus those super useful,  go-to stencils that offer intersting layering options for your artwork.
 
Sara will be along to share with you LIVE her new products and ideas over in our Facebook Group, 'PaperArtsy People' shortly after this post publishes, and ...
 
These stamps are available EXCLUSIVELY from our approved stockists. Please check the list at the foot of this post to find a retailer online or geographically near you, it makes sense to order within your country where possible. Our retailers also endeavour to join the designer's live to share their direct shopping links - this makes it super easy for you to find a store with product in stock immediately.
 
Hi everyone, Sara Naumann here — I'm so happy to share my newest PaperArtsy release with you! I've got three new stamp sets and three new stencils to show you today, and my hope is that  you'll find these collections to be versatile and useful for lots of different applications, from cards to tags to journals to even jewellery! 

This collection draws upon themes of art and love, nature and journeying. As we in the Northern Hemisphere begin our springtime, with ever-so-slightly longer days and just a touch more color in among the grays of late winter, I wanted to explore techniques using various methods of transparency and translucency. Resin is my go-to for that look, and I'll share some resin effects with you today. Tissue paper is another great way to add layers to your work, whether you combine it with resin (swoon) or use a wet glue to adhere it to your surface. 

For the projects in this post, I'm using a variety of Fresco colors: Hint of MintPeach NectarSeaglassLemon MeringueLimelightZesty ZingBlushPea Coat and Bouganvillea. You'll see a lot of silver and gold foiling, which is from WOW's Fab Foil, which I apply with stick glue. I also use their clear embossing powder to create a raised, stamped image which also means the ink will stay in place when I add resin or glue. 

Soooo.... ready to play? :)


Price: RRP €23.00 +VAT    Size:5" x 6" (13 x16.5cm)
All stamps are individually trimmed onto cling foam with a laminated storage/index sheet.
  
Eclectica³ Sara Naumann Set 65 (ESN65)

Secret Heart
This large distressed heart makes for an eye-catching focal image, and looks great when stamped in crisp black ink.
 

Here I've stamped the heart with black ink and clear-embossed it onto white tissue paper which was first brayered with SeaglassLemon Meringue and Peach Nectar. After stamping and embossing, I coated the piece with resin epoxy. This makes the tissue totally translucent except for the areas of paint, and makes it sturdier too.
 
 
There's a "secret heart" sentiment on the stamp set, but of course you can use just one portion of the stamp—here I have just the mysterious word "secret" on a leftover snippet of book paper. Notice the little postmark image? That's a separate stamp and it's super-useful as a little accent. Same with the cluster of postage that you see cut out and tucked under the main image.  
 

Voyage
I adore any words and phrases that evoke travel, journeying or exploration of any kind. Of course they're ideal for art journals and memory albums, as well as artwork that celebrates imagination and dreamers.

 
The word "voyage" is so fun to personalize, either by painting in some of the letters as I did—I think next time I'll play with adding a button or embellishment over the "o".
 
 
Remember that cluster of postage from the previous card? I've used it here in the same position, as you can see using the same basic layout can give you really different looks! 
 

Eclectica³ Sara Naumann Set 66 (ESN66)
 
 Notes & Observation 
 
I love the symbolism of birds, and this set has so many images to use as project focals—whether you use the images as they are, or snip them apart.
 

I layered this wise little owl onto sheet music paper, after stamping and embossing the image onto brayer-painted white tissue paper and coating it with resin.
 
 
Snipping apart the words gives more options for layering, and adhering the focal with foam tape gives space for script stamping on the background.
 

Sing
 
Resin-coating is ideal for journal covers and accents, as it makes delicate paper sturdier. You can use tissue paper, or even white napkins (separate the plys).

 
After heavily brayering white tissue paper with Limelight and Peach Nectar, I stamped and embossed the bird, then painted it with more Limelight. As an alternative, you could brayer less paint on the background and make the birdie brighter.
 
 
I coated the tissue with resin epoxy one the paint was dry. Once the resin is dry and cured, the tissue paper can still be cut or torn. If you want a very thick resin piece, simply apply a heavier coat of resin. You can also add a second layer the next day. (And you can keep going if you wish, to have a super-duper thick and sturdy piece.) I love how the edges of this piece are translucent and show the snippets of text stamping underneath.
 

Eclectica³ Sara Naumann Set 67 (ESN67)

Finding Joy
Flowers are some of my absolute favorite images to work with! I always think a simple floral motif is a wonderful way to express thoughts of growth, joy and beauty.  
 
 
While you can definitely fussy-cut this flower (and the sentiment on the stamp), I thought it would be a perfect focal element, especially with some paint—Peach Nectar and Limelight—to color it in.
 

Larger stamps can also be used in parts and pieces—I mask off elements with washi tape or masking tape, then ink, remove the tape and stamp to capture a portion of the design. The numbers peeking out from that scalloped edge are part of another floral image.

 
Little Flower Tag Book

Stamping, layering and creating a little resin charm as "journal jewelry" —the possibilities are endless!
 

This sentiment is perfect for a gardener, or for those who simply love flowers. I've designed it to fit nicely within a 2 1/2" square, making it easy to die cut. (Am I the only one who struggles to line up words with the edge of a paper cutter?)

 
The little embellishment accents the top of the tag look like a bit of journal jewelry! The base is actually a wooden Scrabble® tile. I stamped and embossed the flower on tissue paper, painted it with Bougainvillea and Limelight fresco paint, and then glued it to the tile. Once the glue was dry, I added a flat-back pearl and a layer of resin.


Regular Size: 6.5" x 7" (16 x 18cm) Price: RRP €5.60 + VAT
  
PaperArtsy Stencil 368, regular size (PS368)

Secret Keeper

With this piece, I wanted to create a lot of layers on a single piece, giving depth and dimension without much bulk. The base is brayer-painted Smoothy cardstock (swoon, I love Smoothy!), with a tissue-paper layer of stamping and lots of stenciling. No resin here...I decoupaged the image onto the cardstock with glue.
 

With an alphabet stencil, you can certainly use one or two of the letters, or spell a word... you can also use the letters as backgrounds or borders. These letters were stenciled with clear embossing ink and white powder. I was not going for a perfect look; rather, just a hint of the text.


A distressed effect with silver foil edging creates a visual space between the stenciling and the sheet music pattern. Don't those numbers look so tactile?


Charming Gardeners

An orange-and-yellow painted and stenciled background brings energy and warmth. With the split stenciling, you only need a simple focal element, like a sentiment and coordinating floral image.
 

The outline letters are made with a reverse-stenciling technique (one of my favorites!): Brayer paint—in this case, Bougainvillea—onto the stencil; in the case of letters, you'll want to do that on the back side of the stencil. Mist with water, then press it like a stamp onto your painted paper.
 

Of course Grunge Paste and stencils are meant for each other. These dimensional letters are made with Grunge Paste stenciled through, then a bit of Lemon Meringue rubbed on top when the stencil is still in place. Remove, cover with clear embossing powder and carefully heat-set for a clear, glossy, dimensional look.


PaperArtsy Stencil 369, regular size (PS369)

Equilibree Tag Book

A sweet little tag book cover has bright pink layers and a hint of gold as a contrast to the bright white stenciling.


Although the stencil is an all-over design, it's also easy to use in portions—like for a border. The raised white embossing is under the layer of stamped resin-coated paper. 
 
 
A snippet of reverse-stenciled book paper is glued to the back of an acrylic tag in the top right corner of the photo (I cleaned my craft room and found about a dozen of these!). This makes a fun accent and another example of "journal jewelry".
 

Carte Postale Tag Book

While I've made this into a tag book, there is no reason why this project couldn't be a tag on it's own. And the journal jewelry here? Well, the Carte Postale resin piece could easily be strung on some copper ball chain to be a striking piece of wearable art.

 
Here's a bit of reverse-stenciling onto painted book paper—after lifting up the stencil, I clear-embossed the paper. (You may recognize it from the acrylic tag in the previous project!)
 

I've got some white-embossed bubbles along the right side of the tag, and a bit of the edge of the stencil too. Yep, those edges are fair game as a design element, too!


PaperArtsy Stencil 370, regular size (PS370)

Carte Postale

Stencils with lines of words, letters or numbers work beautifully to create the illusion of stripes—which means that you can get some really cool effects when you lay one "stripey" design vertically, and layer it again horizontally to create a cross-hatch design or even the suggestion of a plaid effect.

 
I love the texture you get when you reverse-stencil with paint on a brayered background, then add clear embossing powder!
 
 
Then, overlayer with another round of stenciling—this is done with Grunge Paste, uncolored, just straight from the jar. I love the bone color of it, and how it can blend so nicely into a background.
 

Dreamer Notebook
 
A resin-coated sheet of stenciled tissue paper can easily be layered on top of contrasting papers (like sheet music) or painted papers (you'll see the Lemon Meringue) to give texure and color variety. You can still punch holes in the resin paper, I used a regular hole punch so I could add my ring binding.

 
Here you can see the sheet music shining through the open space of the letters. 
 

To adhere resin-coated tissue or paper onto another paper, I recommend using wide double-sided tape on the entire piece, then smoothing it flat.


Project 1: Resin Art Journal

I love the idea of adorning journals, books and other treasures with resin pieces—so here I have a resin charm as my journal jewelry. It's super-easy to make, so let's take a look!
 
 
To make the charm: First, create your background piece and stamp your design with black ink, then heat-emboss with clear powder. This ensures the ink won't smear.

 
Cut, punch or die-cut the piece to fit inside the metal bezel.
 

Use white glue or Mod Podge to coat the piece front and back. When that's dry, glue it inside your metal bezel.

 
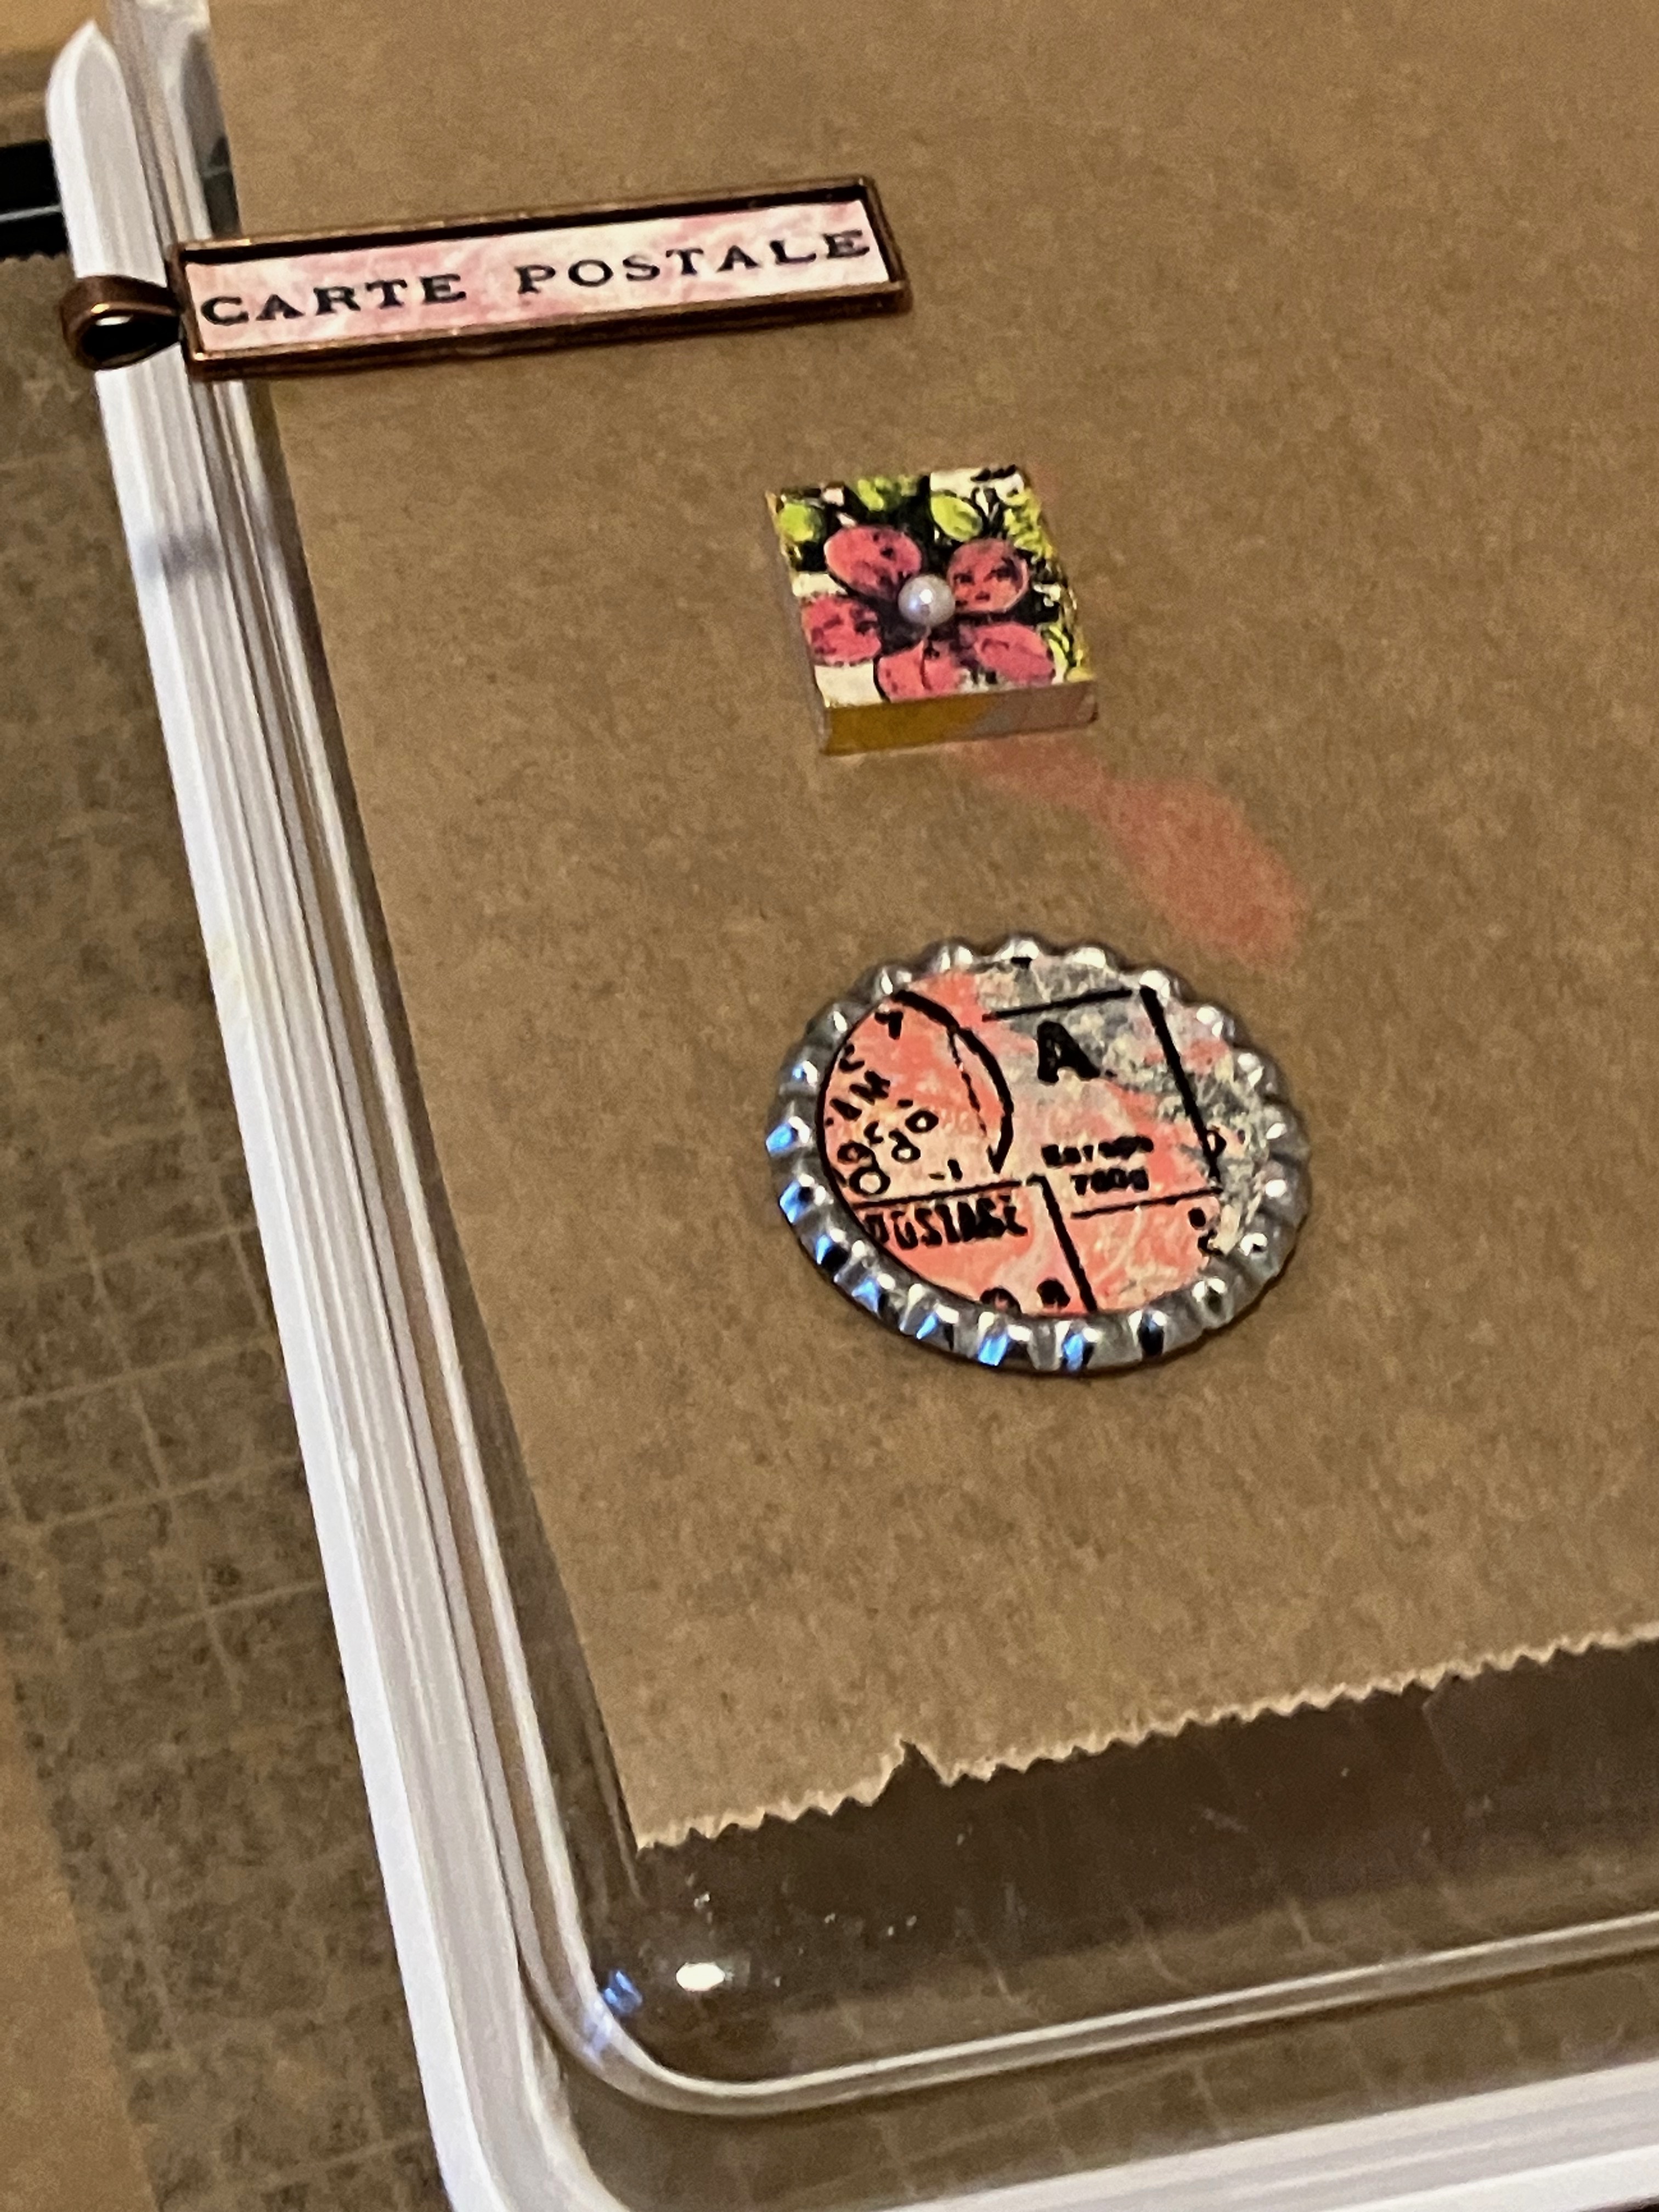
Place it on a flat surface, on top of a protective material like a craft mat, bin liner or baking paper. If the embellishment has a loop, like the rectangular Carte Postale bezel, place it on the edge of a box so the loop can hang off.
 

Then, let's mix up the resin epoxy. It's easy. I'm using ICE Resin from Ranger, but any two-part resin epoxy will mix about the same way. Please read the instructions on the box carefully and be sure to protect your work surface with a craft mat, and wear protective gloves and an apron. 
 
Use a measuring cup to mix Part A, the resin, with Part B, the hardener. You'll usually get a measuring cup included in the box with the resin. You'll mix equal parts of Part A and Part B, so start with Part A, pouring exactly half the total amount into the cup. 

 
Then, add Part B. It is vital that you measure precisely. (That's why I use a Sharpie to mark the lines on the cup to be sure!)
 
 
And mix. Stir gently but thoroughly for about two minutes, folding the two liquids together until they are completely blended and there are no striations in the mix. Scrape down the sides of the cup, and along the edges of the stir stick.
 

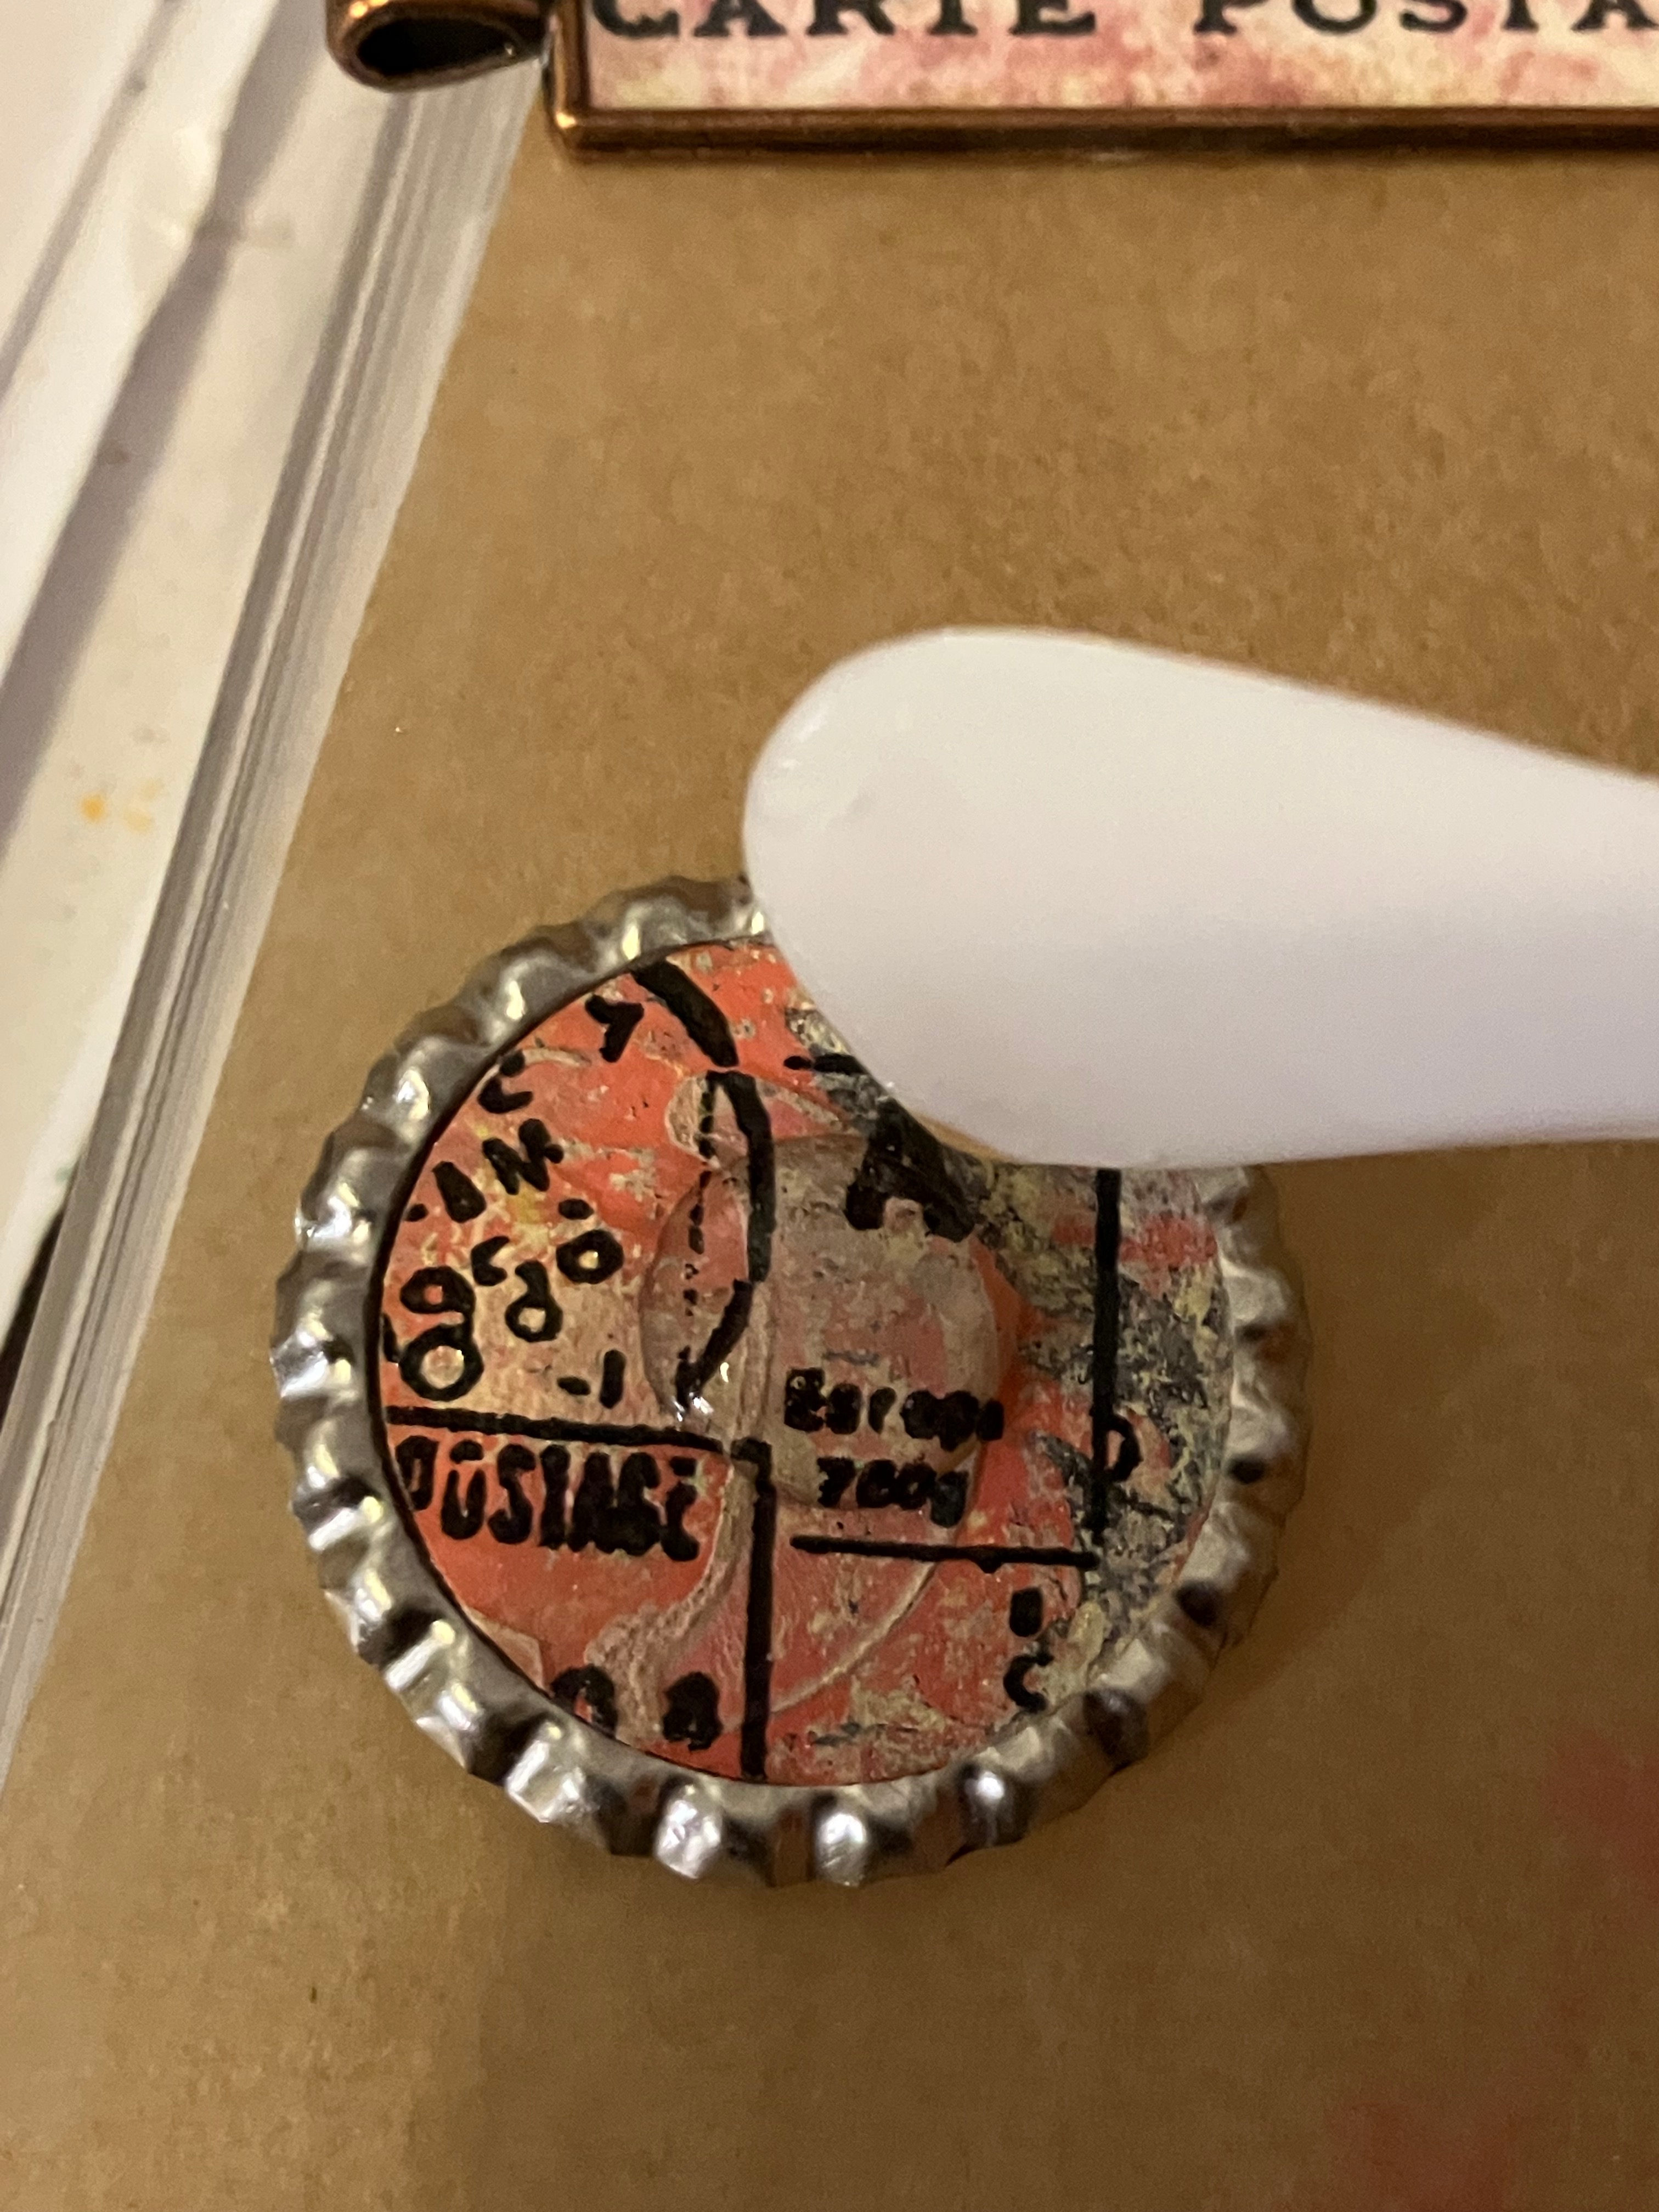
You can see the bubbles here—to eliminate them, blow gently through a straw. The warm air will cause the bubbles to dissipate. Use the stir stick to slowly drip the resin into the bezel. It will be thick enough so you have control. Still, take care not to overflow the piece.
 

Let the piece dry overnight. It will cure within a few days to be rock-hard. (Cure time may vary by manufacturer.) You can work with the piece once it's dry and before it's cured, but just don't place it in an air-tight container until it's cured. I glued a metal loop to the back of the bezel, and then could hook it onto my journal binding.
 

The journal cover is also resin—it's a piece of white tissue stenciled and coated with resin for translucency.

Project 2: Balance Birdie

This project also incorporates layers of translucency—with tissue paper as well as an ivory resin bezel stamped with the bird. Let's have a look.
 
 
First, I prepared my background with paint as well as reverse stencilling. Then I stamped and embossed the birdie onto white tissue paper. I played with the positioning until I decided which area of the paper I wanted the bird to go on. 
 
 
Then, I applied white glue to the reverse side of the tissue paper.
 
 
Place it onto the background and add more glue on top.
 

Use the brush to smooth out any wrinkles, then let it dry.

 
So now let's talk about the bezel on top. This is made with Ivory Resin from Pentart. Alumilite White is another brand that gives a similar effect. Like resin epoxy, it's a two-part combination; however, the finished effect is not clear, but white. It also takes much less time to mix and cure. (Like, minutes!)
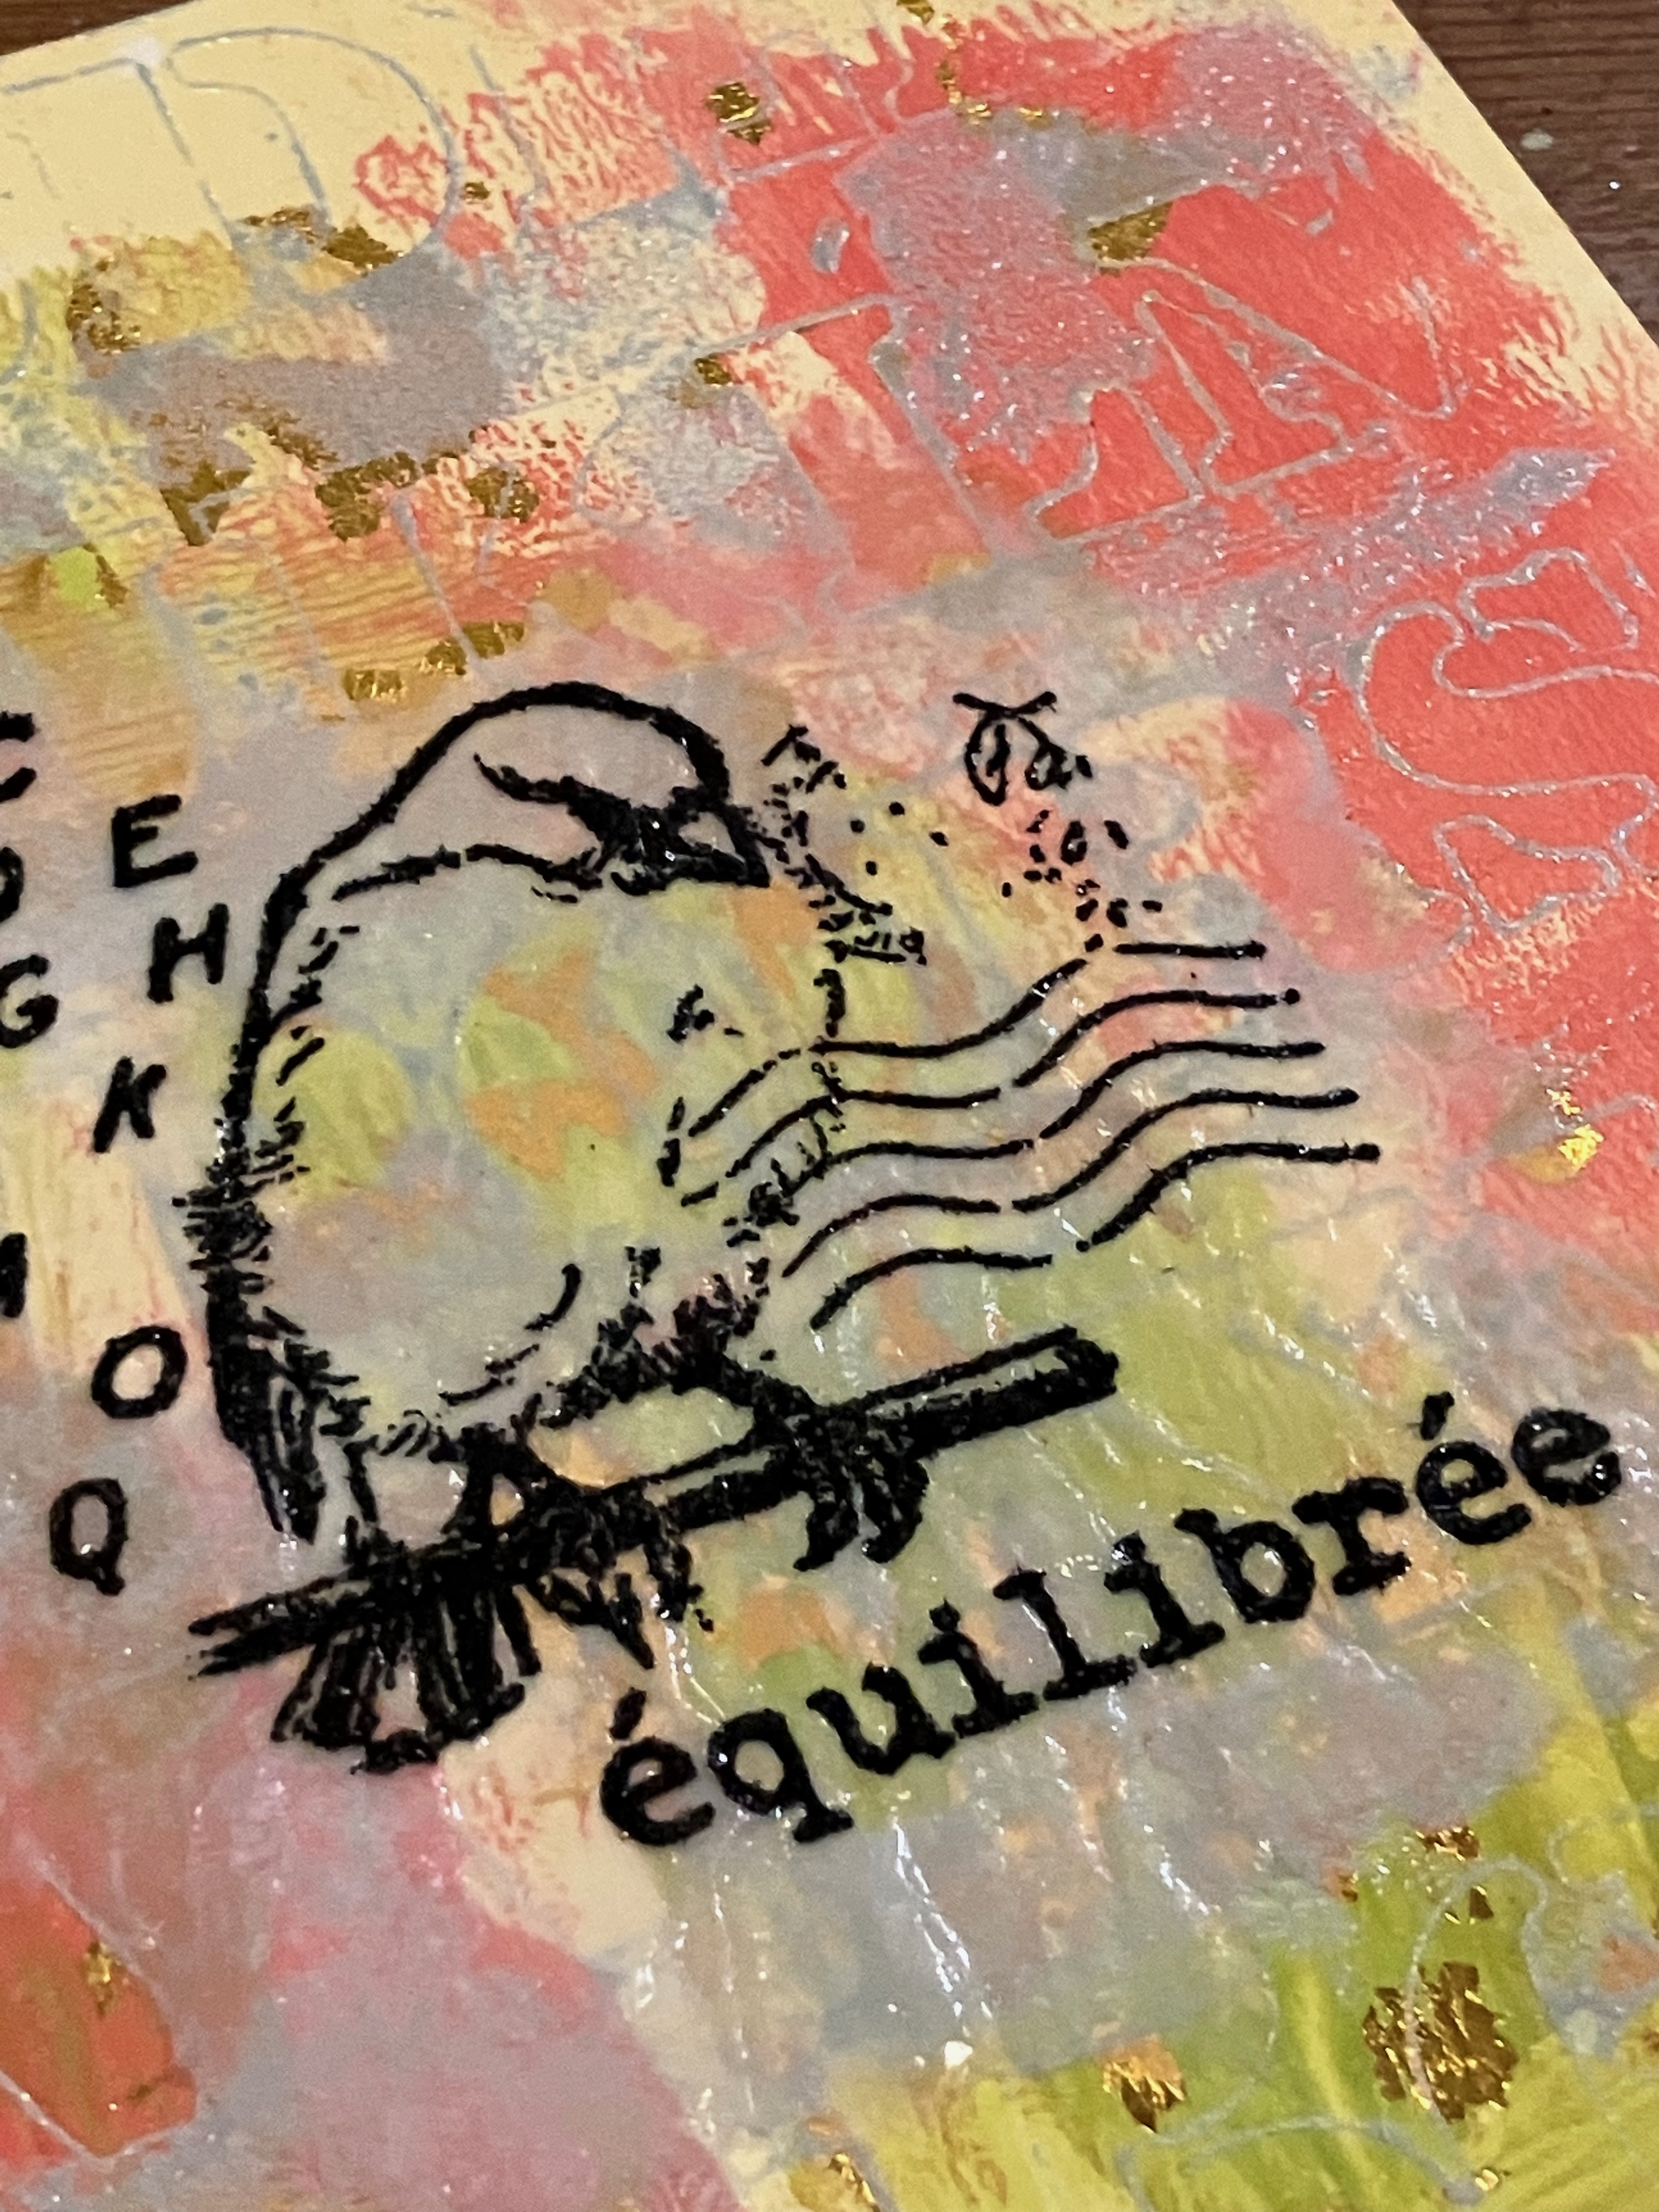
 
In this case, I poured the mixed resin into a bezel, making sure the resin was level with the edges of the bezel. When it was dry, I stamped and clear-embossed the bird image on top. Then, I used Hint of Mint and Limelight to add a bit of color, and went over it with Gloss Glaze.
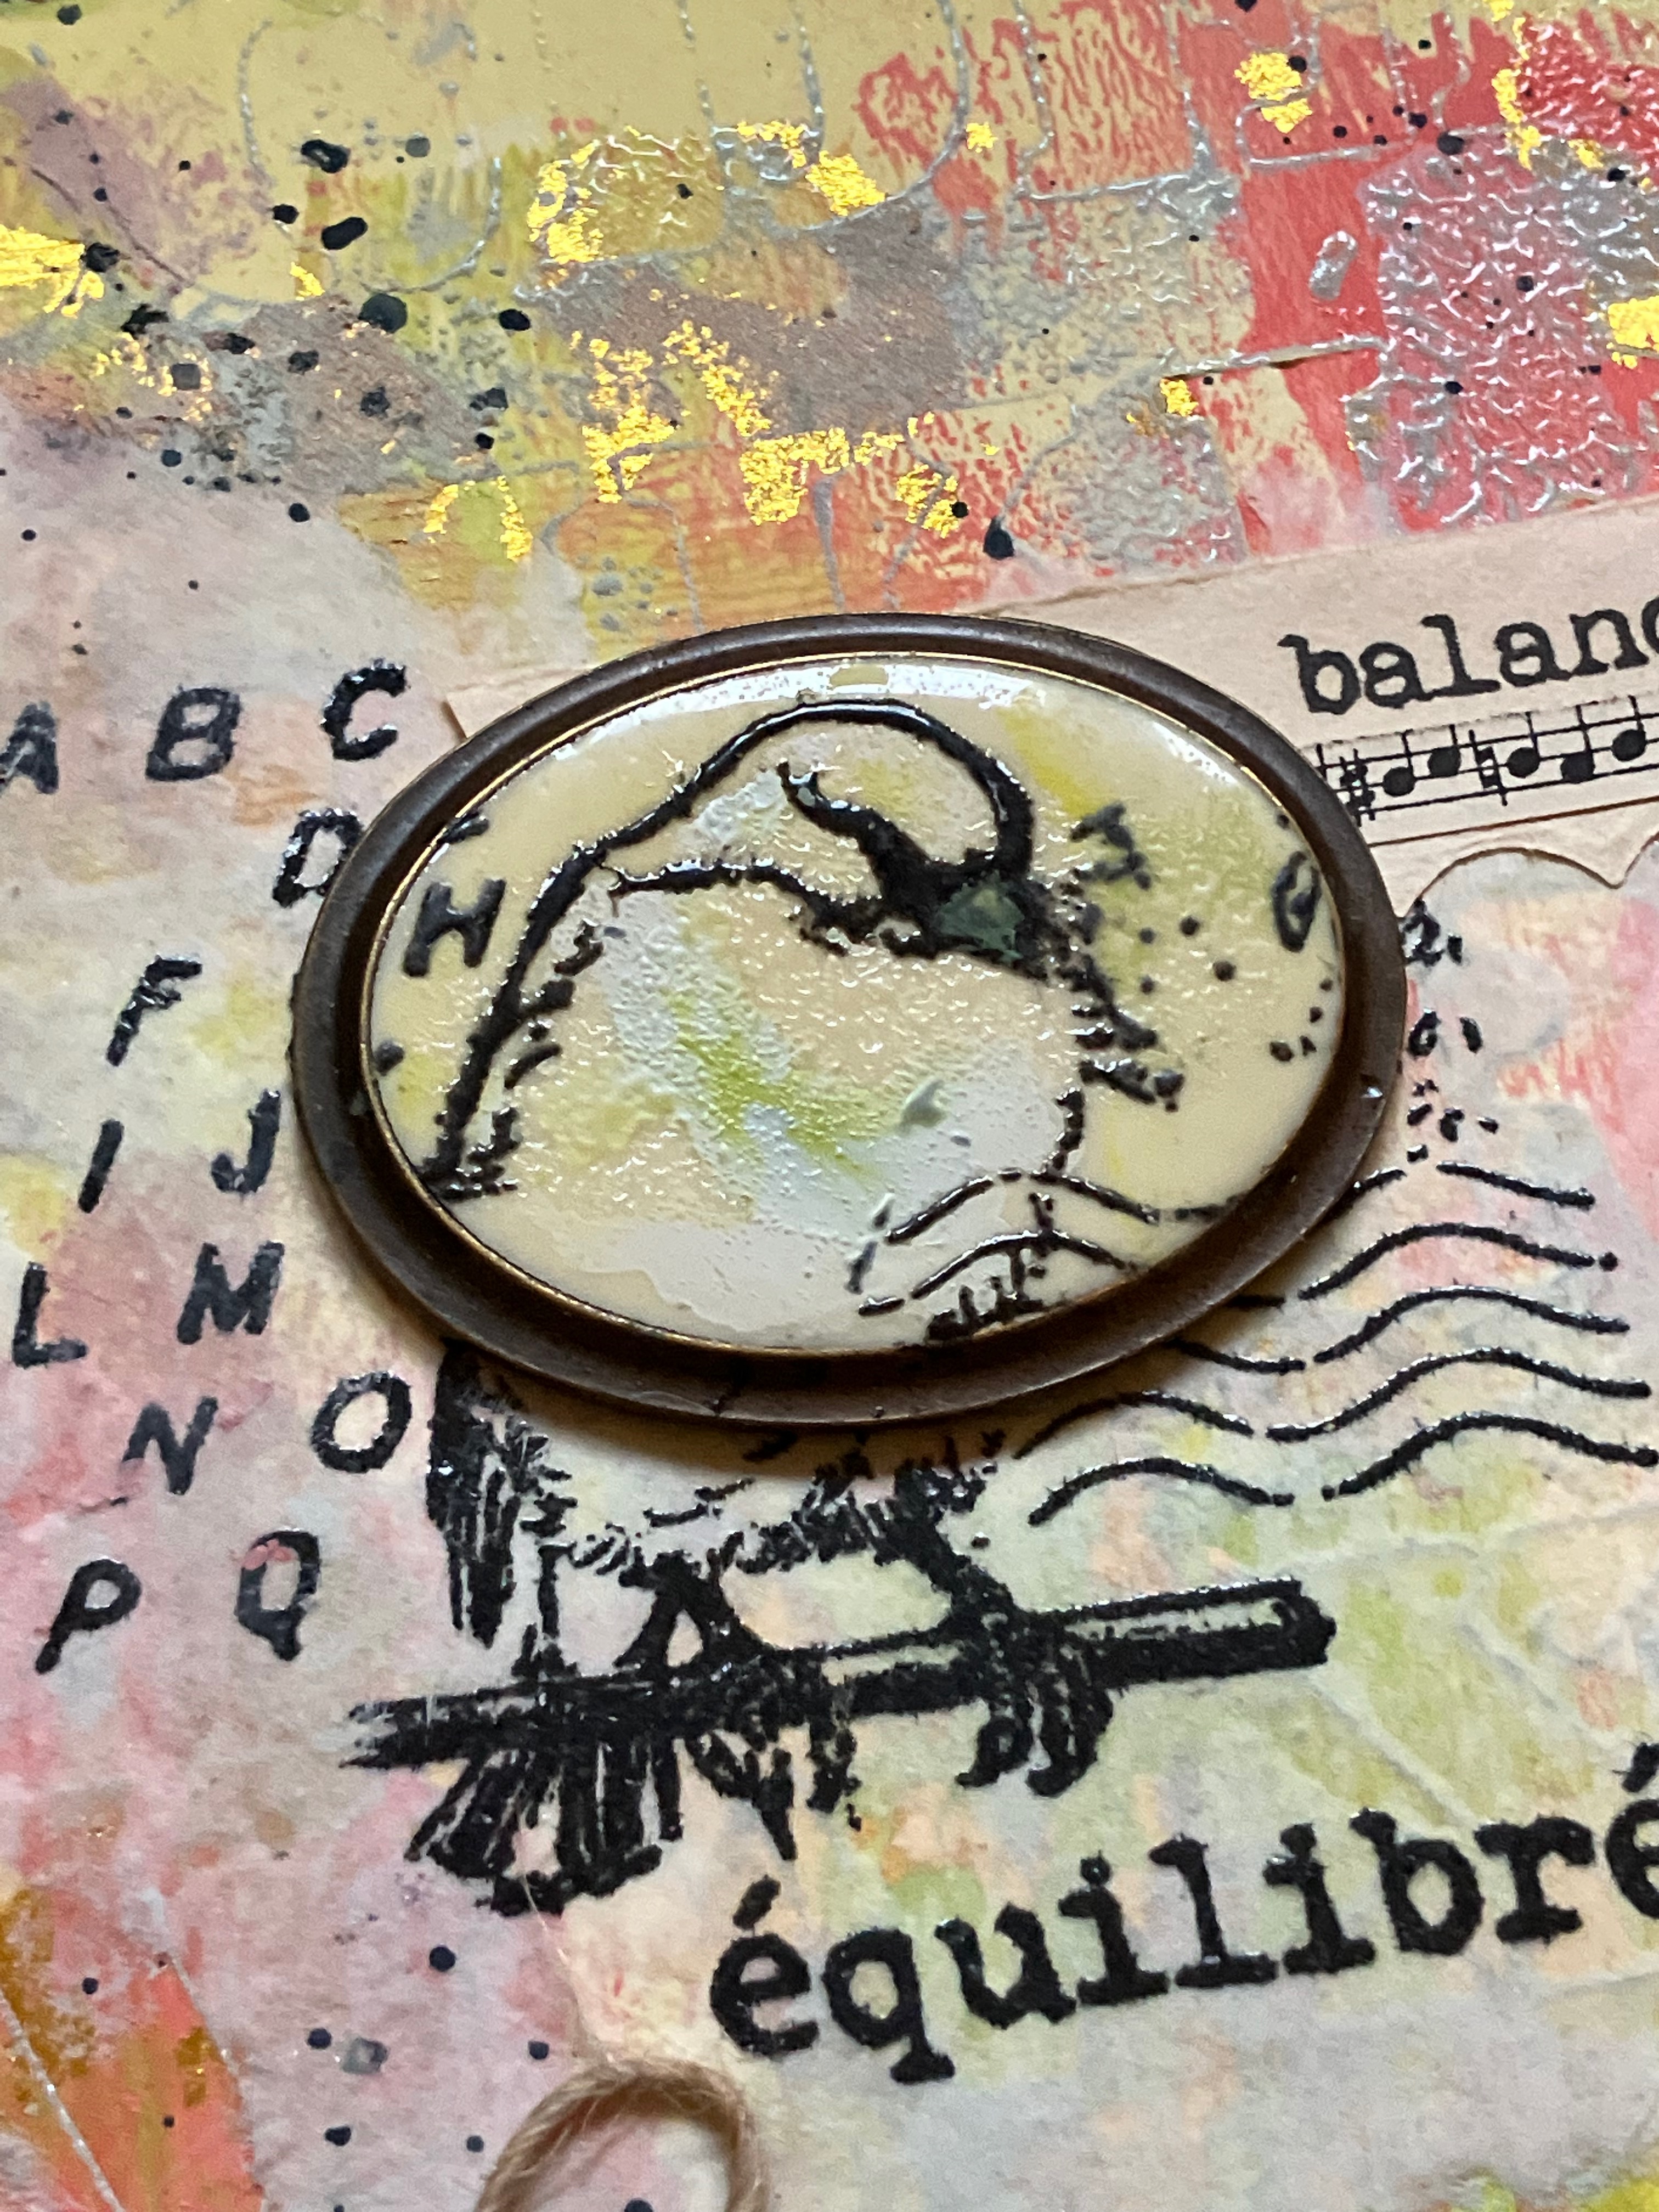

Then, I simply glued the piece on top of the tissue paper bird body!


The word "balance" is stamped onto a snippet of book paper and added as an accent.
 

And voila—layers, texure, and colors... so many wonderful elements to combine!

Thanks for hanging out with me for this blog post! And a big special thank you to the PaperArtsy team for all their hard work in producing such great quality stamps, paints and supplies!

Socials...

 PaperArtsy Stockist List

Our stockists are your go-to  source for all PaperArtsy products, and we suggest that you also use the PaperArtsy People Facebook group to source a retailer in your country. Many are members of our FB group and will happily share links to their online stores.

Australia
Bev's Cross Crafts, Spreyton, Tasmania https://www.bevscrosscrafts.com.au/
Crafters Cupboard, Berwick, Victoria www.crafterscupboard.com.au
Memories on the Murray, Murray Bridge, SA  https://www.memoriesonthemurray.net/
Natalie May Scrapbooking, Dover Gardens, SA https://nataliemay.com.au/
Scrapbook Superstore & More, South Penrith, NSW https://www.scrapbooksuperstore.com.au/
The Scrapbooker's Confetti Box, Swansea, NSW https://thescrapbookersconfettibox.com/
The Scrapbook Store, North Perth,WA http://thescrapbookstore.com.au/ 
Time To Createwww.timetocreate.com.au

Belgium
Cart N Scrap Art, Antwerp, www.cartnscrapart.be
Créatelier Caracolle, Liège, www.createliercaracolle.be

Canada
Clipper Street Scrapbook Company, Langley, BC. www.clipperstreet.com
Paper Art Creations Inc, Leduc, Alberta, www.paperartcreations.com/
Scrapbook Centrale, Dollard Des Ormeaux, Quebec www.scrapbookcentrale.ca
Scrap Addicts, Edmonton, Alberta www.scrapaddicts.ca/
Scrap and Bean, Edmonton, Alberta scrapandbean.com/ 
Scrapbooking Fairies, Drayton Valley, Alberta www.scrapbookingfairies.com/
The Paper & ink Boutique, Calgary, Alberta www.paperandinkboutique.com/
The Scrap Yard, Calgary, Alberta, www.thescrapyardcalgary.com/ 

Denmark
Hobbyboden Scrapworld Samso www.hobbyboden.dk

France
Eirl Bancon Cartoscrap, Midi Pyrenees, www.cartoscrap.com
Fée Du Scrap, Saint Sébastien-Sur-Loire, www.feeduscrap.fr/
Horizon Créatif, Ste Jalle www.horizon-creatif.fr
Instant Créatif, La Possession, La Réunion, www.icreatif.re
Katzelkraft, Ingwiller www.katzelkraft.fr/en/
Kerudoc Creation, St Yvi www.kerudoccreation.com
Le Grenier des filles, Pierre Benite
Page de scrap, Saint Pavace, www.pagedescrap.fr/
Scrap Déco Home, Goutrens, www.scrapdecohome.fr/
Toutencolle, Dun sur Avon www.toutencolle.fr

Finland
Heidin Korttipaja, Istunmaki, www.korttipaja.fi/fi
Piia Paper, Kittiläwww.piiapaper.com/fi

Germany
Stempelbar, Berlin, www.stempelbar.de
Stempeloase Munich, Munich www.stempeloase.de
Stempelfee Shop, Hilden www.stempelfee-shop.de
Stempellaedle, Stuttgart, www.stempellaedle.de/shop

Greece
Scraps N Pieces, Kallithea www.scrapsnpieces.gr

Italy
Immagine SAS di Rapaccini, Rome, www.immaginelab.com
Il Negozio Della Mamma Di Cle, Torino, www.ilnegoziodellamammadicle.com
Marte Savona, Savona, www.martesavona.it
Pezze E Colori, Lissone, www.pezzeecolori.it/ 
Piccole Passioni, Siena, www.piccolepassioni.it

Japan
La Wadao, Odawara, Kanagawa, www.lawadao.com
Tiny Dots, Funabashi-shi, Chiba www.tinydots.shop-pro.jp

Netherlands
De Hobbystudio, Genemuiden, www.dehobbystudio.nl/
Doe@ding,Spijkenisse doeading.nl/
Hobbycompleet de Duif, Leeuwarden www.hobbycompleet.nl
Stampingcorner, Capelle Aan Den Ijssel www.stampingcorner.nl

Norway
Hobbygarasjen, Kopervik, www.Hobbygarasjen.no

Spain
Cien por Cien Manualidades, Barcelona,  www.100x100manualidades.es
Ideas 10 Manualidades Y Scrapbook, Bilbao ideas10manualidades.com/
Marakiscrap, Tarragona, www.marakiscrap.com
Scrap & Papers Experiences, Barcelona, www.scrappapersexperiences.com
The Paradise Corner, Barcelona, www.theparadisecorner.com

Sweden
Butik Elva, Staffanstorp, www.butikelva.se

Taiwan
Mandy's Cards, Taipei www.facebook.com/mandy.card.77

United Kingdom
Amelia's Creative Crafts, Studley, Warwickshire  www.ameliascreativecrafts.co.uk
Art from the Heart, Harrogate, Yorkshire www.afth.co.uk
Crafts at The Malthouse, Herstmonceux,  East Sussex, www.themalthouse.co.uk/
Loobi Crafts, Leighton Buzzard, Bedfordshire, www.loobicrafts.co.uk
Papermaze, Ipswich, Suffolk www.papermaze.co.uk/ 
Stampers Grove, Springbank, Lilliesleaf, Melrose,Scotland www.stampersgrove.co.uk
The Artistic Stamper Craft Store, Faversham, Kent www.theartisticstamper.com
The Forget me not Kraft KabinRochford, Essex, www.TheForgetMeNotKraftKabin.co.uk

USA
Artistic Artifacts, Alexandria, VA www.artisticartifacts.com/
Artistic Studio Creations, Fayetteville, Georgia www.facebook.com/ASCbyCrystal
Craftiness, Chatsworth, CA, www.craftinessonline.com/
Everything Scrapbook & Stamps, Lake Worth, Florida https://everythingmixedmedia.com/
Frantic Stamper, Oregon www.franticstamper.com
Free Heart LLC, Denver, Colarado, www.freeheartllc.com/
Joggles, Coventry, Rhode Island, www.joggles.com
PaperCraft Clubhouse, Westbrook, Connecticut, papercraftclubhouse.com/
Qingquing's Stamp Shop, Portland, Oregon
Runaway, Art & Craft Studio, NE Salem, Oregon www.runawayart.com/
Simon Says Stamp, Columbus, Ohio www. simonsaysstamp.com
Topflight Stamps, Irmo, South Carolina topflightstamps.com/

If you are interested in becoming a PaperArtsy stockist contact Dounia@paperartsy.com for more information

PaperArtsy Links
Facebook Group PaperArtsy People
Facebook Page PaperArtsy