Showing posts with label valentines. Show all posts

Monday, 9 February 2026

Valentine treat boxes with KC {by Martine Dubé}


Valentines Day is around the corner and I always like to make treat boxes with little cards to offer to friends and loved ones. I made some using Kate Crane's mini stamps, infusions and Fresco Finish Chalk Acrylics.


The supplies use to make this project are Kate Crane mini stamps  (KCM008KCM021KCM022KCM023) along with some Fresco Finish Chalk Acrylic in SnowflakeCeriseSmoked Paprika and Pumice, I also use some infusions in the color You Are Cerise. The cardstock I use is the Smoothy white stamping card 240gms (SCA4) and watercolor paper.


I started with a light base of infusions in Are You Cerise so that by background is not too white and to start creating layers. To do that you need to apply the infusion and with a water bottle add a lot of water and dry with a heat gun. I did this step in both paper (smoothy card SCA4) and watercolor paper to see the difference in color and how the smooth card would react with a lot of water.


Make sure this first layer is dry before making the next one. You can see here that the color is brighter on the smoothy card and that it took water very well. I also iron my cardstock so it's flat when I start to make my print...yes I iron my cardstock!!!


Using the same color of infusions  you make your background print - here I made hearts using a round paint brush but you can make the print you want - you could also use a stencil.


To add texture to my print I splattered the left over infusion, again here it's better if your print is dry that way the print and the splatters don't mix together.


For more texture I use water down fresco paint (Snowflake) to do more splatter.


Finish with doodle on the hearts with a paint pen.


Here are my finish background ready to be die cut.


Time to create my tags to put on the boxes. First I stamped the images that I wanted  KCM008, KCM022KCM023. I also used KCM021 to add texture to my tags.
 

I use freso paint (Cerise, Smoked PaprikaPumice) to color my images and watercolor pencils to add shadows.


I cut my tags out of watercolor paper and did the same watered down infusion background, you could add some infusions splatters here but I forgot...OOPS!!! Then stamped some hearts in matching colors and some texts for textures.


I've fussy cut my images in order to put some dimension on my tags.


For dimension I use some foam tape on the back of my images and added some stripe washi tape to ground them on my tags.


I colored some seam binding in pink and orange to match.


The tags are ready to put on my treat boxes, and I used a piece of double sided adhesive to do so.


Die cut the boxes and glued them with liquid glue.


I always have fun making these littles boxes, I love giving them to my family and to my co-workers. I always try to put an image that match their personality.


Facebook:Martine Dubé
Instagram:martined.crafts
Pinterest:Martine Dubé

Saturday, 18 January 2020

2020 #1 Love is in the air: Follow Your Heart with ESC {by Claire Snowdon}

2020 Topic 1: Love is in the Air


I really love the mix of old and new in this card by Claire. An old vintage style rose stamp, and new bright mixed media techniques with hot colours. This creates a gorgeous vibrant card that totally resonates with having a splash of valentine fun!
~ Leandra

Hi everyone, it's Claire Snowdon with you today, and I'd like to share with you a traditional style Valentine's Day card.

The card style is traditional in the colours I have chosen and the use of the roses however I've given it a modern twist by adding a couple of pops of contrasting colours and bold stencilling.


The background started off with a couple of pieces of Tim Holtz tissue tape and then I added the Fresco Finish paints in: Blah Mange, Sorbet, Red Lipstick, Cerise, Coral, Green Patina and Yellow Submarine.


The next step was stencilling, stamping and splattering!  This stage is my favourite :)
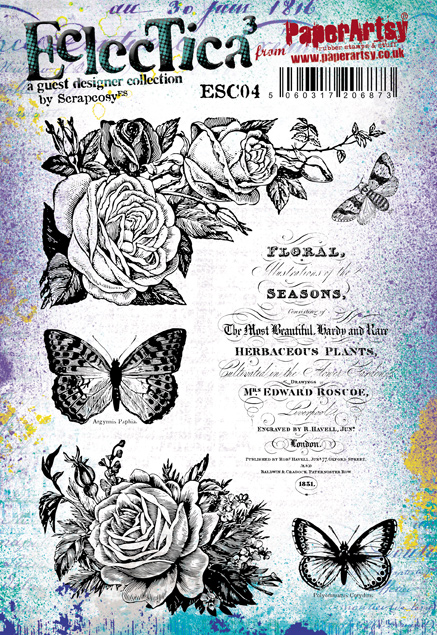
I stamped in the background using Blah Mange and the script stamp from ESC04


A little more stamping with the script stamp from ESN11 using Archival Potting Soil.


I stencilled the dots with a Tim Holtz stencil and Little Black Dress.  


And finally to finish it off it was splattered with Chalk, Yellow Submarine and some gold Posca Pen too - for good measure!


I used the left over pink paints from my craft mat to brayer a scrap of Smoothy heavyweight card and then stamped the roses from ESC04 using Versafine in Onyx Black.


I added an extra bit of definition to the roses using coloured pencils before fussy cutting the image and adding to the card with foam squares. I then added the metallic sentiment stickers which are by Tim Holtz.


To finish the card off nicely I mounted it on black card then added to the card blank again using the foam squares.


I really enjoyed making this card - it's good to throw in a few contrasting colours now and then to mix things up a bit.  There is tons of inspiration on Pinterest and Instagram - especially for Valentine's Day ideas so do go and take a look.


Thanks, Claire xx


Saturday, 28 September 2019

NEW: JoFY Stamps {with Lauren Hatwell}

September 2019 New Products
JOFY Collection


If you hear that Lauren is on the blog, you won't know what to expect; but it's never going to be dull or boring! She's here today perfectly showcasing the new JoFY sets which will take us through 5 months of celebration events in one fell swoop! From fabric stamping, googly eyed monsters to Christmas treats and lurrvve shakers, Lauren has done it all! 


Hi everyone, it's Lauren with you today. Very excited to get my hands on Jo's latest release. She is spoiling us today, taking us through from Halloween, through Christmas to Valentine's Day. 

Jo's style is so polished. I know whichever set I pick up, I will end up with a really smart and professional looking project. I was so excited to get my hands on the new Fresco Finish paint colours that I painted all my projects rather than use my go-to Copic markers. It was a joy! So relaxing to just sit and paint. The new colours are gorgeous. I am hooked!


I did get a bit carried away and I did have to reign myself back in but this set is just so good! I actually think Jo has created the cutest ever little witch and skulls here; I am addicted... 


You need a cute little trick or treat bag to carry all your Halloween swag so it was time to whip out my sewing machine for this one and make a little fabric patch. It is amazingly easy to paint on fabric with the  Fresco Finish paints and I know the paint will hold the stitching in place so the edges can fray back to give a nice distressed look without everything disintegrating. Clever huh!?


Jo has the most amazing writing and I love the large words and sentiments she uses. I couldn't resist adding a pair of googly eyes to this card. 
.

I had a lot of big plans for this stamp and then I saw how amazing it is just stamped and coloured; a real one stop shop when it comes to card making. I love the two differently sized sentiment tags and I can't help thinking they would make great little windows or shaker elements on a card. Talk about attention to detail! Jo has really nailed it with this set. Of course it would also look great if you created layers and I do have a fancy to tuck a little snowman in there behind those trees. That said, I think this stamp is beautiful just as it is and such fun to colour.


There's that little sentiment tag again. Doesn't it look great with this cute little group. I think this little stamp would be perfect for so many things. I've used it for a treat box place setting here (a tradition in our house) but I think it would make a really sweet little card or gift tag too.


I cannot begin to tell you how much I love the stamps in this love themed set. This shaker card turned out great and it's just one stamp from the set. Imagine this in your journal with the centre cut out so you get a Tracy Scott style peek through to the page behind... Wow!

I honestly could have kept on going with these for days and days if time had permitted. It was a wrench to put them down and I have barely skimmed the surface of what is possible. 


Thanks for joining me today, I bet you have loads of ideas whirling around in your heads for these amazing stamps.

Lauren x

Facebook:LaurenHatwell
Instgram:Bluebertie12