Monday 29 April 2024

2024 Topic 3 : Vintage PaperArtsy Stamps {by Martha Ponsanesi} on the PaperArtsy Blog


Hello everyone, Martha (@craftingmartha) here, it's great to be back with you!

Today, I'm excited to share with you a mini album that I've created following our new topic, "Vintage PaperArtsy Stamps".


My starting point was to use the Queen stamp from the Hot Picks stamp set 1604 (HP1604) for the cover, and I developed my mini album adapting it to those measurements. After crafting a prototype using photocopy paper to determine the structure, I selected mixed media paper sheets to bring my vision to life.


Looking at the Queen's face, it seemed to me that I could see a dreamy gaze directed towards the sky, so I choose the Hot Picks stamp set 1903 (HP1903) with its astronomical theme.
Wanting to create my mini album from scratch, starting from creating my own papers, I chose to use Infusions Dye Stain and Mattints.


Choosing two Infusions Dye Stain Colors, Magenta (CS23) and In the Navy (CS15), I started by sprinkling Magenta over one sheet of mixed media paper...
 

...generously spritzing it with water, and then evenly spreading the pigment with a brush.


To avoid wasting excess color, I layered another sheet atop the soaked paper, resulting in two fully colored sheets with a peculiar texture.


On another sheet, I stamped various stamps from the Hot Picks stamp set 19030 (HP1903) and embossed with white embossing powder.


Subsequently, I applied Infusions Dye Stain Color - In the Navy (CS15) , spritzing it with less water this time, allowing the pigments to freely flow around the embossed images.


Utilizing the Magenta and In the Navy colored sheets, I cut and folded them according to the specified measurements: the blue one is 10" 3/8 x 5" 1/4 folded at 2" 3/4 - 5" - 5"1/8 - 8", and the pink one is 8" 3/8 x 5"1/4 folded at 2"3/4 - 2" 7/8 - 5" 5/8.
 

Since my pages were colored on only one side, I decided to take another sheet, stamp the numbers from the PaperArtsy Hot Picks stamp set 1604 (HP1604) to create a pattern, and then finally use the new Mattints.


Mattint is a new product and If you missed the launch, I invite you to read the introduction post here and take a look at the posts from the past weeks (2024:Topic 2), where other talented bloggers have experimented with them, creating beautiful projects.


Although I've only recently discovered Mattints, I already love them. By using The Pink and Dragonfly over the stamped images, I created this beautiful background. However, it seemed too 'clean', so to make it more consistent with the other backgrounds, I added some Infusions Dye Stain Colors - In the Navy (CS15) with a brush dipped in the Dragonfly Mattint.
I'll use this newly created patterned paper to decorate the white part behind the blue sheet.


For the white part of the pink sheet, I wanted to use Mattint - Glow, but this time to apply the Printed Tissue PT01, also vintage-themed. I used the part where one of the stamps from the Hot Picks stamp set 1604 (HP1604) is reproduced.
 

The Printed Tissue, being thematic, are the ideal complement. For example, I didn't know how to decorate one of the pink pages, but looking at the entire Printed Tissue sheet, I found another image that could serve as a focal point and that blended perfectly with the other stamps used. Mattints are ideal for collage thanks to their completely matte finish.


Okay, now that the pages are ready, I'll use some more white cardstock to prepare the mats for the photos that I'll be putting in.

 
Now, let's talk about the image that actually inspired the whole project. I stamped and embossed my queen, then colored her in a not-too-precise manner with Mattints Dragonfly, The Pink and Glow blending together to create various shades.
 

I cut her out, leaving a nice white border so she stands out against the background of the cover. Finally, I glued her down using some foam tap.


The theme of the quarter is 'Glazed', which I definitely respected by using the Mattints, but I also wanted to interpret it in a non-conventional way. I created a transparent cover using a page protector and the fuse tool, so it also became a 'shaker', with sequins and stars inside.

Now all that's left is to assemble everything.


I glued the two cardstock structures together along the spine.


As for the shaker cover with the ribbon closure, I attached it to the pages with three brads. And there it is, my finished mini album.


I had a lot of fun making it, a very simple structure that allowed me to play with the new Mattints, with stamps from old releases that are always enjoyable to use, and then I confirmed my love for the Printed Tissue, which is a real lifesaver and an economical and versatile solution for backgrounds and focal images.


Thank you for joining me on this creative journey! With the help of Mattints, Infusions, stamps, and Printed Tissue, you too can create a mini album infused with vintage vibes.
Until next time, happy crafting! 
Martha x


Thursday 25 April 2024

2024 Topic 3 : Vintage PaperArtsy Stamps {by Ann Barnes} on the PaperArtsy Blog


Hi everyone, it is Ann ( aksbarchitect CREATES) here with you. I have been really enjoying all of the vintage PaperArtsy projects lately. What a wonderful celebration to be a part of! I am excited to share my project for the this PaperArtsy topic with you today.

The Vintage PaperArtsy concept had me thinking about ways of using the incredible vintage style images in a contemporary way. Exploring new methods and mediums is something I love to do, so I decided I would try my hand at making a modern jewelry piece with resin; a clean and simple design that will allow the image to be the main focus. I learned a lot with this project, especially when it came to stamping on non-porous surfaces.


While the process was definitely a struggle for me, the modern filmstrip jewelry pieces turned out better than I had hoped, definitely showcasing the vintage stamped image in a contemporary light. I had thought that working with resin would be the most complicated part of the process- it turned out that my knowledge of ink types and stamping on nonporous surfaces would be the real hurdle.


I chose to use the PaperArtsy Minis stamp MN35  as the main image for my project. As much as I love using color in my artwork, when I imagined this project, the use of color never even entered my mind. I kept going back to the PaperArtsy theme for this quarter: Glazed. With the stamp image being a silhouette within a filmstrip, I always envisioned the colors from the external surroundings showing through the piece, making an accessory that would work with whatever someone was wearing.


The first step in any project I am working on is to familiarize myself with the supplies I will be using. If I am stamping, I like to do some test stamps, to ensure I know how to achieve the best results as well as to understand which inks will work best for my substrate. Initially, I stamped PaperArtsy Minis stamp MN35 on some text paper. This was my first time using this stamp so I wanted to prime the stamp, and create a reference for future use.


I want my bracelet to appear as if an actual filmstrip is encased in the resin. This means I need a crisp and opaque black stamped image. After my test stamping, the next step is to experiment on the clear acetate. I have a basic idea that working with either the Ranger Archival Ink, Tsukineko StazOn ink, or PaperArtsy Fresco Finish Chalk Acrylic paint (Little Black Dress, FF19) will give me the most opaque images, thus mimicking an actual strip of film negatives. 

I will be using clear acetate as the base for my stamping. Acetate is non-porous, a very different finish from the text paper that I stamped on initially. I did a bit of research on the best inks for stamping on non-porous surfaces. It appears that any of the three mediums I selected should work. Since I have never stamped on Acetate before, I want to stamp some sample pieces to help me decide which black I will use on the final piece.


I stamped the image one time with each medium onto the acetate. As you can see, the Ranger Archival Ink(Black Soot) appears somewhat ghosted. I waited a long time for the ink to dry and even much later, the ink smeared. The image does not appear as crisp as it did in my initial test print. I will not be using the Archival Ink for my jewelry piece.


Next, I used a brayer to spread PaperArtsy Fresco Finish Chalk Acrylic (Little Black Dress, FF19) onto the stamp, then, using a stamping platform, stamped the image. I believe if I stamped repeatedly, I could achieve an opaque black on the acetate, however, the matte finish will not provide the look of a glossy strip of film. I will not be using the PaperArtsy Fresco Finish Chalk Acrylic paint for my piece.


Finally, I used the Tsukineko StazOn ink (Jet Black) Solvent ink and I was very pleased with the crispness, even though it seems I will need to do multiple passes to achieve a solid image. The black ink is opaque, glossy, and reminds me of how an actual film strip might appear. I waited for a long time after stamping and the ink dried on the acetate and did not smear. This will be the ink I will use for my piece. 

I am both excited and a bit anxious about the next steps. The StazOn ink requires a bit of drying time so I will need to do the stamping in stages. I will also need to create more than one strip in case I have any problems with the resin.

I set up my stamping platform to make it easier to extend the single stamp image into an elongated strip of images. Using a different color ink to stamp the image onto a base paper will allow me to easily see which areas of the stamped image have not stamped completely since the acetate is clear. It will also help me align the images to create the continuous strip.


Right away I notice that this process is going to take even longer than I had originally thought. When stamping on the acetate, you need to wait for the first layer of ink to completely dry before stamping another layer. Since acetate is non-porous, the ink sits on top and if you re-stamp before the first layer is dry, it simply picks the first layer back up.


I create a few extended strips of images and allow the first layer to dry. Then I reposition the strip and begin the process once again. I repeat this process at least three times. Even though the silhouette of the man never does quite fill in solidly, I think it gives it a vintage look. It is time to move on to creating the jewelry piece.


The strips of acetate were measured and cut to fit into a silicon cuff bracelet mold before they were stamped on. Once the ink has dried completely, I mix the Art Resin (resin and hardener) together according to the instructions and pour it into the mold. I then push the stamped acetate into the resin mixture.


I had a good amount of resin left over after I filled the mold. The resin mixture must be used within a short time frame before it begins to harden. Instead of wasting the extra, I decided to coat a couple of the stamped strips with a thin layer of resin. These pieces might be fun to use later in my art journal or on a card.

The suspense in waiting for the resin to cure and hoping that it is crystal clear had me a little worried, especially after all of the effort to get the stamped images just right.

I decided to make some additional jewelry pieces from the resin coated strips. I made a set of earrings using a singular image for each. I punched a small hole at the top, then added jump rings and an earring hook. I think these will be a fun accompaniment to the cuff bracelet or even on their own!


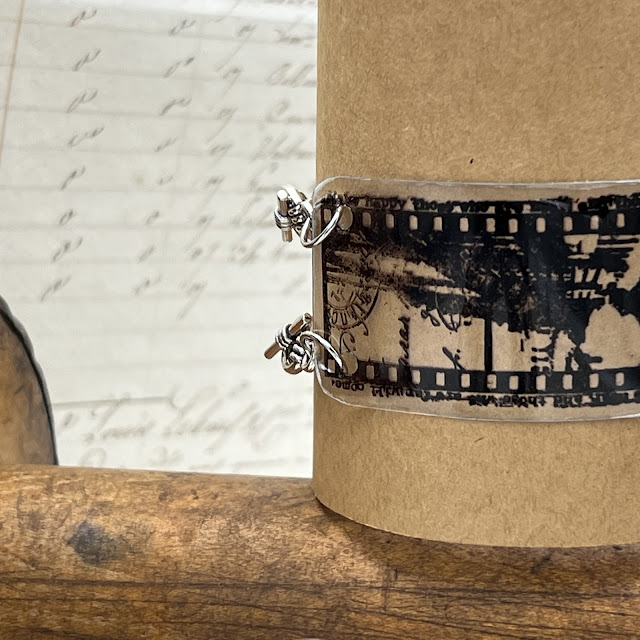
Using one of the additional resin coated strips, I made double toggle clasp bracelet. This piece might be fun for a casual outing, or even just to run errands. I like the idea that it is a bit more flexible than the cuff. The remaining pieces will go into my art bin. 


Even though I struggled with various steps creating this project, I enjoyed the process, and I believe that the jewelry will be a fun way to accessorize an outfit. Creating resin jewelry pieces could be done with any of the wonderful PaperArtsy stamp images. I have even considered masking within the filmstrip and incorporating different images to create an entirely different look.


Thanks for stopping by, I hope that maybe this has inspired you to pull out your supplies and create something. 
-Ann