Showing posts with label Polyshrink. Show all posts

Wednesday, 2 April 2025

Tunnel Box Card with NEW JoFY products {by Martha Ponsanesi}


Hi everyone, it's Martha (@CraftingMarthawith you today.

Have you seen the new release of stamps and stencils by JOFY? I’ve fallen in love with them, those little monsters are adorable, and the Minis are each more beautiful than the last.
If you want to purchase any of these beauties, you can find a PaperArtsy Stockist here.


Since there are some birthday-themed stamps, I thought I’d create a tunnel box card, which gave me the opportunity to use several elements. Choosing from all these stamps wasn’t easy at all :) -  since it’s structured on multiple layers.


I got a bit carried away, taking stamps from one set and some from another, and also using different Minis and stencils... I really loved the new release! :)
I couldn’t resist using a lot of different colours of Fresco Chalk Acrylics for the backgrounds and going on you'll see also several Mattints used to colour the elements, both stamped on PaperArtsy Cardstock and... you’ll see later.

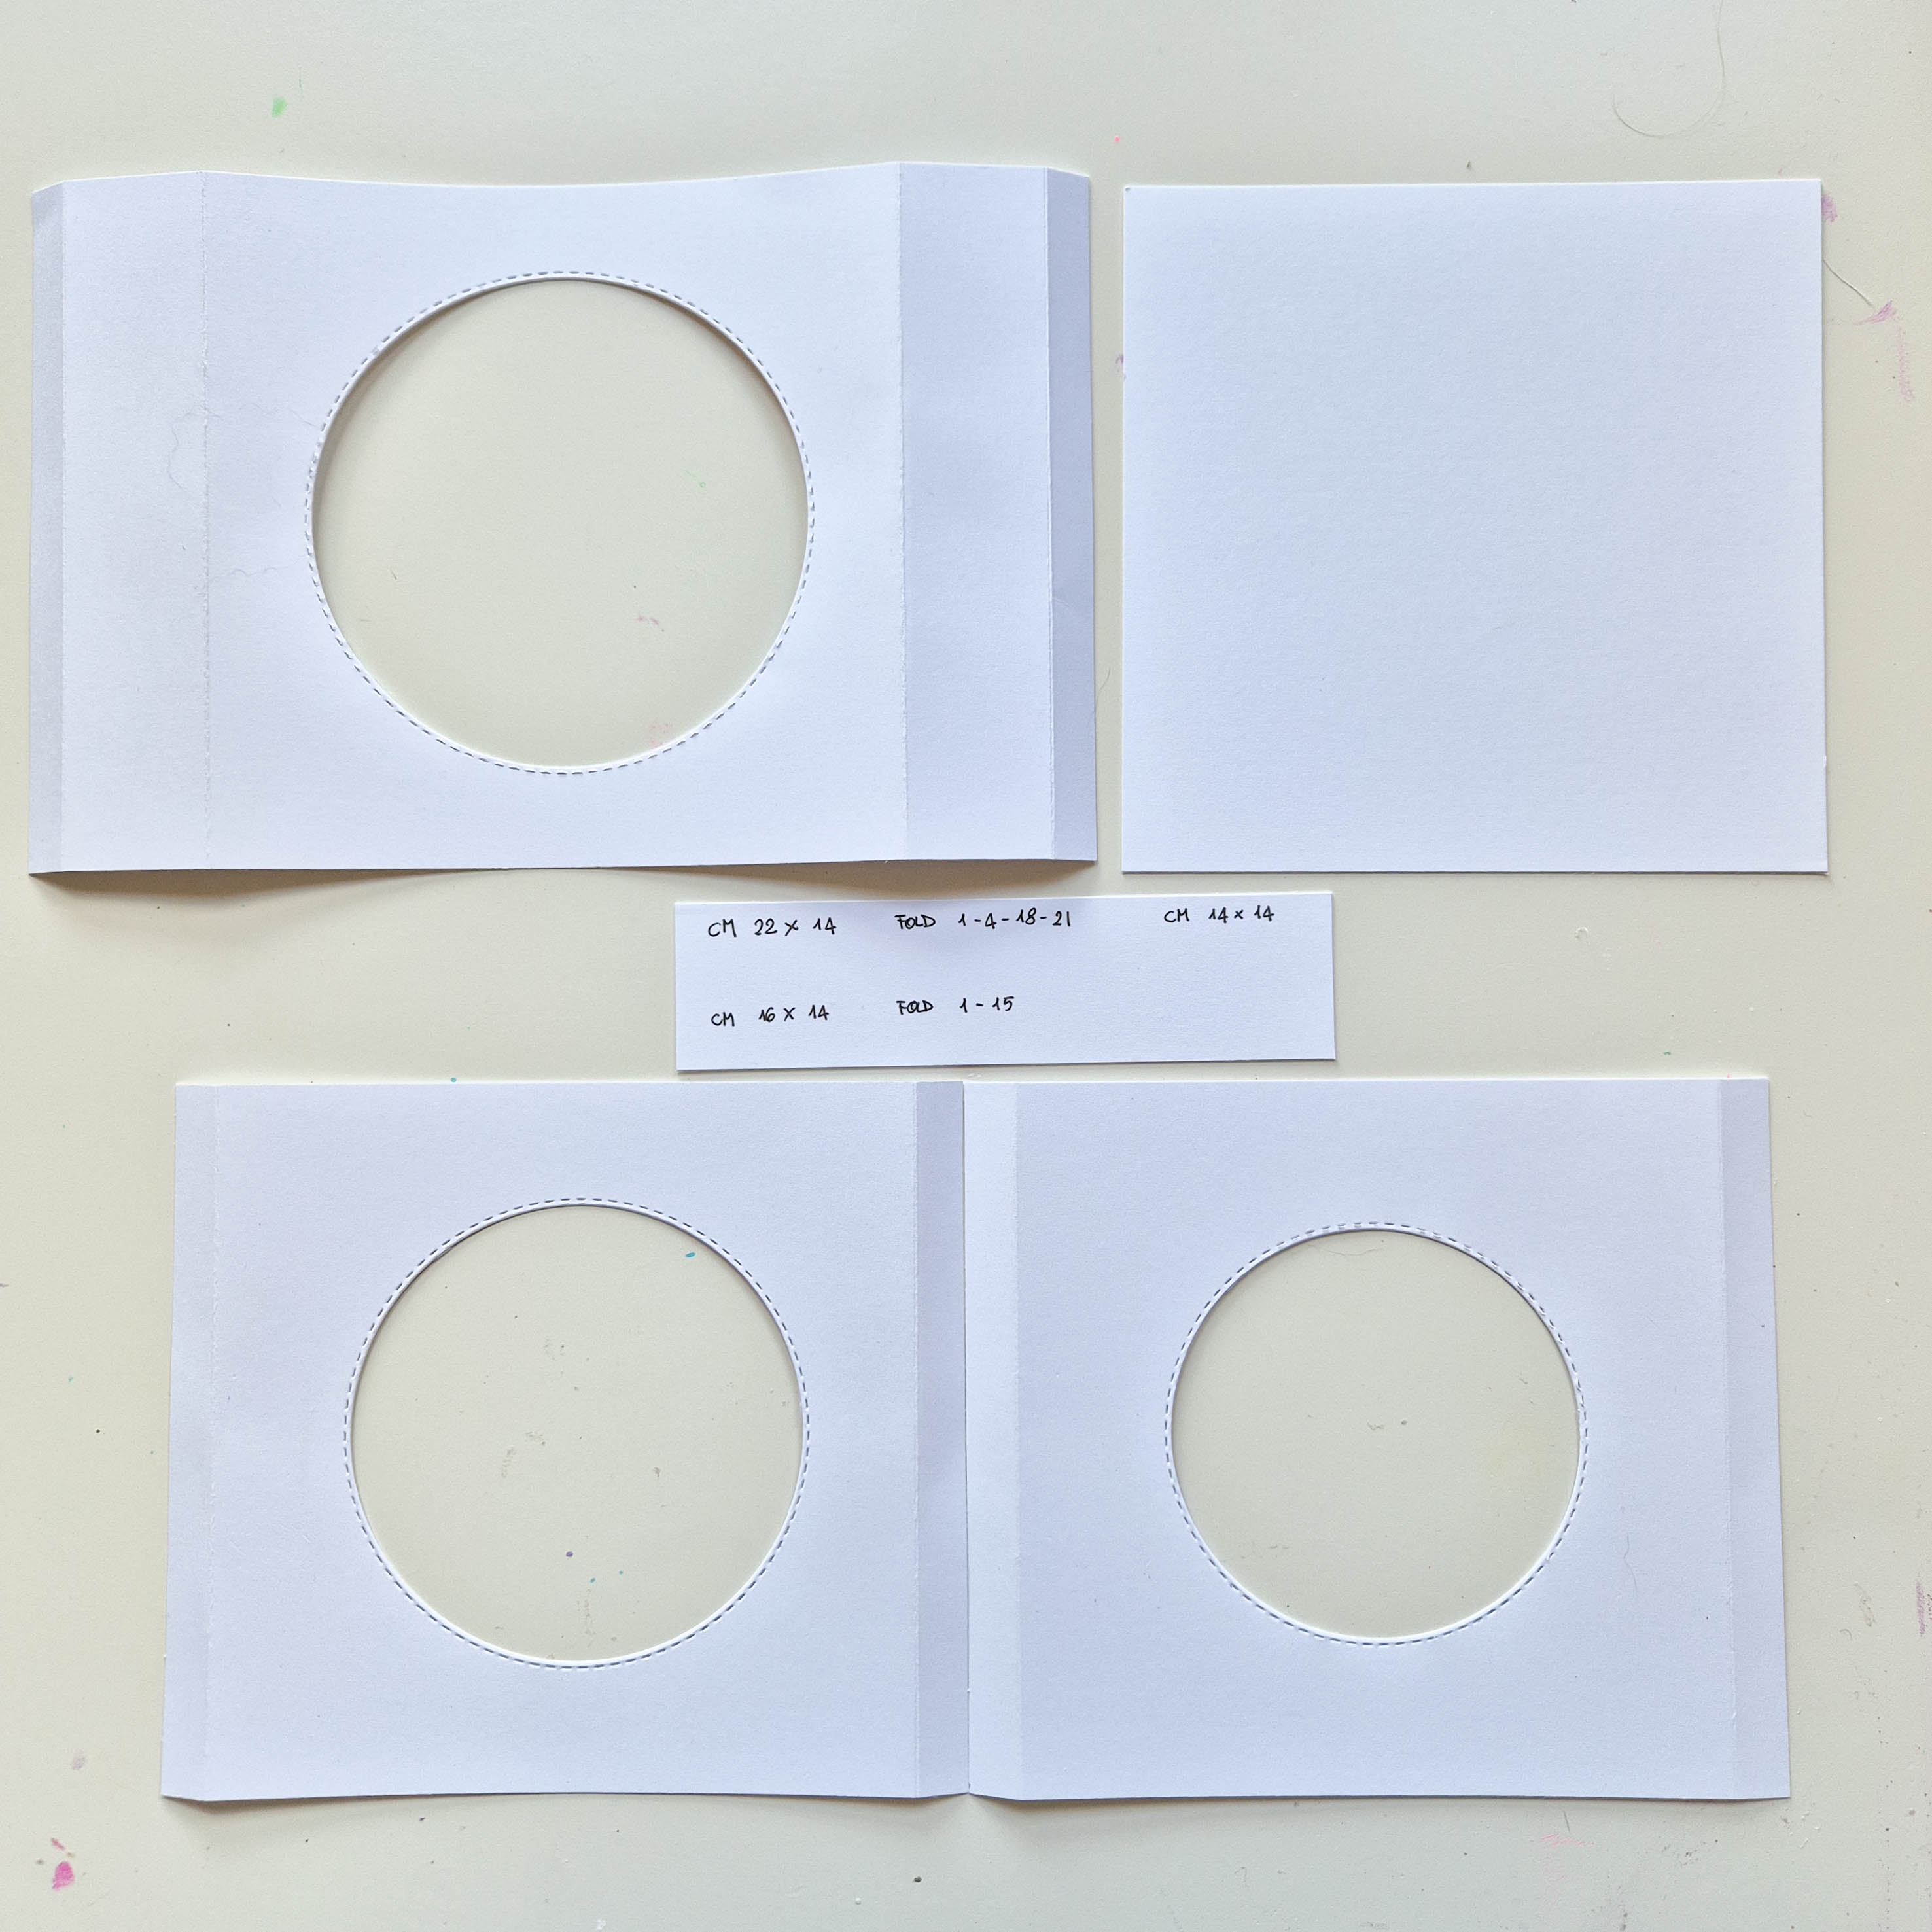

First, I cut 4 pieces from PaperArtsy Smoothy Card (SCA4) with the following measurements:
1pc 22 x 14 cm, 2pcs 16 x 14 cm, and 1pc 14 x 14 cm.
In the photo, you can also see where to make the folds. I then die-cut three concentric circles.


On each of the three cardstock pieces with the round opening, I blended a couple of Fresco Finish paints through the Stencils. For the first one (with the smallest hole) I blended with a sponge Fresco Chalk Acrylics in Parakeet (FF225) and South Pacific (FF45) through Stencil (PS461).


For the second one, I used Fresco Chalk Acrylics in Mustard Pickle (FF148) and Scottish Salmon (FF158) through Stencil (PS459).


For the last one, I used Fresco Chalk Acrylics in Berry Nice (FF216), Bubble Gum (FF116) and Ice Berg (FF165) through Stencils (PS459) and (PS461).


These are the three stenciled panels.


To finish the background, I also used some stamps (JOFY140) and (JM88).
Now that I have decorated the structure, I can assemble the various pieces to create my tunnel box card and focus on the embellishments.

To assemble the card, you simply need to glue the flaps onto the inner spine as shown in the pictures.

Now it's time to "populate" these layers with some monsters :).


First I stamped these delicious little monsters on some scraps of PaperArtsy Smoothy Card and embossed with Clear Embossing Powder...


...and then I roughly coloured with a little brush and some Mattints in Glow (MT01), Jam (MT05), Dragonfly (MT07), The Pink (MT08), Ladybug (MT12), Mojito (MT13), Acid (MT14), High Viz (MT15). I like using Mattints because, even though I'm not very skilled at coloring, when I use them, the results I achieve are satisfying to me.


However, my preferred colouring technique remains applying the cardstock directly onto the drops of colour: easy and always quite unpredictable :).


JOFY's monsters in the regular stamping set are quite big, so I was inspired to use one of them with Polyshrink.


I blended some Mattints with a sponge over the stamped image, and set aside to dry. The colours looks very pale, but when it gets shrinked, they'll look more vibrant.


I cut it with scissors, living space to make a little hole and transform it into a charm.


Using the embosser to create a charm with polyshrink is always a lot of fun.


I had tried coloring Polyshrink with Fresco Finish Acrylics too, which provide more coverage compared to Mattints. However, in this case, I preferred using the little monster colored with Mattints.


Now that I have enough cardstock and polyshrink embellishments, I can complete my card.


Here is the finished card, with all the layers, monsters and colours.


These adorable monsters along with the sentiments, other coordinated elements and stencils are the perfect companions if you are in the mood to party.
Maybe I'll try to make an happy birthday banner in the same mood of the card.

Have fun.
Martha xxx


Thursday, 4 December 2014

Matryoshka Tree {with JoFY and LPC Stamps by Julie Ann Lee}

Hello, it's Julie Ann here, delighted to be back at the PaperArtsy blog. I have a simple Christmas decor project to share, combining Lynne Perrella and JOFY stamps . Recently while I was visiting a trendy little cafe and gift-shop, I noticed some magical, Christmas branches: my creative cogs started to whir! Could I use PaperArtsy products to create something equally magical but not so pricey?

I started with a few twigs gathered on a winter walk, tiny pine cones and an empty glass bottle that had contained Bath Milk - probably from last Christmas! This was my chance to have a go at painting glass with Fresco paint!


I was totally bowled over by the coverage! I used a couple of  good coats of Antarctic with a touch of Lin Brown's Hint of Mint, randomly splodged and I painted the branches with layers of Antarctic, Lake Wanaka and just a hint of Limelight for a translucent lichen effect. All it needed for a winter sparkle was a sprinkling of Distress Glitter here and there.


I wanted the snow-flakes to appear to melt into the glass, so I stamped with JOFY Mini07 without a block. I used Lake Wanaka, sponging it onto the stamp with 'Cut-n-Dry' foam and acting quickly - before the paint could dry! With the paint still moist, I sprinkled the bottle with a little Clear Distress Glitter. This frosted effect looks great, but it doesn't show up in photos. 
JOFY Mini07

Time to adorn! I took some Polyshrink Shrink Plastic and lightly sanded it with a 'cross hatch' pattern of strokes. I then applied a diluted coat of Antarctic - if the Fresco is too thick or uneven, it can flake when it's heated. I then drew a drop shape around an image stamped from LPC016 by inking up the stamp with Jet Black Archival and carefully pressing
the paint side down onto the stamp.


 LPC016

I made a number of these 'drops', cutting around the shape I had drawn, punching holes at the top with a Cropodile and then - the magic - heating them with a heat tool until they shrank to drip size dangles. I edged them with Sapphire Treasure Gold and a smear of Glossy Accents, sprinkled with Distress Glitter.


My 'matryoshka tree' takes me back to the blue skies and glittering snow of Christmas 1987 when I was on my honeymoon in Moscow. I do hope you will feel inspired to create a glittering winter tree using Fresco Paints and PaperArtsy stamps. If you don't enjoy working with Shrink Plastic, you could alter little wooden ornaments to hang from the branches!

Julie Ann. 


A huge thanks to Julie Ann from PaperArtsy for this delightful project, what a stunning reminder of your time in Moscow. I think we are all enchanted with nesting dolls, there is something so romantic and ancient about them. The Fresco paints have worked beautifully on the glass and the snowflake stamp make the bottle look etched. 

We would love you to join in with the challenge. If you are inspired to action by any of this month's guests who have blogged in December 2014 then join in and link up your creativity HERE. You might win a voucher to spend on products of your choice from the PaperArtsy online store. You need to add your link by 17:00 (London time) Dec 31st 2014, the winner will be announced 2 hours later at 19:00, Dec 31st, 2014.

Tuesday, 30 September 2014

GD: Lelainia Lloyd Project #2 Hallowe'en Gift Box


"Hello everyone, Lelainia here with project number 2. Hallowe’en is my favourite holiday. It was my Gramps’ birthday and so it will always hold a special place in my heart. I could hardly be designing for PaperArtsy in October and not use their fabulous line of spooky stamps! Awhile back, a friend of mine, Penelope Harris taught me how to make a box using playing cards. As soon as I had it constructed, I realised that there was no way I had to limit myself to using playing cards-I could paint and stamp my own cards to make a fabulous boxes. This project is the result of those imaginings"!


I chose the Smoothy HeavyWeight White Stamping Card. It’s the perfect weight to stand up to painting, stamping and stencilling while also being strong enough to hold the box shape. I am in love with this paper!


I began by cutting 22 cards that measure 2 ½ x 3 ½ inches. (Standard ATC size) In order to make the most of each sheet of paper, I made sure I inserted my A1 sheets into the paper trimmer so that they lie this way: I wanted the longer edge of the paper (the 11 ¾  inch side) parallel with the bottom of my paper trimmer. Once I had my paper positioned this way, I cut 3 strips 2 ½ inches. I cut the remaining strip 3 ½ inches. Next, I cross cut the 2 ½ inch strips by 3 ½ inches. This gave me two cards per strip. For the 3 ½ inch strip, I cross cut at 2 ½ inches. This strip will yield 3 cards. When I was done, I had a total of 9 cards, all measuring 2 ½  x 3 ½ inches. I repeated this process for the second sheet of paper. For the third, I only needed to cut three 2 ½ inch strips & then cross cut at 3 ½ inches. This leaves a bit of the third sheet left over. I cut a few extra cards in case I made a mistake along the way.

 
Next, I rounded the 4 corners of the entire deck of 22 cards using a corner rounder. This is an important step, so be sure not to skip it-it helps the box slide together smoothly.


I counted out 12 cards and set the rest aside. I folded each of the short ends of the 12 cards (top & bottom) over by 3/8 of an inch. I measured the 3/8 of an inch and made a score line using a stylus on both sides of each card. Once all the cards were scored, I folded the ends over and used a bone folder to make a good clean crease.


I went ahead and painted each of the 12 cards with Tango and Autumn Fire and then layered Snowflake over top using The Crafter’s Workshop Mini Sketch Grid stencil. I think this is my all-time favourite stencil now. What I loved about it is that when used with the Snowflake paint, it gave my cards just the right amount of light to make the stamped images pop.


Then I counted out 6 cards from the 12 I had just painted. These cards will form the outside of the box-4 sides, the top (lid) and the bottom. I unfolded the creases to have them lie flat but made sure they were all facing in the portrait direction. (Short ends up and down.)  I stamped these 6 cards using HPHW04 and HPHW02. When I was finished stamping, I re-creased the folds, using my bone folder. It's important that the creases be really crisp.


I took the remaining 13 cards and folded each of them in half, creasing them with the bone folder.


I flattened them out again and then painted them Little Black Dress where the crease is. I painted over the crease line and about 1 inch either side of it. There is no need to paint the entire card as you will only see the crease because these cards are going to become the hinges that hold the box together.


{Assembling the Box:}

First I took one stamped card and one stencilled card. See how the stamped card has the folded flaps left and right and the plain stencilled card has them top and bottom. I made sure this was the orientation I was using to lock them together as a single unit.

 
I just tucked the flaps in at the top and bottom to interlock the two cards. At this point, I put my interlocked units under a stack of heavy books overnight to help the folds lie flat. I don't recommend stacking the units one on top of the other, as the paint will still be ever-so-slightly tacky and you risk having them stick to one another.


Once the interlocked units had been flattened overnight, it was time time to assemble the box. I began by sliding one of my hinge pieces into the gap on the side of one of my interlocked units.


Next, I slid another interlocked unit onto the other side of the hinge piece to connect them. I added another hinge to that unit's gap.


I slid another unit onto that hinge. Now I had 3 sides connected. I added another hinge.
When I had the 4th unit attached, I added another hinge to the remaining gap and use it to close the box into a proper square.


Now that the box was a square, I flipped it upside down so I could add the bottom.
I took the interlocked unit I wanted to use as the bottom and put a hinge in each side of the gaps, all the way around.


I slid the top hinge into the box bottom and tucked the edges into the gaps on the left and right.


I turned the box around to face me and gently worked the other hinges into the gaps.


Once all the hinges were in the gaps, I gently pushed down, slowly to slide the bottom into place.


Finally, I added the last hinge to the gap on the top of the interlocked unit I wanted to use for the lid. I worked the hinge into the top of the box and slid it down gently.


While I had my Staz-on ink out, I stamped Minis MN77 onto a piece of PolyShrink. Quick tip: Place the stamp ink side up and then lay the PolyShrink on top and gently smooth it with two fingers. This creates a clear image. I cut around the image leaving a very scant white border around the outside. (I cut mine so that it had a coffin shape to it, just for fun.) I lay the image on a Teflon sheet and used my heat gun to shrink it.


Next I wanted to make a small hole in the top of the charm for a jump ring to go through. I used this little gizmo I have for hand drilling, called a two hole metal punch. It's super handy for drilling holes in just about anything. If you don’t have one, you could also use a teeny tiny Fiskars 1/16 hole punch. I also own one of those and it makes a very tiny hole, the perfect size for jump rings. I added 2 jump rings to the PolyShrink charm so it would hang properly.


I cut a 3 inch piece of ribbon and threaded it through the top jump ring. I put a piece of double sided tape between the fold of the ribbon so that it would stay nicely folded and to give it some strength. I put a piece of double sided tape on the ribbon at the top on both the front and the back and then slid it between the front gap in the box lid. Once I had it centred, I smooshed it to make sure it was stuck to the inside of the lid securely. The charm becomes a tab for opening and closing the box.


As a final touch, I wanted to add some paper grass to cushion anything I put in the box, so I tore some pages out of a book, sliced them in skinny strips with my paper cutter and then scrinched them up in my hand a bit to help give them some loft. I tucked them into the box. When I am ready to give the box to someone I'll filled it with Hallowe’en candy and it’s good to go!


Wasn’t that fun?! I've shown you mine, now it's your turn .... I do hope you give this a try.I will be back tomorrow night with my final project of the month.


~Lelainia~

A huge thanks from Team PA for sharing this spook-tac-ular step by step project with us all. This is the ideal gift to have on stand by for all the little trick or treaters. The addition of the Polyshrink tag is the perfect finishing touch.


We would love you to join in with our monthly challenge. If you are inspired by any of this month's guests who have blogged between Oct 1st 2014 and Oct 31st 2014 then join in and link up your creativity HERE. You will go in the draw to win a voucher to spend on products of your choice from the PaperArtsy online store. You need to add your link by 19:00 (London time) Oct 31st 2014.