Showing posts with label Julie Ann Lee. Show all posts

Wednesday, 15 March 2017

2017 #4: Tiny Hinged House {by Julie Ann Lee}

2017 #4: Doors, Windows and Architecture

Julie-Ann's penchant for miniature art is always such a delight to behold, and tonight's post features another of her tiny house treasures. Nothing could be more appropriate as we explore this fantastic structural theme.

Hi everyone, Julie Ann from Magpieheaven here.

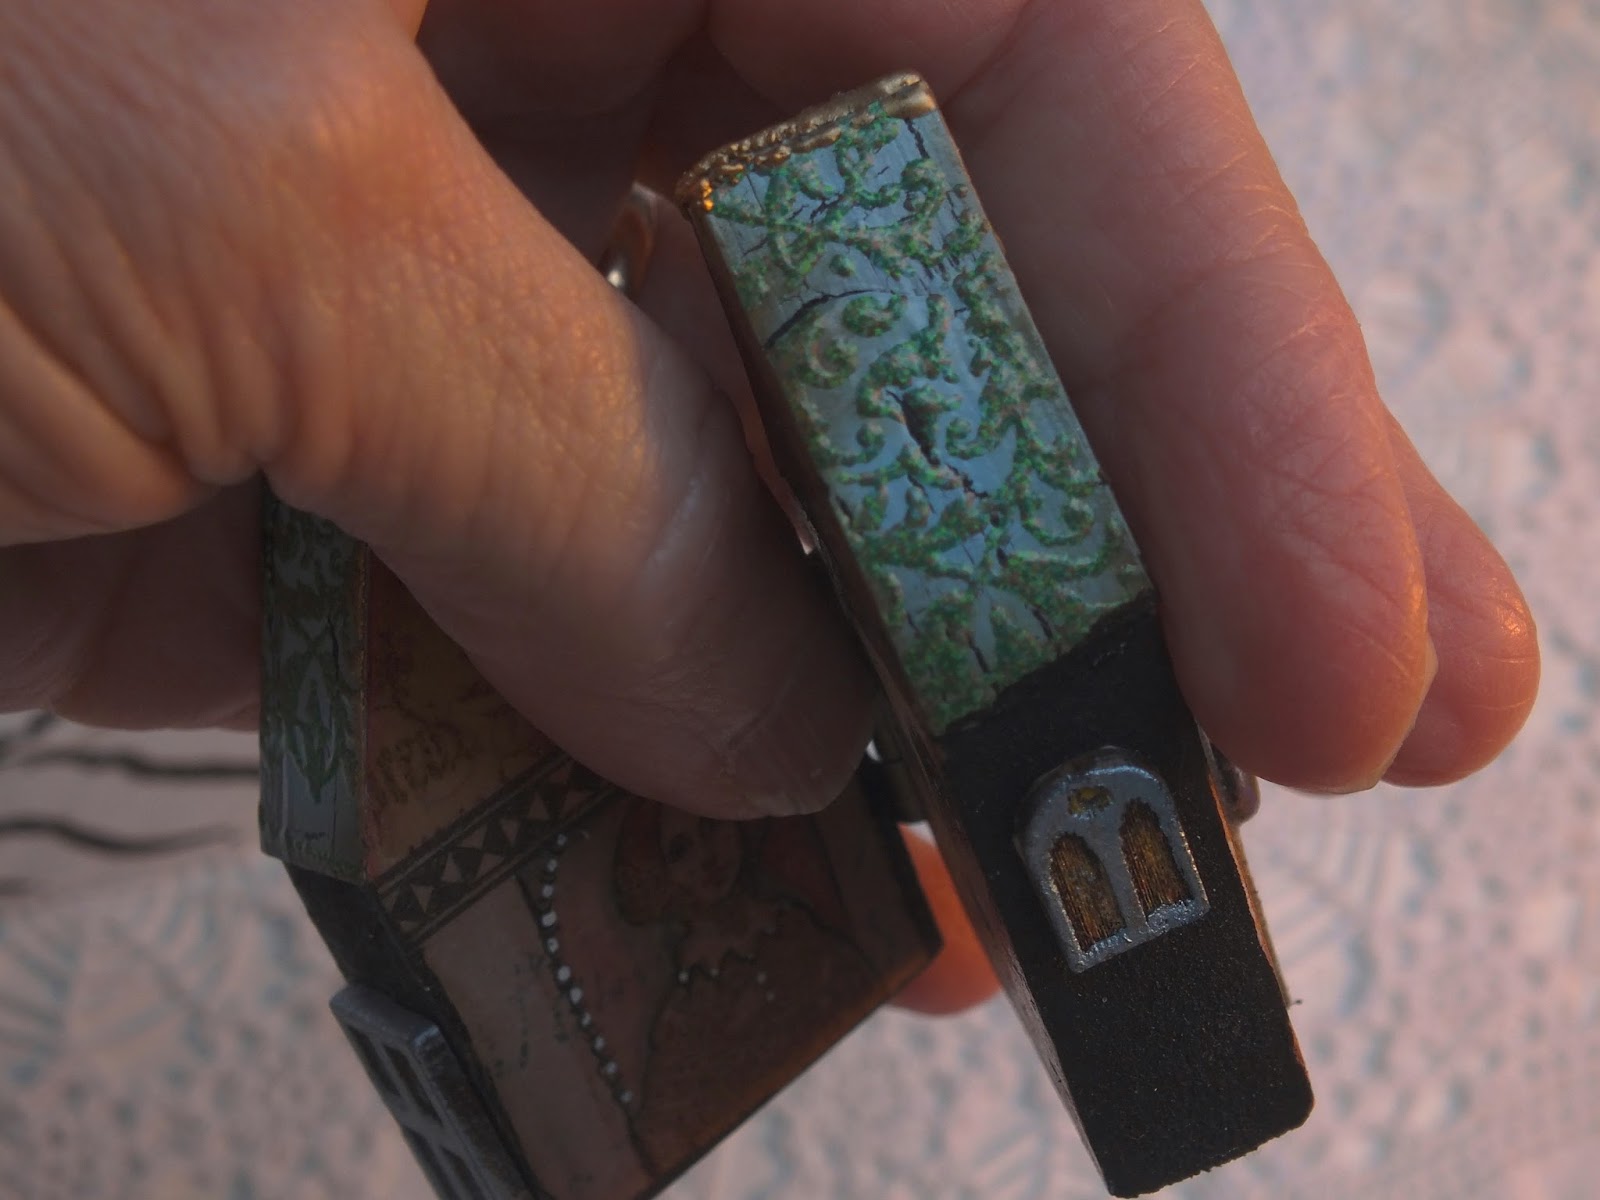
I'm delighted to be here on the PA blog tonight. When I saw that the topic for this fortnight was Doors, Windows and Architecture, I jumped at the chance to explore an obsession of mine: doors and windows into the past. I love creating little houses and since discovering that I can not only cut out my own shapes from MDF; but also connect them with dolls' house hinges, I've been eager to show you an experiment in combining my own artwork with Ink and the Dog stamps on tea-bags and miniature hinged houses. The end product is a kind of hinged-house shrine to my ancestors that I can fit into the palm of my hand.


The texture of dried-out tea-bags takes Archival ink and water-colour so beautifully and they have that vintage look. I've often thought they would be perfect teamed with Ink and the Dog stamps. Since I've been researching my family history, I wanted to create a miniature that looked old and mysterious - a house of secrets!


This is the moment when I can allow my imagination to take me inside those magical doors of possibility! I have stamped out my images in Coffee Archival; gathered some sheets of designer Paper, smoothed and gesso'd my house shapes and I'm ready!


I was so excited by the effect of this little group from Ink and the Dog, Buttons, Plate 4 ...


...on this stained tea-bag. I never tire of the sheer joy at seeing the effect of images stamped on different surfaces. At least one of those ladies was going to find her way into my miniature house.


Even at this early stage, when I am attaching paper with Matte Medium and filing off the edges, I feel the occupants of the little house beginning to make themselves known. This is Annie, the lace-maker who dreams of some day creating the lace for her own wedding gown.


Once the paper and tea-bags are smoothed into place and the edges neatly sanded, I can begin to add detail, playing with different embellishments. I discarded this little window frame in favour of something smaller, but experimenting with different additions until you are satisfied with the effect is so much fun.


Ink and the Dog Schooldays, Plate 1 ...


...on tea-bags, over Chatsworth paper with a hand-drawn face looked like it might just work!


For an aged look to the roof, I created some Crackle Glaze strips, using Blue Oyster Fresco over Little Black Dress and embossing with a Verdi-Gris embossing powder and the decorative border stamp from School Days 1. Sponging with Coffee Archival and melting gold UTEE along the joins provided the finishing touch.


These words from Ink and the Dog, Letters, Plate 5 ...


...have always intrigued me and now they seemed perfect for the door that opens onto Annie's house.


Were there things Annie left unsaid to Judah, the taylor, who became her husband? Are her hopes and dreams there in the fading writing on the walls?

Thank You so much for stepping inside Annie's house. I was so pleased with the effect of stamped tea-bags over patterned papers. You might like to cut out your own miniature houses from sheets of MDF, if you have access to a band saw, but there are lots of wood and MDF house shapes out there that you could decorate,using PaperArtsy stamps. If you've been exploring your family history, why not create a little house using stamps and real ancestor photographs and re-create the architecture of your past?

I'm so looking forward to visiting your blogs to see what you come up with for this topic.
Julie Ann.
Magpieheaven:
Facebook:
Twitter:- Julie Ann Lee @woletz1
Pinterest: Julie Ann Lee @Pinterest

The story you weave of Anne, and her dreams really brings this little house to life. It is so easy to imagine a row of neighbours, each with their own hopes and dreams to share with the creator. Thanks Julie Ann for sharing your delightful insight and talent. ~ Leandra


We always hope that you  learn something interesting from our blog. Our bloggers deeply appreciate your comments so much, so please take time to let them know you've been inspired! Why not join our challenge by blogging your interpretation of the current topic and link it here?

The current topic link will close 17:00 (London Time) Sunday, XXX 2017, and the winner will be announced 2 hours later at 19:00.

All links go in the draw to win a £50 voucher to spend on products of your choice from the PaperArtsy online store.

Monday, 8 August 2016

2016 #15 Trinket Goblets {by Julie Ann Lee}

 2016 Topic 15: Patterns - Trinket Goblets

Hi everyone, Julie Ann here from Magpieheaven.

Tonight I'd like to share a post about Patterns.When you were a child did you ever daydream and see faces in those floral patterns on the curtains, or the carpet? The more I thought about pattern, the more I began to think that our life is about patterns: sleeping, waking and opening our eyes wide to find patterns in the world.

I love the patterns in flowers and plants so I chose to work with Lin Brown's beautiful Eclectica stamps for PaperArtsy, ELB16. Ever since I saw Darcy Wilkinson's exquisite little papier-mache tea-cup here. I wanted to have a go at creating with papier-mache and playing with pattern on my finished piece. I've created three little trinket goblets that reflect the pattern of sleeping, waking and living and that - I hope - evoke friendly faces peeping out of the leafy curtains!


Step One:This project uses all recycled materials, apart from the wonderful PaperArtsy products - of course! I began by drawing three little faces with a Micron pigment pen. It's very important to use pigment pen if you're going to draw your own faces for this project and that you heat-set them with a heat tool, as you don't want the lines to run when you apply Satin Glaze to them. If you use stamped faces, heat set the ink you use in the same way. I drew the faces onto white tissue wrap that came with some packaging and painted it with a little Nougat Fresco and a touch of water-colour pencil.


Step Two: I put these aside, took three of my treasured Chinese tea-cups and lined them with cling-film. I had some old music books I'd found in a charity shop, so I tore these into strips; made up a nice, messy potion of 2 parts PVA glue to 1 part water; soaked my strips and moulded them carefully into the tea-cups. I created one layer, waited until this dried, added another and then, when that dried, a third. This process took me about four or five days until the cups lifted out of their 'moulds' and they were firm and dry. The cling-film peels away very easily.


 ELB16
Step Three: While my cups were drying, I painted some more of the tissue with a blend of diluted Teresa GreenZucchiniGranny Smith and a mix of Brown Shed and Snowflake. I stamped with ELB16 in Ranger Coffee Archival. I wanted to create subtle colour, as my plan was to allow the music notes on the goblets to show through in places.


Step 4: Now the fun begins! I painted my cups with a blend of Satin Glaze and Inky Pool to create a blue glaze rather than a colour as such and applied this to my cups. When this was dry, I painted areas with more satin glaze where I wanted to stick a pattern of cut out faces and Lin Brown petals/leavesI carefully smoothed out as many wrinkles as I could before giving a top coat of Satin Glaze. The tissue is remarkably tough once it's been painted with Frescos, but if it does tear it's possible to piece it together.


Step 5: You can probably see that I wasn't able to eradicate all wrinkles as I smoothed the tissue around the curve of the cup , but I wasn't too concerned about this


Step 6:  My cups needed something more and as I glanced around my craft corner, I noticed 3 empty wooden spools. I had one of those 'light-bulb' moments and exclaimed 'Goblets!' Probably anyone who heard thought I'd gone completely mad! I could have decorated these, but I rather like the natural wood contrast. For a finishing touch, I painted the insides with 2 coats of Little Black Dress. Finally I applied a coat of Pearl Glaze to give an interesting finish and rounded off with a narrow line of painted and embossed copper foilwhich I had over from another project.


When I'm working, especially on miniature projects, I like to have my bits and bobs to hand in little containers, as they so easily go astray. Now I'll have three pretty patterned goblets reminding me of natures's patterns.


You do need to be patient as you wait for your little cups to dry, but I thoroughly enjoyed creating something from recycled materials that I could use to keep trinkets and tiny pieces of collage paper or charms to hand - you could even wind some twine or ribbon around the stems so you have that close by too. You could try creating all kinds of patterns on papier-mache cups or bowls, collaging with stamps of faces, flowers and abstract patterns - the possibilities are endless. The child in me loves making a gloopy mess with the PVA potion, but it's really important to wear old clothes and an apron and cover your work area thoroughly with a project like this, as the glue mixed with water drips everywhere!
Thank you so much for dropping by today. I do hope you'll have some fun creating patterns and enjoy all the wonderful patterns around you. 

Julie Ann @ Magpieheaven and Twitter woletz1.

Oh Julie Ann these are fabulous, I love how you took inspiration from my teacup and totally made it your own. These goblets are so creative. Finding faces in foliage and clouds is something we all do, and here you have brought them to life ~Darcy

We would love to see how you interpret this Patterns topic by linking what you make to our 2016 Challenge #15: Patterns, on this page HERE.
All of our bloggers love to see your twist on their ideas,  particularly if you were inspired directly by their post. 
All links go in the draw to win a £50 voucher to spend on products of your choice from the PaperArtsy online store. The Patterns link will close 17:00 (London Time) Sunday, Aug 21st 2016. The winner will be announced 2  hours later at 19:00.

Friday, 27 May 2016

2016 #10 Hippy Doodle Cards {by Julie Ann Lee}

 2016 Topic 10: Doodles

Hi everyone, Julie Ann of Magpieheaven here.

Tonight I'd like to share with you a post about doodling, which has always been a passion of mine. Whether I'm on the phone; in the Dentist's waiting room or meeting a friend for a coffee, you'll see me compulsively scribbling away on scrap paper, a napkin or the back of a magazine. A little while back I decided to stop discarding what I had scrawled on the back of envelopes and old receipts and decorate projects with it. 

This project is an example of how you can use doodles around PaperArtsy stamped images to create unique greetings cards. You've probably created some quirky and individual designs yourself that should have ended up on cards, canvases or journals rather than in the bin!


Step One: I started with a print-out of a little caricature of my own; but - if you prefer - you could use a stamped and coloured image of a face with a doodled embellishment. I gave Florence, the anxious Flower Child a doodled head-band.


Step Two: As you can see, I used a Craft Card blank and I stamped some of my favourite Sara Nauman script from ESN10 in Snowflake Fresco as a border. Often I find myself doodling around some existing text or patterns and Sara's circles, also from ESN10, make the ideal starting point for some 'stream of consciousness' art! I stamped these in jet black Archival ink.
ESN10 

Step Three: Now for some doodling around the stamped images. I used Micron Pigma pens and Inktense pencils to create these leafy 'Peace' symbols and Hippy friends to reassure anxious Florence. The white highlights are created by dipping a cocktail stick into some Snowflake Fresco and adding little white dots.


Step Four: It's also fun to add doodles to a brayered and sprayed background and the addition of some Infusions, fixed with Satin, Metallic or Pearl glaze would be effective! For this card, I brayered with Snowflake and slightly diluted Smurf, before spraying with Inky Pool and adding spatters from a toothbrush dipped in Inky Pool. The basic technique of using an Opaque with a spritz of translucent works really well for a background like this.


Step Five:  I used Part of the sentiment from Sara's ESN10, stamped in Inky Pool with clear embossing on some pre-prepared 'master-board'. White embossed circles complete this variation on the theme of Florence and her Hippy faces!


Step Six: Gold embossing can help create an impression of doodle links in a golden chain! I also enjoy playing around with the positioning of the eyes to create different effects.


Sometimes I find creating cards a chore, but these cards were so simple to create and doodling around a stamped image is so relaxing and such fun that the process was a pleasure. Once your surface is dry, Frescos are easy to doodle over with Pigma pens like Micron and you can achieve great effects with water-colour pencils, so why not find a simple stamp shape that you like, stamp it out in ink or paint and have a go? This kind of doodling should work well on Mail Art envelopes and journal pages too and you could use it on little gift tags or boxes to make your package really individual and coordinated.

Thank You so much for joining me tonight. You can find out more about how I created these cards and others like them if you have time to hop across to my blog Magpieheaven and you can find me on Twitter, woletz1. Wishing you a lovely creative weekend, full of doodling!

Wow Julie Ann these cards are wonderful.  With your doodles full of personality you have created really unique pieces. i love the faces in the rings, so quirky. Poor Florence really does look anxious, but she needn't be, her headband is very pretty. ~Darcy

We would love to see how you interpret this Doodles topic by linking what you make to our 2016 Challenge #10: Doodles, on this page HERE.
All of our bloggers love to see your twist on their ideas,  particularly if you were inspired directly by their post. 
All links go in the draw to win a £50 voucher to spend on products of your choice from the PaperArtsy online store. The Doodles link will close 17:00 (London Time) Sunday, May 29th 2016. The winner will be announced 2 hours later at 19:00.

Wednesday, 23 March 2016

2016 #6 Plaster Wrap Seascape Canvas {by Julie Ann Lee}

 2016 Topic 6: Liquid Sculpting Medium

Hi everyone! It's Julie Ann from Magpieheaven here.

Tonight I'd like to share with you a 7" x 5" chunky canvas I created using strips of Plaster Wrap also known as Modroc.

From the moment I learned about this material, on a workshop with Mary Jane Chadbourne last Summer, I was hooked! It's an inexpensive and magical way to bring dimension and texture to a canvas and it works brilliantly with Fresco Finish Paints and Treasure Gold, which highlights every peak and swirl. 

I love to create wild seas with foam and crashing waves and in my canvas I've included a tiny MDF house inspired by Mary Jane's Tinytopia class. Do you ever feel that your craft-room, studio or crafting space is a haven where you can take refuge from the busy, clamouring world around you? Well, this is the theme of my Modroc canvas with the Craft-room Fairy inviting you in!


Step One: Plaster Wrap comes in a thick roll. You need to cut strips from this with good, sharp scissors. As you can see in the photo, I've put a towel over a plastic table-cloth, as this is a messy and wet process. I use an old ice-cream container for my supply of hand-hot water and I keep a supply of baby-wipes close by, as your hands become covered in the plaster. The first step is to soak the strips in the hot water and squeeze them a little, before attaching them to the canvas, moulding and building them into the effect you want to achieve. No glue is needed and there is time to sculpt the strips as you go before the plaster dries.


Step Two: Below you can see how I created something resembling a choppy sea with only the Plaster Wrap and the hot water! I like to extend the plaster strips over the sides too. Now you have to be patient - something I find quite difficult when it comes to crafting - and leave the canvas to dry thoroughly. I usually leave it overnight. You can tell you're ready to go on to the next step when the plaster has morphed from a greyish white to dazzling, washing powder commercial white!


Step Three: While you are waiting patiently for your Modroc to harden, it's time to think about a background. I wanted my little art studio to be nestling in enchanted woods. I like backgrounds to be whimsical, creating a suggestion of ethereal lands beyond the canvas and I think Urban Snapshot stamps are perfect for creating this effect. They are absolutely lovely for stamping with Fresco Paints. I used China, Granny Smith and Inky Pool on tissue paper with USNT3 on some white tissue wrap. I had fun over-stamping with three different paint colours. There's also some stamping in coffee Archival Ink too and a little moth that I decided to keep for another project.


Step Four: Now, thanks to the magic of Blogland, we can fast forward twelve or so hours when we're ready to work on painting and sticking! I painted with a blend of Satin Glaze, Snowflake, Space Cadet, Smurf, Mermaid, Blue Oyster and Antarctic with a touch of Inky Pool on the edges to add depth. Similar colours are reflected in the waves, but there are touches of Winter Green and Turquoise in the depths. The grassy bank is a combination of Teresa Green, Granny Smith, Limelight and Winter Green.


Step Five: I attached my torn tissue trees with PaperArtsy Satin Glaze with the tiniest drop of Smurf added. The trees and the script stamps were extended over the sides and top of the canvas. The fluffy clouds are cheesecloth - another of Mary Jane's great ideas! Once the basic painting is done, you can 'touch up' with some mark making with a brush for the grass. I've also added some touches of Chocolate Pudding for the earth.


Step Six: All that was left to do was to add my welcoming little Craft-room fairy. I created her using my own artwork, collaged with a scrap of Chatsworth paper, a detail from an old map and can you spot a tiny section from ESN07 stamped onto a scrap of paper for a door? 'The Woods' is part of a quote from Robert Frost on USNT4, stamped onto card painted with Mermaid.


I thought you might like to see a detail of how the design is continued over the sides of the canvas too.


I hope you've been inspired to create your own little canvas world using Modroc. I love how sculptural this technique is - it's easy to create something that seems to invite the onlooker right in. I particularly like the potential for moulding waves, but this material is so versatile I've found it works for simulating everything from drapery to a rocky landscape. I'd love to see where your imagination leads you with this one! Combining Plaster Wrap with different PaperArtsy stamps and the wide array of Fresco Colours opens up so many possibilities.

'Bye for now from Julie Ann at Magpieheaven, Twitter, woletz1.

I have heard of people using modroc for this purpose , but I've never actually seen an explanation of how to before! This is fabulous Julie-Ann! And the perfect finishing touch is one of your gorgeous tinytopia people - they are superb! Thanks so much for sharing in detail the process!! Very, very helpful! ~Leandra

We would love to see how you interpret this topic by linking what you make to our 2016 Challenge #6: Liquid Sculpting Medium, on this page HERE.

All of our bloggers love to see your twist on their ideas, particularly if you were inspired directly by their post. 

All links go in the draw to win a £50 voucher to spend on products of your choice from the PaperArtsy online store. The Liquid Sculpting Medium link will close 17:00 (London Time) Sunday, April 3rd. The winner will be announced 2 hours later at 19:00.

Friday, 19 February 2016

MORE NEW PA Products {March 2016} Elizabeth Borer

Hi Everyone, Leandra here with some beautifully detailed new stamps from Liz Borer tonight

Liz is ever so clever when it comes to drawing flowers, and this time she doesn't disppoint. These flowers can be draped easily around frame, or to ground a collage, and the quotes are such a fabulous addition. For those of you who are colouring aficionados, you will love adding depth and shade to these designs!

Here's a video introduction of these stunning stamps. I introduce the stamps and show samples featured below! It's great to see the 3D effects on the video which you can't see in a photo so easily!


So lets take a closer look at the actual stamps


As ever, we always have some super talented crafts who volunteer to help us work with our newest stamps.  I'll hand over now to Liz who will introduce her support crew tonight, and has some of her own work with these new stamps to show you too. Enjoy ~ Leandra

Hi everyone, Elizabeth Borer here to show you my newest stamps designed for PaperArtsy.

Leandra and I discussed adding more flowers for this release, but in a way that they could be layered or turned in all directions with ease. I love quotes, and so it was hard to choose from my acquired favourites a short list for these, but we decided a larger size would prove the most handy

Let me introduce my wingmen who have been super, along with Lauren, who has been my tech administrator too on this occasion!
 
Tonight we start with Lesley Ebdon.  

Lesley takes a fairly clean and simple approach to her mixed media art. Her placement is always spot on and she has a keen eye for detail.


'Wild Flowers' using EEB07 by Lesley Ebdon 

As soon as I saw this gorgeous Morning Glory spray, my first thought was chintz and the lovely flowery sprays on my Grandmum's faded bedroom wallpaper when I was a little girl.   I love the addition of quotes to this new release too.....so useful!

'Nature Doesn't Hurry' using EEB08 by Lesley Ebdon
One of my favourite things to do is decorate 3D items such as boxes, picture frames, mirrors, etc., and Elizabeth's stamps are perfect for this purpose. The images are perfect for mixed media projects and they look beautiful here stamped in white and layered up.

'Morning Glory' using EEB07 by Lesley Ebdon

I wanted to show that this beautiful Morning Glory image could be kept simple if required. I chose to brayer a rough background but I still couldn't resist stamping a few single flowers and cutting them out though, lol!

'With a  Flourish' using EEB08 by Lesley Ebdon
I love the flourishes Elizabeth has included in both her new stamp sets and have a few ideas brewing to use them as a main feature on projects but I kept it in the background this time so I could use the stunning double flower stamp from EEB08 over Stampbord.

Next up we have Lauren Hatwell.

Lauren tends to be known for her quirkier side and her zany creations so I wasn't sure what she was going to come up with. I'm so pleased to see she has clearly enjoyed colouring and layering all the images to create her samples. 

'Grafitti Wall' using EEB07 by Lauren Hatwell

Oh what a lovely time I had colouring and fussy cutting these gorgeous blooms for this project. I love the way they tumble across the page. Each one is so beautifully and delicately drawn. You can't help but be entranced by them.

'Flower Girl' using EEB08 by Lauren Hatwell

I love these beautiful frilly flowers and the lovely curly flourish. They were an absolute joy to colour in and layer up. There are so many other things I want to do with these stamps. I think they'd make beautiful cards and they're perfect for journal pages. I'd like to stamp them onto a dictionary page and colour them too.


Our third contributor tonight is Julie Ann Lee.

Julie Ann is a talented mixed media artist with a highly individual style. She enjoys drawing and includes a lot of her own artwork in her designs, so I really enjoyed seeing how she used the stamps to embellish one of her faces

'Art Nouveau Greetings' using EEB08 by Julie Ann Lee

Liz's stamps have such life and movement: the flowers look as if you could just reach out and touch their velvety petals. I wanted to embrace that idea with a 3D effect and some texture. There are details of how I created these cards and hangings on my blog here. I wanted to see how these delicate little flowers would work with a master-board that echoed their fluidity in a more abstract way. It was a joy to work with such detailed and elegant designs, which I can't wait to see gracing 3D projects like decorated boxes or glass bottles and jars.

'Kraft Card' using  EEB07 by Julie Ann Lee
I enjoyed experimenting with these blooms on Kraft card and with book text. I'm really excited at the possibility of incorporating them into journals and altered books too.

Next I wanted to see how these lovely Art Nouveau style stamps would look on little MDF hearts. I couldn't resist using the flowers with a face I had drawn onto Vanilla Crackle. It would be fun to match them to stamped faces too. I was really excited to see how the flowers worked on Shrink Plastic.

'MDF Hearts' using  EEB07/08 by Julie Ann Lee

The delicate and detailed flourishes and flowers are great to team with embellishments like these little birds and roses.


So now it's time to show you what I've made with these new stamps. I've got a few step outs so you can see exactly how this all came together.


Project One: Floral Fan using stamp sets EEB07 and EEB08 by Liz Borer

For my first project I made a floral fan 


I painted the background with Nougat Fresco Finish Paint and, when dry, used low tack masking tape to add stripes using Blush and Very Berry. 


Then I stamped the flourish with Mushroom pigment ink. I used this colour because it is neutral and creates a non obtrusive background.

 
Next, I cut several wedge shaped pieces of card and used a corner punch to decorate the edges. I then stamped the flowers from EEB08 onto the card.


I stamped the flourish randomly using mushroom ink again over the wedges.I painted the background with Wintergreen mixed with Matt Glaze to make it transparent and then painted the flowers with Blush and Very Berry.  I also stamped and painted two single flowers, which I cut out. I stuck the fan pieces onto card painted with Plum and cut out around the edges to create a border .


To complete the project I attached lace onto the background and then attached the fan pieces as shown. I added some ribbon at the base of the fan and then attached the two single flowers over the ribbon. I finished the fan by sticking gold seed beads to the centres of the flowers.

Project Two: Wild Flowers using stamp sets EEB07 by Liz Borer


I painted the base with Wintergreen and then dabbed Plum, Very Berry and Blush onto the base using a wet wipe.
 

Then I stamped the flowers and swirl from EEB07 onto the background. I used masks over the images to create a curved area of flowers. To hide the background I painted Chalk onto the flowers. There is one flower in this picture that I have painted in this way.


The leaves were painted with a paler green (a mixture of Wintergreen and Vanilla) and then Wintergreen. The flowers were painted with Blush and Very Berry.


To make the smaller panel I painted some card with Nougat and then dabbed Blush and a very small amount of Very Berry over the top. Using Wintergreen I stamped the quote over the card. I liked the fact that using paint made the image rather patchy. When dry, I stamped the single flower onto the panel and painted it as before. I also stamped the word Wild onto the painted card several times and cut these out. I mounted the panel and words onto black card.


Finally, I attached the panel and words onto the base using dimensional glue.


Project Three: Parchment Flower Bouquet using stamp set  EEB08 by Liz Borer


First, I painted the background with Plum paint. Once dry, I stamped the flourish from EEB08 and embossed it with Ivory powder.


Next, I stamped and embossed several flowers from EEB08 onto parchment paper using ivory embossing powder. I then coloured the back of the paper with pencils that toned with the colour scheme. Finally I cut out the flowers.


To make the small quote panel I painted card with Nougat and rubbed a small amount of Very Berry over it. I stamped the quote and embossed with ivory powder. Then l rubbed White Fire Treasure Gold around the edges.


I stuck lace to the background as shown. Then I shaped the parchment flowers and stuck them to the base using dimensional glue to create "fluffy" flowers. To make the bouquet of three flowers, I used the double image and tucked the single flower under it. I then attached the quote to the base as shown.


It's very interesting making projects with stamps that I have designed, because I find I forget that I designed them and just enjoy creating with the images. Although l had had ideas about what I would do with these stamps, the projects took on a life of their own and did not end up the way I had planned! I find that this is part of the fun of making projects and I hope that you have had as much fun as I have.

Many thanks to my wingmen for their hard work, and thanks to Leandra and Mark for their support and advice.

Liz , see my blog here

Wow, isn't this the most exciting time of the year, so many new ideas and goodies to see. I do hope you can take some time to leave feedback for our designer and her wonderful wing-men here or on their own blogs.

All tonight's wing-men have detailed step out's explaining how they made their samples on their own blogs tonight, so do drop by and take a look by following the links

We will be sending these new stamps to retailers from March 1st, 2016. Make sure you pre-order yours with them now!

Enjoy!