Showing posts with label PS095. Show all posts

Thursday, 25 June 2020

2020 #11 Handmade Pocket Journal with ETS {by Autumn Clark}

2020 Topic 11: Calming Colours


Can you have a calming feast? Well I reckon Autumn has brought one for us. Just using the photos alone, there are so many fabulous ideas and plenty of inspiration to make your own soothing journal.
~ Keren

Hi everyone, it's Autumn Clark from SewPaperPaint with you today, and I'd like to share with you a great way to use up a day's worth of gelli prints by making a useful little pocket journal.

I decided to stitch together a few prints, mainly because I needed a new journal to work though some thoughts and I was sure that our calming colors topic would be a perfect place to start!  Using light colors for your prints give a great backdrop for handwriting and layering, so lets get to the details.


I simply cannot put this journal down!  I've been adding new thoughts daily and look forward each day to revisiting it.  The concept is easy to replicate.  I picked out the thinnest cardstock in my stash and cut it in half, then used my 8x10" gelli plate with a beautiful array of PaperArtsy Fresco Chalk Finish Acrylics in Taupe, Blush, Concrete, Hint of Mint, Sage and Waterfall and made a batch of two-sided prints.


This palette conjures the essence of escape for me!  My half-page cardstock pieces were about the same size as a particular book I use to brayer off my paint during the gel printing process.  I love using a book for this purpose so I can incorporate the text, as well as the color, into my finished work, in this case as full pages in my journal.


I kept some prints with solid color and also used several stencils and masks to get a variety of patterns/textures.  Those include PS095, PS106, PS108, PS092, PM006 and PM007.


I carefully decided on the order of my prints, mixing in the book pages, then used the three-hole pamphlet stitch to group them all together.  There are many advantages of this stitch for a journal.  1. The pages all lay flat when opened.  2.  The stitching can easily be removed if pages need to be added or taken away.  3.  It is incredibly simple to achieve, but the result is quite a strong binding.


As if gel printing and playing in paints isn't fun enough, the best part is adding the stamping, journaling and ephemera.


I focused on PaperArtsy Eclectica³ {Tracy Scott} Collection ETC39, ETC31, ETC27 and ETC25, all over-sized insects and flowers, perfect to make a big impact on a small journal.


I have always loved making art from "junk", so turning my least loved cardstock, an old book and a few drops of paint into a journal I can treasure brings me so much joy.


I have found that journaling even the most mundane thought can clear my mind to make room for more important things.  I find myself picking up one of my bottles of Frescos and finger painting here and there and love that I can continue to build layers and interest as I go.


This will not be the last of this type of journal for me!  In fact, I am inspired to continue in this size and colorway and make a group of these journals to use as inserts in an even larger journal.  Perhaps this lofty goal will encourage me to continue with daily journal entries and promote better mental health, and in return more creativity.  Do you find that you are more creative when you've actively reducing stress in your life?  I think it may true for us all and hope you will try this process for yourself.  I just know you will find the practice a rewarding one.

Until next time,
Autumn Clark

Blog: SewPaperPaint
Facebook: Autumn Clark
YouTube: Autumn Clark - SewPaperPaint
Instagram: @sewpaperpaint
Pinterest: Autumn S Clark

Thursday, 23 April 2020

2020 #7 Under the Sea: Blowing Bubbles with Scrapcosy {by Nikki Acton}

2020 Topic 7: Under The Sea

Blowing Bubbles using PaperArtsy ESC10 - by Nikki Acton

Intro
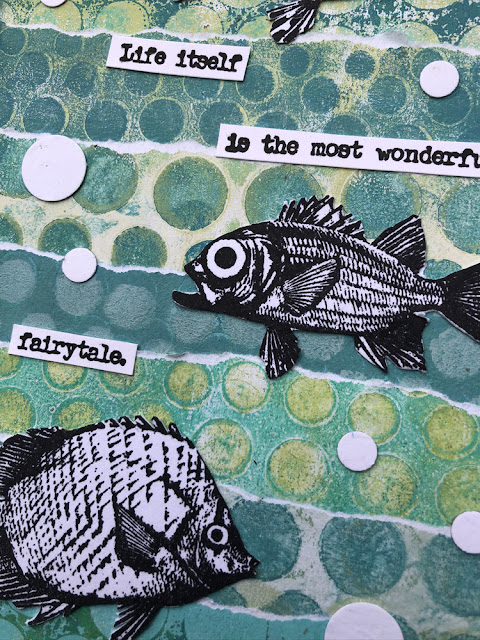
All the detail is in the cleverly constructed background. A great excuse to play with some gel printing techniques and a watery paint-colour palette.  I love how the stencilled spots link all the backgrounds together, and the white, torn-edge waves also link to the fish stamped in black on white.
~ Leandra

Hi everyone, Nikki from Addicted to Art with you today sharing a card using stamps by Raquel aka Scrapcosy. 

This is a really simple design and could be adapted utilising any background papers - I created mine using my gel plate.
Blowing Bubbles using PaperArtsy ESC10 - by Nikki Acton
The basis for the background is lots of torn strips of papers (creating wave effects hopefully) - so this really could work with anything, although I made mine in sea toned colours and used Scrapcosy's stencil (PA095) to creates the bubble effects.


So first of all it was just play time! Add paint to my gelli plate - lay down the stencil - remove some paint - take a print. Ooooh I like what is on the back of the stencil - print that too. Start again - different colour of paint - bring in the stencil - add colour this time - take a print - and so I keep playing using both the positive and negative of the stencil and also any paint left on the stencil.


I tore my prints into strips - around 1-2 inches wide and layered them on my card - making sure they overlapped.

Blowing Bubbles using PaperArtsy ESC10 - by Nikki Acton

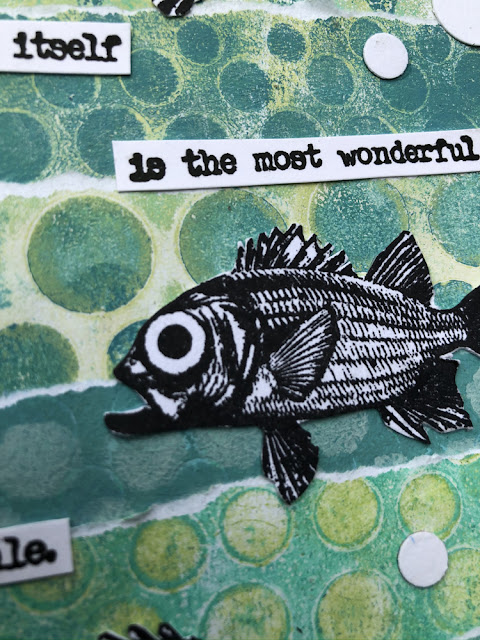
Finally of course, I stamped the wonderful fish images from Scrapcosy stamp set ESC10 and added a quote from Alison Bomber EAB16. 


The detail on the fish is amazing and I just left them stamped in black and cut them out.

Blowing Bubbles using PaperArtsy ESC10 - by Nikki Acton

Like many of us I do just love playing with paint and making backgrounds, whether with a brush, a brayer or my gelli plate. Mixing them up like this - tearing and collaging together is very forgiving - as you just pick the bits you like! Add your favourite image(s) and maybe some words or a sentiment and your done.

Thanks for joining me today, I hope you have a creative week.

Nikki x


Instagram: @Nikki_Act
Pinterest: nikacton

Tuesday, 21 April 2020

2020 #7 Under the Sea: Fossilized Fish Bones with Ink & The Dog Minis {by Autumn Clark}

2020 Topic 7: Under The Sea


'Deep sea' explorations can unearth beauties like these tonight. Autumn has managed to create experimental pieces that look fossilised. The shine looks like they're deep under the ocean too. Plenty of techniques to get your teeth into!
~ Keren

Hi everyone, it's Autumn Clark from SewPaperPaint with you today, and I'd like to share with you a couple of tags inspired by deep sea fossils with an unmistakable underwater vibe.

There are only two Ink & The Dog Mini Stamps of fish and I really wanted to create a project that would showcase them and for their incredible design.  Sometimes the best way to do that is with a bit of texture...


This process was filled with discovery.  First, I learned that if you add two layers of clear embossing and a third layer of a mixed media powder, (here our own Seth Apter's Deep Sea Baked Texture powder,) you get a really beautiful transparent embossed finish that actually looks like tinted glass.  Secondly, I discovered that you can stain Art Stones with Infusions to make your own colored embellishments.  Here I used In the Navy Infusions.  My final tidbit of discovery was in adding Fresco Finish Chalk Acrylics with a baby wipe through a stencil for a very soft and faded stencilled effect.  So grab yourself a cuppa...


I had in mind to use clear UTEE for my fossils and paint them, but after two layers (adhered with the Ranger embossing ink dauber onto torn edged watercolor card) it occurred to me that I could end with Seth's powder.  The result was much more transparent than if I had used three layers of his powder only (and much less wasteful I might add!)  


I kept my Mini stamps 100 and 101 at hand, inked with Versafine and when that last layer was just melted I impressed the stamp into the molten embossing powder.

Because my top layer of embossing was quite dark I didn't get the contrast I had hoped for.


First I turned to Distress Crayons in Rusty Hinge to try to bring back the contrast.  It didn't work as well on the fish as it did on the edges of my torn card and the pitted sections of the embossing.  But I am so glad I added it first!


So I applied PaperArtsy Fresco Finish Chalk Acrylic in Concrete to a piece of cut and dry foam and "inked" my stamp with it, carefully aligning with my first impression.  


I was instantly smitten!  


I then went onto do some gel printing with PaperArtsy Fresco Finish Chalk Acrylics in Inky Pool with a little Concrete.   I used Kraft card for my prints, which I am loving doing with shades of blue these days.  I cut my prints into tag shapes, then to add a bit more detail I used PaperArtsy Stencil {by Scrapcosy} PS095 and carefully smoothed more Concreate through the circles using a baby wipe.  I'm not sure if I have seen this done before, but I instantly loved the technique!  The paint globs just a little along the edge of the stencil, to create somewhat of a shadow effect.  Brilliant!  Finally I added some stamping with Distress Oxides in Rusty Hinge using Mini Stamp 23.


I didn't want to go overboard using too many stamps, but needed a proper sentiment.  I used a portion of PaperArtsy Eclectica³ {Scrapcosy} Collection ESC12 on a scrap of my printed paper.  The creatures on this stamp set would be equally lovely embedded into UTEE, don't you think?  


As a final touch I layered my "fossils with some vintage crochet for faux fish netting.  I stained my Art Stones with In the Navy Infusions and adhered them with matte Mod Podge.  


I can't stress enough the importance of free play, experimenting with your supplies.  You truly never know what you will discover!  These tags remind me to dive deep and remain curious.   

Then again, your play may be with beautiful impressions of a flower or face, embedded into your chosen embossing powders.  Think of the many ways you can apply these techniques and run wild my friends!  It's all in the journey!

Stay safe, stay well and big hugs, Autumn

Blog: SewPaperPaint
Facebook: Autumn Clark
YouTube: Autumn Clark - SewPaperPaint
Instagram: @sewpaperpaint
Pinterest: Autumn S Clark