Hi again everyone, Penny here.
Tonight I was supposed to share with you a post about Powertex...but I didn't have any...
So I checked with Leandra and she said it was ok to use plaster bandage instead. But actually, I was still clueless about where to go with this, and the result is a bit whacky even for me!
Ever heard the expression "mad as a box of frogs"?
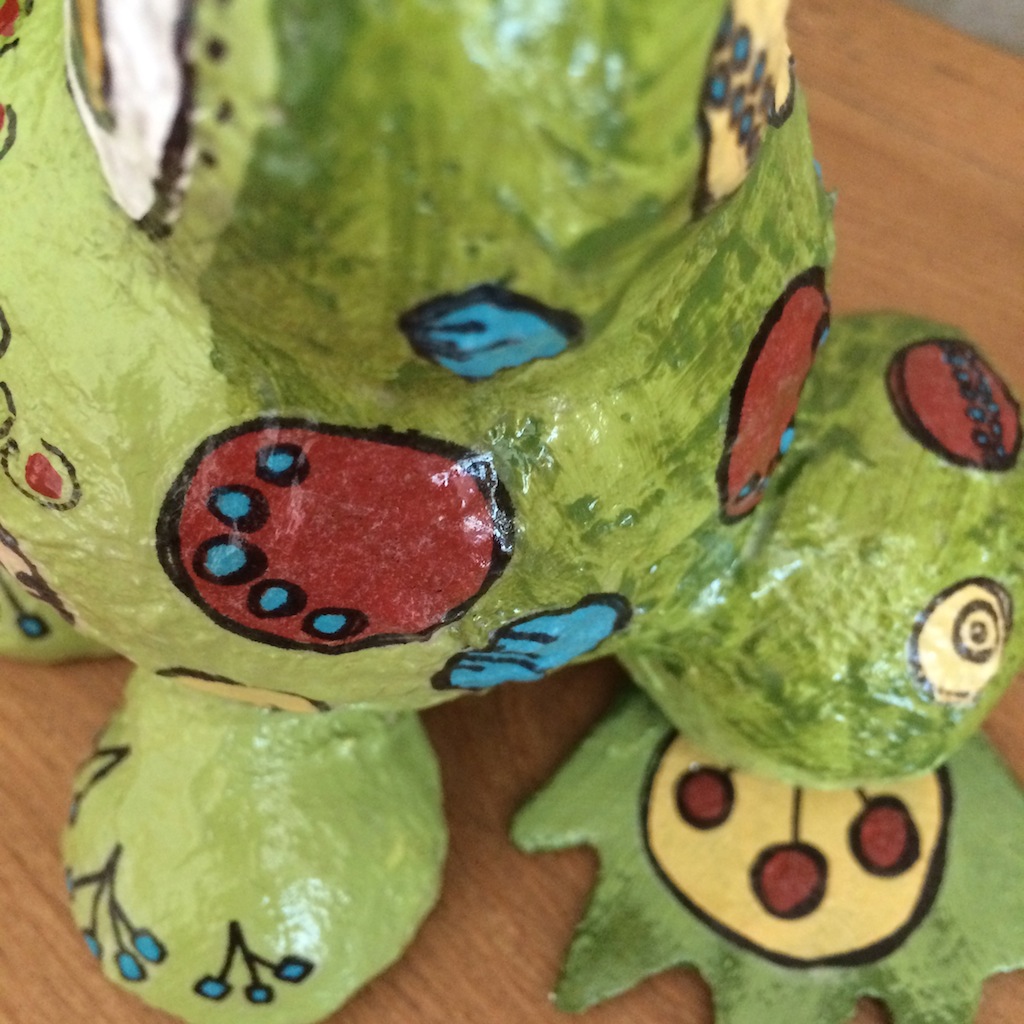
I looked round for something suitable to model with, to create a form to cover with the plaster bandage, and found some old polystyrene shapes (been there for years). I played around for a while, until Froggy appeared!
I loosely pinned the pieces together with straightened paper clips. Then the messy bit...ever worked with plaster bandage?
Modroc is an open weave gauze infused with plaster of paris. The plaster is reactivated by dipping the bandage srtips into water.
Top tip: use a disposable container for you warm water....I didn't want to pour it down the sink (blocked pipes, I worked that one out!) so my baking bowl is still sitting there with a solid lump of plaster of paris in the bottom. Good job I don't bake.
Easy going all the way from there. The feet are simple shapes in mountboard, covered with bandage. Granny Smith Fresco is opaque and a good base colour all over, then the translucent Hey Pesto for the mottled skin on his back.
I am totally in love with Kim's new stamps, EKD01 and EKD02, and saw straight away how to use them here.
I went back to my favourite technique of stamping on tissue paper and painting on the back: it makes dealing with awkward lumpy surfaces really easy.I used Dolly Mix,Snowflake,Captain Peacock, Haystack and Brown Shed.
Spots, eyes, toes and warts and all! and a nice shiny coat of gloss medium.
I won't bore you with the wide mouthed frog joke....
I hope you have enjoyed this amphibian ramble and are inspired to have a go (if you're tough enough!) with plaster bandage.I must hop off now (groans) and think of something for next time.
Oh Penny how much fun, this made me smile, almost as wide as your froggie. Kim's stamps are amazingly perfect for this. The combination of the robust modroc and the delicate tissue is a great partnership. ~Darcy
We would love to see how you interpret this topic by linking what you make to our 2016 Challenge #6: Liquid Sculpting Medium, on this page HERE.
All of our bloggers love to see your twist on their ideas, particularly if you were inspired directly by their post.
All links go in the draw to win a £50 voucher to spend on products of your choice from the PaperArtsy online store. The Liquid Sculpting Medium link will close 17:00 (London Time) Sunday, April 3rd. The winner will be announced 2 hours later at 19:00.
Hi everyone! It's Julie Ann from Magpieheaven here.
Tonight I'd like to share with you a 7" x 5" chunky canvas I created using strips of Plaster Wrap also known as Modroc.
From
the moment I learned about this material, on a workshop with Mary Jane
Chadbourne last Summer, I was hooked! It's an inexpensive and magical
way to bring dimension and texture to a canvas and it works brilliantly
with Fresco Finish Paints and Treasure Gold, which highlights every peak
and swirl. I love to create wild seas with foam and crashing waves and
in my canvas I've included a tiny MDF house inspired by Mary Jane's
Tinytopia class. Do you ever feel that your craft-room, studio or
crafting space is a haven where you can take refuge from the busy,
clamouring world around you? Well, this is the theme of my Modroc canvas
with the Craft-room Fairy inviting you in!
Step One: Plaster
Wrap comes in a thick roll. You need to cut strips from this with good,
sharp scissors. As you can see in the photo, I've put a towel over a
plastic table-cloth, as this is a messy and wet process. I use an old
ice-cream container for my supply of hand-hot water and I keep a supply
of baby-wipes close by, as your hands become covered in the plaster. The
first step is to soak the strips in the hot water and squeeze them a
little, before attaching them to the canvas, moulding and building them
into the effect you want to achieve. No glue is needed and there is time
to sculpt the strips as you go before the plaster dries.
Step Two: Below
you can see how I created something resembling a choppy sea with only
the Plaster Wrap and the hot water! I like to extend the plaster strips
over the sides too. Now you have to be patient - something I find quite
difficult when it comes to crafting - and leave the canvas to dry
thoroughly. I usually leave it overnight. You can tell you're ready to
go on to the next step when the plaster has morphed from a greyish white
to dazzling, washing powder commercial white!
Step Three: While
you are waiting patiently for your Modroc to harden, it's time to think
about a background. I wanted my little art studio to be nestling in
enchanted woods. I like backgrounds to be whimsical, creating a
suggestion of ethereal lands beyond the canvas and I think Urban
Snapshot stamps are perfect for creating this effect. They are
absolutely lovely for stamping with Fresco Paints. I used China, Granny Smith and Inky Pool on tissue paper with USNT3 on some white tissue wrap. I had fun over-stamping with three different paint colours. There's also some stamping in coffee Archival Ink too and a little moth that I decided to keep for another project.
Step Four: Now,
thanks to the magic of Blogland, we can fast forward twelve or so hours
when we're ready to work on painting and sticking! I painted with a
blend of Satin Glaze, Snowflake, Space Cadet, Smurf, Mermaid, Blue Oyster and Antarctic with a touch of Inky Pool on the edges to add depth. Similar colours are reflected in the waves, but there are touches of Winter Green and Turquoise in the depths. The grassy bank is a combination of Teresa Green, Granny Smith, Limelight and Winter Green.
Step Five:
I attached my torn tissue trees with PaperArtsy Satin Glaze with the
tiniest drop of Smurf added. The trees and the script stamps were
extended over the sides and top of the canvas. The fluffy clouds are
cheesecloth - another of Mary Jane's great ideas! Once the basic
painting is done, you can 'touch up' with some mark making with a brush
for the grass. I've also added some touches of Chocolate Pudding for the earth.
Step Six: All
that was left to do was to add my welcoming little Craft-room fairy. I
created her using my own artwork, collaged with a scrap of Chatsworth paper, a detail from an old map and can you spot a tiny section from ESN07 stamped onto a scrap of paper for a door? 'The Woods' is part of a quote from Robert Frost on USNT4, stamped onto card painted with Mermaid.
I thought you might like to see a detail of how the design is continued over the sides of the canvas too.
I
hope you've been inspired to create your own little canvas world using
Modroc. I love how sculptural this technique is - it's easy to create
something that seems to invite the onlooker right in. I particularly
like the potential for moulding waves, but this material is so versatile
I've found it works for simulating everything from drapery to a rocky
landscape. I'd love to see where your imagination leads you with this
one! Combining Plaster Wrap with different PaperArtsy stamps and the
wide array of Fresco Colours opens up so many possibilities.
'Bye for now from Julie Ann at Magpieheaven, Twitter, woletz1.
I have heard of people using modroc for this purpose , but I've never actually seen an explanation of how to before! This is fabulous Julie-Ann! And the perfect finishing touch is one of your gorgeous tinytopia people - they are superb! Thanks so much for sharing in detail the process!! Very, very helpful! ~Leandra
We would love to see how you interpret this topic by linking what you make to our 2016 Challenge #6: Liquid Sculpting Medium, on this page HERE.
All of our bloggers love to see your twist on their ideas, particularly if you were inspired directly by their post.
All
links go in the draw to win a £50 voucher to spend on products of your
choice from the PaperArtsy online store. The Liquid Sculpting
Medium link will close 17:00 (London Time) Sunday, April 3rd. The
winner will be announced 2 hours later at 19:00.
Well hello everyone, Darcy here to introduce our latest topic; Liquid Sculpting Mediums. Currently there are 2 very popular mediums being used to create 3d works of art, you may recognise them as Paverpol or Powertex (brand names) and these products are mostly seen used with fabric or natural fibres. However fabric stiffeners have been around a long time, as homemade starches progressing through to manufactured sprays. All these products are designed to give fabric various degrees of stability, ranging from just a little body to rock solid, and weatherproof.
Glues, mediums and moulding pastes can also be used; not just with fabric but other textural elements, and all can be experimented with to create new and exciting pieces of art. Gels and pastes also harden into solid mediums, which alone can create dimension. While those can be used in conjunction with other elements, on the whole, is the liquid mediums that we shall explore in this topic. To create structure, these liquid mediums need to be applied to forms such as texture beads, armatures and fabrics in order for the properties of the medium to have full effect.
Before we start, let's see who won the Topic 5: Art Doll Challenge... A fabulous topic, I adore Art Dolls and could look at them all day. I am so glad you all joined in, looks like you had enormous fun too. I feel really spoiled with all the new inspiration that you provided. if you missed some of the entries do go back and take a look, there is everything from paper dolls to found objects and stitched creations.
The winner of Art Dolls is: Rebecca Harris from Craftin-Artasia
Email Darcy to claim your prize. Darcydotneedles@hotmail.com
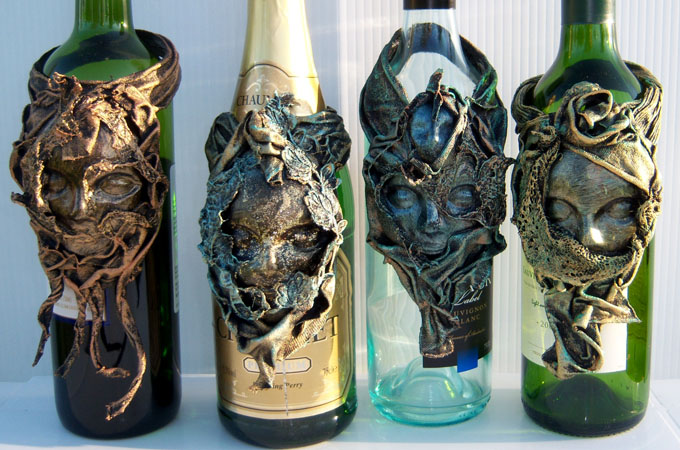
So let's get started exploring this topic. The first product we'll take a look at is Powertex. This is an environmentally friendly, water-based sculpting liquid. It is reccomended to be applied to absorbent materials (natural) such as cotton fabric, paper, cardboard, leather etc. Once the surface has been painted or dipped with Powertex, it can be manipulated into shape and then left to dry. While this is an air drying medium, a little warm air from a hair dryer can help speed up the process. Drying times will vary and will depend on the thickness of your substrate, the quantity of medium applied, and how warm your working conditions are. Generally the work will be touch dry in a few hours, but some flexibility will remain. The medium continues to harden over time, and within around 2-3 weeks the project will be fully hard. You can paint the item during this time with your preferred paint, and if your project is intended for outdoors then you will also need to add varnish. So what can we make? if you have searched already for inspiration you will have seen many figurines. Some of the most effective are very simple shapes, giving the illusion of a figure. Note, no hands or feet.. just a face. The details are all in the choice of and draping of the fabric. These can be formed over a wire armature, or a box or the very popular option of a glass bottle.
Some have a totally blank face, but most that I have seen incorporate a detailed face. Options for faces include making your own from clay and a mould, buying a ceramic face or perhaps re-purposing a dolls head.
Using a fully poseable body, either a doll or a wire armature, gives you more options. .
In this video you can see how a fabulous Masai figure comes to life using Powertex products.
Add in wings using fabric draped over wire, and you transform your figure into something magical. You can see here how Nancy Lynn Donaldsonhas used wired to create these very simple shapes to use in her angel.
A figure does not need to be free standing, you could always incorporate your face and illusion of a body into a canvas. This one is just beautiful, the texture allowed to be so promiment with the use of neatral tones.
If the texture of fabric isn't enough for you, then you can add aggregates to the Powertex such as clay, concrete, sand and stone. You also have options with colour: Clear Powertex is a white liquid that dries clear, though this can be coloured by adding various pigments. If you want a ready-coloured medium then you have choices of Lead, Bronze, Terracotta, Ivory, Black and Green, Red,Yellow and Blue. There are also 3D sand and balls available in various sizes, these really bump up the texture and can result in some stunning abstract art like this canvas by Tracey Evans
Or the stunning vibrancy of this one by Rhonda Hunt
Perhaps you are looking for a way to enhance your backgrounds; this piece has been started on corrugated carboard, nothing ould be simpler. The possibilities for this are endless, think how you could build upon this with stamps and embellishments.
Let's see some other methods of using these sculpting mediums. How about trees?
Here is a quick video showing how to make some 'bottle bling' similar to the photo above.
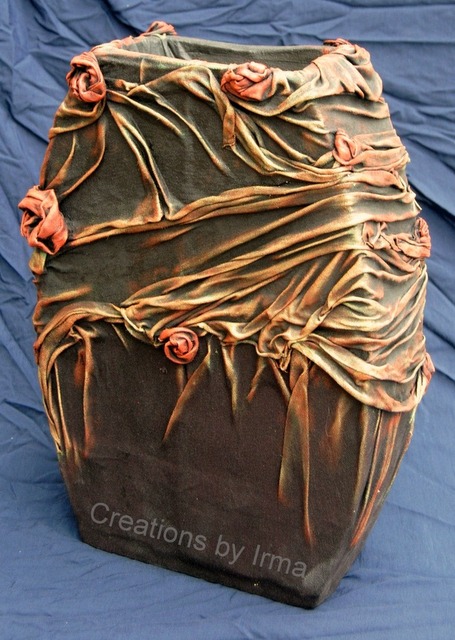
The other lomg-time fabric hardener brand you may know about is Paverpol. This too is a non toxic liquid, albeit it thicker and more gloopy than Powertex. Again this works best with natural materials. the same methods are used, in that you dip your fabric into the medium, allow the excess to drip off then drape over your chosen armature or form. Paverpol is also available in clear, bronze or grey.
With both products you need to protect your worksurface and yourself with plastic, once dried onto a wood table or your clothing these mediums cannot be removed.
Paverpol projects can be painted and sealed, or you can colour the medium with pigments such as coloured pigments, mica powders, glitter or fine coloured sand or even high quality acrylic paints. However do not dilute the Paverpol by more than 2%. There is a really informative pdf sheet available HERE. this contains lots of info about using Paverpol.
Irma Westerdijk is a certified Paverpol instructor, she can teach you how to make gorgeous pieces like this.
I am more than a little in love with these, how cute!
I am in awe of this scenic creation by Joanne Savage
Perhaps making jewellery is more in your comfort zone?
I could go on and on showing you thousands of creations from across the world, if you search for Powertex or Paverpol you will soon find yourself lost in a whole other dimension of artworks.
Before you all scurry off to search, or perhaps you are running away scared, fear not.. there are other options. You can dip your fabrics into starch, or glue, or even a sugar mix.. who remembers making starched snowflakes?
Isn't this crochet bowl lovely, it is from the book Crochet Adorned
This piece was done by one of our designers Liz Borer. the fabric was painted with a glue, pleated and left to set. You can see how she did it HERE.
Finally there is Modroc, this is a gauzy bandage impregnated with plaster of paris, it is bought dry and on a roll. To use it you must reactivate the plaster of paris by cutting strips off the roll and soaking in water. This returns the plaster to a liquid form, no need to add fabric as it is already combined. You then drape over a form, pleat or smooth and leave to dry.
One final photo, a delicate flower sculpture using modroc by Eleanor Swan
Whatever form and sculpting medium you choose I hope you have a fun two weeks, though I forsee you all getting very sticky!
Don't forget to follow Leandra's pinterest board if this topic pushes your buttons, you will see plenty more examples to whet your appetite there!
I am really looking forward to seeing what you create over the next 2 weeks! Darcy
Topic 6: Liquid Sculpting Medium PaperArtsy Blog Challenge
We'd love you to share your ideas and link up your creative response to our current blog topic. Take a minute to read the challenge guidelines below.
All links go in the draw to win a voucher to spend on products of your choice from the PaperArtsy online store. The Liquid Sculpting Medium link will close 17:00 (London Time) Sunday, 3rd April 2016, winner will be announced 2 hours later at 19:00.
1. The challenge is a for you to show how you are inspired by the current blog topic.
Your entry should contain:
- a mention of which post inspired you and why, and
- a link in your blog post to that original post on the PA blog.
The whole concept of this challenge is 'play along with us'. You are encouraged to put your own twist on ideas you see on our blog, do your own thing - whatever grabs you!
2. The link you put on our linky page must lead directly to the specific post on your blog where you have explored the technique/ idea mentioned in point 1 above. Don't link to the home page of your blog.
3. We prefer your challenge blog post is created exclusive to our challenge, but if our topic fits perfectly with another challenge, then you may link to both if appropriate.
4. You are most welcome to use stamps/ products/ substrates you have to hand from a variety of companies, we do not expect you to exclusively use PA products - it's lovely when you do though!
6. You can enter as many times as you like. We don't want to restrict your creativity!
NB. Link closes at 17:00 Sunday 3rd April 2016 (London Time)
7. The winner of the random draw will receive a £50 credit voucher to be redeemed on the PaperArtsy Website. The credit voucher includes VAT and postage. We request that one of your purchases is an A5 rubber stamp. You can add any other items to your basket, but the final total should not exceed £50.
8. Each fortnight on Sunday, the winner will be announced at 19:00 (London time). In the same post, the link for the next fortnight will be posted.
9. It's your responsibility to claim your prize coupon from Darcy.
email: darcydotneedles@hotmail.com
Good Luck! If you have any questions, don't hesitate to ask!