Showing posts with label 2016 Topic 10. Show all posts

Saturday, 28 May 2016

2016 #10 Garden of Dreams {by Pavla Hozikova}


2016 #10: Doodles

Hello everyone, it’s Pavla here with a post about Doodles. I have to confess, I never was much of a doodler. I really don’t see anything relaxing about staring at a white page with a lot of black lines. This makes my head ache and for this exact reason, I’m not really a fan of colouring books. So, you ask, why am I doing a post about doodles? Because, luckily, there are these wonderful designers who do the doodling for us. I really fell in love with Emma Godfrey’s stamp sets and I will be doing a project using her circle doodles. Some of you might know, I have this recurring circle theme that pops up every now and then…


Step One: I started with a leftover wooden frame (I believe this one was from IKEA). I gessoed it first, then I randomly applied some paint. I used Yellow Submarine, Blood Orange and a little bit of Smurf on the top (it adds this patina-ish kind of look).


Step Two: I stencilled some dots on top and then went over the edges with a black ink. You can see the difference in the photo - the black gives it a slightly aged look. 


Step Three: Next, I took regular twine and coloured it with black gesso. Then I wound it around the frame.


Step Four: Now, the fun part. I stamped a lot of circles on a piece of cardstock using black archival ink. The circles are from two different sets by Emma Godfrey (EEG07 and EEG15). I coloured them using Daler Rowney acrylic inks. 

EEG07
EEG15
Step Five: Then I cut the circles out. You can see I also turned some of the wheel-like circles into flowers.


Step Six: Finally, I glued the circles to the twine - some to the front, some to the back. I used PVA glue to attach the pieces, then turned the frame over and put a generous blob of glue to the back of each piece and let it dry (I’m a bit of an over-gluer). I added the quote from Lin Brown’s set ELB04

ELB04.

I initially wanted to do this assemblage flat in my journal but I really like how it turned out in 3D. I hope you got inspired. See you some other time!
Pavla

Instagram: pavla_art

Wow Pavla this just jumps off the screen. How clver to use the black strings as they now look like doodled lines between the circles. Emma's stamps have worked brilliantly here and those blended inks are just gorgeous. ~Darcy

We would love to see how you interpret this Doodles topic by linking what you make to our 2016 Challenge #10: Doodles, on this page HERE.
All of our bloggers love to see your twist on their ideas,  particularly if you were inspired directly by their post. 
All links go in the draw to win a £50 voucher to spend on products of your choice from the PaperArtsy online store. The Doodles link will close 17:00 (London Time) Sunday, May 29th 2016. The winner will be announced 2 hours later at 19:00.

Friday, 27 May 2016

2016 #10 Hippy Doodle Cards {by Julie Ann Lee}

 2016 Topic 10: Doodles

Hi everyone, Julie Ann of Magpieheaven here.

Tonight I'd like to share with you a post about doodling, which has always been a passion of mine. Whether I'm on the phone; in the Dentist's waiting room or meeting a friend for a coffee, you'll see me compulsively scribbling away on scrap paper, a napkin or the back of a magazine. A little while back I decided to stop discarding what I had scrawled on the back of envelopes and old receipts and decorate projects with it. 

This project is an example of how you can use doodles around PaperArtsy stamped images to create unique greetings cards. You've probably created some quirky and individual designs yourself that should have ended up on cards, canvases or journals rather than in the bin!


Step One: I started with a print-out of a little caricature of my own; but - if you prefer - you could use a stamped and coloured image of a face with a doodled embellishment. I gave Florence, the anxious Flower Child a doodled head-band.


Step Two: As you can see, I used a Craft Card blank and I stamped some of my favourite Sara Nauman script from ESN10 in Snowflake Fresco as a border. Often I find myself doodling around some existing text or patterns and Sara's circles, also from ESN10, make the ideal starting point for some 'stream of consciousness' art! I stamped these in jet black Archival ink.
ESN10 

Step Three: Now for some doodling around the stamped images. I used Micron Pigma pens and Inktense pencils to create these leafy 'Peace' symbols and Hippy friends to reassure anxious Florence. The white highlights are created by dipping a cocktail stick into some Snowflake Fresco and adding little white dots.


Step Four: It's also fun to add doodles to a brayered and sprayed background and the addition of some Infusions, fixed with Satin, Metallic or Pearl glaze would be effective! For this card, I brayered with Snowflake and slightly diluted Smurf, before spraying with Inky Pool and adding spatters from a toothbrush dipped in Inky Pool. The basic technique of using an Opaque with a spritz of translucent works really well for a background like this.


Step Five:  I used Part of the sentiment from Sara's ESN10, stamped in Inky Pool with clear embossing on some pre-prepared 'master-board'. White embossed circles complete this variation on the theme of Florence and her Hippy faces!


Step Six: Gold embossing can help create an impression of doodle links in a golden chain! I also enjoy playing around with the positioning of the eyes to create different effects.


Sometimes I find creating cards a chore, but these cards were so simple to create and doodling around a stamped image is so relaxing and such fun that the process was a pleasure. Once your surface is dry, Frescos are easy to doodle over with Pigma pens like Micron and you can achieve great effects with water-colour pencils, so why not find a simple stamp shape that you like, stamp it out in ink or paint and have a go? This kind of doodling should work well on Mail Art envelopes and journal pages too and you could use it on little gift tags or boxes to make your package really individual and coordinated.

Thank You so much for joining me tonight. You can find out more about how I created these cards and others like them if you have time to hop across to my blog Magpieheaven and you can find me on Twitter, woletz1. Wishing you a lovely creative weekend, full of doodling!

Wow Julie Ann these cards are wonderful.  With your doodles full of personality you have created really unique pieces. i love the faces in the rings, so quirky. Poor Florence really does look anxious, but she needn't be, her headband is very pretty. ~Darcy

We would love to see how you interpret this Doodles topic by linking what you make to our 2016 Challenge #10: Doodles, on this page HERE.
All of our bloggers love to see your twist on their ideas,  particularly if you were inspired directly by their post. 
All links go in the draw to win a £50 voucher to spend on products of your choice from the PaperArtsy online store. The Doodles link will close 17:00 (London Time) Sunday, May 29th 2016. The winner will be announced 2 hours later at 19:00.

Wednesday, 25 May 2016

2016 #10 Butterfly Trails{by Wanda Hentges}


2016 Topic 10: Doodles

Hi everyone!!! Wanda Hentges here. Tonight I'd like to share with you this panel for the Doodles theme. 

It's fun to doodle on a project!!! I seem to go in spurts - I'll be doing it on everything and then on nothing, although quite often my doodling is just adding a squiggle by an edge. With this as a topic I got to thinking about different ways to doodle and then had a good time incorporating a few of those ways into this piece. 


Step One: I began with a 5" x 7" Media Board (Ranger) and used a palette knife to put a thin layer of Grunge Paste over the canvas side of the board. The only thing I tried to do is not get it really thick, otherwise there were some spots without any Grunge Paste and the thickness is not completely even. While the paste was still wet I scribbled in it with the tip of a skewer. Once it was completely dry, I used a sanding block to smooth out any really rough spots, wiped it off with a damp cloth and painted over it with Sherbet


Step Two: After drying the paint, I used a stamp from EEV05, stamping it with Pink Peony ink. This was very subtle and even less noticeable after everything else was done but you do catch glimpses of it.

EEV05

Step Three: Next I stamped the same image with Snowflake paint and dried it. I put a Fine Line Applicator top on a bottle of Bougainvillea and used this to add little dots (I think adding dots counts as doodling) in the grids of Snowflake stamping.


Step Four: To bring out the lines in the paste more (and just because glazing is fun to do), I mixed some Banana and Satin Glaze to use on the panel. I knew I didn't want it to sit long because that could tint the pink in the flat areas so I brushed it on and wiped it off immediately even taking a damp towel and wiping a bit harder to keep those areas pink. I must have rubbed too hard in a few spots where maybe I didn't have as much pink paint and it took it back to the Grunge Paste color but that just made it look like another layer... Bonus!!! 


Step Five: Instead of just using a pen around the edge (my first thought), I used a Finnabair Paint Brush (the silicone end) along with Little Black Dress to make marks. Each time I put paint on the brush I would make lines 2 or 3 times before putting on more paint which made some marks darker or more solid than others. 


Step Six: I used the sketchy petal shape from EEV02 along with Leaf Green ink to give some background and added dimension to the flower. With each inking of the stamp, I stamped 2-3 times being sure to get the darkest images between the petals of the flower.

EEV02

Step Seven: To make the flower, I started by brayering a piece of Heavy Smoothy Card with Fresco Finish Paint. The colors are brayered in this order - Bougainvillea, Candy Floss, Caribbean Sea, Banana, Bougainvillea


Step Eight: I stamped (EEV09) the flower Petal 5 times and the circle for the center once with Archival Ink Jet Black and cut them out. To cut out the circle I used a 1" circle punch. I doodled inside the flower petals with a White Gel Pen and added Bougainvillea dots. In the circle I added White Gel Pen dots. The flower is attached to the panel with foam mounting tape. 

EEV09

Step Nine: The words (EEV10) were stamped on a scrap of the brayered paper with Jet Black and embossed with Detail Black Powder, cut out, glued to black paper and cut out for a black border. The butterflies are punched from Heavy Smoothy. I first sponged Caribbean Sea along the outer wings and then lightly added some Candy Floss over that, glued them to the panel and added sticky-back pearls.

EEV10


I really had fun making this and hope you are inspired to do some doodling!!! I can't wait to see what you make!!!!!!!!!

Thanks for following along!!!
~Wanda

Hi Wanda, lots of great doodling here. Your choice of doodle stamps fits perfectly with the scribbled background. It is great how that fades into the background while still retaining the interesting texture. ~Darcy

We would love to see how you interpret this Doodles topic by linking what you make to our 2016 Challenge #10: Doodles, on this page HERE.
All of our bloggers love to see your twist on their ideas, particularly if you were inspired directly by their post.
All links go in the draw to win a £50 voucher to spend on products of your choice from the PaperArtsy online store. The Doodles link will close 17:00 (London Time) Sunday, May 29th 2016. The winner will be announced 2 hours later at 19:00.

Monday, 23 May 2016

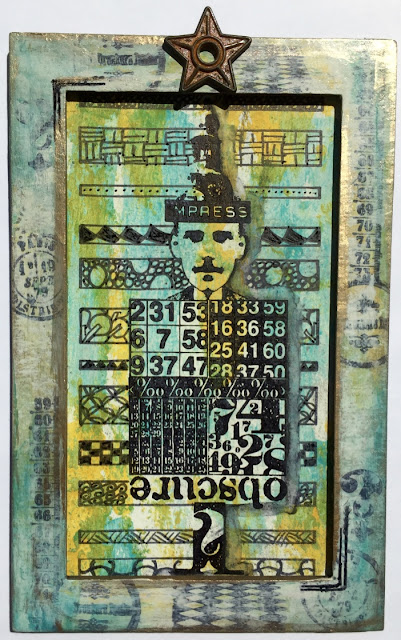
2016 #10 Impress {by Gabrielle Price}

 2016 Topic 10: Doodles

Hi everyone Gabrielle from Crafty Thoughts here.

Tonight I'd like to share with you this evening with a post about first attempts at doodling.

I am not a huge doodler outside of boring meetings at work (!) and so I wanted it to become a background to my main image rather than be the main feature.


Step One: On a piece of board I used palette knife and 'painted' an uneven layer of Chalk.


Step Two: Then I added a little Beach Hut and then a little Tangerine Twist


Step Three: As I wanted the doodling to go behind the main image I stamped the image (isn't he adorable?!) and then, using the stencil PS018, added the boxes making sure I didn't draw over the image.


Step Four: It is at this point you could make the decision if you want to doodle INSIDE or OUTSIDE the boxes. I decided to draw inside but if you are more experienced than me then you could be braver and do the outside! Using a Berol Handwriting pen I doodled in the boxes. 


Step Five: The reason I used the Berol pen is that I knew it would soften when I added a watercolour pencil shadow.


Step Six: The final touch was to add a frame. I made the frame the same way as the board, added more stamps from the same set and the added a layer of Chalk paint to knock it back a little and bring the main image to the fore. A little Treasure Gold and a Barn Star from the PaperArtsy stand at Ally Pally and it was finished!


I really like the shadow as it makes the main image stand out:


I think I shall explore more doodling patterns and how to do them but I hope that this shows you that you really don't have to be an expert to have a go!
Thank you for stopping by - Gabrielle x (@freyatom)

For all us beginner doodlers this was a great idea to incorporate the stencil to allow you to explore doodling further Gabrielle Thanks for sharing your doodling debut with us. ~Gillian

We would love to see how you interpret this Doodles topic by linking what you make to our 2016 Challenge #10: Doodles, on this page HERE.

All of our bloggers love to see your twist on their ideas,  particularly if you were inspired directly by their post. 

All links go in the draw to win a £50 voucher to spend on products of your choice from the PaperArtsy online store. The Doodles link will close 17:00 (London Time) Sunday, May 29th 2016. The winner will be announced 2 hours later at 19:00.

Sunday, 22 May 2016

2016 #10 Finishing Touches {By Kay Carley}

 2016 Topic 10: Doodles

Hi everyone Kay Carley here.
Tonight I'd like to share with you a post about adding doodles to your creations.

I quite often like to finish off my card designs by adding doodled lines or dots using either a black multi-liner or a white pen. One of my favourite things to do at the moment is to add a doodled frame around  any stamped words but I thought for this 'doodle post' I'd take my doodles a step further and create a jar for my flowers to stand in along with some doodled stems and tiny leaves for one of the tiny flower heads contained on EKC02.

Originally the two tiny flowers that are found on this particular stamp sheet were included so that you could stamp borders or backgrounds; use them to layer up on top of the larger flower heads or stamping them so that it looks as if they are falling from the flower heads. You can also use them to stamp on top of the grass stamp to make the grass into mini flowers which is what gave me the idea of using them this time with some doodled stems amongst the grass for this card;).


Step One: Paint a 10x21cm smooth white panel using Moonlight Fresco Finish - I personally like to use a damp sponge wedge to do this in order to give a patchy/streaky effect as I prefer this to having 'smooth colour'!! Next, using Lin Brown's PS001 stencil and Teresa Green Fresco Finish add some dots and circles over the entire panel. Thoroughly dry with a heat gun. Using a pencil draw in a jam jar. Don't worry if it is a wonky jam jar (like mine!!) as this is part of its charm!!


Step Two: Add some Teresa Green to the top and base of the panel, dry with a heat gun then using Watering Can archival ink and stamps from EKC02, stamp some grasses and the leafy sprig along the base of the panel and then stamp a couple of the leafy sprigs into the jam jar.


EKC02,
Work out where you want to stamp your main flower heads then using a damp baby wipe dot in Snowflake, Dolly Mix and Lavender.


Step Three: Sprinkle a small amount of Violet Storm Infusions onto the flower heads and lightly spritz with water. Dab with kitchen towel to absorb some of the water and dye. Dry with a heat gun.

Stamp the flowers into the jam jar using black archival ink using the prepared circles as a guide as to where to position your flower heads. Stamp three small flowers amongst the grass and draw in stems and tiny leaves for them using a 0.3mm black multi-liner. Then trace over the jam jar using the multi-liner.


Step Four: Colour the jam jar using Tumbled Glass and Pumice Stone Distress markers. Elongate the stems in the jam jar with the black multi-liner. Paint all the tiny flowers, leaves and stems using Dolly Mix, Lavender, Zucchini and Zesty Zing Fresco Finish paints.

Dry with a heat gun then trace back over the black stamped imagery using the multi-liner.


Step Five: Trace over some of the stamped leafy sprigs using the black multi-liner in order to make them into foreground imagery.

Using the white pen add highlights to the flowers, leaves and down one side of the stems and to any other areas that you feel would benefit from having white added to it.


Step Six: Using the black and the white pens add faux-stitching along the base and top of the panel.


Paint a small white strip of snowflake at the top of the panel, dry with a heat gun, stamp the words with black archival ink, heat set then lightly paint over the letters with the Fresco paints. Heat set again before tracing back over the letters with the black pen and adding a doodled frame. To finish attach to a card base and apply some Stardust glitter glue accents for some sparkle!


Adding doodles to your creations really helps to add interest. I often use both my black and white markers to help certain elements stand out or as a way of highlighting something. Even for those of us who can't draw - just doodling wavy lines or dots around stamped sentiments or faux stitched lines around a panel is an easy way of starting to doodle! Give it a try - you'll be surprised what a difference just a little bit of simple doodling will make to the overall look of your finished item.

Thanks for stopping by :).
Kay x

Facebook: https://www.facebook.com/kaycarley.designer/
Twitter: https://twitter.com/carleycards
Instagram: https://www.instagram.com/kay.carley/
Pinterest: https://uk.pinterest.com/kaycwilson1/


So delicate and summery. the doodled details on the flowers and the white accents really makes them pop against the dabbed backgrounds. This is such a great combination of paint and pen. ~Darcy 

We would love to see how you interpret this Doodles topic by linking what you make to our 2016 Challenge #10: Doodles, on this page HERE.
All of our bloggers love to see your twist on their ideas,  particularly if you were inspired directly by their post. 
All links go in the draw to win a £50 voucher to spend on products of your choice from the PaperArtsy online store. The Doodles link will close 17:00 (London Time) Sunday, May 29th 2016. The winner will be announced 2 hours later at 19:00.