Showing posts with label EGL37. Show all posts

Thursday, 29 February 2024

2024 Topic 1: Miniature {by Etsuko Noguchi} on the PaperArtsy Blog


Hi everyone Etsuko (My favorite things) here with you today. The cold season is passing by and I can feel the breath of spring in my garden. And my mind can't stop thinking about the tropical landscapes that are just around the corner.

Our first topic of the year is 'Miniature' and I was tempted to create a small tropical world using my favourite artist Gwen's stamps. I had a bit of time to create the project, so I decided to create three pieces incorporating resin and glass in this season's theme 'Glazed'. Today I'd like to share with you what I did well in the process of making these, and what I unfortunately did notdo so well. Please enjoy with me to the end. Thank you.


Making jewellery is always a pleasure, especially Boho jewellery which excites me!! Usually I decorate with ethnic fabric scraps, beads or embellishments, but today I tried it with what we had on hand.


The anemone fish stamp made by Gwen is a must in tropical aquariums, and tribe stamps were used because I thought they would make interesting pendants with decorative faces. I used these pastel colours for this project and added coloured pencils in some areas.

Stamps are Gwen stamp set 09 and 37 (EGL09, EGL37).
Colours are Fresco Finish Chalk Acrylics ( Dolly Mix, Wisteria, Blue Oyster, Cerulean, Fuzzy Cactus, Vanilla and Mahogany )


The first step was to make an aquarium pendant using a small Cloche Dome. The star of the show inside is the Anemone fish. I made jellyfish, starfish and seaweed, and the rhinestones were added to make it look like jewellery.


The image of the fish is stamped onto a paper with any black ink, scanned into the printer and fed into the computer to set the opacity of the image to 50%, which is then printed onto inkjet shrink plastic. The reason for the 50% opacity is that 100% produce a darker colour baked in the oven. The fish image on the left has been coloured with paint, the on the right is just an outline. After the plastic is cooked, it shrinks to 1/4 of its actual size. 


In my experience, toaster ovens seem to be less likely to fail than shrinking plastic with a heat tool.


Just the outline of the image can be stamped or printed on plastic and then coloured in later with oil-based coloured pencils for a beautiful finish.


Finally everything was glued down with PVA glue and glass glitter was sprinkled around the bottom on top of the glue, the dome was installed and the chain was attached to finish.
The first miniature with glitter and glass dome glazing. So did you get a bit of the tropical vibe?
This glass dome freebie site by Stephanie Rubiano's Studio Rubiano.


The second piece is the Boho pendant and necklace. I love this tribal stamps and have used them in various forms, but this was the first time I had used it in jewellery and I was very excited. The theme 'Glazed' is explored with the shiny resin finish.


In addition to the above, most of the materials are things that everyone has, such as resin solution, clay, clear document folders, clear tape, glass glitter gold wax and PVA glue.


Cut the coloured images into the oval shape.

.
Gwen stencilled excess papers attached to the reveres.


As all tribal image are on paper, apply Paper Sealer on both sides to prevent the resin solution bleeding onto the paper.


There are no ready-made bezels to fit this irregular oval shape, so I usually use flat copper tape and solder the bezel, but this time I thought of a different and convenient method and remembered that resin does not stick to clear folders, so I decided to use this.


I cut the clear folder into 5mm wide strips and stick them onto the wide clear tape in the shape of the bezel and protect the outside of the bezel with PVA glue to prevent a resin liquid leakage. 


Fill the bezel 1/2 full with resin, allow the resin to dry, place the tribal image on top of the resin and pour the resin until the paper is covered, holding it up with a stick to remove any bubbles. Small bubbles disappear easily with heat tool. After the bubbles have been removed, pour the resin until the bezel is full again. -Always wear surgical or polyethylene gloves when using the resin.-


Leave it to dry for two days (in winter) when the resin completely dry, remove the tape underneath and remove the surrounding bezel to complete the process.


I chose to use glass glitter and beads to decorate the the pendant's edges,  and using a strong glue to prevent peeling.


I was thinking of sari ribbons for the necklace, but thought it would be nice to add handmade beads, and the idea of printing tribe stamps on clay come to mind. Now let the enjoyable work begin!!  The images below were stamped on the clay stretched into an oval shape, how clear the image appeared.


Then next step is to use round wood dowel or the back of a thin brush, shape the beads into long and narrow.


Once the clay is dry ( the clay I used was baked ) it's time for some fun colouring, I used Fresco Finish Chalk Acrylics ( Little Black Dress, Caribbean Sea and Chocolate Pudding ) for a vintage look, but you can choose any colour you like.


When the paints are dry, lightly rub the top with gold wax for a more vintage look.


This is the Boho pendant and necklace finished look, I still wanted to use the sari ribbons so I added the back of the neck to adjust the length and make it more comfortable. And it has a Boho taste.


I hope you all have a bit more fun with me. This is the last piece Boho earrings. 


This time the background and tribe faces was painted over acetate. This way it would not be too thick when seen from side. This is because the earring edges remain intact.


When the background paint is dry, stamp with Ranger Archival Ink Jet Black.


The original plan for the earring technique was to drip 2-3 colours of alcohol ink onto the resin and stir it a little to create a marbled pattern, and then insert the acetate with the tribal face printed on it into the resin which is nice, but when I actually tried it, the colours developed too dark and did not work as shown in this picture.


The above plan was temporarily put on hold and the resin was made in clear, the picture shows the bezel of the clear folder removed after drying.


This image is from the side view of the earrings, so sorry although it may be difficult to see.


And the back of the earrings.


Creating objects to decorate the room or jewellery making always gives me happy moments. I created this project to share this moment with you and I am very happy if you like it. 
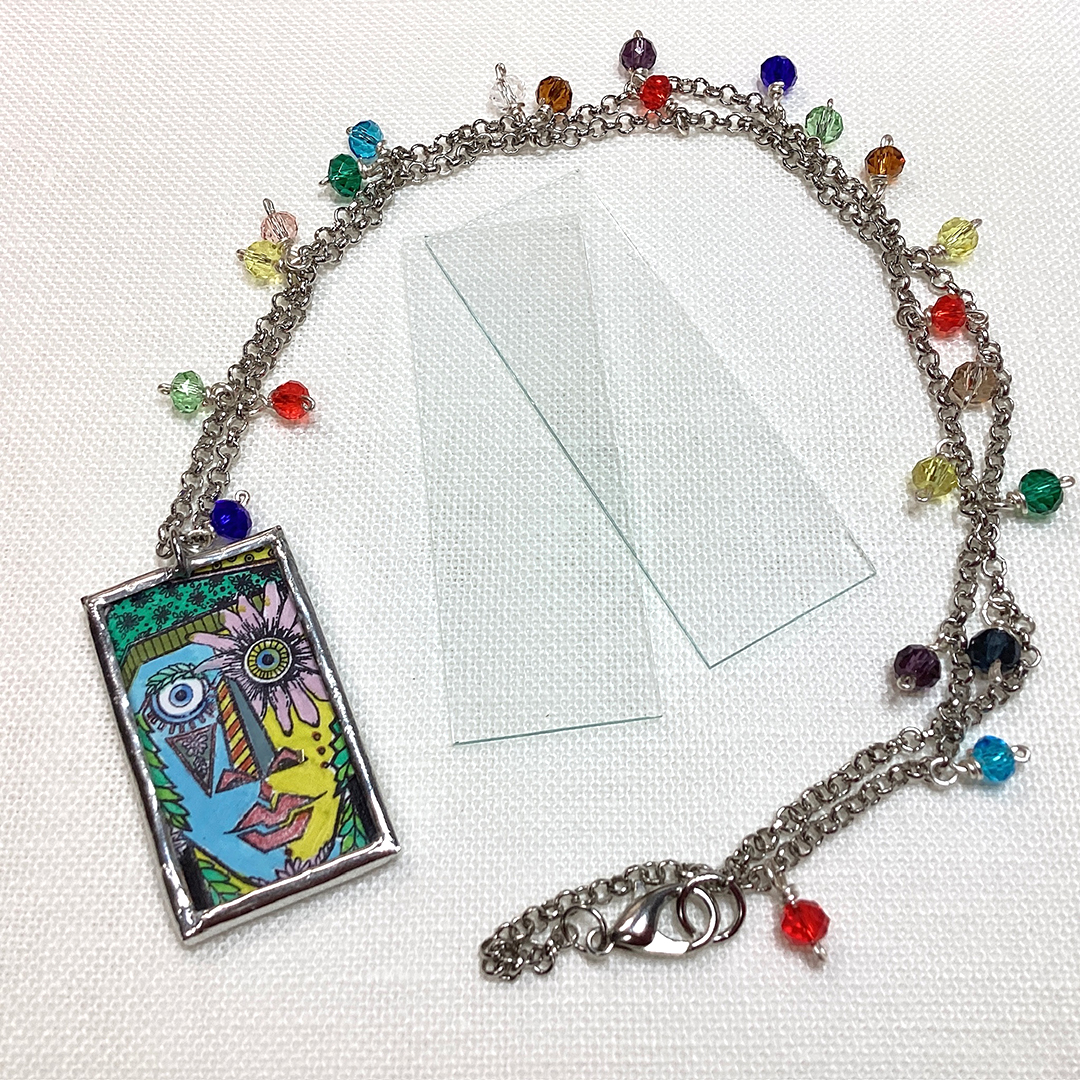
Finally, I add another pendant picture. (I'm soldering with micro slide glass.)


Facebook: Etsuko Noguchi
Instagram: Pixienest
Pinterest: Etsuko N

Monday, 6 November 2023

NEW PaperArtsy Products: Gwen Lafleur {November 2023}


A note from Leandra:

This release is reminiscent of a Sunday afternoon walk through a nature reserve. Birds, fish and flowers are there to delight and explore, from pond dipping to spotting birds circling overhead these gorgeous stamps sets will take you on a journey of discovery.

Gwen will be live with her new products for 30 minutes over in our Facebook Group, PaperArtsy People shortly after this post publishes. I really hope you can drop by or catch the replay. You will love seeing what Gwen has made with these for sure!
 
For the next few months, these stamps are available EXCLUSIVELY from our approved stockists. Please check the list at the foot of this post of from the home page tab of the blog.
 
Hi everyone, Gwen here! 

I'm thrilled to share my latest release 
for PaperArtsy with you which includes three hand-drawn stamp sets.

Nature has always been one of my biggest sources of inspiration and for this collection of stamps, I've turned to three of my favorite parts of nature: birds, flowers, and the ocean. I love having the ability to mix and match to add these elements into my work, and I hope you do as well!


Price: RRP €23.00 +VAT    Size:5" x 6" (13 x16.5cm)
All stamps are individually trimmed onto cling foam with a laminated storage/index sheet.

  
Eclectica³ Gwen Lafleur stamp set 37 (EGL37)

"Exotic Ocean" Mixed Media Projects


Sea Dragon Art Journal Page

I've long had a love for visiting aquariums and looking for tide pools on the beach - I think that sea life is so incredibly fascinating. I remember the first time I saw a sea dragon in an aquarium - such an elegant and other-worldly creature. They look like large, leafy seahorses and I couldn't resist drawing one as a stamp to go into this set. 
 

I love how you can add an exotic ocean creature into your work, as I did here on this page of a mini nature-themed art journal. But you can also use just the leafy edges of the Sea Dragon to create sea plants or to add a unique texture into the background or the edge of your work for added versatility.

Here you also get a better look at the fragment of a sounding map that I included as a background element. (These maps show the depth of the water as well as the locations of things like piles and submerged elements to help ships navigate through the waters.) This makes such a cool and realistic looking collage element for creating a layered background.
 

Clown Fish Altered Postcard

While I love Nemo as much as anyone, I have to admit that I've had a soft spot for clown fish since one of my roommates in grad school got a salt water aquarium that sat in the living room of our apartment; one of her first additions to the tank was a pair of these distinctive fish. I used to take care of her aquarium for her when she would travel and the Clown Fish habitat is still a favorite stop when I get a chance to visit an aquarium.

Add the clown fish to some coral, smaller schools of fish, and give them some bubbles, and you can create a fun scene for a card, journal page, or for a scrapbook layout. For this piece, I used one of my favorite substrates - an antique postcard. 
 

One of my favorite things about these stamps that having the shading and a light suggestion of scales included in the design makes it very quick and easy to color them (and if you stamp on a white background, just a quick layer of orange and you're about done!) 
 
 
I also really enjoy having two different perspectives of the fish - it makes it so much more fun to create scenes and to have some variety to add into your work. 


Eclectica³ Gwen Lafleur stamp set 38 (EGL38)

 Backyard Birds Mixed Media Projects

I grew up in a family that loves birds - there are a few different versions of Sibley's bird books handy in our living room for any backyard birding and my mom still tells stories of the types of bird houses that were on her parents' property when she was growing up. I also have aunts and uncles who are birders and I have several t-shirts that proclaim, "Easily distracted by birds." Nothing but the truth! I can't imagine a world without birdsong and being able to enjoy the presence and antics of these fascinating creatures. 

For this set I picked a few favorites both from some of the many bird species that can be found nesting in my yard (here we have the Downey Woodpecker and one of its feathers as well as a Carolina or Black Capped Chickadee) to visitors (like this Red Winged Blackbird) who live in the grasses along the banks of a nearby pond and stop in now and then for a snack at one of my feeders. And of course, I included a branch for them to perch on with some acorns for a fun little accent.
 

Chickadee Painted Wood Ornament

I love Chickadees - where I live, we have Carolina Chickadees and they're tiny and adorable but also fierce. They stay here year-round, so I wanted to use one as the main image for a handmade Christmas ornament. I love how beautifully the image stamps and how quickly you can get a life-like bird with less than 10 minutes and a bit of paint and ink.
 
 
I'm also really happy with how easy it was to take the plain branch image from the set and transform it into a holiday scene with a few flicks and dots of paint to make pine boughs and berries.
 

Avian Art Journal Pages

I used the other two birds in the set, along with the feather and acorn images, to pull together a spread in my mini nature-themed art journal. I'm absolutely thrilled at how beautifully these stamp and how easy it was to create realistic looking painted birds in my journal.
 

This little friend is drawn as a male Red Winged Blackbird, but all you have to do is change the colors of his feathers, beak, and legs to create a completely different species of bird. Here, I kept him as a blackbird and love how I was able to create a bit of a wash with the PaperArtsy Fresco Acrylic Paints to add his dark color without completely losing the details of the stamp.
 

It's no secret at this point that I love to use my stamps to create scenes, and I can't get over how that single branch can be so versatile and create different looks in those scenes depending on how you position it, what you add to it with either stamps or paint / drawing, and how you color it.
 

For the other page in my spread, I focused on this little male Downy Woodpecker (the female doesn't have the red patch.) In the last several years I have become quite fascinated by woodpeckers - especially the way they rule the feeders and the hierarchy that is determined by the size of the woodpecker, but I digress... (Did I mention that I also have a few t-shirts that say Bird Nerd?)

Needless to say, these little guys are also quite adorable and I love their black and white spotted feathers that give them such a unique and easily identifiable pattern.
 

Hands down, my favorite thing about the woodpecker and feather stamps is that I stamped it in black, and with literally two minutes and a white gel pen and a touch of red PaperArtsy Fresco Acrylic Paint, I had a totally realistic looking illustration in my journal. I know I've said it a few times, but I do love a great shortcut!


Eclectica³ Gwen Lafleur stamp set 39 (EGL39)
 
 Pollination Garden Art Journal Spread

For the final set in this release, I had to include flowers, of course! I drew some of the plants that I have in my yard, which were initially chosen to plant because the deer won't eat either Marigolds or Lantana. However the amount of Lantana in particular has increased because it's such a great pollinator - both types of flowers attract lots of bees and butterflies. 


Of course, I had to have a classic jar stamp for collecting a bouquet of backyard blooms in your artwork. I love creating and using stamps of glass items in my work and how fun it is to fill them with flowers and other things (see the project below!) In this case, I didn't even mask anything - I just used paint and a pen to make it look like the flowers were overlapping the glass. I also enjoy how easily you can make a wash with the PaperArtsy Fresco Acrylic Paints to make it look like the jar is full of water.
 
 
The little bee might be my favorite part of the set, though - it's awfully cute! 
 

For the second page in the spread, I focused on the French Marigolds - I love the color and I think they're such a pretty flower. I added a stem of lemon leaves that make great filler if you want to make a bouquet in the jar, but they're also great for giving a little more weight and added layers to a focal point. 
 

I actually drew this butterfly as a Monarch Butterfly, but you can color it any way you want to change it up and give you a different look for different projects. The same is true for the other flowers and leaves in the set - it's easy to mix it up to get lots of variety in your work with just a different shade of paint!


Project - Stamped and Collaged Tags


As a project combining all three sets from this release, I thought it would be fun to do some collaged tags with focal points made up of stamps from different sets. Together, these three tags use all of the stamps in all three sets.

 
First you stamp and paint your images. I used a stamp positioning tool and a lighter ink and stamped my first image on heavy PaperArtsy Smoothy Card. I painted the image with PaperArtsy Fresco Acrylic Paints. When the paint was dry, I put the paper back in the stamp positioning tool and restamped the main image in a darker ink to get the details back in. 
 

If you want to create layered pieces, you can then mask the first image and follow the same process to stamp the image you want to have showing behind it. Or, just stamp them each separately and you can layer and glue them together in the next steps.

In the case of my Clown Fish in the jar shown above, I didn't mask it since I wanted it to look like it was inside the jar and I just positioned the jar stamp over the fish and stamped on top. (If there's a bit over overlap where the fish gets a bit outside of the jar, you can cut it off.)


After the focal points are stamped and painted, cut them out. If you didn't mask and layer the designs into a single image to cut out, just do each one individually and then you can overlap them as you like and glue them in place.


With the focal points ready, you can start working on the elements to make it into a tag. I started with the tag background using an extra large manila tag and rubbed Distress Ink on my Teflon mat and spritzed water, then rubbed the tag in the wet ink. I also pounced the ink pad directly on the tag and spritzed and then dabbed with a paper towel to get different effects. 


Next you can pick some of the images that you didn't choose for your focal point and stamp them randomly over the background of the tag. 


With the background done, it was time to create a few collage elements. For this I just used plain copy paper since I wanted something very lightweight, but you can use whatever you'd like. For each one I chose 1-2 images and stamped them - some random, some in a pattern, and then colored them with PaperArtsy Fresco Acrylic Paints and then added a light wash for the backgrounds.


Once all of the elements are done, it's time to assemble! I pulled out some ledger paper, book pages, reproduction tickets, and some stamped labels. Arrange strips of your collage elements in the background until you like how it looks and feels - I like to have a bit of the stamping still show through from the base. Adhere the collage elements in place (I used a glue stick) and then glue down your focal point on top. (Since I used heavy card, I used Tacky Glue for that part.) 

Voila! Completed tags that you can add into a journal, turn into a tag book, or give or hang them as their own little pieces of art.


That's it for today! I hope you love the new stamps as much as I do and that you're feeling inspired by the samples and project tutorial. I can't wait to see what you all do with the designs in this new release.

Happy stamping!
Gwen

Socials...

Teaching Schedule:
November 2023 - Gratitude Junk Journal 2023, hosted by Tiare Smith (Online - not too late to join!)
November 18, 2023 - Ornaments & Amulets at Artistic Artifacts in Alexandria, Virginia, USA
April 19-20, 2024 - 2nd Annual Creative Minds Summit at Artistic Artifacts
May 16, 2024 - Angels & Icons, Art & Soul Retreat, Harrisburg, PA, USA
May 17, 2024 - Stitches + Glue, Art & Soul Retreat, Harrisburg, PA, USA
May 18, 2024 - Flip Art Folio, Art & Soul Retreat, Harrisburg, PA, USA

I also have several online workshops available on demand. Those and future workshops are all listed and kept up to date on my website.

Below is a list of the retailers who have already got these new releases in stock ready for you to buy NOW! 

 PaperArtsy Stockist List

Our stockists are your go-to  source for all PaperArtsy products, and we suggest that you also use the PaperArtsy People Facebook group to source a retailer in your country. Many are members of our FB group and will happily share links to their online stores.

Australia
Bev's Cross Crafts, Spreyton, Tasmania https://www.bevscrosscrafts.com.au/
Crafters Cupboard, Berwick, Victoria www.crafterscupboard.com.au
Memories on the Murray, Murray Bridge, SA  https://www.memoriesonthemurray.net/
Natalie May Scrapbooking, Dover Gardens, SA https://nataliemay.com.au/
Scrapbook Superstore & More, South Penrith, NSW https://www.scrapbooksuperstore.com.au/
The Scrapbooker's Confetti Box, Swansea, NSW https://thescrapbookersconfettibox.com/
The Scrapbook Store, North Perth,WA http://thescrapbookstore.com.au/ 

Belgium
Cart N Scrap Art, Antwerp, www.cartnscrapart.be
Créatelier Caracolle, Liège, www.createliercaracolle.be

Canada
Paper Art Creations Inc, Leduc, Alberta, www.paperartcreations.com/
Scrapbook Centrale, Dollard Des Ormeaux, Quebec www.scrapbookcentrale.ca
Scrap Addicts, Edmonton, Alberta www.scrapaddicts.ca/
Scrap and Bean, Edmonton, Alberta scrapandbean.com/ 
Scrapbooking Fairies, Drayton Valley, Alberta www.scrapbookingfairies.com/
The Paper & ink Boutique, Calgary, Alberta www.paperandinkboutique.com/
The Scrap Yard, Calgary, Alberta, www.thescrapyardcalgary.com/ 

Denmark
Hobbyboden Scrapworld Samso www.hobbyboden.dk

France
Eirl Bancon Cartoscrap, Midi Pyrenees, www.cartoscrap.com
Fée Du Scrap, Saint Sébastien-Sur-Loire, www.feeduscrap.fr/
Horizon Créatif, Ste Jalle www.horizon-creatif.fr
Instant Créatif, La Possession, La Réunion, www.icreatif.re
Katzelkraft, Ingwiller www.katzelkraft.fr/en/
Kerudoc Creation, St Yvi www.kerudoccreation.com
Le Grenier des filles, Pierre Benite
Page de scrap, Saint Pavace, www.pagedescrap.fr/
Scrap Déco Home, Goutrens, www.scrapdecohome.fr/
Toutencolle, Dun sur Auron www.toutencolle.fr

Finland
Heidin Korttipaja, Istunmaki, www.korttipaja.fi/fi
Piia Paper, Kittilä, www.piiapaper.com/fi

Germany
Stempelbar, Berlin, www.stempelbar.de
Stempeloase Munich, Munich www.stempeloase.de
Stempelfee Shop, Hilden www.stempelfee-shop.de
Stempellaedle, Stuttgart, www.stempellaedle.de/shop

Greece
Scraps N Pieces, Kallithea www.scrapsnpieces.gr

Italy
Immagine SAS di Rapaccini, Rome, www.immaginelab.com
Il Negozio Della Mamma Di Cle, Torino, www.ilnegoziodellamammadicle.com
Marte Savona, Savona, www.martesavona.it
Pezze E Colori, Lissone, www.pezzeecolori.it/ 
Piccole Passioni, Siena, www.piccolepassioni.it

Japan
La Wadao, Odawara, Kanagawa, www.lawadao.com
Tiny Dots, Funabashi-shi, Chiba www.tinydots.shop-pro.jp

Netherlands
De Hobbystudio, Genemuiden, www.dehobbystudio.nl/
Doe@ding,Spijkenisse doeading.nl/
Hobbycompleet de Duif, Leeuwarden www.hobbycompleet.nl
Stampingcorner, Capelle Aan Den Ijssel www.stampingcorner.nl

Norway
Hobbygarasjen, Kopervik, www.Hobbygarasjen.no

Spain
Cien por Cien Manualidades, Barcelona,  www.100x100manualidades.es
Ideas 10 Manualidades Y Scrapbook, Bilbao ideas10manualidades.com/
Marakiscrap, Tarragona, www.marakiscrap.com
Scrap & Papers Experiences, Barcelona, www.scrappapersexperiences.com
The Paradise Corner, Barcelona, www.theparadisecorner.com

Sweden
Butik Elva, Staffanstorp, www.butikelva.se

Taiwan
Mandy's Cards, Taipei www.facebook.com/mandy.card.77

United Kingdom
Amelia's Creative Crafts, Studley, Warwickshire  www.ameliascreativecrafts.co.uk
Art from the Heart, Harrogate, Yorkshire www.afth.co.uk
Crafts at The Malthouse, Herstmonceux,  East Sussex, www.themalthouse.co.uk/
Loobi Crafts, Leighton Buzzard, Bedfordshire, www.loobicrafts.co.uk
Stampers Grove, Springbank, Lilliesleaf, Melrose,Scotland www.stampersgrove.co.uk
The Artistic Stamper Craft Store, Faversham, Kent www.theartisticstamper.com
The Forget me not Kraft Kabin, Rochford, Essex, www.TheForgetMeNotKraftKabin.co.uk

USA
Artistic Artifacts, Alexandria, VA www.artisticartifacts.com/
Artistic Studio Creations, Fayetteville, Georgia www.facebook.com/ASCbyCrystal
Craftiness, Chatsworth, CA, www.craftinessonline.com/
Everything Scrapbook & Stamps, Lake Worth, Florida https://everythingmixedmedia.com/
Frantic Stamper, Oregon www.franticstamper.com
Free Heart LLC, Denver, Colarado, www.freeheartllc.com/
Joggles, Coventry, Rhode Island, www.joggles.com
PaperCraft Clubhouse, Westbrook, Connecticut, papercraftclubhouse.com/
Qingquing's Stamp Shop, Portland, Oregon
Roadtique Boutique, Rochester, New York Facebook Page
Runaway, Art & Craft Studio, NE Salem, Oregon www.runawayart.com/
Simon Says Stamp, Columbus, Ohio www. simonsaysstamp.com
Topflight Stamps, Irmo, South Carolina topflightstamps.com/

If you are interested in becoming a PaperArtsy stockist contact Dounia@paperartsy.com for more information

PaperArtsy Links
Facebook Group PaperArtsy People
Facebook Page PaperArtsy