Showing posts with label 2017 Topic 8. Show all posts

Tuesday, 26 December 2017

PA 2017: Blog Year in review: Topics 5-8


Good Evening again from PaperArtsy HQ,

Over the next few days we are taking a look back at some of the magnificent posts we featured over the Spring period of 2017 on the PaperArtsy blog. 

Tonight I'm sharing some highlights from Topics 5-8. Grab some Xmas foodie leftovers and a cuppa, and lets take a look!

Leandra 

Topic 5: Blue and Ochre

As I explained yesterday, every round in 2017 we kicked off with a 'colour combo', as featured in Stampington's True Colours publication. Another combo in there which I use time and time again is blue and ochre.  It does take some care, because mix those 2, and you create a lovely green, which is fine if you want green, but if you perfer the contrast these 2 colours offer, then you do need to work with dry layers to maintain each colour's integrity. Let's see what some of the bloggers got up to...

My first pick is this incredibly detailed journal spread by Chris Cresswell. I could stare at it for an absolute age! Interactive doors, beautifully layered flowers, and all the colours pop and contrast so well!. Caramel and Toffee are 2 of our paint colours that often get overlooked, but those with Pumpkin Soup, and tadaaa....Chris has created a range of ochre  tones so perfectly!


And I hope you didn't miss this booklet by Claire Snowdon. She brayered her backgrounds, used masks with Distress Inks for added depth.


You can see the contrasting shades just sit together  so well. At the end of the day we are talking blue and orange, but if you take orange into the rustic ochre direction, you can also change your blues too, creating a softer contrast.


So are you ready for a Lauren doozy? One of her weird and whacky zinski-world creations?
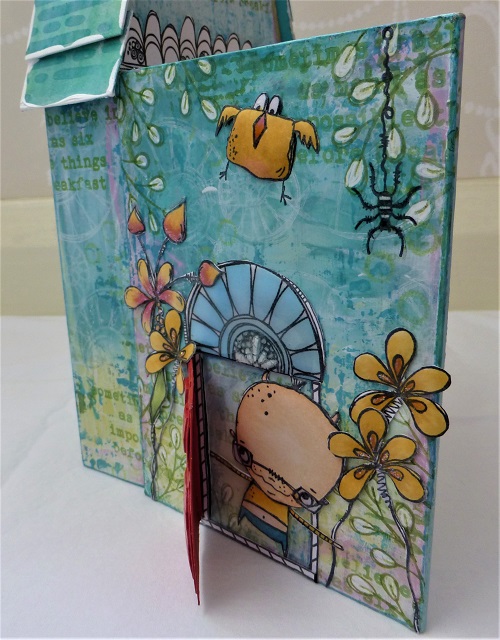

Well we were so busy with Ally Pally when this published, that it really did not get the attention it deserved! A 3 dimensional, interactive Zinski zone!


Her flower-puffing technique fascinated people, but can you see how she does it to the Zinski birds too! She even has roof shingles and stained glass windows!


Topic 6: Resin and UTEE

For many people, melting embossing powders is thier first 'wow' crafty experience. When you see the powder melt, perhaps it's a shiny raised pop, or a molten metallic medallion, but it just is super-cool when you start to learn the myriad of techniques this product offers. Then, when you get hold of the larger UTEE crystals, OMG, the things you can do!!
Resin is a pretty broad term, and at the other end of the scale we have those 2 part mixes that set up hard, and are wonderful for jewellery, small niches, and even seal floors , canvases or tables!

My first pick is this striking panel of tiles by Nikki Acton. Not only is the colour contrasting, but that tile is very clever in the way she floats a stampled image in the top layer so delicately.


Not everything went exactly to plan for Jennie, but she always pulls it together so perfectly, that in the end you can't imagine it any other way. See here for more.


I don't think I have ever seen anyone master UTEE so elegantly as Lin Brown. In this post she shares a few samples, here is just one of those, where she buries embossed metal into her UTEE. Her finishing touches are always so well executed. How dare she retire! We still crave to see more of her creative exploits!


And it must be in the genes of Lin's/ Lynne's - are all L's this good at UTEE exploration! Lynne Moncrieff is well know for her use of resin papers, and here she shares one such trinket composed to perfection!


Topic 7 : Found Objects

Well I'm pretty good at losing things, it has to be said, and how frustrating is that! THe number of times i take off my glasses before after showering, and cannot see them to find them again!! Finding things is so much more fun! This topic sent our designers into a spin of activity.

Kim Dellow contrasted the delicacy of acetate, with some rusty washers in this post
 

And we all loved Ellie's forest walk which turned up a range of items that she re-purposed into a forest floor canvas so beautifully.


And Raquel re-purposed all sorts of items to create this coffee puck dispenser for her kitchen!


Jennie altered a tin to create a new home for a little found boy! He looks very happy! 


Topic 8 : Assemblage
Assemblage. It's an artsy kind of word, but isn't that what we do no matter what we create?? We are basically assembling layers, textures, colours, embellishments until they are arranged in a way to suit our personal taste. I guess 'assemblage' could infer more of a 3D composition, but lets see what everyone got up to for this one!
First up check out this lovely piece that Autumn Clark entered in the challenge for this topic. I love the minimal use of colour, yet there is so much to see. She always gets that light-dark balance just right! Go to her post and check out the textures in her base layer. Beautiful!


And this by Alison took my breath away. 


It has to be one of my favourite pieces of the year! It was this piece that inspired me to make 'shades of white' a colour option later in the year! She started with a base layer of tags!! Just go and look again here, it is beautiful!!


I really liked this from Alison Hall too. Such a great idea to use a piece of slate stone this way as her substrate.


Carol Fox created this Zinski inspired garden sign


And Keren decorated a violin - as you do!! Yes you do get spoiled people!!


I hope you have enjoyed this trip down our memory lane of 2017 with me. I'll be back tomorrow with some more treat and reminders of how clever and creative our talented bloggers are! Don't forget to save the posts that float your boat on pinterest. No excuse now, you'll hit the New Year with a dozen ideas to crack on with!

Leandra 

Sunday, 21 May 2017

Topic 8 {Assemblage} Challenge Winner

Hello everyone, Leandra here today,  

We have just completed 2 weeks of wonderful assemblage posts her on the PA blog. Assemblage is simply the way we pull a bunch of objects together in a way that is pleasing to the creator. Even decorating a room is assemblage on a grand scale; colours, textures, shapes and layers all play a part in creating the overall look.

It seemed to be a topic that stumped not only you guys (participation was down on our usual) but also I got many email inquiries from the bloggers who also struggled to fix on what they might conjure up. They were looking for rules, and guidelines or a framework, and I guess it's that problem where sometimes, if the brief is too wide, then we don't really know where to start from.

Hey ho, we are moving onto to a new round soon, not every topic will tickle everyone's fancy!

So who won the Topic 8: Assemblage...

The winner of Found Objects is: Jane  from Dizzycrafter with her lovely post 'Rusty Cogs'


Email Leandra to claim your prize. sales@paperartsy.co.uk

Darcy is off for the next month or so, she is recovering from a major, planned surgery, so she on strict orders to not move, lift, wiggle etc...I think about the only thing she can do is listen to audio books and look at movies, but only that will happen if she is feeling up to it. We all wish her a very speedy recovery!!

We are taking a short 2 week, mid-year blog break. Those of you who follow us, will know we are finally coming up for breath after an unexpected crazy start to the year, and we need to catch up and re-group in readiness for the next round on the blog...as ever, it will be something a little bit different, so hold onto your hats, and we''ll see you back here on Sunday 4th June. That evening, at blog-o'clock, some of us will still be driving back from Doncaster at that time. If we get to see you at the Doncaster Dome, even better, we have lovely ideas and products to share with you all at the show too!!

Happy crafting!
Leandra

Saturday, 20 May 2017

2017 #8 Growth {by Keren Baker}

2017 Topic 8: Assemblage


Throwing down the 'think outsode the box' challenge with gusto, Keren has used a very unusual substrate as her base for this assemblage! Take a look...
 

Hi everyone, it's Keren with you today.

This Assemblage topic is something that I dived into with no real direction and no real clue about what the theme really entailed. This assemblage piece has ended up being possibly the favourite project that I've created to date.

I finally got my head around what assemblage means once I'd completed it (haha!). In my musing over a 'found' object I actually found a child's violin I'd been given years ago and had forgotten about. This sparked the whole project. I used lots of bits lying around my desk that were half started for other projects and inked up some JoFY sets too!


I loved everything about this - gathering unconnected items that fitted into the theme 'Growth'. As a musician, the only way to grow is to practice and repeat and immerse yourself into music. I guess art is like that too. The first sticking point was actually allowing myself to paint the violin! Wisdom would have said to actually sand it down, but I knew that the Fresco paints were good enough to handle my short cuts ;-). Once I'd painted two completely contrasting colours using Hyde Park & Smurf, I added Crackle Glaze before a coat of Chalk


I could have removed the strings but decided to avoid the hassle and simply moved them out of the way. Having unmounted flexible stamps were so useful when trying to stamp onto the neck. I'd previously coated the neck with a couple of layers of Guacamole and then I used the leaves from JoFY set 49


I wanted to change the leaves into flowers, so added a couple of colours plus some gel pen detailing and voila!


The quote is completely perfect for the theme and came from another JoFy set- 52. I was too nervous to stamp onto the violin as I didn't want to mess it up so I just used tissue paper instead.


I loved the idea of butterflies adding movement to the piece and had some white Stazon stamped on acetate that I attached in different areas. Without growth, the caterpillar would never transform into the butterfly so I used the butterflies from Hot Pick 1506


I wanted to add something that tied in the musical theme. I took some sheet music; a piece of Einaudi's 'Divenire' that I'd had to play for a friend's wedding. The culmination of the growth of their relationship was their wedding, so it tied in perfectly with the theme.


You can see a little glitter on the Grunge Paste that are pasted onto acetate. I used a Lin Brown 005 stencil . It does however peel off really easily and is very brittle on the acetate. Next time, I'd gently sand the acetate and perhaps add some Gel Medium to the Grunge Paste to add some flexibility.


I stamped and added the beautiful JoFY flowers and arranged them as if they were growing out of the F holes. The found wire spring and old beaded strings (for the butterfly antennae) helped finish off the details.


Creating Assemblage with leftovers was easier when I didn't overthink it. Taking an unloved instrument and re-purposing it seemed like a kinder act than simply recycling it. Deciding to cluster the main design elements in one area meant the piece didn't end up feeling so cluttered and incorporated my love of white space too. If you get the chance to upcycle an old instrument, do have a go. I'll be hunting out more old/broken instruments and I really recommend it- the sense of the instrument having had a previous life and wondering what music had come from it really added to my creative experience. I need to be brave and now drill a hole in the scroll so I can maybe hang it up in my craft room! 

Thanks for joining me. Do catch up with me over social media too,
Keren xx

Blog: Kerenbaker's Blog
Facebook: Keren Baker
Twitter:@craftstampink
Instagram:@craftstampink
Pinterest:@craftstampink

Wow, I'd be over the moon and totally buzzing with that piece Keren! You conducted your creativity like a true maestro! Fantastico! ~ Leandra


We always hope that you  learn something interesting from our blog. Our bloggers deeply appreciate your comments so much, so please take time to let them know you've been inspired! Why not join our challenge by blogging your interpretation of the current topic and link it here?

The current topic link Topic 8 (Assemblage/ 3D Crafting) will close 17:00 (London Time) Sunday, May 21st 2017, and the winner will be announced 2 hours later at 19:00.

All links go in the draw to win a £50 voucher to spend on products of your choice from the PaperArtsy online store.


Friday, 19 May 2017

2017 #8 A Great Many Things {by Lauren Hatwell}

2017 Topic 8: Assemblage

On the PaperArtsy blog today, Lauren successfully manages to transform a piece of waste card into a rusted frame with little niches to explore, full of detail and interest....

Hi everyone Lauren here. It's been fairly manic at PAHQ with one thing and another, so it's been really nice to take some time to make something lovely, but inexpensive for my home. 

I've always been a forager. I love nothing more than to find a pretty shell, a cute little vintage button or a postage stamp with a nice picture on it. The trick is always finding ways to enjoy those little treasures and keep them in view rather than tuck them away in a dark place never to be seen again. Assemblage is the perfect way to achieve that, so I jumped at the chance to make something for this theme. My starting point was some cardboard packaging from a game and some greyboard (Ahhh Greyboard! How do I love thee? Let me count the ways...)

My project today is really about creating a place to put my little finds so that I can see them and appreciate them every day. I wanted something I can add to over time, but I want it to be nice to look at in the meantime. I've used some of the things I've collected over the years, pulled together with some of my favourite PaperArtsy Hot Picks. 

I've used Hot Picks:


...to set the scene for my finds


It never ceases to amaze me what you can achieve with paper and paint. From this plain old packaging for game pieces...


...to this brushed metal effect


....to something a bit more distressed using Black Knight Infusions


I love the way something as simple as Grunge Paste and Paint creates the look and texture of rust here.


Ah the joy of creating something from nothing. The packaging is coated with plastic so would probably have ended up in landfill. It's great to be able to make something useful out of it rather than just toss it in the bin. I've had these little shells in a bottle in a drawer for years. It's so lovely to be able to use them and enjoy them.


I still love seeing the top layer of paint crackle as it dries. The effect is wondrous. I need more crackle in my life!!!


More Crackle? How about some Crackle Glaze for those little clocks...


Last but not least, I had to add my favourite little butterfly from HP1602. She's an absolute stunner and adds a hint of colour and delicacy to the final piece. She's becoming a bit of a signature addition to my projects. I think she might be my desert island stamp....


I have really enjoyed playing with textures to make something useful. I confess I am absolutely in love with this frame and already planning to make a couple more to go in my craft room or hallway. There are lots of ways you could change the look of the frames too.  I might at some point sprinkle some Emerald Isle Infusions to add a hint of seaside/woodland moss or I might add  more "wood" and "metal" for a more industrial feel. It's going to be fun collecting little bits and bobs for the apertures in my frame too. The next frame has larger apertures and I am already looking forward to foraging through my collection of HotPicks stamps for some larger images to set the scene for my photographs and treasures.

Thanks for joining me this evening. Hopefully you'll feel inspired to have a rummage and assemble your own piece of art for the challenge. 

Lauren Hatwell
Blog: Marvelous Mechanical Mouse Organ
Facebook:Lauren Hatwell
Twitter: LaurenHatwell @Bluebertie12

10 out of 10 for repurposing something totally useless! What a stunner, I love that you have left some of the niches blank and been selective about which ones to decorate. I know those infusions over metallic glaze have been a big hit for you at demos lately! The textures are gorgeous. Awesome idea! Thankyou! ~ Leandra


We always hope that you  learn something interesting from our blog. Our bloggers deeply appreciate your comments so much, so please take time to let them know you've been inspired! Why not join our challenge by blogging your interpretation of the current topic and link it here?

The current topic link Topic 8 (Assemblage/ 3D Crafting) will close 17:00 (London Time) Sunday, May 21st 2017, and the winner will be announced 2 hours later at 19:00.

All links go in the draw to win a £50 voucher to spend on products of your choice from the PaperArtsy online store.

Wednesday, 17 May 2017

2017 #8 A Modern Cinderella Shoe {by Liz Borer}


2017 Topic 8: Assemblage


Liz Borer joins us this evening with a stunning creation, her use of colours, paint, and blending techniques are always beautifully considered; true eye candy. 


Hi there everyone , today my blog post is within the subject of Assemblages . Unfortunately I have been doing a lot of tidying and packing recently and couldn't find any of my stash to create what I had originally intended! So I was wandering around the house wondering what to do when I came across an old pair of my daughters boots which were looking very sad. I decided to do some three dimensional crafting starting with a boot (I did ask her permission first!).

Poor boot! It was badly scuffed and stained from salt, definitely seen better days. I will admit to painting the whole boot with an acrylic sealer before starting, which is why it doesn't look too bad. This wasn't because I didn't think the paint would adhere, I know it will, but to stop any stains seeping through.


So firstly I painted the whole boot with Mushroom Fresco Finish Paint and dried it. I used Grunge Paste through a stencil onto tissue paper because I wanted to add dimension to the background. Once dry the tissue is strong enough to hold the Paste but flexible enough to place onto curved surfaces. I apply it by painting a thin coat of Matte medium to the surface, applying the tissue paper and painting more matte  medium over the tissue. This adheres the tissue and if you paint gently it flattens any wrinkles. I find it easier to cut up the stencilled area and apply it in smaller pieces. I had intended to only add this to the boots heel but I liked it so much I added parts of the stencilled Grunge Paste all over the boot!


The whole boot needs repainting to cover the Paste and tissue paper. I then washed thinned Plum paint into the creases and along seams to add interest. Also l rubbed White Fire Treasure Gold over the raised areas to highlight the stencilled shapes.


Now for the fun part! I collect lace and trimmings from lots of places. The trimming around the top of the boot is a ribbon with beads hanging from it. I painted the ribbon with Plum paint and once dry attached it to the top of the boot then added more lace. 
Am I crazy to say that at this point I want a pair of boots like this ?!


I found some Grunge paper pre cut swirls, so l painted them with Squid Ink and embossed them before adding some Treasure Gold.


Here's a lot of embellishments that I have coloured with White Fire Treasure Gold. I have found that if I mix this with a little alcohol blending solution I can make a paint to used to colour any items .


I've gone rather over the top adding lots of embellishments and the painted swirls to the boot. The boot is on a block of wood which was painted with Squid Ink.


I love the finished boot ! I think I may decorate the other boot (maybe very steampunk) because I enjoyed making this so much. But, oh dear, yet another thing I won't be happy to throw away because an old shoe or boot can have a new life ....
Bye for now, Liz .

Oh Liz, this is fabulous, theatrical and magical; definitely fit for a princess, or any shoe lover for that matter. I can imagine a shelf full of amazing shoe creations, no more unloved shoes. The boot itself is wonderful but displaying it on the board with the lace doily and all the extras really does transform it into an art piece. ~Darcy

We always hope that you  learn something interesting from our blog. Our bloggers deeply appreciate your comments so much, so please take time to let them know you've been inspired! Why not join our challenge by blogging your interpretation of the current topic and link it here?

The current topic link Topic 8 (Assemblage/ 3D Crafting) will close 17:00 (London Time) Sunday, May 21st 2017, and the winner will be announced 2 hours later at 19:00.

All links go in the draw to win a £50 voucher to spend on products of your choice from the PaperArtsy online store.