
2017 Topic 6: Resin

And now for a fabulous idea that works for charms, jewellery and all sorts of dangly bits that might just add the perfect finishing touch to your crafty projects! Lynne has the perfect solution!
Hi everyone, Lynne Moncrieff (Adorn) here this evening, delighted to be sharing a blog post for Topic #6 Resin.
Resin
had me hooked from the first outing even though our relationship has
had one or two bumps in the road, it being the more temperamental
character in this relationship! I still view it as early days in our
relationship, we have only been working side-by-side for a year or so.
The
beauty of resin is the possibilities. Although it was the prospect of
so many possibilities which hindered me in my decision making of style
of project. As I prepared for this project, I did not actually know what
type of project I would make, would it be a resin paper journal or some
form of wearable art, I could not decide. The designated stamps, the
latest Lynne Perrella Stamps, ultimately made my decision for me.
Studying the details made me realise how suited the stamps are for
bezels which would become part of a pendant.
In
the photos, you will see items (bezels, stamped images) which do not
appear on the completed project. I wanted to show the process as I
approached it, which meant I prepared items which I subsequently decided
not to work with. This is how I work all the time, a very fluid
approach. I am very relaxed about this as I never see it as time wasted
preparing those items because I can always save them for another
project.

ICE Resin was used in two ways on this pendant, to fill bezels and to create resin paper.


I wanted the paper with the stamped images to retain opacity so I applied ICE Resin Paper Sealer. If I had not applied it, the paper would become transparent once the ICE Resin was applied and the stamped detail would be lost.

This project was an opportunity for me to have my first play with Iced Enamels. You can see the comparisons with the bezels straight from the package. I decided to add a layer of Ivory onto the Torched Copper (square bezels). This was really a play session from beginning to end because at no stage did I know for certain what my plan was.

The stamped images placed inside the bezels, ready for resin time!

Following manufacturer's instructions is key to successful resin. If I have a spell away from working with resin, I will refresh my memory of the do's and don'ts.
With the mixing spoon, the resin is gently dribbled into bezels. A doming effect can be created with ICE Resin which is so beautiful and the clarity of the resin is exquisite.

Normally
I apply resin to full book pages, this time I tore pages to approximate
size I would require. It was only at this stage, I knew the direction
for incorporating resin paper into this pendant.
 Alongside
the vintage book pages, resin was also applied to more stamped pieces.
Some of the stamped pieces were first prepared with paper sealer
Alongside
the vintage book pages, resin was also applied to more stamped pieces.
Some of the stamped pieces were first prepared with paper sealer Now.... time to step away from the resin. Be patient, allowing resin to dry/cure.
You do not want to move filled bezels, the less you disturb them, the better. I place a plastic container over the bezels, to avoid any airborne dust particles floating into the resin. Ideally, you want to leave everything in situ until dry/cured. If you have furry friends, ensure they cannot get access to your working area.
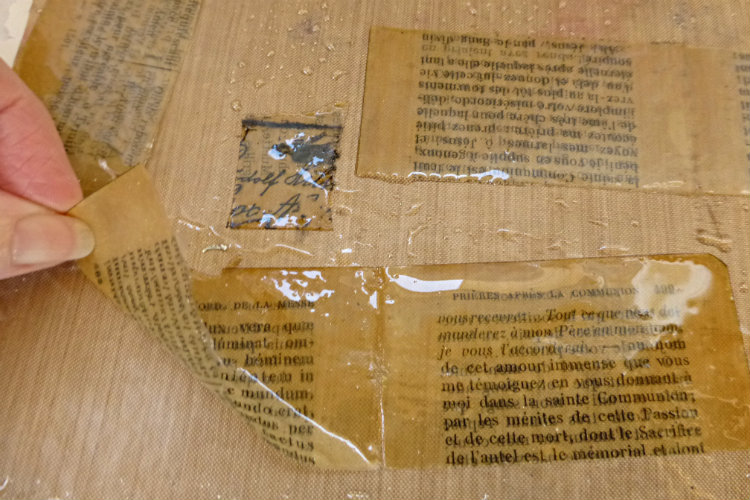
Leaving everything overnight, when I returned the next day, the resin paper easily peeled off the craft sheet.

Look at the clear, shiny results with the doming effect of the ICE Resin on the bezels.

Gathering various jewellery findings, I set about forming the pendant. I was indecisive as to how I would bind the resin papers but as I was digging through my vintage key collection, I happened to stumble across an Idea-ology clip. There was my answer for binding. Applying enamel to the clip allowed the appearance to be more cohesive to the rest of the pendant.


I shied away from working with resin for the longest time, an unopened package lay unloved for 2 years. What was holding me back... my own self! If you have any inclination of experimenting with resin, dive on in because I doubt if you will regret it. When incorporating stamping, you can see how the exquisite details are magnified in the bezels by the ICE Resin. When you consider that you can tint resin, work with inclusions, incorporating all manner of interesting items, stamping onto resin paper, working with fabric... the sky is the limit!
If planning on working with bezels/frames, I suggest getting up close and personal with your PaperArtsy stamp collection. View stamps with new eyes, seeking out the smaller design details.
I now wish I had continued this project further, making ear-rings or a ring - something else to add to that lengthening To Do List!
Visit HERE for videos, FAQs, Tips and Techniques on ICE Resin and related products.
Oh this looks very addictive Lynne!! Thank you so much for sharing this and I really think those Lynne Perrella stamps are the perfect choice too! There is lots of amazing details!! I had no idea about the 'paper sealer' product! That will be very useful indeed! ~Leandra
We always hope that you learn something interesting from our blog. Our bloggers deeply appreciate your comments so much, so please take time to let them know you've been inspired! Why not join our challenge by blogging your interpretation of the current topic and link it here?
The current topic link (Resin) will close 17:00 (London Time) Sunday, April 23rd 2017, and the winner will be announced 2 hours later at 19:00.
All links go in the draw to win a £50 voucher to spend on products of your choice from the PaperArtsy online store.
The current topic link (Resin) will close 17:00 (London Time) Sunday, April 23rd 2017, and the winner will be announced 2 hours later at 19:00.
All links go in the draw to win a £50 voucher to spend on products of your choice from the PaperArtsy online store.


22 comments:
I've never used Ice Resin but love your projects and your step by step pics to help us..
Gorgeous project Lynne.... I've always been scared to try ice resin but I may just get some and give it a go!!
I'm scared of using resin too but I might try to join in with some UTEE project. Such a beautiful make and jewellery items make wonderful gifts!
Such a fabulous piece of jewellery Lynne. It really is wonderful and I love the way the resin colours the papers. Jennie x
Gorgeous Piece Lynne x thank you for sharing the step by step and tips along the way. I love LP stamps, in particular the new release stamps. I was lucky enough to see them in real life at Ally Pally and can't wait to use them
Annie x
Sooo gorgeous !
Corrie x
Really gorgeous artwork Lynne and a very informative how too as well. Might yet tempt me to try ice resin so thanks for the inspiration.
Fliss xx
A fantastic post - so full of ideas and inspiration, and, of course, beautiful art jewellery.
Alison x
Wow! I love the way you have used those fabulous LP stamps - what a brilliant result with the ice resin! Chrisx
Absolutely stunning Lynne!
Loving the resin papers and your finished necklace is gorgeous Lynne! xx
Lynne, such an amazing post and your necklace is fabulous, dear.
The transformation of the bezels are unbelievable , so gorgeous, and your photos of papers and materials so wonderful. You surely don`t have to feel you need more training in creating beautiful pieces with resin. xx
What a wonderful, wonderful project lynne! Thank you for so many helpful tips,
Lucy x
Great Tutorial Lynne, I'm not very confident with Resin and find myself referring back to the method all the time. I love what you have created, Thank you for sharing.. Tracey xx
A stunning project. The resined papers look amazing.
What a great post! This is truly one to keep for all the tips and the wonderful result, which is so original and beautiful! Sorry I'm so late commenting. I've only just popped over and I'm so glad I made it! xx
Beautiful project.
What an astounding piece by Lynne! I love those new Lynne Perrella stamps- must haves!
Jackie xx
Wow Lynne I have just about all the elements you have used for your beautiful creations lying around including Ice Resin. Why? Because I've always been afraid to have a go with it, lol! Really must take the bull by the horns and have a go.
Hugs
Lesley Xx
What a incredible fantastic project Lynne!! How you used the resin are wonderful it's so many idea and great result. This necklace that assembled them all is really marvelous!! xx
What glorious experiments Lynne and stunning finished art, as usual. How inspiring these experiments are. I have never used Iced Resin....yet! Xx
fantastic piece of art!!!!love it
Post a Comment