Showing posts with label PM026. Show all posts

Thursday, 19 October 2023

2023 Topic 10: Tags {by Renata Peley} with Ink & the Dog Stamps


Hi everyone, it is Peley Renata with you today and this time, I was in a vintage mood. As you might know, I like to try new stuff, so a couple of years ago I tried creating junk journals. It was really fun and satisfying to do as I got to use up a bunch of old scrapbook papers, fabric pieces, threads, charms and paper scraps that I collected over the years. I remember watching a whole bunch of tutorials on YouTube on how to create your own journal, book binding and also on creating all those fun little pockets for journal cards and such. In a very short period of time, I created three journals, but sadly I didn’t create any new ones for at least a year now. So, this was a perfect occasion for me to go down memory lane and create mini versions of junk journals, but this time in a tag format!


This was one of those projects for me when you get so much dragged into your own thought process that you forget anything else like lunch, time, taking process photos and even to drink the coffee. But let me see if I can manage to draw you into my creative process and perhaps tempt you to try creating something like this as well.


The main topic for this project was tags, while the quarterly topic was typography and, in my mind, these two were easy to combine. I am one of those crafters who feels that a project isn’t complete without splatters and subtle text or numbers in the background. It is a perfect layer, perfect background interest which in my opinion goes well with almost everything. And I think that we all have at least one script stamp or stencil among our artsy supplies.

Anyway, with this topic in mind, I got inspired to use a couple of stamps from PaperArtsy Ink & The Dog A6 collection. All my chosen stamps featured either text, numbers or both within every image.


The stamp sets which I used and which you can see on the image above are: BG2 from the Backgrounds collection, PT2, PT3 and PT4 from the Pierrot collection, EA1 from Ephemera collection, then we have G3 from the Gentlemen and E3 from the Eclectic collection. They all belong to the PaperArtsy Ink & The Dog A6 Collection.

Now I knew what I am going to stamp, but just had to figure out on what to stamp. As I said previously, I did plan to create junk journal tag booklets, so I went digging in my stash of paper scraps. And that’s when the fun began!


The first step was to create a substrate and there were a couple of things to consider. First, it had to be in a tag format and second, it had to be a sort of a booklet. Also, I planned to create two tag booklets so that one of them would feature mostly text, while the other one mostly numbers. With that in mind, I decided to use the Art by Marlene Tag-Tastic die set. It cuts a very large tag with some other dies for hole reinforcers, a smaller tag which is great for inserts etc. Though I did modify it a bit so that both ends of the tag would be the same in order to close up nicely. Of course, you don’t really need a cutting die to create this, you just need a ruler, scissors and something to pierce a hole like a Crop-A-Dile or something like that.


Here you can see that I cut out four elements. Two of them as tag book covers and two of them as inserts. The paper that I chose was 200gsm mixed media paper as I didn’t want the cover to be too flimsy and also it should handle acrylic paints because the next step was to cover that big bright, white surface and make it look more vintage.

The first color that I applied was PaperArtsy Fresco Finish Chalk Acrylic Vanilla (FF65).


Of course, I didn’t want it too plain and simple, so I also added just a touch of PaperArtsy Fresco Finish Chalk Acrylics Khaki (FF177) and Toffee (FF74). By the way, I applied these paints on all four cut-out elements and on both sides.


As usual, I didn’t resist adding some splatters. For this, I used Toffee again but also PaperArtsy Fresco Finish Chalk Acrylic Buff (FF96). Later on, I will do some inking as well to age it a bit more, but at this point, I was happy with my base color.


With the base of the tag booklet complete and my selection of stamps on the ready, it was time for some rummaging around the house and my crafting closet.

After my little treasure hunt, I came up with some really fun goodies. First of all, I prepared a nice selection of book pages in various sizes, languages and aging stages. Oh, and in this pile, there were also a couple of tea dyed notebook pages and some old cardstock pieces as well.


And now the part that took me about 2-3 days: creating journal pockets. At start, I made some very basic ones, but that helped to jog my memory and I created a bunch of fun-looking pockets with windows and decorations and everything. Truth to be told, at this point, I strayed away a bit from my project and just had fun creating pockets in various styles, sizes and from different types of paper. If you ever want to try something like that, there are some amazing YouTube videos and blogs on this topic alone.

Anyway, I created about 30 pockets or more, but I will show you just a couple of them, mostly to demonstrate the styles and shapes that I made.


Another thing that I found in my treasure hunt was my old hand-made ephemera. There was a point some time ago, when I felt that I lacked inspiration and ideas to make a full project so instead, I decided to create some bits and pieces using really the smallest paper scraps. Some of them were free printables cut to small formats, some cut-outs from books or scrapbook papers while others I stamped. Anyway, I even got them organized by shape and size and now I was genuinely happy to put them to use. And as luck would have it, a lot of them had numbers or little text on them which was just perfect for my project where typography also was in the back of my mind as our quarterly theme.


With all these goodies gathered, I slowly started assembling my tag booklets and planning some layouts.


This first tag that I was creating was supposed to feature mostly numbers, so that’s something I tried to pay attention to when choosing the stamps from my selection to embellish the elements. Here, for instance, you can see that I chose a stamp with a big and bold number to decorate the little pocket that I created from tea-dyed notebook paper.


I didn’t only stamp numbers, I also stamped some other images. As you can see on the photo below. This picture in particular was supposed to be on the cover of my tag, but it felt a bit small so I decided to do some stencilling as well, using one of the super versatile and gorgeous PaperArtsy Mini Stencils PM026.


Working with this mini stencil inspired me to take a step backwards, and add more background interest with another PaperArtsy stencil featuring numbers: PS021. For inking, I used a Ranger Distress Oxide ink pad in Vintage Photo color, and while this ink was still in my hands, I also used it to darken the edges of my tag as well.


Of course, I was doing some more inking, stamping, paper folding and, in the end, my final layout looked something like this:


And from the other side:


As you can see, I created three pockets which I filled with small papers of different shapes and types, some of them premade, while others I cut out and decorated using PaperArtsy stamps. Also, I made a little cluster of papers and stitched them all together while leaving the threads for a bit messy look. What else….oh, of course I used paper doily, a bit of washi tape, mini paper clip and later on I will add a couple more details, but before completing this tag booklet, I made another one featuring letters, so let me show you a bit of that process too.


Ok, so now on to the second tag book. As you can imagine, most of the process was much the same but of course there were some details that I did differently this time around.

First of all, if I am being honest, I wasn’t 100% happy with my cover image for the previous tag. I stamped it with black ink, and even the print wasn’t ideal. But I learned from my mistakes and this time I used dark brown ink and a stamping platform.


This time, instead of numbers, I created background interest using a script stamp. This particular one is PaperArtsy Ink & The Dog A6 Backgrounds collection (BG2).


Next to the couple of premade ones, I also created a few new ephemera pieces using PaperArtsy stamps from the Pierrot collection.


The next step was planning out the base layout.


I am not the most organized person, so for me there was a lot of going back and forth between stamping, creating elements, planning layouts and realizing I have more pockets and not enough papers to fill them with, so once again I went back to stamping. Here you can see that I used tea-dyed paper and a PaperArtsy stamp from the Ephemera collection (EA1).


And then it was all about compiling these elements into one whole, binding the papers and making them into booklets.

For creating the holes, I used Crop-A-Dile, while for binding, I used jewelry cord, but any kind of decorative thread can work just as well.


As this project was coming to its end, I also filled the created pockets with previously mentioned ephemera pieces. Here I will show you a couple of images of how it all looked.


These two images above represent some of the pages from the tag featuring mostly numbers, but the next two the tag featuring letters.


As you might notice, I really tried to include the typography topic in my tags. Another thing that you might notice is some sewing that I did. When it comes to junk journals, I really enjoy including a variety of textures in them. That’s why some pockets were sewn in, others glued while I even stapled one of them. Also, there is such a lovely variety of papers included: old book paper, scrapbook paper, vellum, tea-dyed paper etc. And at the end, I feel like all these items came together so nicely, as if they were made for each other.


In a project like this, no one can guide you precisely from step to step. All of us will have a different range of stamps, ephemeras, sense of beauty and layout. When I create a project like this, I like using paper scraps, small cut-outs, but I also like a bit of stitching and sewing, I enjoy using different types and sizes of paper, I also prefer a bit of a messy look, imperfect stamping, clusters of paper, etc…If you try to create this kind of project, let yourself be inspired by other people’s work, but let your crafty supplies and scraps guide you through the crafty process. And if you do it like this, there are two things that I can promise you: you are going to have a lot of fun and a lot of mess to clean up around you crafting station. 😊

Renata 💜


Monday, 23 January 2023

NEW PaperArtsy Products: PA Minis & Mini Stencils {January 2023}

A note from Leandra:

These minis stamps and stencils are the dinkiest, cuties! Even thought we initially designed them to be used for miniature art, as it turns out, they can also work really well for journal pages and larger format projects.

I love the structure the stencil designs give to allow abstract layers to easily be created from the dot-frame, squares or geometric patterns with the stamps adding a structure and important postal details on the upper layers. This really makes it super fast to create cards, tags and more. Much easier to check out the pictures below to see how many of these products coordinate together so beautifully.

We will be live after this post publishes in PA People to briefly share samples and more from this release (replay will be pinned to the top of the group). These products are available to order NOW, and exclusively for the next few months from your favourite PaperArtsy stockist. See the list at the foot of this post.


Price: RRP €4.90 +VAT    Size: approx credit card size
All stamps are individually trimmed onto cling foam, with a laminated storage/index sheet.

For this release, we are exploring miniature mail art and ticket-inspired designs, with a focus on versatility, customisation and building layers. Amidst architectural details, you might also detect a French flavor, not surprising after 2 years living in the South West of France. These stamps might be mini but they offer a bit of everything for a max of possibilities: Patterns for background building, intricate focal elements to mix and match plus words and sentiments in all sizes. We hope you have as much fun with these as we are!


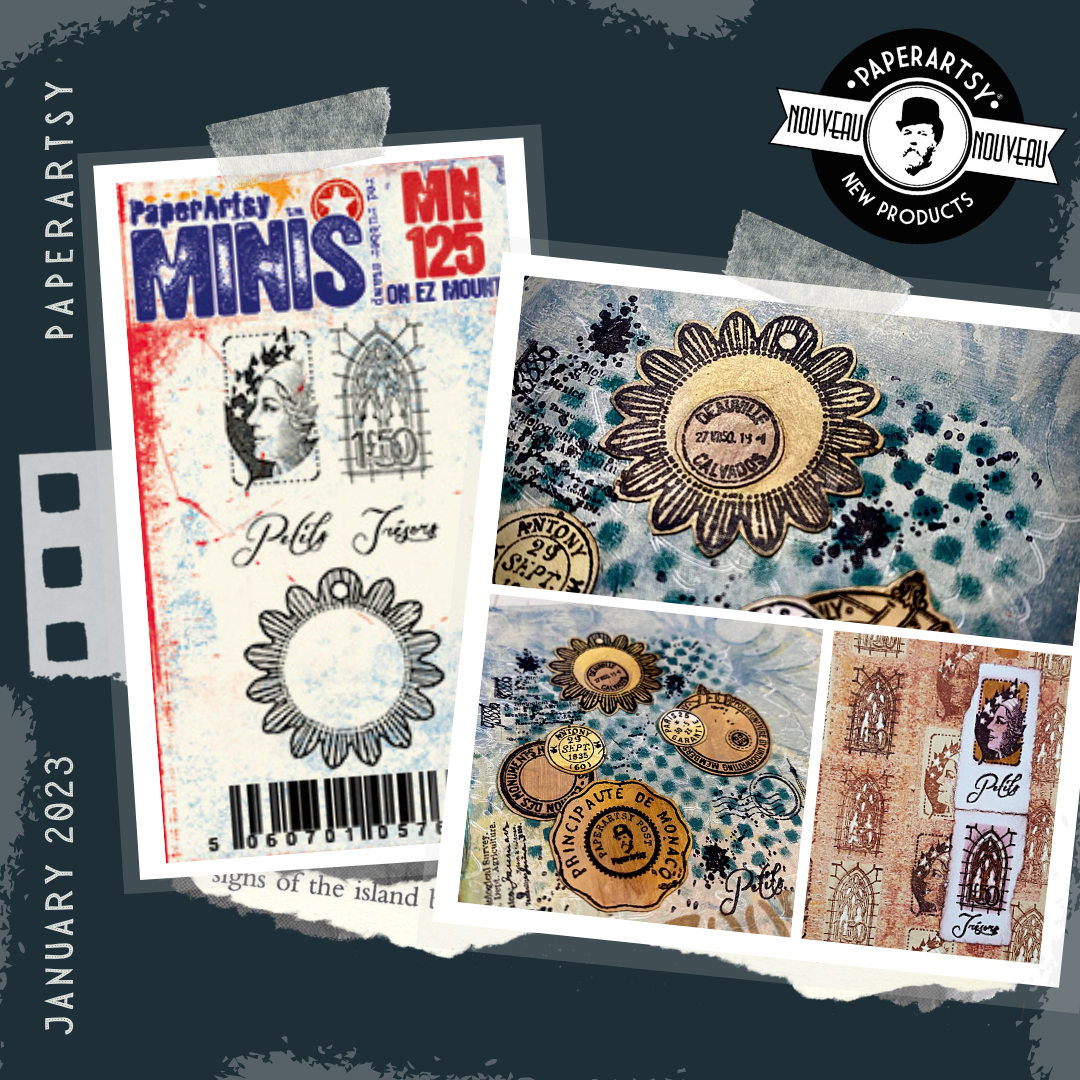
PaperArtsy Ink & The Dog Mini 125 (MN125)
Coordinates with MN127, MN128, and mini stencils PM021 and PM022

While certainly complete by themselves, the first 4 stamps of this release (MN125 to MN128) were created to also work together to 'mix and match' so you can expand the designs. The sun tag is perfect by itself to showcase numbers or a small portrait.


Featuring Marianne, symbol of the French Republic, and a classic gothic window, the two rectangular designs can easily be repeated for an intricate background or be used alone to personalise ephemera. We all have our collection of "Petits Trésors" (little treasures) so I am sure this sentiment will find its use.


The small designs are perfect to create your own ephemera, maybe tickets to visit a cathedral?


MN127 and MN128 both have two round designs that fit inside the sun tag, giving you 4 possibilities, and more to make by yourself! 


Just add a fun background, gel-printed for example, and you have a simple yet striking card.


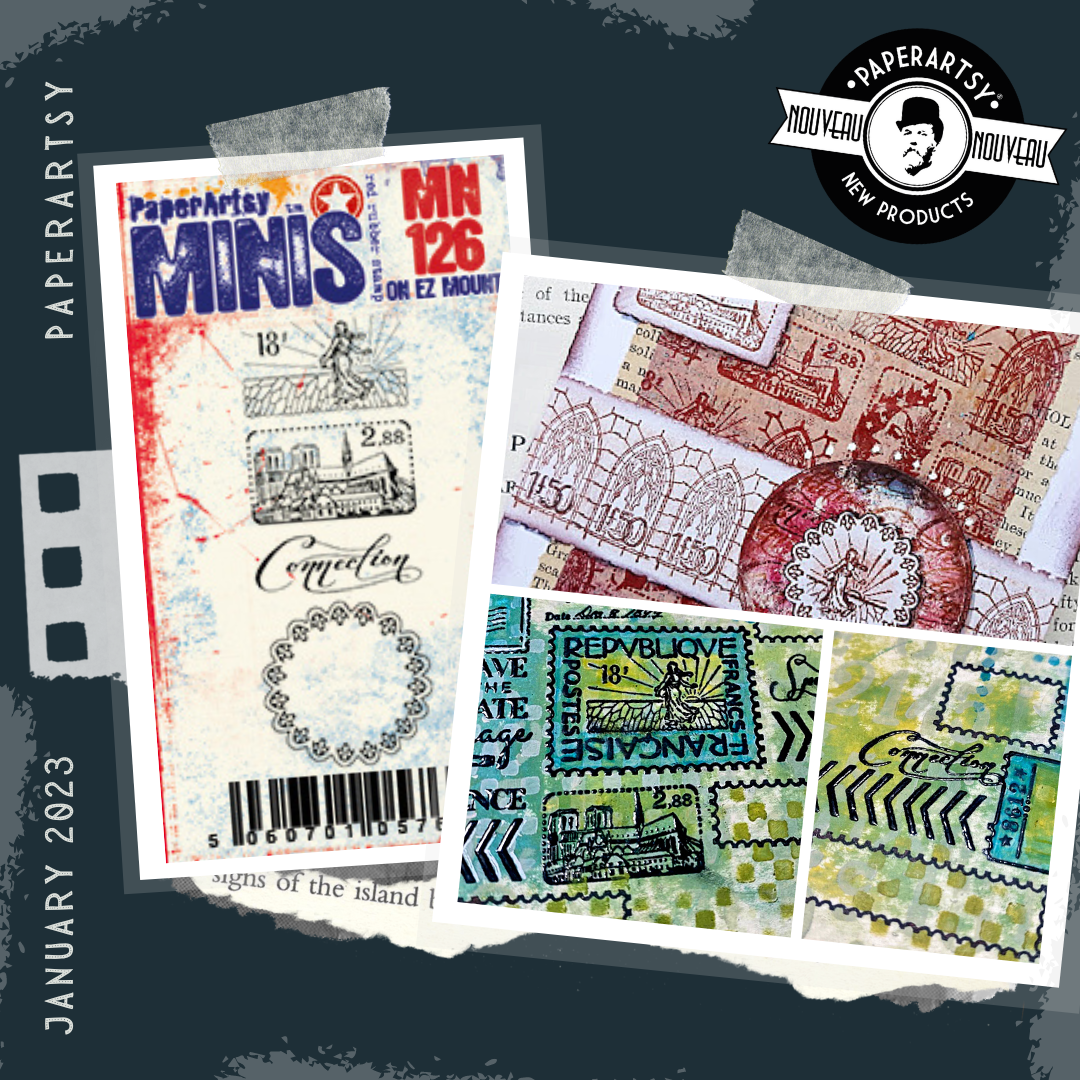
PaperArtsy Ink & The Dog Mini 126 (MN126)
Coordinates with MN127, MN128, and mini stencils PM021 and PM022

Featuring Notre-Dame cathedral and 'the Sower', a classic image of French stamps and coins, the 2 top designs are the exact same size as the rectangles on the previous MN125, only in a landscape orientation. You can therefore easily mix and tile them for complex and interesting backgrounds. They are also perfect to create your own small ephemeral elements.


This stamp also features an ornate round frame. The Sower (from the rectangle design) can fit inside the circle frame for an Art Nouveau inspired medaillon.


This scalloped frame also matches the round designs of MN127 and MN128 for even more combinations.


The intricate 'Connection' sentiment complete this stamp for a world of possibilities. With it swirls, it is also great to create interest in a background.


Framing an abstract image gives a completely different vibe, very decorative.


PaperArtsy Ink & The Dog Mini 127 (MN127)
Coordinates with MN125, MN126, and mini stencils PM021 and PM022

Postage stamps are a staple of rubber stamp imagery among our designs. With its unique font, this bold one can be completed by the rectangular designs of MN125 and MN126, or any image of your choice.


This 'postal frame' works both horizontally and vertically for maximum versatility.


There is a little bit of wiggle room when stamping the inside design, so it is quite forgiving even when you are just eye-balling it.


'Return to sender' and a custom Parisian postmark complete this mail art set.


The two round designs at the top also fit perfectly in the round circular tags from MN125 and MN126 for customised embellishments.


PaperArtsy Ink & The Dog Mini 128 (MN128)
Coordinates with MN125, MN126, and mini stencils PM021 and PM022

Time for tickets and coins! The coins, featuring Marianne, are the same size as the designs on MN127 and match the circular frames in MN125 and MN126. The word 'Specimen' is one of those useful ones that can fit across many genre.


The frame can accommodate the tiny scenes from MN125 and MN126 to create mini ticket ephemera for churches, museums and shows.


The coins easily repeat to pattern intricate and quick backgrounds.


You will also find many other elements that fit the frame too, such as this hand.


Also fitting within the frame to label your little treasures, we have added some survey tags from the 1890's.


The fine and intricate text from the 'big' one makes great for backgroung texturing, inkeeping with PaperArtsy tradition!


Of course, you can also use them to make your own tags, or by themselves.


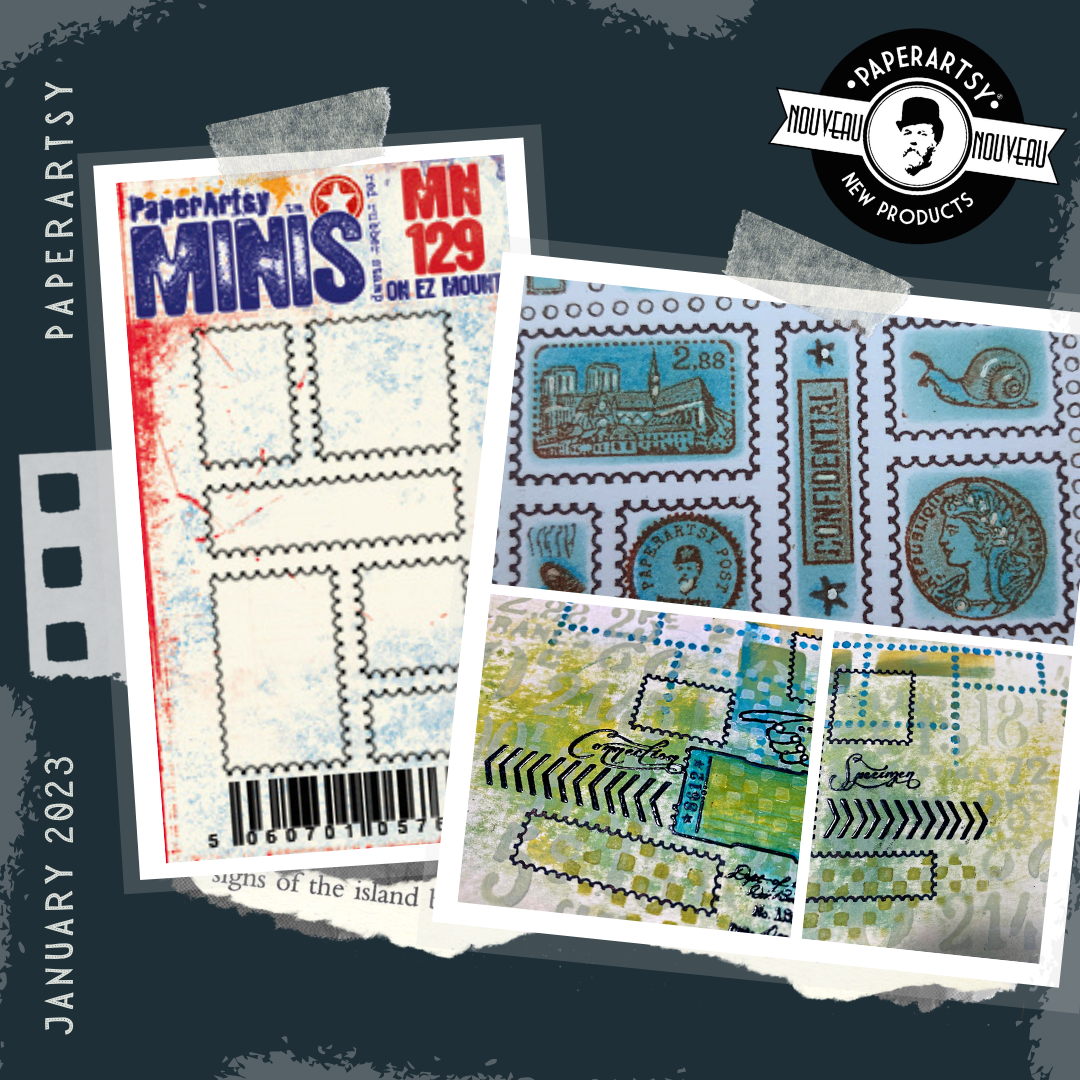
PaperArtsy Ink & The Dog Mini 129 (MN129)
Coordinates with mini stencil PM022, as well as MN125 & MN126

Are we ever going to get tired of stamp of postal stamps? Not this time at least! Used as a block, this mini stamp creates a quick and delicate background of stamps to be filled, or not.


The possibilities are endless to build beautiful little stamps and fun elements.


The delicate edge also creates an amazing texture when repeated on a background.


The designs are also spaced enough to be easily cut apart to use separately or to arrange in a a new configuration or bring focus to an element. How great would they be stamped into Grunge Paste?


If you want to mix and match, the biggest rectangle and square in the corners fit the rectangular designs from MN125 and MN126 and the circles from MN127 and MN128 respectively. 

To easily colour these stamp, be sure to also check out the Mini stencil PM022, shown in blue above and below, it's a perfect match.


PaperArtsy Ink & The Dog Mini 130 (MN130)
Coordinates with mini stencil PM021, as well as MN127 & MN128

If we are doing the rectangles, we also have to do the circles, don't we? This collection of postmarks easily populates a background with a detailed texture and the individual designs are perfect for post-inspired projects of all sizes.


With so many postage stamp inspired designs, post-marks can be used independently. They really give authenticity to your mail art! but they also build  texture in mire subtle colours.


The 2 biggest sizes can be filled with the circles from MN127 and 128 for some more mix and match! The open one in the bottom left corner matches too!


You can also layer them together: the Paris and Deauville marks fit the open one in the bottom left corner. So you could make a 3 layer post-mark.


Mini stencil PM021 is you friend to help colour these.


PaperArtsy Ink & The Dog Mini 131 (MN131)

A stand-alone design, this can be the focal of any card, or easily be a bold background for other layers too. Perfect when stamped in lighter colour inks, but who will be brave enough to cut apart some of these elements to use them separately ??? We would! Small sharp scissors are a must, and you might need to bend the stamp to snip the designs apart. It was not designed to be cut apart - but it is possible! Truly miniature art would thus evolve! Ok yes, of course you could stamp first and then trim the bits into other mini elements!


On this sample it was the central element around which the entire journal spread was designed, here's a closer look below.


PaperArtsy Ink & The Dog Mini 132 (MN132)

We love the elements on here, and if you do snip these apart (quite do-able) - indeed you will see from the live in PA People that Leandra has done just that - then you have the tiniest Eiffel Tower ever, allowing the most fun miniature art ideas!


Let's try super-small; twinchies, mini books, mini mail art - there are plenty of ways to enjoy small art creativity.


That is the end of the Ink and the Dog Mini stamps for this release, lets move onto the stencils!


Mini Stencil Size: 3.5" x 3.75" (9 x 9.5cm) Price: RRP €2.92 + VAT


PaperArtsy Mini Stencil 021  (PM021)
Coordinates with MN130, as well as MN125, MN126, MN127 and MN128

Circles, circles and more! Here is a stencil to quickly and boldly populate a background. Its big open spaces also make it great for gel printing or blocking out patterns.


Thanks to the different sizes of circles, it is easy to build layers and create complex looks. Alternating relief in metal create cogs and wheels.


Building layers in Grunge Paste reveals funky flowers.


Of course, as stated previously, this stencil allows you to easily colour the post marks of MN130 in one go, you'll find those across the left side of the mini stencil.


The two big scalloped shapes also match the circular stamps of MN125 and MN126.


Among all the circles of this mini stencil, you will find all you need to colour all the inside of the postmark too.


PaperArtsy Mini Stencil 022  (PM022)
Coordinates with PM023 and mini stamp MN129, as well as MN125, 126 and 127

And now, the square version! Another mini stencil perfect for gel printing, layering, and quickly building an interesting background. Wouldn't it also look so good reverse stencilled?


Layering this stencil creates a great overall pattern with a retro feel. Alternating media allows for transparency, creating complex patterns from simple shapes.


Rectangles are easy to cut out for windows, laces pages or overlays. This stencil has both shapes and interconnecting lines.


Stencilled with Grunge Paste, the rectangles are big enough to stamp in, for even more texture.


The group in the bottom left corner of the design allows you to easily colour the stamp shapes of MN129. The corner one matches the rectangles of MN125 and MN126 and the biggest rectangle the stamp on MN127.


PaperArtsy Mini Stencil 023  (PM023)
Coordinates with PM022, as well as MN127 and MN128

This one is inspired by perforations on the edges of classic lick and stick postal stamps. The circles of MN127 and MN128 fit in the upper square.


Make your own composition, to be filled with little scenes, quotes or faces.


It is also great for isolating and highlighting a section of an image or adding that little pizzaz to a background.


It perfectly matches the previous mini stencil, PM022, so you even have the solution to create that classic white border of postage stamps.


Or it can be a soft and gentle layer within a larger background.


How cool is it once dry-embossed in Crunchy wax paper! The grid created by this stencil is customisable and fun to fill... or not.


Now for something different... take this stencil, with its vertical and horizontal lines, and rotate it to create a new pattern.


PaperArtsy Mini Stencil 024  (PM024)

We continue our exploration of checkers from last year, this time in stencil form...  These are tiny, perfect for both small and big projects. Subtle in tone on tone or eye-catching with great contrast, you can never go wrong with chequerboard patterns! The possibilities are endless: bumping, layering, texture, embossing... so have a play!


This semi regular pattern looks great in 3D, here dry embossed on metal.


Layering creates endless new patterns, especially if you involve gel printing and reverse stencilling!


As shown on the focal of this card, you can also 'complete' the pattern for a tiled look.


Stencil bumping is particularly effective, for a slightly trippy result...


PaperArtsy Mini Stencil 025  (PM025)

As you are now aware, in this release, if we are doing it with squares, we also do it with circles... So here are some fading dots! With high contrast the pattern is almost hypnotising so use with caution... But in coordinated colours, it creates a nice undulating effect for an interesting background.


Painted, sanded back for the scratchy effect and bam! Instant background.


This stencil is also great at pulling the eye toward the focals, or at creating funky borders. Add fading colour to the fading dots for maximum gradient!


Up and down are not the only directions you can this stencil in! Dots look great in a circular pattern too.


The different sizes of dots can also be layered for a more complex pattern.


PaperArtsy Mini Stencil 026  (PM026)

Here at PaperArtsy we believe you never have enough typographical number stencils! These are vintage and varied in size and font, coming from vintage stamps, coins or ledgers. Used separately or together,  they cover all your numbering needs... or just instantly create a very cool background.


With a bit of easy masking, you can opt to stencil a specific number or add the 'Francs' or 'Centimes' to any customised postage marks.


Individually, these numbers are great to make tags and plates. the larger ones are big enough to be embossed, even in metal!


Thanks again for joining us here today to celebrate this new release. We look forward to seeing your ideas with these fun mini elements!

From all of us here at PaperArtsy, Happy New Year!

  PaperArtsy Stockist List

Our stockists are your go-to  source for all PaperArtsy products, and we suggest that you also use the PaperArtsy People Facebook group to source a retailer in your country. Many are members of our FB group and will happily share links to their online stores.

Australia
Bev's Cross Crafts, Spreyton, Tasmania https://www.bevscrosscrafts.com.au/
Crafters Cupboard, Berwick, Victoria www.crafterscupboard.com.au
Memories on the Murray, Murray Bridge, SA  https://www.memoriesonthemurray.net/
Natalie May Scrapbooking, Dover Gardens, SA https://nataliemay.com.au/
Scrapbook Superstore & More, South Penrith, NSW https://www.scrapbooksuperstore.com.au/
The Scrapbooker's Confetti Box, Swansea, NSW https://thescrapbookersconfettibox.com/
The Scrapbook Store, North Perth,WA http://thescrapbookstore.com.au/ 
Time To Createwww.timetocreate.com.au

Belgium
Cart N Scrap Art, Antwerp, www.cartnscrapart.be
Créatelier Caracolle, Liège, www.createliercaracolle.be

Canada
Clipper Street Scrapbook Company, Langley, BC. www.clipperstreet.com
Paper Art Creations Inc, Leduc, Alberta, www.paperartcreations.com/
Scrapbook Centrale, Dollard Des Ormeaux, Quebec www.scrapbookcentrale.ca
Scrap Addicts, Edmonton, Alberta www.scrapaddicts.ca/
Scrap and Bean, Edmonton, Alberta scrapandbean.com/ 
Scrapbooking Fairies, Drayton Valley, Alberta www.scrapbookingfairies.com/
The Paper & ink Boutique, Calgary, Alberta www.paperandinkboutique.com/
The Scrap Yard, Calgary, Alberta, www.thescrapyardcalgary.com/ 

Denmark
Hobbyboden Scrapworld Samso www.hobbyboden.dk

France
Eirl Bancon Cartoscrap, Midi Pyrenees, www.cartoscrap.com
Fée Du Scrap, Saint Sébastien-Sur-Loire, www.feeduscrap.fr/
Horizon Créatif, Ste Jalle www.horizon-creatif.fr
Instant Créatif, La Possession, La Réunion, www.icreatif.re
Katzelkraft, Ingwiller www.katzelkraft.fr/en/
Kerudoc Creation, St Yvi www.kerudoccreation.com
Le Grenier des filles, Pierre Benite
Page de scrap, Saint Pavace, www.pagedescrap.fr/
Scrap Déco Home, Goutrens, www.scrapdecohome.fr/
Toutencolle, Dun sur Avon www.toutencolle.fr

Finland
Heidin Korttipaja, Istunmaki, www.korttipaja.fi/fi
Piia Paper, Kittiläwww.piiapaper.com/fi

Germany
Stempelbar, Berlin, www.stempelbar.de
Stempeloase Munich, Munich www.stempeloase.de
Stempelfee Shop, Hilden www.stempelfee-shop.de
Stempellaedle, Stuttgart, www.stempellaedle.de/shop

Greece
Scraps N Pieces, Kallithea www.scrapsnpieces.gr

Italy
Immagine SAS di Rapaccini, Rome, www.immaginelab.com
Il Negozio Della Mamma Di Cle, Torino, www.ilnegoziodellamammadicle.com
Marte Savona, Savona, www.martesavona.it
Pezze E Colori, Lissone, www.pezzeecolori.it/ 
Piccole Passioni, Siena, www.piccolepassioni.it

Japan
La Wadao, Odawara, Kanagawa, www.lawadao.com
Tiny Dots, Funabashi-shi, Chiba www.tinydots.shop-pro.jp

Netherlands
De Hobbystudio, Genemuiden, www.dehobbystudio.nl/
Doe@ding,Spijkenisse doeading.nl/
Hobbycompleet de Duif, Leeuwarden www.hobbycompleet.nl
Stampingcorner, Capelle Aan Den Ijssel www.stampingcorner.nl

Norway
Hobbygarasjen, Kopervik, www.Hobbygarasjen.no

Spain
Cien por Cien Manualidades, Barcelona,  www.100x100manualidades.es
Ideas 10 Manualidades Y Scrapbook, Bilbao ideas10manualidades.com/
Marakiscrap, Tarragona, www.marakiscrap.com
Scrap & Papers Experiences, Barcelona, www.scrappapersexperiences.com
The Paradise Corner, Barcelona, www.theparadisecorner.com

Sweden
Butik Elva, Staffanstorp, www.butikelva.se

Taiwan
Mandy's Cards, Taipei www.facebook.com/mandy.card.77

United Kingdom
Amelia's Creative Crafts, Studley, Warwickshire  www.ameliascreativecrafts.co.uk
Art from the Heart, Harrogate, Yorkshire www.afth.co.uk
Crafts at The Malthouse, Herstmonceux,  East Sussex, www.themalthouse.co.uk/
Loobi Crafts, Leighton Buzzard, Bedfordshire, www.loobicrafts.co.uk
Papermaze, Ipswich, Suffolk www.papermaze.co.uk/ 
Stampers Grove, Springbank, Lilliesleaf, Melrose,Scotland www.stampersgrove.co.uk
The Artistic Stamper Craft Store, Faversham, Kent www.theartisticstamper.com
The Forget me not Kraft KabinRochford, Essex, www.TheForgetMeNotKraftKabin.co.uk

USA
Artistic Artifacts, Alexandria, VA www.artisticartifacts.com/
Artistic Studio Creations, Fayetteville, Georgia www.facebook.com/ASCbyCrystal
Craftiness, Chatsworth, CA, www.craftinessonline.com/
Ephemera Paducah, Paducah, Kentucky www.ephemerapaducah.com
Everything Scrapbook & Stamps, Lake Worth, Florida https://everythingmixedmedia.com/
Frantic Stamper, Oregon www.franticstamper.com
Free Heart LLC, Denver, Colarado, www.freeheartllc.com/
Joggles, Coventry, Rhode Island, www.joggles.com
PaperCraft Clubhouse, Westbrook, Connecticut, papercraftclubhouse.com/
Qingquing's Stamp Shop, Portland, Oregon
Runaway, Art & Craft Studio, NE Salem, Oregon www.runawayart.com/
Simon Says Stamp, Columbus, Ohio www. simonsaysstamp.com
Topflight Stamps, Irmo, South Carolina topflightstamps.com/

Our brand is only available from established stockists who are VAT/ GST/ sales tax registered and for whom product education is a core principle. If you would like to apply to be a stockist, you can find our more about our supply criteria here.

PaperArtsy Links
Facebook Group PaperArtsy People
Facebook Page PaperArtsy