Showing posts with label Gilded. Show all posts

Friday, 10 January 2025

2024 - Year in Review - Topics 7, 8, 9, 10 {on the PaperArtsy Blog}


Greetings from PaperArtsy HQ,

It's the final look back at some highlights from 2024 on the PaperArtsy Blog. Today we review Topic 7: (Gel) Printing, Topic 8: White and the designer focus for Topic 9 was Alison Bomber (EAB). 

The theme overarching these topics was Nature and its treasures: shapely leaves, delicate flowers, bold berries. We encouraged our bloggers to incorporate this theme into their posts too.

Speaking of challenges, this year we also introduced the concept of 'With 3 Things' where bloggers were sent 3 things and challenged to do something. For example, a paint or colour item, a stamp or stencil. Sometimes the stamp might be a bit different, but similar so that the bloggers more or less were using the same things.

We are so fortunate to have such wonderful bloggers who share their stunning ideas with us each month. I am really looking forward to appreciating what awesome talent we can all learn from in the year ahead!

Topic 7: (Gel) Printing

Spontaneous, fun and scrappy. Gel printing took the crafting world by storm a few years ago and is a now a favourite process for many crafters. We thought this topic would be a great opportunity to celebrate it, but also share with you all the other forms of printing that historically preceded it. The topic intro post takes you through many techniques, from Relief Printing, to Intaglio, to Monotype, including Gel Printing. You can find there not only varied eye-candy but also lots of educational links to try them with supplies you already have. We hope you give a try to something new!

For out bloggers fabulous projects, let's start with this quirky mini book by Mi Mii. Like a lot of you we love a fun play session with the gel plate, creating loads of yummy printed papers, sure, you can create some pretty dodgy prints along the way, but once armed with some simple techniques, success and confidence quickly grows. Then comes the question of what to do with them. Mi Mii's answer: lots of collaged scraps for dynamic pages. Check her original post HERE for the full process!


In an other style, how about these fresh flowers by Martha Ponsanesi (@CraftingMartha). Gel printing does not have to be complicate or layered to be effective! Nor are you limited to paper as Martha shows with her fabric-printing. Follow Martha on her journey to turn plain fabric into a 3D garden with simple techniques and sunny colours in her original post HERE.


We love when our bloggers try on a new technique and take us on the journey with them. This time Floss Nicholls explored collagraph, mixing it with stamps, and the results are... enlightening! As you can see, she experimented quite a bit so give her original post HERE a read to learn all about collagraph, and maybe level up your gel printing game.


Our designer Kate Crane also joined in the gel printing fun (she includes it quite a lot in her art) for example with alcohol inks. She has shared several of her favourite techniques, not just in her original post HERE, but also in a video on Facebook in the PaperArtsy People group.


Topic 8: White

It is not the first time we pulled the 'White' trick on our blogging team. It often pushes them outside of their comfort zone and always helps us learn something new. This time around, we did not limit the topic to an exclusively white project, but advised the team to think of all uses of white: overlays, resists, washes... They did not disappoint and each gave their own interpretation of white.

Our first pick is this dimensional frame by Victoria Wilding. She did go down the mainly white route white while adding a beautiful contrast with 'kraft' colour. Genius! She uses white in a lot of different techniques so be sure to check her original post HERE to appreciate them all.


Ellie Knol used white as a fantastic texture builder in this nature inspired hanging trio. Many layers went into those yummy backgrounds; can you spot the lace? Go to her original post HERE to follow along her creative process and see the transformations!


Take a look at these jugs of flowers by Floss Nicholls. She is a lover of colour so this was an interesting challenge for her with the white restriction in place. She used white as an overlay, letting some of the colour beneath peak through, for some amazing effects! You can join her in her exploration in her original post HERE.


For her part, Ann Barnes worked with white as a focal, giving it a leading role in this floral and moody journal spread. While at first glance, you would not call it a 'white project', I love how the white definitively pops when paired with darker colours. In this project, Ann played with pattern building in many ways, all detailed in her original post HERE.


Topic 9: Focus on EAB

Alison Bomber goes by 'Words and Pictures' on most of her social media and it couldn't be a better description of her stamp collection with PaperArtsy. A lover of words, she started designing stamps in 2017, going on to create beautiful sets of carefully curated thematic quotes. In 2022, she added some of her delicious sketched botanicals to the word stamps, as well as some ephemera for versatility. You can learn all about her journey and inspiration, as well as how her passion for theatre and craft entwine. It's all in her interview in the topic intro post.

That month the 'with 3 things' parcels did contain some of Alison's wintery stamps and Jenny Marples made a beautiful mistletoe accordion book with hers. We love the contrast between the delicate greenery and the deep grungy background. Be sure to check her original post HERE to discover the other panels!


We really could not leave out this fantastic decorated fan by Keren Baker. So delicate and elegant! If you give her original post HERE a read, you will see this was as finicky and time consuming as you might expect, but the result is incredible, and functional!


I also loved how Nikki Acton 
(a2a.craft) managed to mash her personal style and Alison's designs in this sunflower wall art. As explained in her original post HERE, everything did not go smoothly but the piece speaks for itself. I love the transition from cut to stencil petals! 


Finally I hope you didn't miss this amazing diorama by Mags Woodcock. She truly brought Alison's designs to life! These berries look dangerously delicious! This is a quite involved project so head to Mags' original post HERE to fully appreciate her work.


Topic 10: Gilded

To finish the year, we wanted an open topic that could fit the festive season but also stand alone. 'Gilded' can be any form of gold and metal: embossing, paint, wax... As long as it is opulent, lavish and a little bit indulgent. Who does not like some shine? 

First is some actual gilding, using flakes, by Liesbeth Fiddder de Vos for this Art Deco inspired star book. The sample mailers create the perfect intricate windows for the golden ladies to peak though. Visit Liesbeth's original post HERE to see all the pages!


For her part, Etsuko Noguchi prepared for the end of year celebration with these sparkling decorations. It is a whole set with acorn garlands and ornaments. The baubles are shakers and light up - super fun! Be sure to check the original blog post 
HERE for all the details.


Inspired by Klimt, a master of in the use of gold, Riikka Kovasin (Paperiliitin) made these gorgeous cards. I love how they are definitively a series but still differ slightly, giving each it own identity. Which one is your favourite? Head to the original blog post HERE to see the details of all of them.


Finally, this is outside of the 'Gilded' topic, but for the last 'with 3 things' of the year, we wanted to give our bloggers and readers a little taste of the new year in advance. So we went with pink and hearts to hopefully spread little love ! I loved this practical and cute present box by Victoria Wilding. Would you be happy to receive this, even before knowing what is inside?


Well, this was an amazing year for our fantastic bloggers, full of beautiful and creative projects. For those of you going through winter, I hope it gave you your recommended dose of colour and joy. 

For those 'down under', enjoy a crafty summer and send some sun our way! In addition to health and love, we wish you all a creative and fruitful year for 2025, full of motivation, inspiration, lovely crafty supplies and fun play sessions!

Thursday, 12 December 2024

2024 Topic 10 : Gilded {by Keren Baker}


Hi everyone

Keren Baker here with you today.

I've been thinking a lot about preparing recently and there's something lovely about creating items you can use for seasons that are special to you.  

This topic Gilded had me thinking about how to add metallic details, and as I'd recently purchased a mould for baubles, this seemed like the ideal opportunity to try it out and with some beautiful ornate details, I felt sure they'd look stunning picked out in metallic wax. Who doesn't love a little excess at Christmas!


I absolutely loved creating these baubles. They're totally unique and really inexpensive to create, and with a little care, something you can reuse every year. Getting to the point of decorating proved to be a somewhat lengthy affair!


There's something wonderful about vintage images, contrast them with some bright modern colours and you have real impact. So of course, being the Gilded topic, I chose PaperArtsy Fresco Finish Acrylics in Gold (FF20), then added in typical Christmas colours; Cherry Red (FF86), Lawn (FF156) and the outlier, Captain Peacock (FF110)!


I used paper clay which is really easy to use, but goodness me, these took days to dry. It may have been the thickness and cold environment but it was a good job I didn't need a speedy make. I had them laid out on a metal rack and was glad to have prepared double the amount I needed so I've got spare whenever I feel like making more.


Paper clay benefits from a gentle sand. I didn't want to lose all the texture but the edges and back looked much better afterwards.


I was ready to gather all the stamped elements. The sets I'd chosen were all from Ink & The Dog; Buttons Plate 6, Xmas Plate 1 and Winter Wonderland Plate 1 . I stamped using Stazon Black so any painting wouldn't affect the images. The square elements make fab details for small projects and you can see in the photo how easy they are to line up to make a larger image.

I'd also got some lovely printed PaperArtsy tissue but it was so creased, I had to now work out what to do with it!


You can see the gorgeous images that I thought would work perfectly- and actually is a great inexpensive way to collect more images without having to purchase all the individual stamp sets. I've decided on which stamp sets I absolutely had to have by using the tissue paper. This beautiful paper is the Scrapcosy designed one (& you won't believe how inexpensive it is ;-)
The issue was that it was so creased from me storing it that I needed a flatter result.


It turns out that sandwiching the tissue paper between 2 sheets of copy paper and ironing on a low heat works really well. By the time I realised that it wasn't going to scorch or erupt in flames, I'd tried ironing straight onto it after doing the sandwiched ironing. You get a really good result by doing that. This ironing is the type I can get behind!!


To preserve the details I painted on the reverse, adding the detail first and then going over with the colour (painting in reverse, really!).


The gold is really vibrant and shows up surprisingly well when you turn the tissue paper over.

I do love a crisp line and my painted lines weren't very neat, so using washi tape got my lines much more precise. Just take the washi tape off fairly soon after you've painted the lines.


All prep now done, I was ready to add layers of tissue paper. I just needed to add a little colour to the images.


A useful glue and sealer is Mod Podge. I prefer the Matt type. Now I just needed to glue and layer the tissue papers.


Most of the white in the tissue will become transparent once the Mod Podge is dried and it's really easy to cut once it's all dried. 
TIP: You will find runny, thin glues easily saturate the tissue paper, which help it disappear into the receiving surface. A thicker glue will not do this so efficiently, so look for a runny glue, and you may need to be quite generous on both sides.


To add some extra gilding, I wanted to add gold wax to the gold areas of the bauble top and base. These waxes are readily available- search for metallic wax or gilding wax. 


Once you've allowed the wax to dry, do give it a little 'buff' with a tissue and it brings the detail to life even more.


I needed to solve the problem of how to hang them. The paper clay isn't really heavy and due to the symmetrical shapes, I could have backed them with another bauble on the reverse, but that would have given quite a bit of weight to delicate branches so I dug out some Christmas music paper in my stash. I glued the string on first.


In theory you should be able to just trace around and use the shape to back it, but due to some slight warping when drying, I'd recommend using the back of the paper (if you want to highlight a particular part of the music or backing paper.)


My baubles were complete, just needed to add a couple of tiny buttons to add to tie in with the button design on one of the baubles.


These would have been beautiful with torn velvet material instead of the string (which I thought about only after I'd finished them!). They would make incredibly beautiful present tags and also if you fix the string hook onto the inside of a sturdy card, they'd make a fabulous focal point for a card. Just add a painty background or use up some old gel prints and you've got your Christmas greeting cards sorted too! If you don't have moulds, you could use simple cookie cutters to get a similar effect.

I'd like to wish you all a really happy Christmas. Your Christmas doesn't need to be gilded or lavish to make it a special one, just surround yourself with the things and people that bring you real joy.

Keren x


Tuesday, 10 December 2024

2024 Topic 10 : Gilded {by Jo Firth Young}


Hi everyone

Jo Firth-Young here today to talk about shiny things!! 
(instagram: @jofyjo, fb:JoFY.JoFirthYoung, www.jofy.co.uk)

When I saw the 'gilded' topic come up I was very happy!! I like things that sparkle and shine!  It got me thinking - how many metallic, shiny, sparkly, 'gilded' types of media do I have in my crafting materials??  I started to make a list - embossing powders, Fresco Finish Gold paint (such a fabulous gold!), imitation Gold Leaf (sheets and flakes - several colours), gilding powders, paper/card, metallic threads, Stickles, glitter, metallic Gelatos... so many options!!

I really like gilding objects - I've gilded several pieces of furniture in my home & its much easier than you might initially think.  Its been fun using imitation gold leaf again - it adds a little bit of 'glamour' to a project.


I've created a group of cards each with a different type of 'gilding' but all starting with the same background paper. This A3 paper was created when I rolled-off paint from my brayer when gel printing - I really like the random, blended stripes & blocks of colour that are created. 
I added stars using stencil PS438 (find a PaperArtsy stockist here) leaving enough open space for additional decoration for each card.

What I really like about all these projects is the contrast between the chalk matte finish of the Fresco Finish paints and the shiny gilded finishes. (Fresco Finish: Gold, Bubble Gum, Sherbet, Butternut, Cheesecake, Aqua Duck Egg, Chalk)


Gilded cards


Imitation gold leaf generally comes in two forms - flakes and sheets (sheets come in books supported with layers of tissue paper).  I've used both types on my cards.


'Love Christmas!'


I used a page of gilding leaf on this card to evenly cover the greyboard heart. The gold leaf is VERY thin and will pick up all the textures of the surface it is applied to - great for picking up detail. You could apply this on top of textured card for a different effect.


I added several layers of stenciling to this card - big white dots (PS309) and an arch of pink dots (PS308).


The snowflakes, embossed in white, are from this stamp set JOFY106.


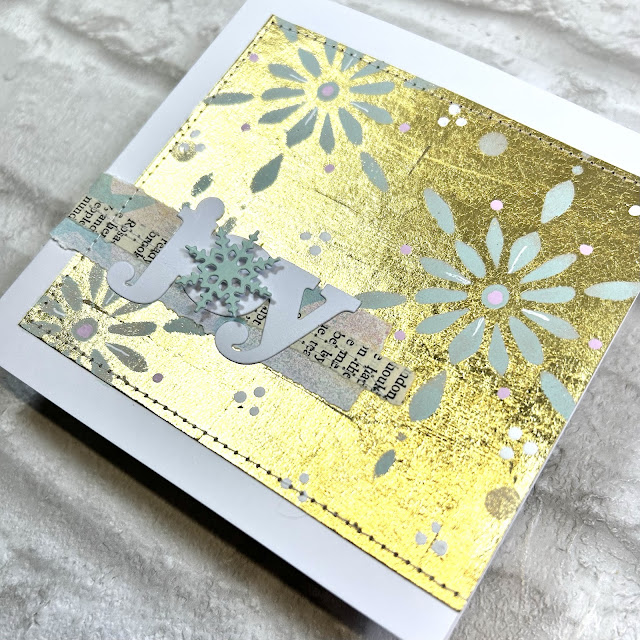
'JOY'


This card uses gilding flakes, adhered with a glue stick and a soft brush. The flakes create a subtle distressed surface, sometimes little gaps are left and an uneven edge created.


'Snowflake Joy'


I decided to cover the front of this card with a sheet of gold leaf that I'd cut into 2.5-3cm squares to create a subtle tiled effect. PaperArtsy Fresco Finish paints can be used on any surface and so of course I had to use them on the gold leaf!! I love how the matte paints look against the sheen of the gold leaf! Great contrast!

This was a tricky card to photograph because of the reflective quality of the gold leaf! lol


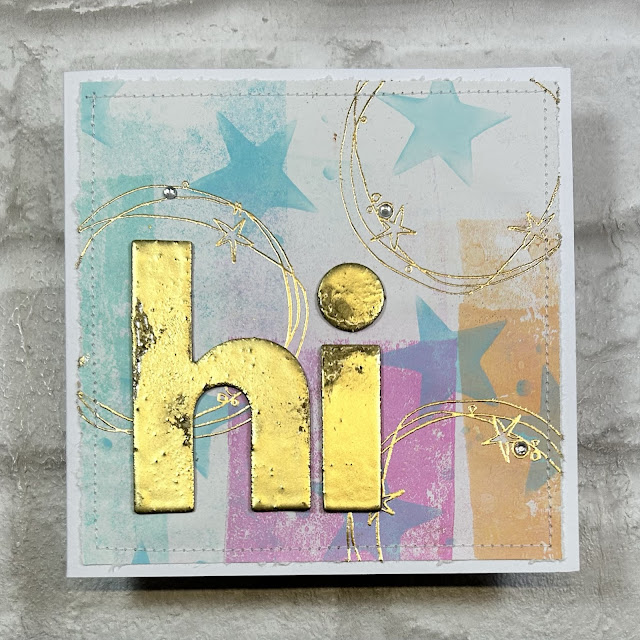
'Hi'


This card features embossing powders. There is something magical about watching embossing powders turn from powder to molten liquid and then solidifying. 


I embossed chipboard letters with several layers of {WOW} embossing powders - the first layer was a Platinum ('dirty' silver) powder followed with 2 layers of 'Gold Rich'. I agitated different areas of the surface of the letters (while still hot) to mix the powders which revealed the first layer - this created a subtle distressed look.  


I stamped circles (JOFY136, available now from PaperArtsy Stockists) on the background using WOW Pale Gold embossing powder.


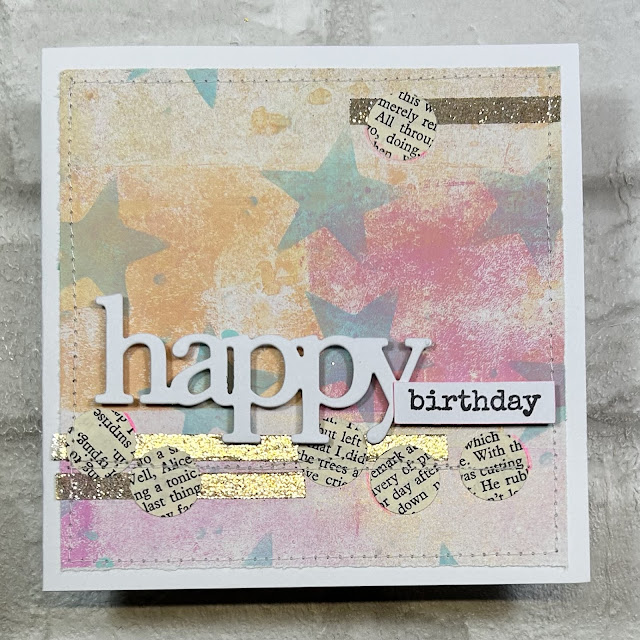
'Happy Birthday'


The Stickles Dry Fine Glitter is made up of tiny smooth particles that, when adhered to the surface (here I used strong double sided tape), creates a sparkly gilded effect.


Flowery Happy Birthday

 
The Gold Fresco Finish is the best gold paint I've worked with! It is so glossy and is a great tone of gold, really rich, and you can use it on your stamps too!


Here I used the Gold paint to stamp the flowers from JOFY132 (available from stockists)


... and teamed it with Ranger's Perfect Pearls - there is a gold mica powder available, but instead I used Mint here to compliment the colours of the background papers. I love how the colour changes when it catches the light as shown in the photos below.


It was fun to use gold leaf and and revisit using Perfect Pearls with the Fresco paints - I'd forgotten what a great combination they are!

I hope these ideas have inspired you to delve into your crafting stash, dig out the blingy things and add a bit of sparkle & shine to your next project - even adding a distressed gold leaf edge to a panel (as in the 'joy' card I shared earlier in this post) can make all the difference!  or a touch or two of glitter! (remember: glitter is not just for Christmas! lol)

Have fun!!

Jo


YouTube: Jo Firth-Young
Pinterest: @jofyjo
Facebook: JoFY Jamboree!
Twitter: @jofyjo
Instagram: @jofyjo