Showing posts with label Clear Tar Gel. Show all posts

Friday, 21 August 2015

2015 #15 Magical Mediums {by Lynn Price}

 2015 Topic 15: Gels and Mediums


Hi, Lynn Price here! I am so honored PaperArtsy has asked me to play around with various mediums for this post. I am a nursing professor here in Connecticut, and have recently discovered mixed media as a fun way to re-charge by creating something unique using an entirely different part of my brain - working with various mediums satisfies all of that!
Today I am playing with a two-page journal layout . 


For this layout, I played with three mediums: Regular gel medium (matte) (familiar to most of us, but used here also as more of a faux encaustic technique), glass bead gel, and Clear Tar Gel (from Golden) – Liquitex calls it's version of this product string gel.

I started with card stock heavily sponged with Distress Ink in warm colors. I die cut dragonflies, butterflies and bees and applied with these gel medium to gessoed pages with a few dry embossed bits which created a light yellow and orange background from the ink reacting to the medium. After stamping with Paper Artsy Mini 44, I then covered most of the plain (non-embossed) die cuts with extra gel medium, to really blend them into the background.
Mini 44

Next I stamped with the end of a beautiful Lynne Perrella stamp from LPC28  in archival ink to create additional detail and added more gel medium.


Then I swiped Golden's Bead Gel with my finger in areas that I thought would pool when I sprayed on the final colors. Because of the gel medium already on the surface, the distress inks on the die cuts no longer react. I love the effects of the beads – so shimmery!


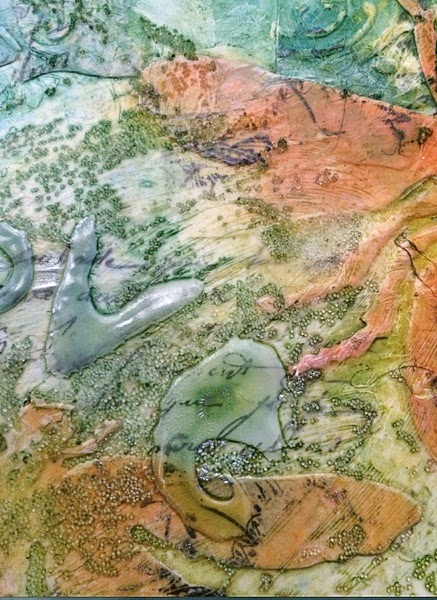
After spraying the two pages with various colors of distress inks, I used the end of a thin paintbrush to write and draw, by dipping into the clear tar gel like a pen. This medium not only dries clear, but is also self-leveling, so small areas originally left open will likely fill in (like the loop in a small “e”, for instance). Here you can see how the clear tar gel indeed dries clear, so that the stamping and colors underneath come straight through - can you see the word “Love” ?


Below is one more close up, showing the beautiful beads after spraying, as well as the phenomenal effect from the Clear Tar Gel on stamping and background color. I have more examples on my blog if you’d like to see more of this finish.

This was such a fun make, that I actually made another one, with clear tar gel which you can see on my blog Experiments in Paper, along with more details of this layout. 
Lynn. 

Welcome Lynn and thankyou for creating such a fun page. You have show just how versatile the gels are, from regular 'sticking' to adding the shimmer and texture of the beads and the dreamy, fluidity of the tar gel. Indeed magical. ~Darcy

We would love you to join in with challenge #15: Gels If you are inspired by any of our guests who blog with us over the fortnight, then please join in and link up your creativity HERE. 

All links go in the draw to win a voucher to spend on products of your choice from the PaperArtsy online store. The Gels link will close 17:00 (London Time) Sunday, Aug 23rd winner will be announced 2 hours later at 19:00.

Friday, 14 August 2015

2015 #15 Drippage Canvas {by Sue Carrington}

2015 Topic 15: Gels and Mediums


Hi everyone Sue here, joining you this evening with a post about Gels. When I saw the theme for this challenge I immediately thought I'd like to give Clear Tar Gel a whirl. I'd not used it before and was intrigued with it's 'drippage' quality, so here goes ! 


Step One: First of all I covered a small canvas with pieces from an old book, giving it a coat of Glue 'n' Seal before using Nougat Fresco Finish over the top. 


Step Two: I then stamped the gorgeous thistle from the ELB22 stamp set onto a piece of tissue paper and painted it on the rear using Green Olives and Caramel Fresco Finish paints. 


Step Three: I attached the thistles to the canvas using Glue 'n' Seal, making sure to paint some over the top too, then mixed some Nougat Fresco Finish with some Golden Regular Matt Gel and spread it over the PA21 stencil. Then it was time to open the Clear Tar Gel ! As the gel itself is clear I wanted the 'drippage' to show up but not be a contrast so I mixed some Nougat with the gel and then let it drip ! I found that the easiest way is to start dripping was away from what you're working on then when you've got a good dribble going move onto your project. I rather liked it ! When the gel was dry I used a baby wipe with Mushroom and Blush Fresco Finish paints, blending them around the edges mainly so the thistles could still be seen clearly. 


Step Four: Now it was time to start collecting the flowers, I started with the tulip head from the ELB23 set. I stamped it twice onto Smoothy card painted with Blush Fresco Finish, then added a little shading with watered down Mushroom and a little Spanish Mulberry. I cut away some of the petals from one of the flower heads so that it could be layered up.


Step Five: By cutting down one of the above flowers this gave me the idea to create a flower with just this section, so I stamped some more onto Smoothy card painted with Blush and then painted them with Bougainvillea (which you'll see on the finished project). 


Step Six: The bluebell style flower, which is also from the ELB22 set, has been stamped once then the stalk has been pained with Limelight then Hey Pesto Fresco Finish paints. I cut it out, then stamped the flower head twice more onto Smoothy card painted with Blush Fresco Finish. I've painted them with Bougainvillea then cut them out ready for layering. 


Step Seven: The final flower is the beautiful poppy from ELB23, which I've stamped onto Smoothy card covered with old dictionary paper which has had a coat of Glue'n'Seal. I stamped three of them and used Bougainvillea again to paint them. I cut out the centre of one of the flowers to layer up. 


Step Eight: I added some hessian edged with lace across the bottom and a buckle and then arranged the flowers. At this point I left it overnight and came back to it the following day as something wasn't quite right. I then decided something was needed in the top left corner to balance things, so I used the stamp from EEG05 to create a book mark from Smoothy card covered with dictionary paper and couldn't resist adding some more drippage to it ! The petals that were created from the Tulip stamp were arranged in the bottom right hand corner and the centre is from the ELB24 set. 


I really enjoyed using the Clear Tar Gel and think it has lots of potential to add a different element to all sorts of projects. I think it would look great using different colours and dribbled in different directions too. Hope you enjoyed my first dabbles with drippage ! 
{ Leandra edit - Sue... the Clear Tar gel looks amazing with the Golden metallic fluid acrylic paints added to it - I prefer Bronze or copper, then dripped ! It's just like drizzling metallic syrup, and makes a gorgeous top layer when used that way - a nice idea for those magpie-crafters! }

Sue 
Blog: www.stampingsuestyle.com
Twitter: @ink_and_me

Wow Sue, you've sold me. I love the look of this tar gel, I must give it a try. Those drippy drips look wonderful, very fluid and with clean edges. A fantastic background of texture to show off the colourful flowers. ~ Darcy

We would love you to join in with challenge #15: Gels If you are inspired by any of our guests who blog with us over the fortnight, then please join in and link up your creativity HERE. 

All links go in the draw to win a voucher to spend on products of your choice from the PaperArtsy online store. The Gels link will close 17:00 (London Time) Sunday, Aug 23rd winner will be announced 2 hours later at 19:00.