Showing posts with label 2015 Topic 20. Show all posts

Friday, 6 November 2015

2015 #20 It Is Not In The Stars {by Emma Godfrey}

2015 Topic 20: Triptychs

Hi everyone Emma here, joining you this evening with a post showing you my take on a triptych. I love art journaling and making home decor items, and if you follow my blog or Pinterest pages, you'll know I also love quotes ... and this topic offers me the perfect opportunity to put all of those together!


Step One: I used three 4"x6" wooden blocks as my base. I stuck some torn book text onto each one, and covered them with gesso. I then stenciled stars randomly (from PS018) over the three blocks using Jet Black Archival Ink and a piece of Cut'n'Dry Foam. I stamped the quote (from ESN13) onto Smoothy card twice - this allows me to cut out alternate lines leaving the largest possible border around each one).

ESN13

Step Two: I applied Mermaid, Smurf and Lilac Fresco Finish paints using a piece of Cut'n'Dry foam. Keeping the three blocks together and working as if they are one piece, will give you a more cohesive finished piece at the end.


Step Three: Now to build up some more layers. First, Eggplant Fresco Finish through The Crafters Workshop Mini Circle Grid stencil. Then Limelight Fresco Finish splodged on with my finger. I stamped the small dots from ESN09 using Beach Hut Fresco Finish, and stamped the text stamp from ESN13 in Jet Black Archival Ink.  The last layer for this stage was Golden High Solid Gel (Gloss) through The Crafters Workshop Mini Tile Texture stencil.

ESN09 

Step Four: Once the Golden gel has dried, I added some Snowflake Fresco Finish with my finger to tone some areas down, and also with the wrong end of a paintbrush to create small dots. Little Black Dress Fresco Finish was applied with the paint pot lid to create the circles.


Step Five: I painted the edges of all three blocks with Little Black Dress Fresco Finish., and then went around the edges and over the gel texture with Treasure Gold Brass.


Step Six: I stuck the quote down and outlined it with a black pen. I painted some wooden stars with Golden Iridescent Bronze (it's so metallic - I love it!), and glued those in place. To finish, I decided I wanted a little extra texture, so I smeared some Golden Glass Bead Gel around some of the corners.


Here's a close up of the first block...


I really enjoyed making this piece - it was going to be a present for someone, but I'm thinking I might keep it for myself - it looks rather nice on the shelf above my desk! I love this colour combination at the moment too - turquoise and purple - and the Limelight really makes it pop.
Thanks for taking the time to look at my project - I'd love to see what you make if it has inspired you.   You can find me on my blog, facebook and twitter.

oh definitely keep them Emma, they are so pretty. The colour combo is lovely and the touches of texture are yummy, esepcially once highlighted with treasure gold. ~Darcy

We would love you to join in with challenge #20: Triptychs If you are inspired by any of our guests who blog with us over the fortnight, then please join in and link up your creativity HERE. 
All links go in the draw to win a voucher to spend on products of your choice from the PaperArtsy online store. The Triptychs link will close 17:00 (London Time) Sunday, Nov 8th winner will be announced 2 hours later at 19:00.

Wednesday, 4 November 2015

2015 #20 Three Wise Monkeys {by Trish Latimer}

 2015 Topic 20: Triptychs

Hi everyone, Trish here, joining you this evening with a post about triptychs!

When creating anything at all, 3 always seems to be a magic number. The whole 'rule of thirds' thing, the fact that embellishments always seem look better (to me!) in threes...I could go on! 

I find a triptych of any kind is just as pleasing to the eye, and I love creating them! My project today was born from a relaxed playing session, simply going with the flow and doing what I love: messing about with paint and background stamping! 

You may recognise the loose theme I was going along with! I think you will see this better if you click the picture.... long rectangles are always fun to fit into a blog post!


Step One: To create the background on my wooden coasters, I smeared on paint with my fingers. To begin with, the lighter colours in my colour scheme: Snowflake, Zesty Zing and Captain Peacock:


Step Two: I then smeared on the two darker colours, Eggplant and Professor Plum, and added splats of Snowflake.


Step Three: I stamped a collaged design randomly on the edges. Not too much, or it overwhelms the main image! I used a variety of circular designs, taken from...


 ECL04...

EEG07...

...and EEV06


Step Four: I decided to use a hand drawn character as my main image, so sketched her out onto a scrap of card...


Step Five: I wanted to used a paper-pieced bit of card for her dress. The easiest way to do this is to trace the dress first. I used some deli paper, then cut it out.


Step Six:  I painted a scrap of card with turquoise paint (a discontinued JOFY colour), then over-stamped in white. The deli paper dress shapes can then be drawn around, cut out and pieced onto the finished figure.


I really love playing about with paint and finding new colour schemes, and the addition of crisp black stamping is always a nice contrast. Don't forget that nice effects can be achieved by not pressing the whole design onto the background when stamping, partial prints with a faded edge can look cool!


I haven't quite decided what to do with my 3 coasters, they are definitely a set, but could just as easily work separately! I may find a shadow box big enough to take all three, and keep them as a triptych. 

Whether the triptych you create is joined together or separate, it's always fun to have a theme running through all three elements, and I tried to come up with a new twist on an old favourite today! 

I had great fun in doing so, so thank you so much PaperArtsy for inviting me back for this theme!

Take care, 

Trish x

www.inkpaintbeads.blogspot.co.uk

What a lot of fun this looks Trish! Love the coaster idea and how you effortlessly have created a cheeky background and put such a fun series of linked collages on top! Thanks for sharing with us! I think you've nailed a couple of recent themes in this triptych too; circles and faces! ~Leandra

We would love you to join in with Challenge #20: Triptychs. If you are inspired by any of our guests who blog with us over the fortnight, then please join in and link up your creativity HERE

All links go in the draw to win a voucher to spend on products of your choice from the PaperArtsy online store. The Triptychs link will close 17:00 (London Time) Sunday, Nov 8th winner will be announced 2 hours later at 19:00.

Monday, 2 November 2015

2015 #20 Wall Art {by Lesley Ebdon}

 2015 Topic 20: Triptychs

Hi everyone, Lesley here from Crafty Love n Hugs and tonight I'm sharing a wall art Triptych.  I love texture and layering but I also love 'clean and simple' elegance so I combined both to create my wall art using the latest release of fabulous Limited Edition Fresco Finish Paints and Lin Brown's wonderful new stamps that I had the privilege of playing with for their launch.


Step One: I started by applying torn strips of white paper and card to two small canvases then applied a coat of Gesso over the top.  I also gave the larger canvas a coat of Golden Gesso.  (Snowflake Fresco Finish would cover beautifully too but I'm a bit precious with mine).


Step Two: Next I applied Deco Art White Crackle Paste to corners of all the canvases and took it over the edges slightly.  I used a crocodile effect stencil in some areas and just applied with my finger over the edges.  After allowing this to dry, I painted all three canvases with a layer of Teresa Green Fresco Finish from the new set followed by a second layer slightly toned down with Honey Dew.  I gave them a third layer adding more Honey Dew and blending with a wet wipe.  (apologies for colour quality on some of the step photos as I was working at night)


Step Three: I made a very watered down mix of each of the new Limited Edition Frescos...


...in spray bottles and then used a pipette to dribble a little of each colour over the crackled areas allowing it to run.  Love the way it moves into the cracks and these new paints created such pretty shades!  I then added a very light spritz of the Captain Peacock and Granny Smith mixes.


Step Four: I finished the small canvases by stamping the birdcage from ELB21...


...twice onto acetate with Black Stazon Ink, cut them out and then coated them with the new PaperArtsy Frosting Glaze on both sides to dull the shine before sticking them to the small canvases.  I stamped two little flowers from ELB22 onto card, coloured and cut them out to embellish the top of the cages.


Step Five: Next I turned my attention to the main image ...... the beautifully elegant Bluebell from ELB22 !

Firstly, I stamped the flower several times onto copy paper manipulating the stem each time so that one flowing stem with several flowers could be created.  I cut them out very roughly and played around with arranging them on the large canvas until I was happy and then restamped each one onto tissue and painted them with the watered down Frescos.  I then fussy cut each flower and stuck it to the canvas with Golden Soft Gel (Matte).


Step Six: Next I used the Golden Gel again to adhere some linen fabric from my stash onto white molding plastic and when it was dry I stamped 5 flower heads, again painted them with my paint mixes and when they were completely dry I cut them out and shaped them with my fingers after heating with a heat tool.


Step Seven: I then used the same Gel to layer them over the images on the canvas, offsetting them slightly to create more depth and dimension.  I also added a little soft smudged pencil shading along the bottom edge of the stems.


I'm pleased with how my triptych turned out and I am really happy with the effect of using different sized canvases.  There are one or two different combinations that can be used when arranging them on a wall which is why I didn't want to join them together.  Lin's latest stamp releases include several fairly large elegant flower images just perfect for clean and simple and their bold lines make them ideal for stamping onto fabric.

If you're not a fan of clean and simple you could always add background stamping or stencilling and add something to the canvas edges.  I'd love to see your take on wall art triptychs.

Lesley
http://craftymammalovenhugs.blogspot.co.uk/
Facebook : Lesley Ebdon
Twitter : @Craftymamma2

Wow Lesley, the effect of the paint in the cracks is so easy but oh so effective with the gorgeous drips and dribbles. Such a gorgeous understated way to start a canvas. Love the bluebells, one of my fave Lin brown stamps too, and I might have done a little 'ohhhhhh' at the genius idea of using frosting glaze to soften the shiny acetate! Thankyou ! ~Leandra

We would love you to join in with Challenge #20: Triptychs. If you are inspired by any of our guests who blog with us over the fortnight, then please join in and link up your creativity HERE

All links go in the draw to win a voucher to spend on products of your choice from the PaperArtsy online store. The Triptychs link will close 17:00 (London Time) Sunday, Nov 8th winner will be announced 2 hours later at 19:00.

Saturday, 31 October 2015

2015 #20 Halloween Triptych {By Gabrielle Price}

 2015 Topic 20: Triptychs

Hi everyone Gabrielle here, joining you this evening with a project that combines two stamp sets in very different styles! When I realised my triptych would be featured on Halloween I knew it needed to be ‘spookily’ themed! I am a huge Shakespeare fan so I took my inspiration from the three witches in Macbeth.


I have recently taken a class with Kate Crane and so used some of what I learned as a base here. I started by painting Purple Rain and Snowflake on to the wooden triptych making sure that the centre of each panel was lighter than the surround as I wanted to create a frame. I did this on five of the panels, leaving the back panel mainly purple. Don't worry about making this too neat!


I added some stencilling in some areas to add a little detail in the background using PS018


Then came background stamping with EEG11 To ensure that some stamping appeared behind the frames I use a ‘mask’ (post-it note!) I didn’t add lots of stencilling and stamping because I didn’t want this to become a journaling page. I can easily get carried away!


EEG11

Then I chose my three ‘witches’ from LPC003 and LPC014, and stamped them on tissue paper. I turned them over and used the rather lovely Granny Smith for the faces, Purple Rain for their accents. The witches hats were painted with Purple Rain and Slate. I chose Slate so the detail of the stamping could still be seen. The frames are thin slivers from a book page. For the side witches I glued the strips on to the witches first and cut off the excess before adhering it all to the triptych. That way I could make sure it all fitted!


LPC003
LPC014,

The panels for the outside were completed the same way, by stamping the skull image several times on a little tissue paper (3cm x 10cm) I used a ‘mask’ again so I could get a good overlap of the images. The tissue paper was again turned over and I painted the skulls in Snowflake.


I typed up the phrases I wanted to use and printed them out, added Distress Ink and then glued them in place. A few painty lines (in Old Gold and Slate) were added with the edge of a credit card and then I blasted them with my heat gun making sure the paint blistered to give a textural finish, and it was complete!

This is the inside...

and this is the outside...


I loved mixing the two stamp styles and adore those witches in their hats! I have a few of these wooden triptychs and so I think I might have a go using other colours as the predominant background colour, maybe Tango or Granny Smith?! Lynne has a such wonderful array of potential 'witches' that I doubt I'd run out of choices!
Thank you for popping by! Gabrielle (@freyatom)

This is great Gabrielle, those stamps of Emma's are such fun and team brilliantly with the 'witches' . I can see that people will be looking at Lynne's ladies in a whole new light. I love the skinny strips of book text, understated but so effective. ~Darcy 

We would love you to join in with Challenge #20: Triptychs. If you are inspired by any of our guests who blog with us over the fortnight, then please join in and link up your creativity HERE

All links go in the draw to win a voucher to spend on products of your choice from the PaperArtsy online store. The Triptychs link will close 17:00 (London Time) Sunday, Nov 8th winner will be announced 2 hours later at 19:00.

Friday, 30 October 2015

2015 #20 A Winter Wonderland {By Helen Chilton}

 2015 Topic 20: Triptychs

Hi everyone Helen here, joining you this evening with a post about making a miniature triptych. I like anything that involves a bit of planning, design and construction - ie. working out how to get it all to fit together. I also enjoyed taking little bits from the stamps here and there to fit my project. 


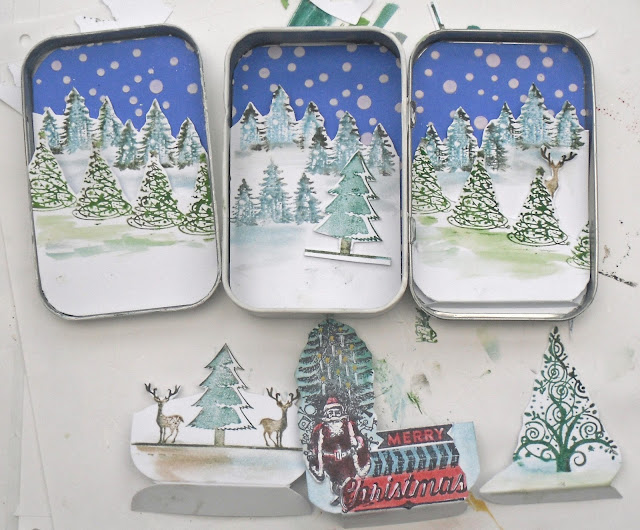
I've taken two small tins and used the base of one and the lids of both to make my triptych.Then I've cut pieces of card to fit inside - bear in mind that the pieces for the lids will be slightly larger.


Colour the card with the Blueprint Sketch ink pad:


Then, using a stencil (this one is made by Kaisercraft), and some Grunge Paste, make a snowy background:


Stick the backgrounds into the tins like this:


Next you're going to look at your stamps closely and pick out elements to stamp up three scenic layers. I've used Distress markers to ink up the stamps as this makes it much easier to colour just the bit you want. The darkest colour is in front, fading out to a pale blue/green at the back: I used Hot Picks XM08 and XM09


Cut along the tree lines so that when you lay them on top of each other they look like this:


Layer up the backgrounds in the tins, the furthest trees stuck to the base, the middle layer raised with foam pads and then the foreground hinged at the bottom to lie level with the top edge of the tin. Stick the hinge flap to the inside of the base of the tin:


Wire the tins together. Stamp the Father Christmas and his reindeer, cut out and wire to top of tin:


Stamp, punch out and wire snowflakes in the same way. Add glitter and sparkly snow to finish:


You can use anything to make a Triptych - card, Stampbord, MDF, wood etc. Look at things you can take apart and reconstruct. It can be flat or 3D like this one. If it's going to be joined, work out how to hinge it together before you start, it saves a lot of time!.This was a bit fiddly to put together but well worth it in the end - it's going on my mantelpiece at Christmas.

So, get triptyching!

Wow Helen, this is fabulous, such a very clever but simple way to create the optical illusion of the landscape and depth. The various trees layer up beautifully, they really do look like they were meant to go together! ~Darcy

We would love you to join in with Challenge #20: Triptychs. If you are inspired by any of our guests who blog with us over the fortnight, then please join in and link up your creativity HERE

All links go in the draw to win a voucher to spend on products of your choice from the PaperArtsy online store. The Triptychs link will close 17:00 (London Time) Sunday, Nov 8th winner will be announced 2 hours later at 19:00.