Showing posts with label 2015 Topic 18. Show all posts

Wednesday, 29 November 2017

2017 #18 Torn, Ripped, Burnt: Torn Memories with VID {by Lynne Moncrieff}

2017 Topic 18: Torn, Ripped, Burnt

It's always a treat when one of our bloggers lets you inside their head; explains how they think, how they create, how they arrange... and it's super-fun when that head belongs to Lynne Moncrieff!


Hi everyone, it's Lynne Moncrieff, Adorn, with you today, and I'd like to share with you a project which found me immersed in my comfort zone where I dipped into many of my tried and trusted favourites to achieve a torn, ripped appearance.  I will throw my hands up in the air, I did not actually burn any items!  In my defence, I hope that some of the  elements have a burnt appearance even though I did not set light to anything. 


The beauty of such a project, items can be hunted and gathered from around the home and garden, a perfect project for re-cycling textiles, found papers and all manner of goodies.  Investing some preparation time in tea/coffee staining and placing bundles of gathered items outside to weather/rust will pay you in dividends. When moving onto creating the project, there is a wealth of stained and weathered items to select from.

I worked with the wonderful PaperArtsy Vintage Ink and the Dog Collection: set 06, the woman on tag stamp being the central figure in the narrative, the other stamps playing an important supportive role in her story. The high quality of PaperArtsy stamps ensured that I had confidence they would stamp onto a variety of collected surfaces:


I will happily while away time preparing bundles.  Vintage tart tins, wrapped with a mixture of textiles and papers, alongside vintage keys, crochet lace, safety pins.... laid outside, either doused in vinegar, tea or coffee with Mother Nature bringing rain and wind to distress the various items.


Patiently waiting for the items to be weathered, broken down, rusted, a little bit battered and torn, before bringing indoors to dry thoroughly. A beautiful tactile collection of textures in a variety of colour tones which will sit side by side harmoniously.


The pleasure in rooting around home and garden, discovering items to incorporate into projects, items which might appear insignificant at first sight but the magic is, they will soon become part of the story that is woven into the artwork. 


I never tire of tea and/or coffee baths. I used them in two ways, to stain virgin items as above but also placing some of the items that had already been outside, playing around with items which have been weathered and then dipping them into the baths, lots of interesting variations can take place, sometimes producing a very dark, almost black/grey colour. 

Vintage ID06


Having a plethora of prepared papers, textiles and extras to stamp onto is in itself inspirational especially when the stamp designs are so in tune with the aged appearance of the papers and textiles, as though each fragment has been unearthed from the past.


When working on such a multi-layered project, I have learned that there is a moment of restraint required from wanting to stamp everything in sight, ultimately there is a fine line, a balancing act of placing stamped elements alongside elements which are allowed to breathe, with no addition of stamping as they paint the narrative as much as stamped pieces.


Sometimes with layers, whether paint, stamping or textiles, they might not be evident to a viewer but that does not make them any less worthy of being included in a project.  For me, layers bring intrigue and in this project the layers symbolize the layers of her life, as though she might be flicking through the pages of her mind, looking at her past.


A wooden vintage clothes peg and craft peg, given a slightly burnt appearance from being weathered with the addition of dipped into a coffee bath. The clothes peg brings visual weight to the top of the assemblage, layered onto a variety of textiles all with torn, raggedy edges, including the fragment of lace which tops of the focal images.


When editing photos, my eye was caught by the fact that this element could be a mini assemblage, ideas already circulating in my head for future projects. . 


Torn, ripped edges of found papers, cardboard paper, calico, all previously stained and weathered with the addition of some of the edges being dipped into coffee or tea, with loose hand-stitched threads adding to the overall distressed appearance, as though memories that are fragile, about to be whisked off in a passing breeze as she desperately tries to grasp hold of those fading memories.


When you take the time to stain, rust, weather, it connects you even moreso with your project. Although ultimately, you cannot control the outcome of any of those processes, you are invested as you patiently wait for the result to unfold.

Try, if possible to re-cycle items or utilize found items as it is so rewarding when those items are transformed into a project.  When sourcing items, keep in mind that a variety of surfaces will not only bring more visual interest to your project, it also heightens the pleasure of stamping and can sometimes result in viewing a stamp with new eyes.

For me, such projects are layers of joy.  From the moment I begin gathering items to the  staining and weathering,I treasure those times as they are meditative, a time when the creative brain is on a different frequency, allowing ideas to brew.  It is also a time to simply experiment, play around with different textures, notice how some tear/rip differently creating different torn edges, some might not stain, rust as successfully as others.  

As for the tea baths, add a dash of Infusions. There is no right or wrong so long as you ensure you are not working with fumes, anything which could be toxic and be careful when handling rusted items, in other words, be creative and play but keep safety in mind.
My mind is already brewing with project ideas and yes, next time I will be burning something up!

Blog: Adorn  https://lynnesbowsandbelles.wordpress.com/
Facebook: https://www.facebook.com/lynne.moncrieff
Instagram: https://www.instagram.com/stampingandbeyond/
Pinterest:https://www.pinterest.co.uk/lynnemoncrieff/

You do this beautifully! I love the loosely gathered and gently stitched elements, dangling thread, frayed lace, newly stamped papers that look old and weathered. It all comes together with your attention to detail in such a thoughtful manner! Taking time to enjoy the process certainly reaps rewards!Thank you for such an insightful post! ~Leandra


We always hope that you  learn something interesting from our blog

Our creative team love to read your comments so much, so please take time to let them know you've been inspired!  

Why not join our 2-weekly challenge by blogging your create response to the current topic and link it here?

The current topic link Topic 18: Torn, Ripped, Burnt will close 17:00 (London Time) Sunday, 10th December 2017, and the winner will be announced 2 hours later at 19:00.

All links go in the draw to win a £50 voucher to spend on products of your choice from the PaperArtsy online store.

Saturday, 10 October 2015

2015 #18 Dreaming of a Sleep Mask {by Clare Lloyd}

2015 Topic 18: Wearable Art

Hello Clare here with a little project which I really enjoyed making as I have recently discovered a love of patchwork. This project raised some laughter too when trying to take a photo. Could I take a photo of myself in the sleep mask (as if)?...then I glanced at the dog...she glared as if to say NO WAY!...so my special Breast Cancer Awareness teddy bear obliged instead!


I began by adding some colour to plain white fabric using Mermaid, PS016 stencil by Emma Godfrey and a stencil brush.


This was followed by some stamping using Orchid, Little Black Dress and my ECL08 stamps.


I die cut out some shapes using PaperArtsy die Leaf #1 and then did some further stamping with the sentiments and face from ECL08 using Black Archival Ink.


These shapes were pinned onto some fabric and I then appliqued them with two rows of machine stitching.


Time to cut out my fabric, a layer of plain fabric and felt using the pattern. These all got sewn together and turned the right sides out. Finally I added some top stitching to define shape and attached elastic.


I haven't put full instructions for sewing the sleep mask, as there are loads of tutorials and patterns on Pinterest which is where I got mine from. I just focussed the arty bit!


PSSSS.....I did try and take a photo of the dog wearing the sleep mask. See it on my blog clarelloyd.blogspot.com. Or find me on Instagram.

This is really cool Clare, teddy looks impressed for sure. With the ever increasing street lights and security lights I am sure we could all do with one of these, and of course now is the perfect time to dream of Christmas. ~Darcy 

We would love you to join in with challenge #18:Wearable Art. If you are inspired by any of our guests who blog with us over the fortnight, then please join in and link up your creativity HERE. 

All links go in the draw to win a voucher to spend on products of your choice from the PaperArtsy online store. The Wearable Art link will close 17:00 (London Time) Sunday, October 11th winner will be announced 2 hours later at 19:00

Friday, 9 October 2015

2015 #18 T-shirt and Earrings {by Wanda Hentges}

 2015 Topic 18: Wearable Art

Hi everyone Wanda here joining you this evening with a post about painting on a t-shirt and shrink earrings to match.  When I saw the upcoming theme, wearable art, I immediately knew I wanted to do a t-shirt.  I hadn't done one in years and it was about time.  When I'd finished the t-shirt, it just seemed to make sense to have matching earrings so you get a bonus project in this post.  


Step One: I washed the t-shirt using no fabric softener, dried and ironed it, laid it out, put freezer paper inside to protect the back of the shirt from paint, and used blue painters tape to mask off an area for painting.  I tore strips of tape in half positioning them down the shirt so I would have a torn edge look.  After these were on I added a full strip of tape along both sides so I had a wider margin to protect the shirt.


I've used stamps from the Lin Brown set, ELB22, and also the small scribbly handwriting image from the Sara Naumann set, ESN18.


Step Two:  I mixed Golden brand fabric painting medium, GAC-900, with each of the Fresco Finish paints I used (except when I used little black dress to stamp with) as recommended on the bottle, a ratio of about 1:1.  The colors of Fresco paint I used to paint the background were snowflake, wisteria, and lavender.  I used both a sponge and a brush to blend and work the colors.  I stamped my first image with smurf (mixed with GAC900).  In areas that were still fairly wet the image bled, which bothered me at first and then I decided it looked good for this project.  It was a good lesson though and I was sure help along some areas with my heat tool when I was sure I didn't want any bleeding.  

You will also notice all the scraps of paper covering the shirt.  I thought I'd be fine until I got paint where I didn't want it and realized I was just too messy and needed to cover up more of the shirt :-) 


Step Three: The small flower head is stamped with guacamole (mixed with GAC-900) and I added splatters with this color.  The checkered image is stamped with snowflake (mixed with GAC-900).  The handwriting is stamped with taupe (mixed with GAC-900).  In some spots the stamp picked up some of the snowflake and transferred it with my next stamping which was fine.  The flowers and quote are stamped with little black dress.  The flowers are painted with glass blue and hyde park (both mixed with GAC-900) and added some "grass". The glass blue was also splattered on.   


This picture shows how I spread the paint on my craft sheet to stamp into and then stamp on my project.


Step Four:  After leaving it sit for a bit because I just wasn't sure I was happy with it, I decided there wasn't enough going on and I needed more in the background.  I used the small flower head again, this time stamping with glass blue (mixed with GAC-900), much better.  


It was now time to remove the tape and see how it really looked.  I was quite pleased, except for the spots of smurf paint that didn't belong.


Step Five:  To hide those spots I splattered smurf (mixed with GAC-900) over the whole front of the shirt.  There are also two spots of snowflake (larger spots where I set my paint brush in the wrong spot), but those will just have to be what they are.  I let the shirt dry completely and then heat set according to directions.  I actually did two of the choices.  I ironed the main area and then also popped it into the drier so all the extra little splatters would be set (I could have ironed those also but chose not to).


Earrings Step One:  I sanded one side of clear shrink plastic, painted on a thin layer of snowflake paint, let it dry, stamped the flower with Archival Ink watering can, punched out the flowers using a 2 1/2" scalloped circle punch, and punched 1/8" holes in the top.


Earrings Step Two:  I used the oven, set at 325 degrees, to shrink the pieces.  I set the circles on a piece of chipboard and put them in the oven.  When they were shrunk I took them out and set an acrylic block on them to be sure they were flat.  I did not push down on the block, just set it on top. 


Earrings Step Three:  The flowers are painted with glass blue and hyde park.  Around the edges are wisteria painted on and lavender sponged on.  Next I applied two coats of satin glaze, one brushed horizontal and the second brushed vertical, allowing the coats to dry in-between.  I then decided I wanted to go glossy instead of satin, but first... I somehow had one little white dot on one of the circles and as I was glazing them it became more noticable. I thought about starting over but instead made more dots.  This was done with a Posca paint pen.  I finished up with four coats of gloss glaze alternating between brushing vertically and horizontally and letting each coat dry completely.  I used silver findings and a bead for each earring.


The directions for washing after painting is to wait at least four days before washing the first time.  I did this and then washed it on cold, partially dried it, and hung it to finish drying.  It came out great!!!  It's slightly stiff in the areas that I got a lot of paint but not too much to wear.  Golden recommends using their airbrush fabric medium for heavier applications.  I hadn't planned it to be heavy and I'm sure if I had only used a brush instead of sponging paint in the background, the application would have been much thinner and there would not be some stiffer areas. 


I hope you've enjoyed today's projects and are inspired to make something for this theme of Wearable Art.  If so, please link up to the challenge post because I would love to come see what you've made.

Creative Hugs,
~Wanda
(BlogFacebookInstagramTwitterPinterest)

oh Wanda this is fabulous! I adore the tshirt and the earrings are such fun. The way you have the strips going diagonal is inspired, it really draws the eye down. Beautiful blending and stamp choices, and the best bit, seeing you model the finished project. 
Thankyou. ~ Darcy

We would love you to join in with challenge #18: Wearable Art If you are inspired by any of our guests who blog with us over the fortnight, then please join in and link up your creativity HERE. 

All links go in the draw to win a voucher to spend on products of your choice from the PaperArtsy online store. The Wearable Art link will close 17:00 (London Time) Sunday, Oct 11th and the winner will be announced 2 hours later at 19:00.

Wednesday, 7 October 2015

2015 #18 Shabby-Chic Wrist Wrap {by Jo Myhill}

 2015 Topic 18: Wearable Art

Hi everyone Jo Myhill (shabbydandelion.blogspot.co.uk) here, joining you this evening with a post about painting and stamping calico to make a shabby wrist-wrap. I wanted to show how you can use fabric with minimal or even no sewing to make a fun fabric hippy style wrist wrap.


Step One: I started by cutting a square of calico (approximately 20cm by 20cm) and ironing it onto some Bondaweb (fusible interfacing). Keep the backing paper on for now as it helps to make the fabric easier to paint. 

Spritz the fabric with water to dampen it (the paint moves around more easily onto damp fabric) and start adding your favourite colours. I started with Cheesecake and then added Professor Plum (new Limited Edition Colour) and Spanish Mulberry. I wanted to create the look of plum crumble seeping and staining into the custard! Add a final layer or two of Chalk to soften the whole thing.


Step Two: Now using some of your favourite background stamps (Hot Picks are great for this) start covering the surface with stamping.  I used Sepia Archival Ink to stamp the large text stamp from Hot Pick 1501.  


Alternate the direction of the stamp (horizontal and vertical). Then using Plum Archival I stamped the large butterfly stamp from Hot Pick 1506...


... over the top, again altering the direction of the stamp. Fill in the gaps with the small stamps from HP1501 to cover your background with Jet Black Archival ink. You want to end up with a collage style background.


Step Three: Cut a square of white felt and stick your fabric top layer to this by removing the 

paper backing from your fabric and ironing the fabric to the felt.  I put some baking parchment between the fabric and the iron. Really press hard to mark sure its well stuck and remember no steam! Square your fabric up, so you've got straight edges and cut into strips, mine are about 1cm, you'll end up with loads of strips! 


Step Four: Now start sewing the strips together, butting the edges up against each other rather than one on top of the other to make one long strip.  I started with hand sewing but also used my machine but you could just as easily hand sew them neatly or grungy! You need the strip to wind several times round your wrist.


Step Five: Once you are happy with the length, hand sew a 'popper' to either end so you can fasten. Along the length of the strip put eyelets in.  I coloured the eyelets and the surrounding fabric with alcohol ink. It stained the eyelet so doesn't matter what colour you use and seeps and spreads nicely into the fabric to make it more grungy and shabby-looking.


Step Six: Now you can start adding your hanging embellishments using jump rings, I kept it simple and just added some tiny wooden beads I had in my stash but you could add, metal bits, shrink plastic bits, buttons, more ribbon - whatever takes your fancy!


This was really fun and easy to make and you could have so many different ones depending on your fabric and paint choice.  They'd be a great make for kids  for those rainy days in the hols.  

I'm thinking with the spare strips I have of adding a lace border and threads tied on - endless interpretations!  I hope you give it a go and I look forward to seeing your take on the idea on the challenge link and hopefully in person!

Jo

Blog: shabbydandelion.blogspot.co.uk
Twitter: @jomyhill
Instagram: jomyhill\a

Love this Jo, and I would never think to add alcohol ink to the eyelets that way. Fantastic music festival wear too! My girls would really love making these - also a great birthday party idea for a teen. Thanks for sharing! ~Leandra

We would love you to join in with Challenge #18: Wearable Art If you are inspired by any of our guests who blog with us over the fortnight, then please join in and link up your creativity HERE

All links go in the draw to win a voucher to spend on products of your choice from the PaperArtsy online store. The Circles link will close 17:00 (London Time) Sunday, Oct 11th winner will be announced 2 hours later at 19:00.

Monday, 5 October 2015

2015 #18 Wearable Art {by Diana Taylor}

2015 Topic 18: Wearable Art

Hi everyone, Diana here from VelvetMoth Studio and I'm delighted to have been asked to do a blog post on wearable art tonight. 

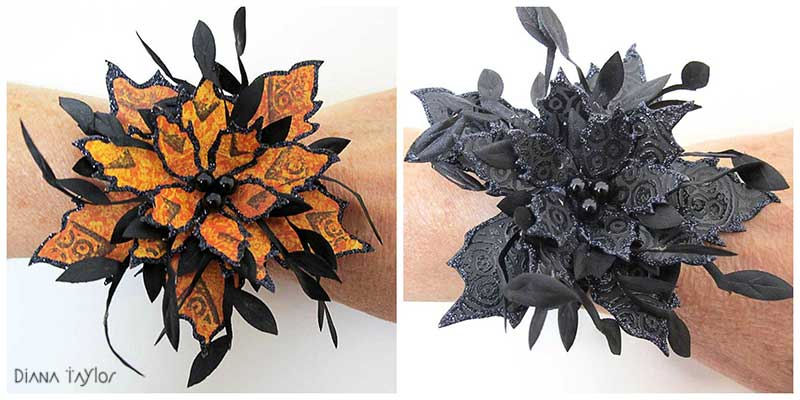
One of my favourite dies is the Tim Holtz Poinsettia die and I have always thought it is far too lovely to keep just for Christmas, so I've decided to use it to make a necklace and cuff that would be ideal for Halloween!

  
Firstly I die cut  three lots of flowers in black card. I stamped them in gold with Ellen Vargo's beautiful leaf stamps set EEV04.  I then edged all the petals with Glossy Accents and black glitter.


I assembled the flowers using PVA glue.  For the large centre flower I used all three templates.  For the smaller flowers either side I used just the two smaller templates. 

When dry I gently pulled forward each petal, squeezed some hot glue behind it and using tweezers I pressed some short lengths of black silk leaf ribbon into it.  While the glue was warm I was able to adjust the petals to the angle I wanted to give a 3D effect. I added three shiny beads to the centre of each flower using PVA glue - I have found that beads can ping off hot glue quite easily once it's cold!


For the first cuff I replaced the black leaf ribbon with orange beads on short lengths of black wire and stamped the petals with PA mini stamp MN96 in gold. 


I put a dab of hot glue behind each petal, stuck the wires into it and held them in place until the glue cooled to get the angle I wanted.   I stamped three leaves in black ink on orange card and clear embossed them, then cut them out and attached them with PVA to the back of the flower. 


The orange cuff was randomly stamped using just the tip of the leaf, and the black cuff was stamped with black ink and embossed with clear embossing powder.


Finally I assembled the necklace and cuffs.  I glued ribbon to the back of the three flower florets using a hot glue gun. I made sure it was glued slightly above the centre of the flowers so they didn't fall forward while being worn and I made sure the ribbon was long enough to be tied in a bow at the back of the neck.  For the cuffs I glued some black elastic ribbon to the back.  


I have really enjoyed making these little pieces of wearable art and I am definitely going to try out some different colour palettes such as pastels with pale cream leaf ribbon for a more summery look.

I do hope I've inspired some of you to get your floral dies out!
Have fun,
Diana

Diana this is exquisite and visually striking. Love all the embossed detail and the touches of dimension from adding in the beads ... bravo. Thanks for sharing your creativity with us. ~Gillian


We would love you to join in with challenge #18: Wearable Art If you are inspired by any of our guests who blog with us over the fortnight, then please join in and link up your creativity HERE

All links go in the draw to win a voucher to spend on products of your choice from the PaperArtsy online store. The Circles link will close 17:00 (London Time) Sunday, Oct 11th winner will be announced 2 hours later at 19:00.