Showing posts with label HP1009. Show all posts

Thursday, 29 August 2024

With 3 Things: Flirty Flamingos {by Laura Denison}


Hi friends, it's Laura (my Instagram) with you as the second of three guest bloggers for this feature. I was so excited when PaperArtsy asked me to be a participant in this month's "3 Things" challenge! I wonder what you would have done with the 3 things shown above?

For this feature on the PaperArtsy Blog, 3 bloggers are sent 3 items in the post. We have no clue what PaperArtsy HQ is going to send us, there are slight variations (for example on this round we each were sent slightly different stamp sets) but generally 2 of the 3 things are identical.


When the mystery box arrived from France, I opened it to find a Scrapcosy stencil (PS106), a Hot Picks stamp set (HP1009), and two bottles of Fresco Finish Chalk Acrylic in Peachy Keen and Marbles. My initial thought was: uh-oh, I don't really "do" pink and light blue. I've never been one to shy from a challenge, so I dove in. The Peachy Keen color reminded me of flamingos. Hmmm, maybe I can do something with that I thought, and I was off and running!

This idea resulted in a dimension textile panel with, indeed, a couple of flamingos. Let's take a closer look.

My work is evolving these days as I am merging and combining many of the types of art I create, with mixed media being the foundational thread. As a teenager in the 1970's, I designed and created soft sculpted dolls and teddy bears, by college I had started quilting. For many years, these two were my art form. 

In 2009, I turned to bookmaking and paper crafts incorporating mixed media and 3 dimensional projects. My education and professional experience is as an interior architect so 3D is natural for me. In the past year or so, I have returned to my quilting and doll making roots. In the last few months my focus has been a combination of these two textile expressions with what I call dimensional quilting. I decided to create one of these projects featuring flamingo's using the supplies sent to me. Some of these items are going to require thinking outside the box to become a flamingo!!  


First up was getting the cool Peachy Keen color onto fabric. You can actually "dye" fabric using acrylic paint! However the tone of the base fabric will impact the result as the color sits on the surface rather than changing the fibers. This is great for getting multiple tones from one paint! Here, both of these fabrics (far left and right) were colored with this same paint, you can see  the before and after with the original fabrics in the centre.

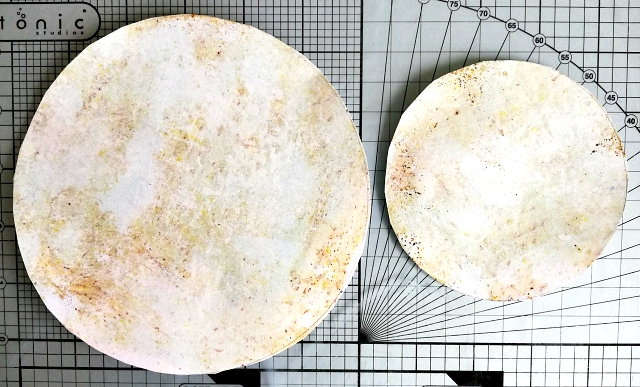
To "dye” your fabric an overall color, the fastest and easiest way is immersion in a container. I use a large jar, but a bowl will also work. The ratio I use is approximately 60% water, 20% fabric medium (any brand will work), and 20% acrylic paint. Fresco Paints are some of my favorites as their chalk finish works seamlessly with fabric to leave a great finish. The fabric medium helps the paint to bind to the fibers. After the colour is heat set, it helps the fabric to remain soft and pliable, and the fabric can still be washed.


Once the paint/medium mixture is ready, I put the fabric into the jar. I tend to use smallish fabric pieces, so the jar is a sufficient size. Stir the fabric to get full coating. The more agitation, the better and more even the coverage.

The fabric shown was a grey piece with writing and diagrams so it came out as a tone of the peachy color.

Wring out the fabric and lay it flat on old towels to dry. Once air dry, heat set using a hot iron on a steam setting, or tumble dry on a cotton setting. Heat setting will make the color permanent. My projects don't end up as usable items so machine washing isn't critical to me, but these fabrics can (typically) be washed as is appropriate for the fabric you have dyed, cool water with your usual detergent should be fine. Note: Always do an experimental trial washing before creating something important that will need cleaning.


For fabrics that don't take well to being immersed into liquid, like this upholstery corduroy, you can paint them or add an even layer of color to the top. My favorite method for this is using a gel plate as a "stamp pad" to apply the color. I use a brayer to spread an even layer of paint to the gel plate and press the fabric onto the plate. VoilĂ ! nice even color and you can pull a paper or fabric print from the now textured plate to add to your fodder stash. TIP: You may find you need to add water to the paint to loosen it enough to sink into the fibres easily, or spritz the fabric with water to dampen, then add paint is another method.

After creating the fabrics for the flamingos, I started to building the background elements of the project. To set off the flamingos, I wanted a deep neutral fabric that I could add some stenciling to, thanks to the Scrapcosy stencil PS106. I like using a cosmetic sponge to stencil on fabric, though a flat brush works as well. You can add fabric medium to the paint and heat set it to make it more permanent


The beauty of using an opaque lighter shade of Fresco Finish paint,  is that when stenciled, it will show up on a darker surface. Transparent paints will lose some of their vibrancy over dark backgrounds. The warm light blue tone of this Marbles color on the deep taupe color is the perfect contrast for the pink of the flamingos. I then heat set the fabric and added other commercially printed fabrics to create the project background. It was then layered and machine quilted.


I decided to use the Hot Picks stamp set (HP1009) to make details for the feathers that would give dimension and detail to the bird-bodies. I use a waterproof pigment or dye ink (for exmple Ranger Archival inks) on fabric for better permanence. Most water-based inks will wash out, even with heat setting. (unless you need them to wash out and then they are PERMANENT, but that's a different story, lol).

As I looked at the hexagonal flower stamp, I realized it looked a bit like feather tips if I cut it apart after stamping. The grasses and birds stamp were stamped onto the fabric and feather shapes were free cut from the stamped fabric. I then fringed the edges of all feathers and tips.


To add to the floral motif of the stenciling in the background of the project, I wanted to add further 3D elements - flowers!

First, I "dyed" fabric with the light blue Fresco Finish Marbles paint. I sandwiched a layer of fusible material between two layers of the finished fabric. Fusible material comes in both sheet and roll forms. It is fused together with an iron and creates sandwich that has more thickness and less fraying. While still warm, the flowers can be gently shaped and they will hold that shape as they cool.

I stamped the little single flower onto the double layer fabric sandwich. I also used  water soluble crayons to add further color.

To create the flamingo’s, I drafted a pattern for the birds and their beaks. They were then stitched, cut out, and turned. Polyester fiberfill was used as stuffing. They are stuffed firm in the head and neck and loosely in the body.

The beaks were hand stitched to the head/neck body piece. I then added the details of the head and beak using water-soluble crayons, acrylic pens, and permanent markers.


To flatten it, I stitched/quilted the body with lightweight yarn. I wanted contrast so I used a darker yarn. If you want a matching color, you use the same immersion technique on white cotton embroidery floss. Once dry, wrap the floss onto a larger piece of cardboard to heat set.


After cutting and fringing what seemed like about a zillion feathers, they were attached to the bird bodies. I used multiple fabrics; most were immersion painted with the Fresco finish Peachy Keen paint. I did add additional color to some feathers with water soluble crayons


The birds were then attached to the background. The birds are only partial, so I created a dimensional frame using fabric covered thin foam for the birds to lay on.


Once the birds were in place, the flowers were attached to the background along with some silk flower leaves.

The flamingos are now ready to be wall hung and enjoyed!

I had a lot of fun with this project and hope you did too! 

Laura

Instagram: @lauraddenison

Sunday, 1 November 2020

2020 Topic #19 A Beautiful Flower with HP {by Amanda Pink}

       2020 Topic 19: Words Of Wisdom


Amanda has chosen one of the most gorgeous flowers from our Hot Picks series to share some watercolour wisdom with you today! Infusions are a fun product, you can use them in different tonal values depending on how crazy you go with the amount of powder to water ratio. Amanda has a great bag of tricks to share!
~ Leandra

Hi everyone, it's Amanda (ink-a-pink) with you today, and I'd like to share with you the project I have created for the current topic 'Words of Wisdom'. 

I have created a piece of 'Art on the Round' for this topic where the focal imagery plays to my chosen 'Words of Wisdom'- a quote about seeing and accepting 'beauty in imperfection'. 
I've mixed up the creativity so there's some water colour painting with PaperArtsy infusions, some gelli printing with PaperArtsy Frescos and some stamping using a couple of PaperArtsy Hot Pick stampsets.   


Usually when I create I start with the backgrounds but on this occasion the creativity began with the flower. In fact, it was the flower that provided the inspiration and guided the way. 


I used a stamping platform to stamp it onto PaperArtsy Smoothy card. I find a platform to be a very useful tool as it enables me to stamp over the image with precision if I don't get a good stamped impression the first time. It also allows you to add colour, then stamp again in black over the top (as long as you manage to keep the item in position during that process!)


I have to show you a close up of the stamped flower as the crisp lines and fine detail is pretty impressive!   

I used to love watercolour painting back in my earlier creative days and have neglected it in recent years so I thought I would re- kindle that love and watercolour the flower using PaperArtsy Infusions as my watercolour medium. Lemoncello was the infusion my hand went to first and I was ok with that as I thought the lemon/yellow tones would be a lovely colour for the flower. 

For anyone who isn't familiar with PaperArtsy Infusions heres a little info about them. They are water soluble particles made up of a fine dye colour pigment and walnut crystal particles that react at different rates when mixed with water. The colour pigment will react first to give instant colour  and then the walnut crystals will dissolve gradually to give a brown base.  
You can control the colour to brown ratio by the amount of water you add and how quickly you blot and dry as you work.

They are a really versatile medium and are available in a range of colours. If you type Infusions into the search bar at the top of this blog you will find many posts showing various ways in which they can be used. 
 

'A little goes a long way' with infusions. The tiniest of sprinkles when spritzed with water was  more than enough for painting the flower. 


The ability of being able to control the colour to brown ratio of the infusions was great for watercolour painting as it allowed me to gradually build up the colour of the petals to create light and shadow and give them depth and dimension. 
I was really pleased with the results of infusion water-colouring and enjoyed being reminded of  the 'inner calm' this type of painting gives me. 

As the saying goes 'after the calm comes the storm'  and that's what happened next with some, lets say, messier, unpredictable gelli plate printing to create the backgrounds. 
I worked with the following colours of PaperArtsy Fresco Acrylic Paints:  Eggshell, Honeydew, Antartic, Blue MoonSnowflake.


I created numerous prints but chose the two in the photo for the project. 
Give or take a pull here and there, they were all created by brayering a Fresco colour on the plate one at a time and pulling a print after each application. If I remember correctly the colour order went something like this: Eggshell, Honeydew, Blue Moon which proved to be camera shy so is missing from the line up in the photo above, AntarticSnowflake. I also added some Lemoncello Infusions to the mix thinking it would add some unity between the backgrounds and the flower.  
  

The prints were cut to cover the two White /Greyboard Rounds from That's Crafty (6inch and 4inch)  
 
I like to add some stamping to my backgrounds for extra detail and interest .


I used the thin number stamp from PaperArtsy Hot Picks 1604 (HP1604) ,stamping with black Archival Ink.


... and the small texture stamp from PaperArtsy Eclectica Seth Apter Collection (ESA13) stamping with Lemoncello Infusions 
 

 Stamping with infusions gives a lovely tonal watery impression. 
 

Around the circumference of the larger 'round' I stamped the grasses in black archival. The stamp is  from the same stampset as the flower: PaperArtsy Hot Picks 1009 (HP1009) 
You know I said how impressed I was with the fine lines and detail of the flower stamp well lets just say I was blown away with the crisp fine thin lines the grass stamp created! 

The circular backgrounds were adhered to the two rounds which were then adhered together  ready for the focal flower and the 'Words of Wisdom'.....


 .... 'Even When Petals have Flaws, All You See Is a Beautiful Flower!' 


These 'Words of Wisdom' haven't as yet been made into a PaperArtsy stamp (or at least I don't think they have ?) so they were created with the help of some PaperArtsy Smoothy (regular) card and a printer. 

 
To 'ground' the flower I created a vase for it to sit in using the base of the 'quirky girl' stamp from PaperArtsy Hot Picks 1604 (HP604) stamp set, mentioned and seen above. It's coloured with Lemoncello infusions and makes for a unique stylized flower holder to finish off the project.  

I have enjoyed creating for this topic as it allowed me to touch base again with my love of watercolour painting and enjoy some 'inner calm'. It also encouraged me to seek out some 'words of wisdom' that would work well with the imagery and try and enhance the wisdom they hold through creativity.  

I hope my 'Words of Wisdom' Art on the Round has offered some creative inspiration, maybe even a little 'pause for thought'?  

Thank you for joining me today/ tonight. 
Keep on Creating 
Take care 
Amanda 
x

Blog: ink-a-pink
Facebook: Amanda Pink
Instagram: p1nkart  
Pinterest: PinkArt