


Hi everyone! It’s Peley Renata here with you today and I have a fun project to share with you and perhaps to put you in early Halloween mood.
As I have never really felt good at modeling 3D shapes, or creating anything with clay, when the topic of the art dolls came up, I decided to make mine out of paper. I know that after those amazing projects and blogs that my crafty friends from PaperArtsy team created, this may seem like an easy breezy project, but stick with me and I promise it will be fun.

The quarterly topic of this month was “Transparency”, and I wanted to express my interpretation of it in a way to make a doll theatre where the dolls on strings could be moved by a hidden puppet master and where would be curtains, and we would never know what happens in the backstage, behind that fabric wall. With that idea in mind, I wanted to set a bit of a mysterious tone for my project. But now let me show you all the technicalities behind this.

As I previously said, the idea was to make a doll theatre, so when I started assembling my supplies, I knew I would like to work with a shadowbox (deep picture frame) and I knew just the right one. I bought mine once from Ikea for a project that I never ended up doing, but you can be more creative than me and create your own. Other items that I had in my mind at this point were a mixed media paper for the background, watercolors, but I also needed fabric for the theatre curtains and I knew it had to be in red to follow a more traditional image of a theatre. And of course, let’s not forget my chosen stamp sets and stencils from Nicci Battilana.

When choosing a color scheme for this kind of project, you can go two ways. You can create it in a bit darker, moody tone, or you can go and make it colorful and cheerful. I am a big fan of Halloween and I imagined making a project that could fit a home decoration for that occasion, but in my case my new project is already sitting on my wall. :)

The first step was to make a background and set the mood of the whole project. I chose to work with 200g/m2 (120lb) mixed media paper. For coloring, you can use inks, sprays, acrylics or like me: watercolors. I chose to work with watercolors because I had in my mind this lose, more organic look, with a bit of a vintage feel.

On the image above, you can see the first layer of color. I intended to make my colors uneven and I added some splatters. Also, I imagined how a stage light would make a brighter spot on the scene somewhere in the middle so the next step was to apply darker colors only towards the edges of the paper.

Hopefully here you can see what I meant. Now I know this doesn’t look great on its own, but later on it all comes together. Anyway, I still wasn’t done layering the colors and I still wanted to darken the edges up a bit, but for this time I used Ranger Distress Oxide Inks in Vintage photo, Ground Espresso and Black Soot colors.

With this, the base of my background was done but I wanted to add just a touch of spookiness to it with a bit of cobweb and a couple of spiders.


I wanted to make the spiderweb discrete, so I heat embossed it with half transparent but also shiny embossing powder. Truth to be told, this ended up being a bit too transparent so I added just a bit of white highlights with a Gell Roll pen to emphasize the web. And since I had embossing powders at hand, I also heat embossed a couple of spiders. To make the stuff more scary, one spider will be hanging just above one of the dolls heads (muahaha :D ).

At this point, I was happy with my background, so it was time to make my paper dolls. For that, there were a couple of things that I had to keep in mind, but you will soon see what I mean.

Now to the most fun part, the making
of the paper dolls. The stamp sets that I picked for my projects are ENB07 and
ENB09 by Nicci Battilana.


As you can see from the stamp sets, we have 2 heads, 2 bodies but only 1 set of arms and legs, but this is not a big issue. If you want to go simple just stamp the legs as they are and use them for both dolls, but I didn’t want to have the same patterns on the legs. One set of legs I stamped with Tsukineko VersaFine ink, but for the other one, I did a bit of a work around with brush markers. For the legs with the black leggings with skulls, I went only on the edges of the pattern with the brush markers, so I managed to stamp only the outer shape of the leg. The legs with the starry pattern were stamped with a blue brush marker, as I was planning to cover the design with darker blue colored pencil. And this all worked out in the end, as you will see.
Another thing that you might have noticed is that one of the dolls on the stamp set doesn’t have a lower body stamp, but that was really easy to draw. And I actually draw one skirt and one shorts since at start I wasn’t sure what I wanted to use.

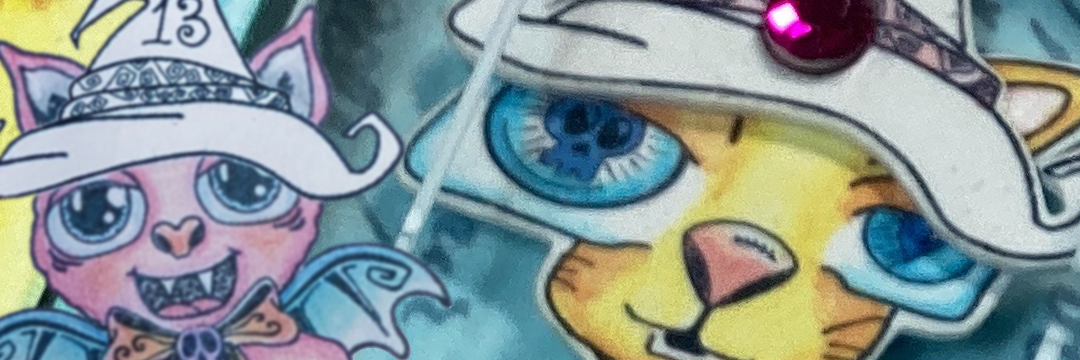
When all the images were stamped (and drawn), I went onto coloring. This time I decided to work with colored pencils. I used Prismacolor Premier pencils and for blending, I used odorless mineral spirit and a blending stump. In case you are concerned about the toxicity of the odorless mineral spirits, you can blend the colors using brighter shades (such as white) or blender pencil as well.

After coloring and fussy cutting the stamped images, it was time to assemble the paper dolls. To attach some elements, I used a black thread, while for others brads. At the start, I used a simple brad on the neck, but later on, you will see that I changed it to a heart-shaped one as I imagined it could serve as a choker necklace.
At this point I had to think about my idea of a hidden puppet master, so while assembling the dolls, I also had to keep in mind to leave longer strings at the doll’s elbows and shoulders.

I repeated the whole process on the second doll, but this time I also attached the “plush” rabbit to one hand using a string.
To secure the dolls’ strings to the base paper, I used simple transparent adhesive tape on the back of my background paper. Also, I wanted to make sure my dolls don’t stick to the background and at the same time give them some more illusion of dimension, so I put 2mm thick foam tape on the back of the dolls, behind their head and main body area but I did not peel off the sticky layer since I still wanted to be able to move them.

Now I had my background and the paper dolls ready, so it was time to make the stage.

Do you remember how I told you
at start that I am not good at making 3D shapes? Well, it turned out there is
one more thing I am not good at. Using a glue gun! It’s such a messy work for
me. I had glue strings all over the place and my fingers. One piece even glued
to my hair, even though I have no idea how that happened. Anyway, let’s keep
that between us and move on to the project. Here is the new batch of items
which I prepared for the next stage of my project.


The curtains….ugh…I must admit
I struggled with these. I wanted them to form a nice shape, but not to cover
too much, but still look like curtain enough?! I know I might sound silly to
you but guys it was easier said than done. Or maybe I am just a paper girl and
clay and textile are just not my friends…. :D
Anyway, this Ikea shadowbox has an inner wooden frame that I took out and adhered my curtains using a glue gun. Also, just for some extra effect, I found these 2 tassels from my stash and attached them to the fabric. And I really loved how that turned out.

On the picture above, you can see the inner frame of the shadowbox that I mentioned, but also my messy glue gun work.
Now for the end, the last thing that I had to do is to assemble my frame and put together the whole project.

Oh, and look at that cute bat that I just placed there just for fun. :)

I have to admit, this was really fun for me to create. I enjoyed figuring out the ways to assemble the dolls, the color scheme of the project, how to make it all look more like a stage, but every project can have some difficulties. Either some medium not acting as you imagined, cutting fabric where you did not intend to, cat stepping in your paint, getting glue in your hair…but let’s leave all this “behind the stage” mishaps and enjoy the creative process because that’s what matters the most. In my opinion, when you enjoy the process itself, you will have better end results as well. And you might even pick up a fun anecdote to tell to your crafty friends. :)
Renata 💜

Just in case that you are curious to see the full crafting process with all the struggles and mishaps, there is a video available on my YouTube channel.

Facebook: Peley Renata
Instagram: @renata_artjournaling
Pinterest: @peleyrenata
YouTube: renata_artjournaling


.png)

