Showing posts with label 2018 Topic 14. Show all posts

Monday, 3 September 2018

2018 #15 ATCoins: Hang in there with LPC {by Helen Chilton}

2018 Topic 15: Artist Trading Coins


Tonight we kick off a new topic: Artist Trading Coins. If you are not sure what these are, follow the challenge link at the foot of the page for a great introduction from Darcy. These are round tiny pieces of art, which might be themed, and people are swapping them for fun. You can make and keep them in your usual Artist trading card folders too as they are designed to fit. I love how Helen has turned hers into a hanging display. I hope you find some time to join us over the next 2 weeks as our bloggers play around with penty of circular ideas! ~ Leandra

Hi everyone, it's Helen with you today, and I'd like to share with you a batch of Lynne Perrella Artist Trading Coins.

I say 'batch' because I made an A4 background and then managed to punch out 8 coins from it. Making them this way means that they all coordinate well. Lynne Perrella's stamps were great as they have so much detail on them. I pulled several sets to start with but in the end only used one, managing to create a different stamped collage on each coin.


Now I know you're meant to trade the coins but I couldn't resist hanging mine up with lots of embellishments!


I chose light paint colours as the images are quite opaque and just scraped it on randomly.


Then I added a bit of stencilling in the same colours. I've used these stencils so often - I love the pattern.


One A4 sheet gives you 8 coins, 2.5" in diameter.


It's easier to ink up the stamp and place the coin face down on top for this. I mixed and matched lots of different parts of the stamps to get my eight designs and just filled in any gaps with a bit of border.


I wanted a bit of darker colour on there so added some with watercolour brush pens - very quick and easy - then added white highlights.


The kraft card coins are for the back as I wanted to run the ribbon between them.


You can hang them up as you please - that's just a stick from the garden with wire wrapped round it. The hardest bit was threading the beads on the ribbon!


You can see how the ribbon slots between the two coins - add beads or whatever for decoration.

I like the idea of making sets of coins. I was going to make a box to put them in but couldn't find anything suitable. Thinking about it, you could use an empty tape spool and just add a top and bottom.

Just because the coins are small, it doesn't mean you can't add lots of detail. I've added embellishments to the hanging mechanism, but you could also add more detail and text (think Alison Bomber's stamps) to the coin itself. How about stamping text round the edges? I'm definitely going to make more of these - they're very addictive!

Helen

Blog: A Splash of Colour

To join our challenge and win a PaperArtsy £50 gift voucher:
Simply make something arty relevant to the topic, and link your creation from any social URL (eg. Instagram, Pinterest, Blog Post etc) sharing your original make to this challenge page.

The current topic link Topic 15: Artist Trading Coins will close 17:00 (London Time) Sunday, 16th September 2018, and the winner will be announced 2 hours later at 19:00.

All links go in the draw to win a PaperArtsy £50 voucher. Please make sure we can contact you as a prize winner - it helps if you share your contact info from the platform you opt to use.

Good Luck! If you have any questions, don't hesitate to ask!

Saturday, 25 August 2018

2018 #14: Tea Time with ESC {by Etsuko Noguchi}

2018 Topic 13: Baked Texture


The glint of embossing powder is often what gets us hooked on crafting, but these are a very different animal! Seth Apter's Baked textures are a new toy for Etsuko, and she puts several through their paces in this post! ~ Leandra


Hi everyone, It's Etsuko/ My favorite things with you today, and I'd like to share with you my 'Tea time panel'. Ever since Seth APter announced his powders, I wanted to use Baked Textures to create grunge techniques. Previous embossing powders I have used are quite flat in comparison so I didn't use them much for mixed media. The 'Baked Texture' powders melt into the surroundings and create an interesting texture so it is a lot of fun. I have not done a lot of experiments yet, but please enjoy what I created.


First I decided to make a little panel with Raquel's new stamps and stencils. In the background I made pieces using Baked Textures and collaged it. the photo frame and teacup are focal points.

What looks black is 'Rocky Road', it is transparent, uneven and very glossy. The dark black tape on the right I used Dirty Sand and on the brown paper below it is Ancient Amber Baked Textures. These stamps are from Seth's set ESA09.


I made a Baked Texture Skins, Although his skin was very smooth, mine had many holes!! 
( left of the photo)


The photo frame I used Raquel's PS106 stencil with Ancient Amber Baked Textures.


When it cooled down I used 'Vintage Beeswax' once on it. And finally I used Rocky Road at the edge.


Finally I put the Gorgeous Raquel teacup ESC15 on the photo frame.


I tried to use Baked Texture but I could not make delicate lines and when I used Vintage Beeswax on the top it got blurred.---That was my choice wrong!! I used Twilight Fresco on the base and stamped by some gold and clear embossing powder.


I was a lot of fun to play with beautiful Raquel Tea Time series and Seth's Baked Textures that can make variety of works. The Baked Textures has a lot of possibilities and interesting to devise it. Please everybody try to this challenge, I will looking forward to seeing them!!!! 

Thank you so much stopping by!!

Much love.
Etsuko xxx 

Blog: My favorite things
Facebook: Etsuko Noguchi
Twitter:
Instagram: pixienest
Pinterest: Etsuko N. 

To join our challenge and win a PaperArtsy £50 gift voucher:

Simply make something arty relevant to the topic, and link your creation from any social URL (eg. Instagram, Pinterest, Blog Post etc) sharing your original make to this topic link Topic 14: Baked Texture . The link will close 17:00 (London Time) Sunday, Sept 2nd 2018, and the winner will be announced 2 hours later at 19:00.

All links go in the draw to win a PaperArtsy gift voucher. Please make sure we can contact you as a prize winner - it helps if you share your contact info from the platform you opt to use.

NB you have 3 weeks for this challenge due to New Products being announced

Good Luck! If you have any questions, don't hesitate to ask!

Friday, 24 August 2018

2018 #14: Baked Texture with EEA {by Nikki Acton}

2018 Topic 13: Baked Texture

Abstract with PaperArtsy Fresco Acrylics, Everything Art stamps and Seth Apter Baked Texture Embossing Powder

Working with geometric shapes is often helpful when building up your composition, you have shapes that can be repeated in different ways within your layers, and a structure seems more obvious to identify than it might if you are trying to be 'random' . Nikki shares her tricks within this post! ~ Leandra

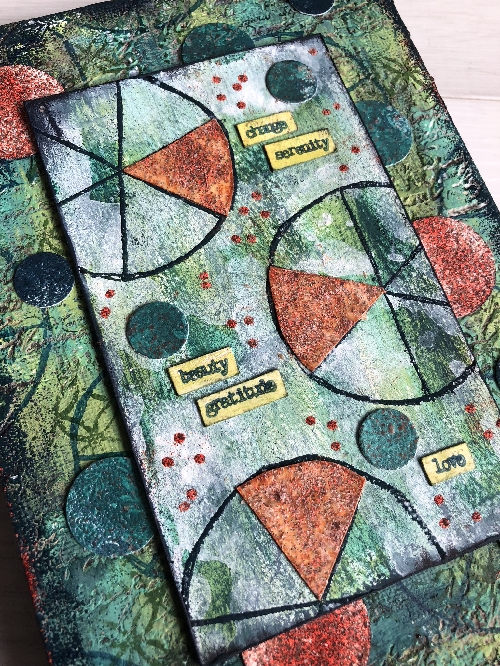
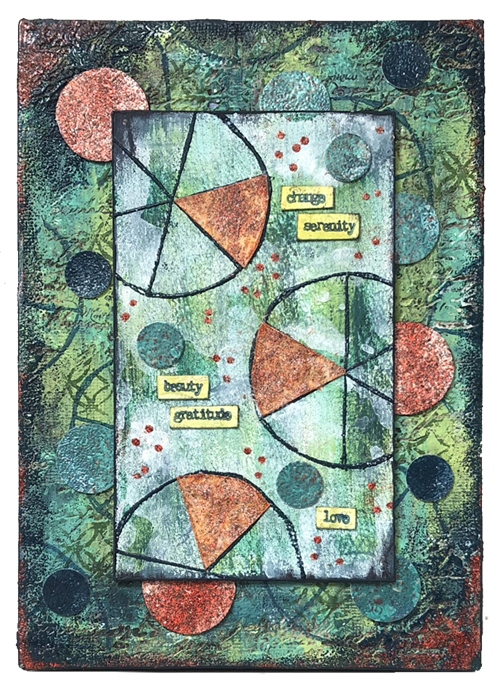
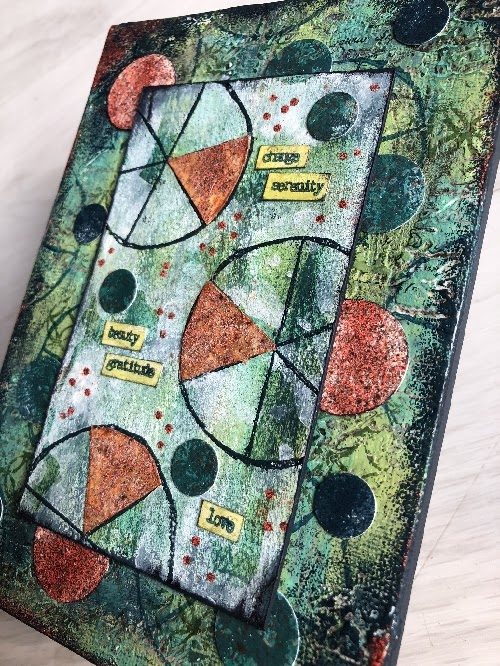
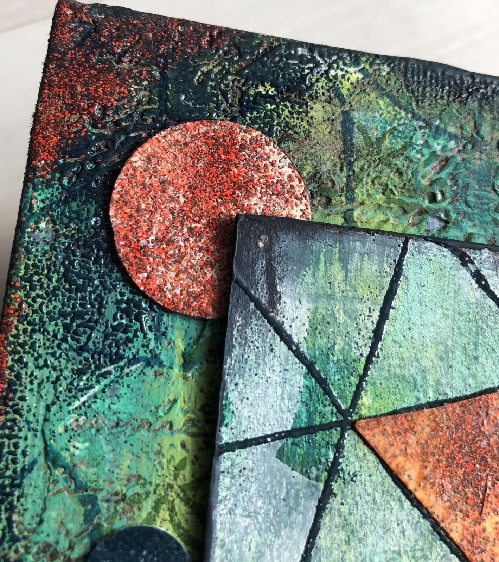
Hi everyone, it's Nikki from Addicted to Art with you today, and I'd like to share with you my abstract canvas board using Baked Textures, Grunge Paste, Fresco Acrylic paints and EEA03 from Everything Art.


I think I have shared before my love of geometric shapes and abstraction in art. Here I have combined these with texture and words - making the composition of all the elements interesting! I may not quite have got this right, but it was fun trying!
Abstract with PaperArtsy Fresco Acrylics, Everything Art stamps and Seth Apter Baked Texture Embossing Powder
My background began with Grunge Paste on a canvas board which I added around the edges with a palette knife and once nearly dry stamped into for some texture. Once finished this is not obvious but it is one of those unseen things that create subtle depth and interest.

Abstract with PaperArtsy Fresco Acrylics, Everything Art stamps and Seth Apter Baked Texture Embossing Powder

I added various Fresco Acrylic paints building up patches of colour - using Midnight, Green Patina, Limelight, Granny Smith and Magic Moss. Once I was happy with this I added a little background stamping using the fabulous 'go to' stamp from one of Seth's recent stamp sets - ESA08.


Abstract with PaperArtsy Fresco Acrylics, Everything Art stamps and Seth Apter Baked Texture Embossing Powder

The front board was cut from greyboard and a coat of Paper Artsy Fresco Acrylic - Chalk added before similar paint colours to the background. I then toned this down by making a puddle of Chalk paint (ie mix with water) and dipping the panel in it. Dry brushing would have worked too - I just wanted to lighten it to create contrast to the background.

Abstract with PaperArtsy Fresco Acrylics, Everything Art stamps and Seth Apter Baked Texture Embossing Powder

I stamped (and heat embossed with Deep Sea Baked Texture on the front panel) - the pie stamp from EEA03 - commencing my composition. I then worked on some card using the Baked Textures - Deep Sea, Chunky Rusty and Patina Oxide sometimes with complete coverage, sometimes just adding sprinkles for a more textured, mottled effect. I punched circles to build up the layout.


Abstract with PaperArtsy Fresco Acrylics, Everything Art stamps and Seth Apter Baked Texture Embossing Powder

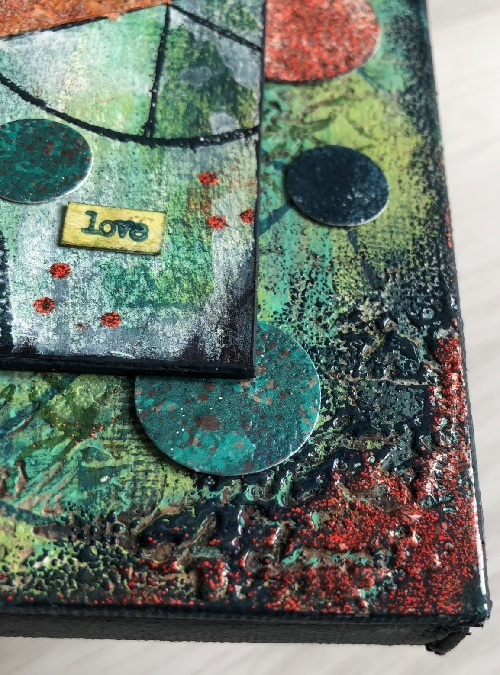
Finally I added Baked Texture around the edges - this is where I do love this product. I added versamark followed by Deep Sea and heated. I then added more versamark and this time sprinkled Chunky Rust to create an additional layer but leaving the Blue visible underneath.

Abstract with PaperArtsy Fresco Acrylics, Everything Art stamps and Seth Apter Baked Texture Embossing Powder

I haven't explored as much as I would like with these powders but I love what I see and what I have seen others doing! They work wonderfully over paint adding both texture and contrast.

Nikki

Blog: Addicted to Art
Instagram: @A2Acardscraft
Pinterest: nikacton


To join our challenge and win a PaperArtsy £50 gift voucher:

Simply make something arty relevant to the topic, and link your creation from any social URL (eg. Instagram, Pinterest, Blog Post etc) sharing your original make to this topic link Topic 14: Baked Texture . The link will close 17:00 (London Time) Sunday, Sept 2nd 2018, and the winner will be announced 2 hours later at 19:00.

All links go in the draw to win a PaperArtsy gift voucher. Please make sure we can contact you as a prize winner - it helps if you share your contact info from the platform you opt to use.

NB you have 3 weeks for this challenge due to New Products being announced

Good Luck! If you have any questions, don't hesitate to ask!

Wednesday, 22 August 2018

2018 #14: Baked Texture with ETS {by Wanda Hentges}

2018 Topic 13: Baked Texture


Seth Apter seems to have created a whole world of excitement and interest with his embossing powders called 'Baked Texture'. Yes, this is the topic of the current blog focus, but have you realised how Seth's powders are different? For example, some have elements within that do not melt, so they have a variety of textures, for example: fluffy. I hope you get to have a play with them. In this post, Wanda gives you a sense of how different they can be.

Hi everyone, it's Wanda Hentges with you today, and I'd like to share with you a panel created on an 8" square Heavy Grey/White Board.

I LOVE the Seth Apter Baked Texture Embossing Powders made by Emerald Creek.  I've used them all on several things since their release.  No, I don't have a favorite.  ALL the flavors are wonderful and I hope the line expands so we have even more choices.  Today's project uses 4 of the flavors and I've used them in a few different ways. 


The powders work great in so many ways!!!  For my project with the powders I've used images from the Tracy Scott stamp set ETS16 


and the Tracy Scott stencil PS052.


Some of the powders can be used just like regular embossing powder.  I embossed the flower and leaves using embossing ink and Ancient Amber powder onto Smoothy Cardstock that was first painted with Eggshell (a new color).  I then used Magic Moss and Brown Shed Fresco paints with plenty of water to add color.

Ancient Amber Powder is translucent.  To give more color to the bud images, I stamped them with Magic Moss and embossed them with the Ancient Amber Powder.  Because the Fresco Finish Paints dry quickly you need to be ready with the powder to immediately add it to the stamped image and then heat.


You can also use the powders without actually heating them.  For the center of the flower I put on Heavy Gel Medium, covered it with Chunky Rust Powder and let it dry, no heating.  


All those wonderful, fuzzy pieces and granules stay stuck and look fantastic.


*TIP --  Before working on the front of the board, paint the back of the board.  Painting the back first creates tension on the back of the board.  Now when you work on the front of the board, creating tension, the board is less likely to warp.    


On the front of the board I started with a complete layer of the Ancient Amber Powder.  I did about half at a time so that I could hold onto the board.  I coated half with Ranger's Emboss It Dabber, added the powder and heated it.  Repeated for the other half.


Over the layer of Ancient Amber I added stenciling with Embossing Paste.  I used the same image four times, once on each edge, but each one needs to be done and dried before doing the next one.  To line them up, I used a centering ruler.  I placed some artists tape over part of the other images to make it easier to stencil and the tape also helped to hold the stencil in place.  I used White Embossing for two of the images and Black for the other two putting the same colors opposite each other.  Over the paste I used Chunky Rust powder.  The Process I Used --  Stencil image, remove stencil, immediately cover image with Chunky Rust powder, immediately heat with a heat tool.  Yes, the paste under the powder will puff a bit but then it goes back down.  I love the effect and now it's melted and dry and you can go right on to the next image.


This picture shows 3 of the images done.  The one at the top is Chunky Rust on White Embossing Paste.  The left and right are Chunky Rust on Black Embossing Paste.  Isn't the contrast wonderful!!!!


Here is a closer view - white paste on the left, black on the right.
  

For the strips of music paper under the flower I started with a piece torn from an old music book and embossed it with Vintage Beeswax Powder.  You can see in the picture the difference between an embossed piece and how it looks straight from the old book.


After embossing I tore strips using a metal ruler.


A piece of cheesecloth was colored using Magic Moss paint.  I placed some paint on my craft sheet, added water, spread the paint out and laid the cheesecloth in the paint, lifted it out of the paint and let it dry.  I did not try to make sure there was paint everywhere but left some areas without.


The metal piece with words is an Idea-ology Quote Token.  I painted Little Black Dress Fresco Finish over the token getting it into all the letters and then gently wiped it off the surface with my finger leaving paint down in the letters. 


The piece under the Quote Token is a cheap, gold metal filigree .......


... coated in Ancient Amber Powder.  I inked the filigree with Embossing Ink, added the Ancient Amber Powder and melted.  Be careful, the metal gets hot.  You can do just half at a time to make it easier to hold and I would hold it with a clip or tweezers. 


I was originally thinking it would look good in a black frame - and it would.  But I also decided to add black around the edges using Rocky Road Baked Texture.  I inked the edges with the Emboss It Dabber, added the Rocky Road and heated it.  It made the perfect edge for this!!!

Before gluing the flower pieces over the other elements I added splatters with both Little Black Dress and Snowflake.  While layering up the cheesecloth and torn music paper I also added black sewing thread and a rust colored craft thread.  The finishing touch was drops of Carnation Red Enamel Accents (Ranger). 


I had fun playing with the powders as I created this piece.  There is much more that can be done with these powders - multiple layers, sprinkling one or more colors into another color as you are heating, and many more ideas.  If you have these powders, I hope you have a play and share your results.  I'd love to see them.  If you don't have them, you just might need them :-)  

Thanks so much for following along!!!!  

Hugs, Wanda

Blog:  https://artbywanda.blogspot.com/
Facebook:  https://www.facebook.com/wanda.hentges
Twitter:  https://twitter.com/WandaHentges
Instagram:  https://www.instagram.com/wandahentges/ 
Pinterest:  https://www.pinterest.com/wandah/

To join our challenge and win a PaperArtsy £50 gift voucher:

Simply make something arty relevant to the topic, and link your creation from any social URL (eg. Instagram, Pinterest, Blog Post etc) sharing your original make to this topic link Topic 14: Baked Texture . The link will close 17:00 (London Time) Sunday, Sept 2nd 2018, and the winner will be announced 2 hours later at 19:00.

All links go in the draw to win a PaperArtsy gift voucher. Please make sure we can contact you as a prize winner - it helps if you share your contact info from the platform you opt to use.

NB you have 3 weeks for this challenge due to New Products being announced

Good Luck! If you have any questions, don't hesitate to ask!