Showing posts with label 2015 Topic 8. Show all posts

Saturday, 9 May 2015

2015 #8 My Heart {by Sara Naumann. PA Signature Designer}

2015 Theme 8: Sprays

Hey everyone, Sara here—ready to get inky, painty and stampy all in one go!

Today I’m playing with Eclectica ESN07 stamps. As many of you know, I love placing lots of small stamps together on one big block to create a background. It’s one of the easiest ways to get an instant start on my project. In this case, I stamped onto acetate, which adds another layer of texture to the card.

Underneath the acetate is a background that combines two of my favorite things: Lin Brown PaperArtsy Fresco Finish paint and Dylusions Lemon Zest Ink Spray. The yellow Dylusions works with just about any paint color, and gives a translucent glow that makes the piece so much warmer and richer.

Both colors are brayered onto white card. Sometimes I think we can forget that you don’t always need a brush for painting, nor are you limited to using spray as only a spray. My brayer is actually my most-used tool for just about any kind of medium application.
The best thing is that this process gives you lots of layers and dimension, but is super quick and easy to do!


1. Squeeze a bit of Fresco Finish Bougainvillea paint onto a craft sheet. Use a brayer to roll the paint onto a piece of white card. Don’t cover the entire surface but leave some areas white. Let dry. Clean your brayer completely.


2. Unscrew the top of the Dylusions Lemon Zest bottle and pour a little onto your craft sheet. Use the brayer to roll colour onto the painted background.


3. Arrange the stamps from ESN07 together on one Flexi Block and stamp onto clear acetate. Note: If you’re using regular acetate, choose solvent ink like StazOn or Surfacez. If you’re using heat-resistant acetate (like that from Crafter’s Companion or Hot Off The Press) then you can stamp with Jet Black Archival and heat-set to speed the dry time. Using a heat tool on regular acetate will cause it to warp!

ESN07

4. Layer the acetate piece on the painted background and staple together.


5. Mat the piece on white, then grey card and wrap with hemp twine before gluing to the card blank. Add layered silk flowers accented with a bow. Stamp “my heart” on white card, ink the edges and attach with foam tape.


I hope you enjoyed the project as much as I did! Thank you to the lovely Leandra and PaperArtsy for letting me share this project with you here!
Sara.

Oh we just love the combination of colours here, you are right that yellow blends in so beautifully. it is easy to forget that sprays do not have to be sprayed, using the brayer is a fantastic alternative and gives so much more control over the ink. Thanks for sharing. 

We would love you to join in with challenge #8: Sprays If you are inspired by any of our guests who blog with us over the fortnight, then please join in and link up your creativity HERE. 

All links go in the draw to win a voucher to spend on products of your choice from the PaperArtsy online store. The Sprays link will close 17:00 (London Time) Sunday, May 10th, winner will be announced 2 hours later at 19:00.
  

Friday, 8 May 2015

2015 #8 Fabric Tags {by Nicole Maki}

2015 Theme 8: Sprays

Hello Everyone, I’m Nicole Maki, a mixed-media artist from Portland, Oregon, USA. I’m so pleased to be sharing my project with you. Paper Artsy is a continuous source of inspiration for me and it’s a real honor to be rubbing elbows with artists I admire so much. 

My tastes run towards outsider art (Basquiat, Matt Sesow, Jesse Reno), urban style and graffiti and bright neon colors. That said, I make a lot of gifts and try to tailor my creations to suit the receiver. This is a real benefit as it keeps my work fresh and saves me from getting into a stale routine of my own favorite colors and images. 

I was excited about the theme of ’sprays’ as they are a tremendous time saver when adding and mixing color and their serendipitous nature allows your project to progress from a place of freedom.


Brush a thin layer of gesso onto muslin. Once dry, spray the cloth with blue, yellow, green and red spray ink. To help the colors blend, spritz lightly with water. For added saturation touch the tip of a fine paint brush loaded with paint to the wet spots on the cloth - I used Limelight and London Bus. Use the same sprays to color a few yards of seam binding.

{The uk equivalent of USA muslin would be a lightweight cotton, with a tight weave such as bleached calico or sheeting}


Once the fabric is completely dry, stamp images from Lynne Perrella Collection 034 using permanent ink. Layer the stamped muslin, batting and a backing piece of muslin and pin pieces of dyed ribbon into place. 

LPC034

Sew around the image affixing the layers of your quilt together. This can be done by hand or machine. 


Cut the tags and bookmarks apart and fray the edges with your fingernail if desired. Add accents with gold paint and attach beads to the images and/or the ends of the ribbons.


Here is the bookmark in its new home. 


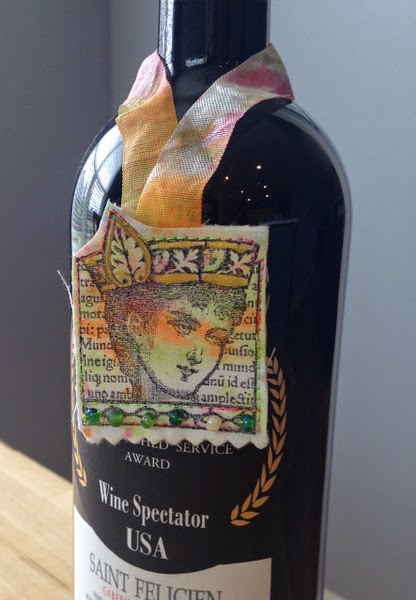
The tag looks great hanging from a bottle of wine, a perfect finishing touch for a gift. 


As a creative person I’ve often ran into the problem of expectations. When a friend’s birthday catches you unaware it’s not entirely acceptable for us crafty types to buy a card off the rack. People tend to happily anticipate a handmade treasure. But treasure-making takes time, something that can be in short supply. My remedy is to make several tags and bookmarks all at once. Then I can add one to a popular paperback or a bottle of wine and the recipient feels cherished.

This technique easily translates into art quilts, mug rugs, cup cozies and cuffs. What I love about it is that it can scale from being as simple as the ones shown above or made more elaborate with the addition of embroidery, buttons, hand-painting, beading etc.
Nicole.

You can find me at my blog, www.madebynicole.blogspot.com and on Etsy,  https://www.etsy.com/shop/PerkyNihilist

Welcome Nicole, and thankyou for such a beautiful and useful project. As you say this technique would work on all sizes. I can see gorgeous cushions made in this way. You chose perfect images to work with as they suit the jewel tones of the sprays brilliantly.

We would love you to join in with challenge #8: Sprays If you are inspired by any of our guests who blog with us over the fortnight, then please join in and link up your creativity HERE. 

All links go in the draw to win a voucher to spend on products of your choice from the PaperArtsy online store. The Sprays link will close 17:00 (London Time) Sunday, May 10th, winner will be announced 2 hours later at 19:00.

Wednesday, 6 May 2015

2015 #8 Spray Tags {by Anneke De Clerck}

2015 Theme 8: Sprays

Hi everyone Anneke here, joining you this evening with a post about paint sprays. 

I made my own sprays with two of my favorite PaperArtsy Fresco Finish Chalk Acrylics. I never made paint sprays before so I had no idea where this would lead me but I have to say I'm happy with the result!

I made a tag book from size 8 tags and attached the pages with a strip of linen fabric.


I started with cutting 8 tags out of watercolor paper. I made paint sprays with Fresco Finish Paint Caribbean Sea and Limelight. See Leandra's video on how to make your own paint sprays. Immediately after spraying I've put the tags vertically to let the paint drip.


Spraying with watered down paint creates beautiful drips on the watercolor paper. As you can see I kept a few areas white on each tag.


After drying I randomly sponged squares with Distress Ink Mermaid Lagoon, Dina Wakley Media Paint 'Lime' and a stencil (Tim Holtz Layering Stencil Harlequin).


I overstamped all of the tags with EclecTica  EDY 05,  EDY 11EDY 12 stamps and Fresco Finish Paint Caribbean Sea and Limelight
I always use my fingers to load paint on a stamp. This way I'm sure to have the right amount of paint on the stamp.


I made pink dots with a stencil (Tim Holtz Layering Stencil Burlap) and Fresco Finish Candy Floss


I'm fond of stamping with unusual stuff. Here I used the lid of my bottle of Tacky Glue in combination with Fresco Finish Bougainvillea


I stamped directly on four of the tags (front pages) with EclecTica  EDY 05EDY 09

EDY 10EDY 11 stamps and Archival Ink Jet Black.


I colored the flowers with a white pencil and a white Sharpie pen.


I painted a page from a vintage book with Fresco Finish Snowflake and punched circles out of it. I glued the circles on the tags and colored them with Fresco Finish Caribbean Sea and Limelight. I painted tissue paper with Fresco Finish Bougainvillea and added torn strips to the tags. 


I layered the tags two by two and sandwiched a strip of linen fabric in between. As the tag on the right ends up as the cover of the book, I've stamped the text from the EDY 11 set in full on it.


For this tag book I had a lot of stamping in mind so I wanted a discrete, soft and smooth background. The spraying and dripping technique with the watered down Fresco Paints was the ideal base!  I hope you will give this technique a try. I would love to see your takes!

Have fun!

Anneke 


somefiddlingonthekitchentable.blogspot.com

instagram

facebook


Ohhh these colours just ooze such wonderful vibrancy!! What a wonderful way to pull a project all together! I love how you have made Darcy's flower stamps softer. So cool! Thanks Anneke! ~Leandra

We would love you to join in with challenge #8: Sprays If you are inspired by any of our guests who blog with us over the fortnight, then please join in and link up your creativity HERE

All links go in the draw to win a voucher to spend on products of your choice from the PaperArtsy online store. The Sprays link will close 17:00 (London Time) Sunday, May 10th, winner will be announced 2 hours later at 19:00.

Monday, 4 May 2015

2015 #8 Fabric Journal {by Ruth Mescall}


Hi everyone, my name's Ruth Mescall from ‘a love to create’. I was so pleased to be asked to do a project on the current theme of 'Sprays'. I love dabbling with ink, paint and fabric and if it involves me getting messy, that's even better! I like nothing more than trying out new ideas and techniques, so I decided to create my own resist canvas and make some fabric journal pages. 


I started with unprimed canvas and to create the resist tried a few different products through a stencil PS001 , as well as trying stamping. After spraying the canvas with paint you can see the results below. Snowflake fresco worked really well but I decided to go with matte gel medium as it was more subtle.


 Whilst the resist fabric pages were drying I made up my spray bottles of mainly translucent fresco paints (about 1/4 paint to water). I mixed up 8 sprays - Zesty Zing and Pumpkin Soup, Tangerine Twist, China and Blue Glass with a touch of Inky Pool, Carribean Sea and Inky Pool, Hey Pesto and Inky Pool, Limelight and Inky Pool, Blueberry, Bougainvillea. The touch of Inky Pool would hopefully help the greens and blues work together.


I sprayed drifts of translucent fresco colours and it gave a lovely blended effect, once dry I used a damp wipe to remove the paint from the resist areas. I stamped images from the following JOFY sets in black archival. JOFY 32 and JOFY 33. The grass being the stalk from JOFY 14


JOFY14

JOFY32

JOFY33


I'd originally thought I could spray colours for the flowers onto the pages but realised that would be far too difficult so I decided to use my sprays to colour the flowers and leaves in a slightly different way. I put a little Matte Gel Medium around the flowers to stop the paint spreading out and then used the tip of the spray tube to dab paint on in puddles of colour.


Once it started soaking into the canvas the drying could be finished with a heat gun. I used some snowflake under the blue flowers so they stayed more true to colour. I really liked the watercolour effect on the flowers and will definitely be making my own resist canvas again.


Thanks for having me, I really enjoyed ‘playing’ Ruth x


argeum.blogspot.co.uk

@argeum1


These fabric resist journal pages look great Ruth, and lovely to see the different resist results. You have shown how well Fresco Paints retain their depth of colour even when diluted. The JOFY stamps are perfect for mimicking a spring/summer garden in bloom. Thank you for sharing your creativity with us all.

We would love you to join in with challenge #8: Sprays If you are inspired by any of our guests who blog with us over the fortnight, then please join in and link up your creativity HERE. 


All links go in the draw to win a voucher to spend on products of your choice from the PaperArtsy online store. The Sprays link will close 17:00 (London Time) Sunday, May 10th, winner will be announced 2 hours later at 19:00.

Sunday, 3 May 2015

2015 #8 Barcelona {by Emma Godfrey.PA Signature Designer}

2015 Theme 8: Sprays

Hi everyone, Emma here, joining you this evening with a post about sprays. I've always loved using sprays - whether they're pre-made or handmade ones. In the project below I've used them in my three favourite ways - making a spray with paint, using just water in a spray, and mixing mica powder into a spray. My finished item is a pocket scrapbooking layout, but the instructions below are for the background sheet I made, which I then cut up and used in the layout.


Step One: Mix up Bougainvillea Fresco Finish paint with water in a spray bottle (I usually use 1/3 paint to 2/3 water).   Lay your stencils (PS016 & PS017) over an A4 sheet of Smoothy card, and spray liberally.  Lift the stencils off and dry the cardstock.   Don't worry too much if it's not perfect ... you just want some colour and interest on the page.


Step Two: Next I applied Distress Ink over the whole page.   I used four colours (Squeezed Lemonade, Spiced Marmalade, Peacock Feathers and Worn Lipstick) and the round Mini Blending Tool (I love that you get no harsh edges with this).  I applied each colour in several areas and then blended them together.


Step Three: Spray water over the page, letting it create larger drops where possible.   Leave for a few moments and then blot.    Because the Distress Inks react with water you will get this fabulous bleach like splodges.   Add more until you're happy with the effect.


Step Four: Stamp the large scribble circle (EEG07) in Jet Black Archival Ink all over the page. Then scrape Snowflake Fresco Finish paint over the top with a palette knife. Allow that to dry, and then stamp the small circle (EEG07) with the Snowflake Fresco Finish paint randomly all over the sheet.
EEG07

Step Five: Draw with a water soluble pencil around some of the small white circles, and then go over the lines with a wet paint brush.    Add some dashes using a charcoal pencil.    Then unscrew the top of your  Bougainvillea spray bottle (that we  used in Step One)  and flick the tube bit over the page to add some splatter in places.


Step Six: To finish the sheet mix some Perfect Pearls mica powder into a spray bottle with some water (I used Bronze), and spray random areas of your page. Once dry, your page is ready to be cut up.


To create the layout I cut 0.25" strips and punched 1.5" circles from the decorated sheet.  I edged all the pieces with a Jet Black Archival Ink pad before sticking them onto Heavy Smoothy pieces of card with my photos.  To finish I stamped some phrases from my stamp sets (EEG01, EEG02 & EEG03) with black ink, and added glitter foam letters for my title.

EEG01
EEG02
EEG03

I love using lots of bright colour, but I also sometimes have to go back to my Clean & Simple roots, and this layout let me do both.  I was so pleased with the way it turned out, and I still have plenty of my background sheet left to use on other projects (check out my blog in the next few weeks to see what I might do with the rest of it). I also loved using my Distress Ink Pads again.  I have to admit it's been a while since I played with them, but it was great to be able to mix them up with the PaperArtsy Fresco Finish paints. Hope you like the layout, and see you soon.

Emma

Blog: www.imaginethatpapercraft.blogspot.co.uk
Twitter: emmaimaginethat

Thanks Emma, this is a fabulous way to create backgrounds and embellishment details. The three techniques used really work well together. We love how those pops of colour peek though the white layer, gives it a real luminescence. 

We would love you to join in with challenge #8: Sprays If you are inspired by any of our guests who blog with us over the fortnight, then please join in and link up your creativity HERE. 
All links go in the draw to win a voucher to spend on products of your choice from the PaperArtsy online store. The Sprays link will close 17:00 (London Time) Sunday, May 10th, winner will be announced 2 hours later at 19:00.