
"Hi everyone, Darcy here. For my fabric item this month I wanted to make a journal. As I thought more about it I decided to challenge myself to make it a completely 'no sew' project, as I am aware that not everyone likes to sew, or has access to a machine.
So bearing this in mind I needed to think about fabric. I could not stitch layers together so it needed to be heavy weight, I could not hem the edges so I had to deliberately fray the edges, or go for a non fraying fabric. This fabric needed to take paint and glue and be somewhat interesting".
I rummaged in my fabric stash and came out with a few denim pockets, these were left over from some charity bags I made a couple of years ago. I made a paper template, and cut each of my denim pieces and pockets to roughly this size. I decided early on that I wasn't too bothered about the edges being neat.

I cut 4 pockets for the pages, and 2 plain pieces for the covers. I allowed an extra bit of fabric on one side of the cover, I folded this under to add a little strength. I then punched 5 holes with a cropodile, down one side of all the pieces. You can see the covers end up with 2 rows of holes, as that is the piece that will be folded under.
Next I added eyelets. This completes the basic construction of the pages. They will be bound together at the end.

I began to paint each side of the covers, and each side of the 'pages'. Blending Fresco Paints directly onto the denim. Once dry I added some background stamping.

Although this is a 'no sew' project I wanted it to have a sewing theme, so I used the following stamps. The Hot Picks Haberdashery Range. There are 7 stamp plates to choose from. HP1211, HP1212, HP1213, HP1214, HP1215, HP1216 & HP1217
I then started to add decoration using the stamps. The best way to do this is to stamp onto tissue paper. You can then paint the back and front, or just the front, and then glue to the fabric. With the movement of the fabric this addition of tissue works really well.
See Leandra's videos on Youtube to see how effective stamping and painting on tissue can be.
I added stamped tissue to this small pocket, and also to the edge of the front cover.

I felt it needed a little something more, so I used coloured grunge paste through a stencil. I wasn't at all sure how it would react on fabric, but it worked really well. I stamped into it with a text stamp, and once dry I added Treasure Gold.
I thought I would need to buy special fabric glue, but it turned out that my regular PVA glue
worked just fine, so using that I attached the small pocket to the front cover. I added plenty of glue, then weighted it down and left it overnight. The next day it was stuck solid.

So onto the pages.
I added paint splatters, and stencilling, and stamped tissue paper.

I then took some images of 50's style women, that a good friend of mine drew. I traced them onto calico, and painted the skin areas with Fresco Paint.
I used Nougat, Rose and Irish Cream for the skin tones. I used fine tipped pens for the shoes and eyes/lips.

Next I traced all the bits of her clothing and hair onto tissue.

These were cut out , painted with Frescos, and then stamped. Once each piece was done I glued them to the fabric body, effectively dressing the doll.

She was then glued into the journal. On the page opposite her I added more stamped tissue
elements, and a quote also stamped onto tissue. To frame each of the words I used just one of the stems from the JOFY stamp collection.
I added other sewing elements to the pages. These were stamped onto tissue, then glued to spare denim, and then glued into the journal. This adds a bit more height and interest to the pages.

I then created 4 more dress up dolls in the same way, here are the pieces of another one. ...and the finished doll.

I cut this waistband detail from another old pair of jeans. I added a little paint and then some
stamped tissue. Once glued to the front and back covers this will become the closure for the book.

So here are the finished pages.
Front Cover..

First 2 pages. You can see I layered the doll onto bits of dressmaking tissue paper.

Next 2 pages.. Here you can see one of the pages has the corner missing, that's ok, I am fine with the pages not being perfect. I also deliberately frayed all the edges.

Next pages.. I just love the quote on this one..

4th doll...


and finally the back cover..

Now to bind the pages. When I made the giraffe, I had a really small amount of clay left over. Rather than throw it out I rolled it into small balls, poked a skewer through them, and ended up with beads.
Once dried out.(took a couple of days) I sealed them with watered down PVA glue, and then I painted them with Frescos. To add the stamping, I found the easiest way was to ink up the stamp and then take the bead and roll it across the stamp. I added dots of acrylic ink and then added a coat of gloss medium.

I then needed a long cord. I would normally make this on my sewing machine... but this is 'no sew'..I dug out my lucet, I cannot remember the last time I used this, must be years. After a good while and a cuppa, I figured out how to use it.

I then threaded my cord through the bottom eyelet on each page, taking both ends through, so they cross on the inside. The cord ends come back out and up through a bead. Then they cross on the outside.

Then they go through the next hole. One cord end goes in the front and out the back, and the other end goes in the back and out the front. Then pass them through the next bead.

Continue crossing the cord ends on the outside, adding a bead, then taking both ends through all the eyelets. Do this till you read the top of the book. Tie the ends of the cord at the top eyelet, then add the last bead so that it hangs down. Take the cord through the bead a couple times and tie a knot underneath.
This is how the edge looks now.. The pages are now laced together and nice and sturdy.

The final job is to fill the pockets on the pages.
I took some manilla tags.
I used a different technique on each one.
Blended opaques... added paper....stamping with Snowflake...adding stamped grunge paste...adding a layer of embossed metal card....stencilling ...

These are the same tags with the next layer on..
On the blended one I added crackle and a top layer of fresco.
On the book page one I added blended translucents
on the stamped Snowflake I added an opaque then wiped back with a baby wipe
on the grunge paste I added Treasure Gold
to the metal card I added spray ink
to the stencilling I added a bumped layer

I then decorated each tag with elements from the Hot Picks Haberdashery Stamp Sets as before. Also lace,ribbon,dressmaking pattern paper,stick pins,buttons etc.
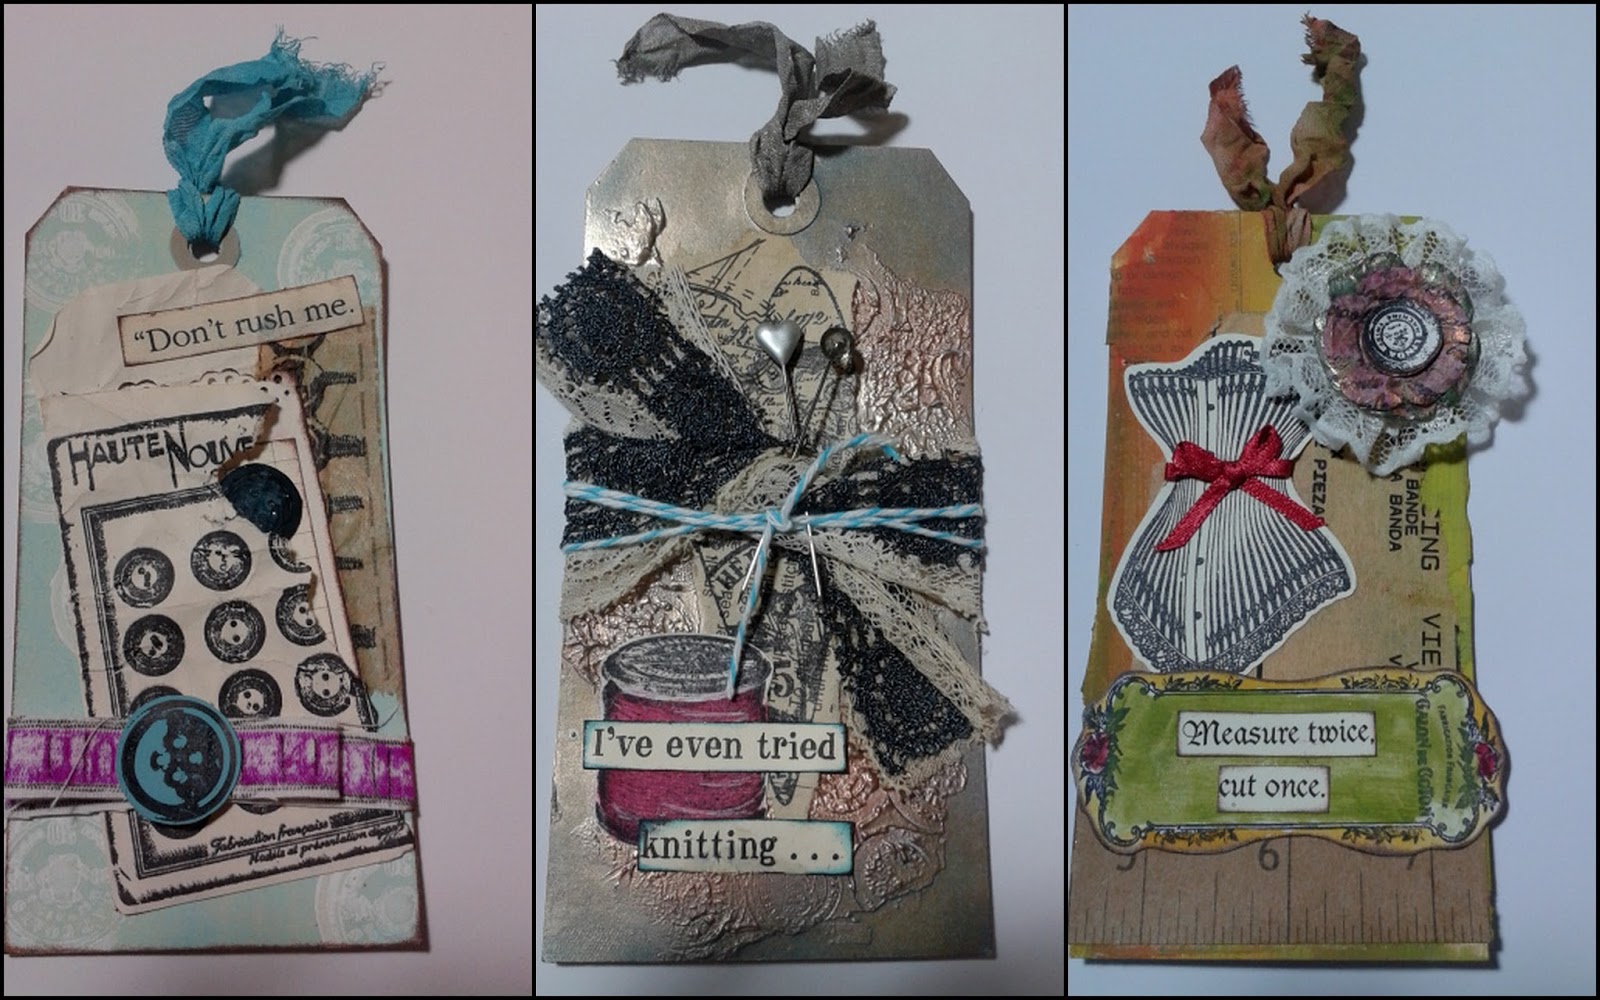
And the other 3..

Now the tags are inside, you can see how thick and fluffy it becomes..


I will be back tomorrow with a special 10th anniversary post.
Leandra Says: How cool the pages look even with the addition of paint, let alone the rest of the elements you introduce. It looks fantastic. And well done on the no-sew fabric book! Who'd have thunk it possible.
Gillian Says:OMG .... I LOVE LOVE LOVE this fabric Journal, the fresco paints look awesome on denim. Love how you have showcased all the "Haberdashery" stamp sets.
If you are inspired by Darcy's post tonight, and want to jump in and have a go, then you should do just that, and blog, Pinterest, or Flickr link your web page showing what you made to our InLinkz tool at the foot of Sunday night's blog post here.
You need to link by noon (London time) on Sunday Sept 1st. We will do 2 prize draws, one for every single entry (including multiple entries), and a second draw with just one entry per name. Successful winners will get to choose an A5 PaperArtsy stamp of their choice. Good luck!


28 comments:
Fab project - love those tags
Sam xx
Got to go back and read this properly Darcy but first impressions...I LOVE IT!!!!
Super tactile journal...."Gillian get ready to do this in a couple of weeks"..LOL!
Love your sense of colour, plus everthing is technically brill.
How fabulous is this!! I love it, and to think it's all done without sewing... you are a star and a half!!
great project and the paint seemed to go well on the fabric, must be decent paint them..thru the project you can see ur love for colour combo's..awesome journal and i really like the dolls u made..they look great
A-mazing! What more can I say? I love this sooo much! Julie Ann xxx
And all the jeans I "grew out" of went months ago!!!! Arrrrggggghhhhh!!!!! Hubby better hide his ;)
Honestly Darcy, you are an artistic genius. This is spectacular & completely gorgeous, I love it.
Well I can only second that. I absolutely love this Darcy!
Wow this is amazing Darcy !!! Fabulous from staart to finish. A xx
Stunning!! Gorgeous project. Thanks for the inspiration.
Darcy, this is brilliant, fabulous and wonderful. x Joyce x
Wow, amazing project - and so much going on - I love it!!!
What a brilliant piece of fabric art! I love it Darcy!
Alison xx
Woomph - what an astounding make!
Alison x
Absolutely, totally wonderful!
I love those quotes. Made me giggle.
Thanks for all the photos and great instructions, although you blew my "I don't use fabric because I can't sew" excuse right out the door!
Ana amazing piece of art - wonderful!
I absolutely love this project. My fav totes amazeballs indeed! Michelle x
That is really really Neat
<3
Oh wow this must have taken forever to make it fab x
Absolutely amazing Darcy! Fantastic!!
Anita x
Another show stopper of a project Darcy! Great idea for using fabric scraps too, love the closure just gives your journal a little extra 'something' :-)
Stunning.
Totally heart touching art collection. Very lovely project indeed !!
....and tomorrows will be a "special" project????? Every project you make is beyond special. *Sit's back and waits to have mind blown* :D XXX
I read this post last night and was quite honestly speechless. After taking another look have to say amazing, love it. What a great idea. Love the no sew option. No idea how you would make cord with your machine but have checked out the lucet. Never seen that before but it looks like fun. May have to try and find one of those.
A wonderful book, I love fabric books, and yours is brilliant.
That's beautiful! x
Post a Comment