Thursday 29 February 2024

2024 Topic 1: Miniature {by Etsuko Noguchi} on the PaperArtsy Blog


Hi everyone Etsuko (My favorite things) here with you today. The cold season is passing by and I can feel the breath of spring in my garden. And my mind can't stop thinking about the tropical landscapes that are just around the corner.

Our first topic of the year is 'Miniature' and I was tempted to create a small tropical world using my favourite artist Gwen's stamps. I had a bit of time to create the project, so I decided to create three pieces incorporating resin and glass in this season's theme 'Glazed'. Today I'd like to share with you what I did well in the process of making these, and what I unfortunately did notdo so well. Please enjoy with me to the end. Thank you.


Making jewellery is always a pleasure, especially Boho jewellery which excites me!! Usually I decorate with ethnic fabric scraps, beads or embellishments, but today I tried it with what we had on hand.


The anemone fish stamp made by Gwen is a must in tropical aquariums, and tribe stamps were used because I thought they would make interesting pendants with decorative faces. I used these pastel colours for this project and added coloured pencils in some areas.

Stamps are Gwen stamp set 09 and 37 (EGL09, EGL37).
Colours are Fresco Finish Chalk Acrylics ( Dolly Mix, Wisteria, Blue Oyster, Cerulean, Fuzzy Cactus, Vanilla and Mahogany )


The first step was to make an aquarium pendant using a small Cloche Dome. The star of the show inside is the Anemone fish. I made jellyfish, starfish and seaweed, and the rhinestones were added to make it look like jewellery.


The image of the fish is stamped onto a paper with any black ink, scanned into the printer and fed into the computer to set the opacity of the image to 50%, which is then printed onto inkjet shrink plastic. The reason for the 50% opacity is that 100% produce a darker colour baked in the oven. The fish image on the left has been coloured with paint, the on the right is just an outline. After the plastic is cooked, it shrinks to 1/4 of its actual size. 


In my experience, toaster ovens seem to be less likely to fail than shrinking plastic with a heat tool.


Just the outline of the image can be stamped or printed on plastic and then coloured in later with oil-based coloured pencils for a beautiful finish.


Finally everything was glued down with PVA glue and glass glitter was sprinkled around the bottom on top of the glue, the dome was installed and the chain was attached to finish.
The first miniature with glitter and glass dome glazing. So did you get a bit of the tropical vibe?
This glass dome freebie site by Stephanie Rubiano's Studio Rubiano.


The second piece is the Boho pendant and necklace. I love this tribal stamps and have used them in various forms, but this was the first time I had used it in jewellery and I was very excited. The theme 'Glazed' is explored with the shiny resin finish.


In addition to the above, most of the materials are things that everyone has, such as resin solution, clay, clear document folders, clear tape, glass glitter gold wax and PVA glue.


Cut the coloured images into the oval shape.

.
Gwen stencilled excess papers attached to the reveres.


As all tribal image are on paper, apply Paper Sealer on both sides to prevent the resin solution bleeding onto the paper.


There are no ready-made bezels to fit this irregular oval shape, so I usually use flat copper tape and solder the bezel, but this time I thought of a different and convenient method and remembered that resin does not stick to clear folders, so I decided to use this.


I cut the clear folder into 5mm wide strips and stick them onto the wide clear tape in the shape of the bezel and protect the outside of the bezel with PVA glue to prevent a resin liquid leakage. 


Fill the bezel 1/2 full with resin, allow the resin to dry, place the tribal image on top of the resin and pour the resin until the paper is covered, holding it up with a stick to remove any bubbles. Small bubbles disappear easily with heat tool. After the bubbles have been removed, pour the resin until the bezel is full again. -Always wear surgical or polyethylene gloves when using the resin.-


Leave it to dry for two days (in winter) when the resin completely dry, remove the tape underneath and remove the surrounding bezel to complete the process.


I chose to use glass glitter and beads to decorate the the pendant's edges,  and using a strong glue to prevent peeling.


I was thinking of sari ribbons for the necklace, but thought it would be nice to add handmade beads, and the idea of printing tribe stamps on clay come to mind. Now let the enjoyable work begin!!  The images below were stamped on the clay stretched into an oval shape, how clear the image appeared.


Then next step is to use round wood dowel or the back of a thin brush, shape the beads into long and narrow.


Once the clay is dry ( the clay I used was baked ) it's time for some fun colouring, I used Fresco Finish Chalk Acrylics ( Little Black Dress, Caribbean Sea and Chocolate Pudding ) for a vintage look, but you can choose any colour you like.


When the paints are dry, lightly rub the top with gold wax for a more vintage look.


This is the Boho pendant and necklace finished look, I still wanted to use the sari ribbons so I added the back of the neck to adjust the length and make it more comfortable. And it has a Boho taste.


I hope you all have a bit more fun with me. This is the last piece Boho earrings. 


This time the background and tribe faces was painted over acetate. This way it would not be too thick when seen from side. This is because the earring edges remain intact.


When the background paint is dry, stamp with Ranger Archival Ink Jet Black.


The original plan for the earring technique was to drip 2-3 colours of alcohol ink onto the resin and stir it a little to create a marbled pattern, and then insert the acetate with the tribal face printed on it into the resin which is nice, but when I actually tried it, the colours developed too dark and did not work as shown in this picture.


The above plan was temporarily put on hold and the resin was made in clear, the picture shows the bezel of the clear folder removed after drying.


This image is from the side view of the earrings, so sorry although it may be difficult to see.


And the back of the earrings.


Creating objects to decorate the room or jewellery making always gives me happy moments. I created this project to share this moment with you and I am very happy if you like it. 
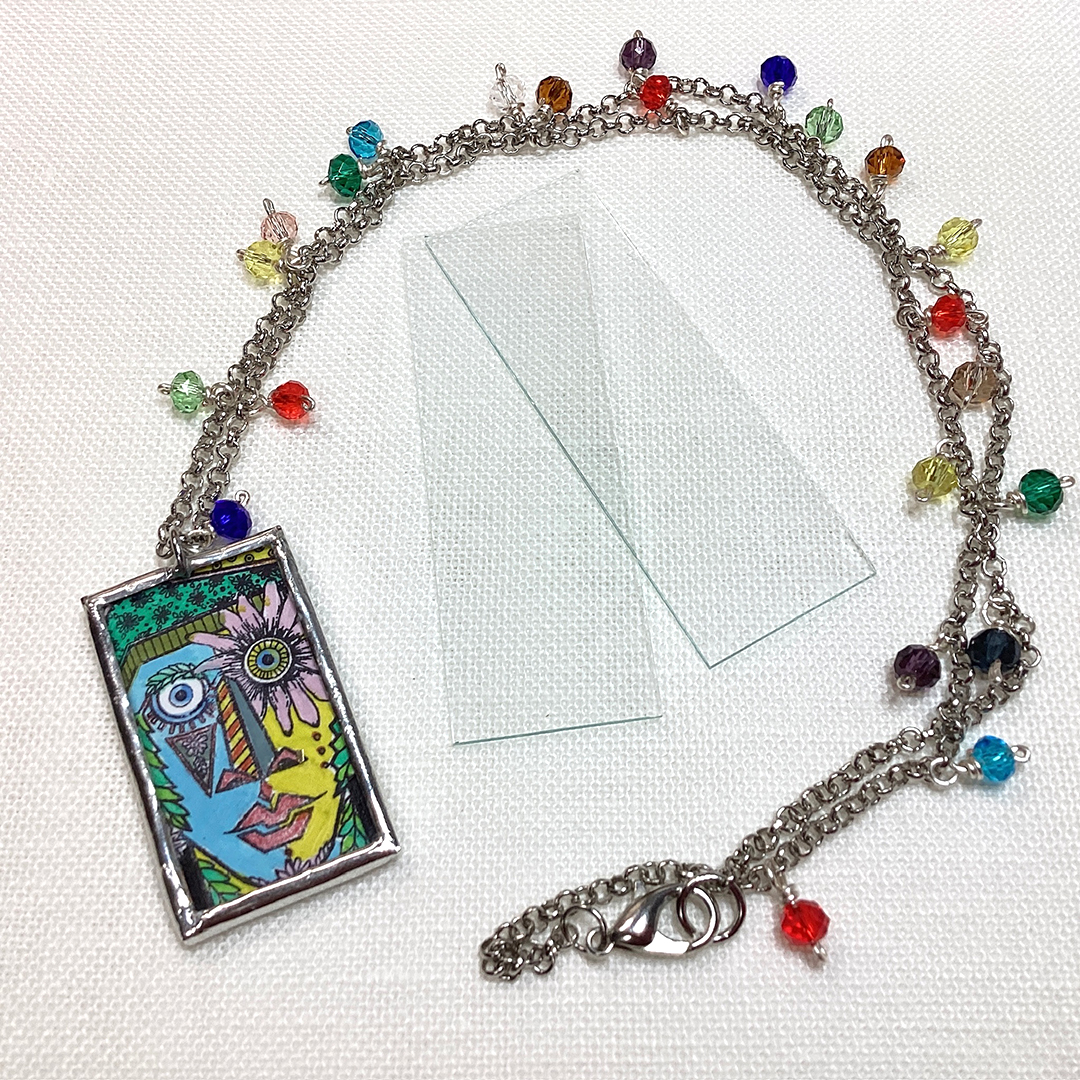
Finally, I add another pendant picture. (I'm soldering with micro slide glass.)


Facebook: Etsuko Noguchi
Instagram: Pixienest
Pinterest: Etsuko N

Wednesday 28 February 2024

NEW PaperArtsy Products {by Jo Firth-Young}


A note from Leandra:

The stunning imagery continues with today's release from Jo Firth-Young. She has created a range of truly super designs for you within this release including stencils, minis and large stamp sets. If you are a JoFY fan, then buckle up! You're going to be very happy I think!
 
 I love the look of the carved style stamps that have layering potential, but ohhhhh those minis
 perfectly formed little rays of sunshine! Fabulous!

These stamps are available EXCLUSIVELY from our approved stockists. Please check the list at the foot of this post to find a retailer online or geographically near you. It really does make sense to order within your country where possible. Our retailers also endeavour to join the designer's live to share their direct shopping links - this makes it easy for you to find a store with product in stock immediately.

Hi everyone, Jo here (www.jofy.co.uk) - welcome to my new stamp and stencil release - my first for 2024!  There are 4 mini stamps, 2 A5 stamp sets and 2 stencils - I hope you like them as much as I do! 

This stamp release includes a little detour from my usual style of stamps in the form of solid (rather than drawn line) images - these are a really nice addition to my collection and will work well with previous (and future) designs.  

The minis include motifs and a couple of lovely repeating background designs - always useful to have for projects of any size.

Let's take a closer look! 


Red Rubber Stamps (A5 set)
Price: RRP €23.00 +VAT    
Size:5" x 6" (13 x16.5cm)
All stamps are individually trimmed onto cling foam, with a laminated storage/index sheet.

Jo Firth-Young - A5 stamp set 132 {JoFY132}

JOFY132 features the solid stamps I just mentioned above. They originate from several hand carved stamps I made during 2023 and they also inspired me to create the accompanying overlay stamps. The stamps work really nicely as borders and background stamps.  The overlays are not designed to match up perfectly, they offer a slightly offset print. As you can see below, lots of options are possible.


This is a happy card oozing all the pink! Bystamping layers of the solid and line flower motifs you can create a larger, random design. (side note: what's not to love about a layer of fluro pink embossing powder!)


Of course the designs will work equally well when cut out and assembled as a cluster, as shown in the sample below.


Jo Firth-Young - A5 stamp set 133 {JoFY133}

The big bold flowers on JOFY133 have been adapted from doodles in one of my junk journals - so they are a bit wonky and irregular.  Previously when I've designed flowers with lines on the petals I have filled the lines in with detail but I have intentionally left these flowers plain. This is so YOU can fill them in with any pattern and colours you would like. 

I would normally create a black and white strip on a petal but leaving the stripes blank means that you can create your own design inside them - chevrons, dots, checks, spots, coloured or plain - the choice is yours!  (There is an example of this in the Mini stamps section further down this blog post.)

The circles dotted around the plate are the flowers' centres - stamp them to use as a 3d mounted centre or stamp them and use as the starting point for doodles (thats what I'm doing!), or create a circles background. All the options are there to enjoy.

In the sample below I have mixed the bold flowers of JOFY133 with the mini flowers of JM74 (coming up below) - they are a perfect combination.


The bold sentiment is a great addition for a card or journal page. On this panel I've assembled the stamps with book text, tissue paper on a background, stencilled with Fern Mattint.


On the card below layered flowers stamped in black on white over a background of coloured spots from JM73 (new!). Lovely flowers - and they're easy to cut out and separate to assemble as you wish.


JOFY Red Rubber Mini Stamps
Price: RRP €4.90 +VAT 
Size: generally credit card (ish) size images
All stamps are individually trimmed onto cling foam


Mini stamps - these are really useful sized stamps to have in your collection, and nice for the budget too!! I've designed several of these images to stamp and repeat - perfect for journal page backgrounds and greeting card designs.

JM73 {JoFY Mini 73}

This is a fun repeating background design - versatile too - it can be used vertically or horizontally, coloured in or used with line print only.
 

I used bright coloured pencils to fill in the spots on this background and created a fun fresh background.... but how gorgeous would it look stamped with gold embossing powder, or white!! 

Is anyone brave enough to snip apart one row to make a border ???


JM74 {JoFY Mini 74}

I found this stamp so useful when making the samples for this release - I had to intentionally STOP using it - I wanted to use it with EVERYTHING! lol  It looks great used with or without its grid background.  I'm sure you are going to love it too!
 

As I mentioned earlier these flowers are similar to the bold ones on JOFY133.  I wanted to give you the two sizes as I knew how well they would work together.  The flowers on the big set 'bend' in the opposite direction to the mini so you'll be able to make really nice garlands/wreaths etc... or bouquets with big and small flowers


The sample below shows the flowers on their grid background.  The addition of subtle shading around the flowers will create a 3D effect.


The flowers in the photo below show why I left the stripes on the petals plain - I've been able to add different patters to each flower - and you can do the same  This also makes them more versatile for stamping on to pattered papers.  


JM75 {JoFY Mini 75}

Teeny tiny flowers!! Possibly the smallest I've ever designed but that doesn't mean they can't be used in a big way.


I had a lot of fun creating this selection of samples - coordinating elements for gifts, journals, cards and home decor.  Its easy to decorate tabs and small elements because the flowers are so small.


The flowers work so well with a natural (autumnal) colour scheme....


..... or with a pretty summer scheme as shown in the photo below.  This card also shows how the design is repeatable across a page. That pattern repeat is very satisfying!


JM76 {JoFY Mini 76}

I designed a stencil a couple of years ago which I love and I always thought it would work really well as a smaller background stamp.... I didn't want it to be exactly the same - it needed to be smaller and slightly distressed.  And here it is!
 

I've shown it here as a tiled background but it would also work really well stamped around a page as a border... lots of options.  

On this sample it has been stamped in grey ink - but imagine it used with a metallic embossing powder, or better still a distress embossing powder!


PaperArtsy Stencils {Large}
Price: RRP €6.58 +VAT
Large Size: 6.25" x 9.5" (16 x 24cm) 
Robust mylar designed to offer longevity, deep texture and easy clean up

PaperArtsy Stencil by JoFY 422 {PS422}

Gorgeous background stencil inspired by the hand carved stamps featured on JOFY132.


This gorgeously colourful sample has been created using Distress Oxide inks.

I'm looking forward to use this stencil with a gel plate to create backgrounds for cards and journal pages - its going to look fabulous!


PaperArtsy Stencil by JoFY 423 {PS423}

I'm a fan of grid journaling but not of having to measure & draw a grid each time I want to create a page... so I made myself grid stencils for a quick fix. 

I've created this stencil with 2 different size grids that can be traced and extended to fit most journal pages.


To create the grid below I laid the journaling grid on the page and add colour and stamping, and overlaid a second stencil to add the pattern (spots).


A really useful stencil for grid journaling but also for creating blocks/grids on backgrounds for cards.


Thanks for popping by to see my samples for this blog release - I've had so much fun creating these designs I hope you enjoy them as much as I do!

Take care

Jo


You can see more and visit me at... 
YouTube: Jo Firth-Young
Pinterest: @jofyjo
Facebook: JoFY Jamboree!
Twitter: @jofyjo
Instagram: @jofyjo


Classes coming up ....
13.04.24  Loobi Crafts, Leighton Buzzard, UK (www.loobicrafts.co.uk)
20.04.24  Amelia's Creative Crafts, Studley, UK (www.ameliascreativecrafts.co.uk)
27.04.24  The Artistic Stamper, Faversham, UK  (www.theartisticstamper.com)
3-10.11.24 Crafting Cruise with Everything Scrapbook & Stamps, USA (email: info@cruiseandcrop.com)

I'll also be releasing a couple of online classes for March '24 so keep an eye out for those in my Facebook Jamboree group.


 PaperArtsy Stockist List

Our stockists are your go-to  source for all PaperArtsy products, and we suggest that you also use the PaperArtsy People Facebook group to source a retailer in your country. Many are members of our FB group and will happily share links to their online stores.

Australia
Bev's Cross Crafts, Spreyton, Tasmania https://www.bevscrosscrafts.com.au/
Crafters Cupboard, Berwick, Victoria www.crafterscupboard.com.au
Memories on the Murray, Murray Bridge, SA  https://www.memoriesonthemurray.net/
Natalie May Scrapbooking, Dover Gardens, SA https://nataliemay.com.au/
Scrapbook Superstore & More, South Penrith, NSW https://www.scrapbooksuperstore.com.au/
The Scrapbooker's Confetti Box, Swansea, NSW https://thescrapbookersconfettibox.com/
The Scrapbook Store, North Perth,WA http://thescrapbookstore.com.au/ 

Belgium
Cart N Scrap Art, Antwerp, www.cartnscrapart.be
Créatelier Caracolle, Liège, www.createliercaracolle.be

Canada
Clipper Street Scrapbook Company, Langley, B.C https://clipperstreet.com/
Paper Art Creations Inc, Leduc, Alberta, www.paperartcreations.com/
Scrapbook Centrale, Dollard Des Ormeaux, Quebec www.scrapbookcentrale.ca
Scrap Addicts, Edmonton, Alberta www.scrapaddicts.ca/
Scrap and Bean, Edmonton, Alberta scrapandbean.com/ 
Scrapbooking Fairies, Drayton Valley, Alberta www.scrapbookingfairies.com/
The Paper & ink Boutique, Calgary, Alberta www.paperandinkboutique.com/
The Scrap Yard, Calgary, Alberta, www.thescrapyardcalgary.com/ 

Denmark
Hobbyboden Scrapworld Samso www.hobbyboden.dk

France
Eirl Bancon Cartoscrap, Midi Pyrenees, www.cartoscrap.com
Fée Du Scrap, Saint Sébastien-Sur-Loire, www.feeduscrap.fr/
Horizon Créatif, Ste Jalle www.horizon-creatif.fr
Instant Créatif, La Possession, La Réunion, www.icreatif.re
Katzelkraft, Ingwiller www.katzelkraft.fr/en/
Kerudoc Creation, St Yvi www.kerudoccreation.com
Le Grenier des filles, Pierre Benite
Page de scrap, Saint Pavace, www.pagedescrap.fr/
Scrap Déco Home, Goutrens, www.scrapdecohome.fr/
Toutencolle, Dun sur Auron www.toutencolle.fr

Finland
Heidin Korttipaja, Istunmaki, www.korttipaja.fi/fi
Piia Paper, Kittiläwww.piiapaper.com/fi

Germany
Stempelbar, Berlin, www.stempelbar.de
Stempeloase Munich, Munich www.stempeloase.de
Stempelfee Shop, Hilden www.stempelfee-shop.de
Stempellaedle, Stuttgart, www.stempellaedle.de/shop

Greece
Scraps N Pieces, Kallithea www.scrapsnpieces.gr

Italy
Immagine SAS di Rapaccini, Rome, www.immaginelab.com
Il Negozio Della Mamma Di Cle, Torino, www.ilnegoziodellamammadicle.com
Marte Savona, Savona, www.martesavona.it
Pezze E Colori, Lissone, www.pezzeecolori.it/ 
Piccole Passioni, Siena, www.piccolepassioni.it

Japan
La Wadao, Odawara, Kanagawa, www.lawadao.com
Tiny Dots, Funabashi-shi, Chiba www.tinydots.shop-pro.jp

Netherlands
De Hobbystudio, Genemuiden, www.dehobbystudio.nl/
Doe@ding,Spijkenisse doeading.nl/
Hobbycompleet de Duif, Leeuwarden www.hobbycompleet.nl
Stampingcorner, Capelle Aan Den Ijssel www.stampingcorner.nl

Norway
Hobbygarasjen, Kopervik, www.Hobbygarasjen.no

Spain
Cien por Cien Manualidades, Barcelona,  www.100x100manualidades.es
Ideas 10 Manualidades Y Scrapbook, Bilbao ideas10manualidades.com/
Marakiscrap, Tarragona, www.marakiscrap.com
Scrap & Papers Experiences, Barcelona, www.scrappapersexperiences.com
The Paradise Corner, Barcelona, www.theparadisecorner.com

Sweden
Butik Elva, Staffanstorp, www.butikelva.se

Taiwan
Mandy's Cards, Taipei www.facebook.com/mandy.card.77

United Kingdom
Amelia's Creative Crafts, Studley, Warwickshire  www.ameliascreativecrafts.co.uk
Art from the Heart, Harrogate, Yorkshire www.afth.co.uk
Crafts at The Malthouse, Herstmonceux,  East Sussex, www.themalthouse.co.uk/
Loobi Crafts, Leighton Buzzard, Bedfordshire, www.loobicrafts.co.uk
Stampers Grove, Springbank, Lilliesleaf, Melrose,Scotland www.stampersgrove.co.uk
The Artistic Stamper Craft Store, Faversham, Kent www.theartisticstamper.com
The Forget me not Kraft KabinRochford, Essex, www.TheForgetMeNotKraftKabin.co.uk

USA
Artistic Artifacts, Alexandria, VA www.artisticartifacts.com/
Artistic Studio Creations, Fayetteville, Georgia www.facebook.com/ASCbyCrystal
Craftiness, Chatsworth, CA, www.craftinessonline.com/
Everything Scrapbook & Stamps, Lake Worth, Florida https://everythingmixedmedia.com/
Frantic Stamper, Oregon www.franticstamper.com
Free Heart LLC, Denver, Colarado, www.freeheartllc.com/
Joggles, Coventry, Rhode Island, www.joggles.com
PaperCraft Clubhouse, Westbrook, Connecticut, papercraftclubhouse.com/
Qingquing's Stamp Shop, Portland, Oregon
Roadtique Boutique, Rochester, New York Facebook Page
Runaway, Art & Craft Studio, NE Salem, Oregon www.runawayart.com/
Scrapbook & Memories, Harrisonville, MO https://www.scrapbooknmemories.net/
Simon Says Stamp, Columbus, Ohio www. simonsaysstamp.com
Topflight Stamps, Irmo, South Carolina topflightstamps.com/

If you are interested in becoming a PaperArtsy stockist contact Dounia@paperartsy.com for more information

PaperArtsy Links
Facebook Group PaperArtsy People
Facebook Page PaperArtsy