Hi everyone Gabrielle here, joining you this evening with a project that combines two stamp sets in very different styles! When I realised my triptych would be featured on Halloween I knew it needed to be ‘spookily’ themed! I am a huge Shakespeare fan so I took my inspiration from the three witches in Macbeth.
I have recently taken a class with Kate Crane and so used some of what I learned as a base here. I started by painting Purple Rain and Snowflake on to the wooden triptych making sure that the centre of each panel was lighter than the surround as I wanted to create a frame. I did this on five of the panels, leaving the back panel mainly purple. Don't worry about making this too neat!
I added some stencilling in some areas to add a little detail in the background using PS018
Then came background stamping with EEG11 To ensure that some stamping appeared behind the frames I use a ‘mask’ (post-it note!) I didn’t add lots of stencilling and stamping because I didn’t want this to become a journaling page. I can easily get carried away!
Then I chose my three ‘witches’ from LPC003 and LPC014, and stamped them on tissue paper. I turned them over and used the rather lovely Granny Smith for the faces, Purple Rain for their accents. The witches hats were painted with Purple Rain and Slate. I chose Slate so the detail of the stamping could still be seen. The frames are thin slivers from a book page. For the side witches I glued the strips on to the witches first and cut off the excess before adhering it all to the triptych. That way I could make sure it all fitted!
The panels for the outside were completed the same way, by stamping the skull image several times on a little tissue paper (3cm x 10cm) I used a ‘mask’ again so I could get a good overlap of the images. The tissue paper was again turned over and I painted the skulls in Snowflake.
I typed up the phrases I wanted to use and printed them out, added Distress Ink and then glued them in place. A few painty lines (in Old Gold and Slate) were added with the edge of a credit card and then I blasted them with my heat gun making sure the paint blistered to give a textural finish, and it was complete!
This is the inside...
and this is the outside...
I loved mixing the two stamp styles and adore those witches in their hats! I have a few of these wooden triptychs and so I think I might have a go using other colours as the predominant background colour, maybe Tango or Granny Smith?! Lynne has a such wonderful array of potential 'witches' that I doubt I'd run out of choices!
This is great Gabrielle, those stamps of Emma's are such fun and team brilliantly with the 'witches' . I can see that people will be looking at Lynne's ladies in a whole new light. I love the skinny strips of book text, understated but so effective. ~Darcy
We would love you to join in with Challenge #20: Triptychs. If you are inspired by any of our guests who blog with us over the fortnight, then please join in and link up your creativity HERE.
All links go in the draw to win a voucher to spend on products of your choice from the PaperArtsy online store. The Triptychs link will close 17:00 (London Time) Sunday, Nov 8th winner will be announced 2 hours later at 19:00.
Hi everyone Helen here, joining you this evening with a post about making a miniature triptych. I like anything that involves a bit of planning, design and construction - ie. working out how to get it all to fit together. I also enjoyed taking little bits from the stamps here and there to fit my project.
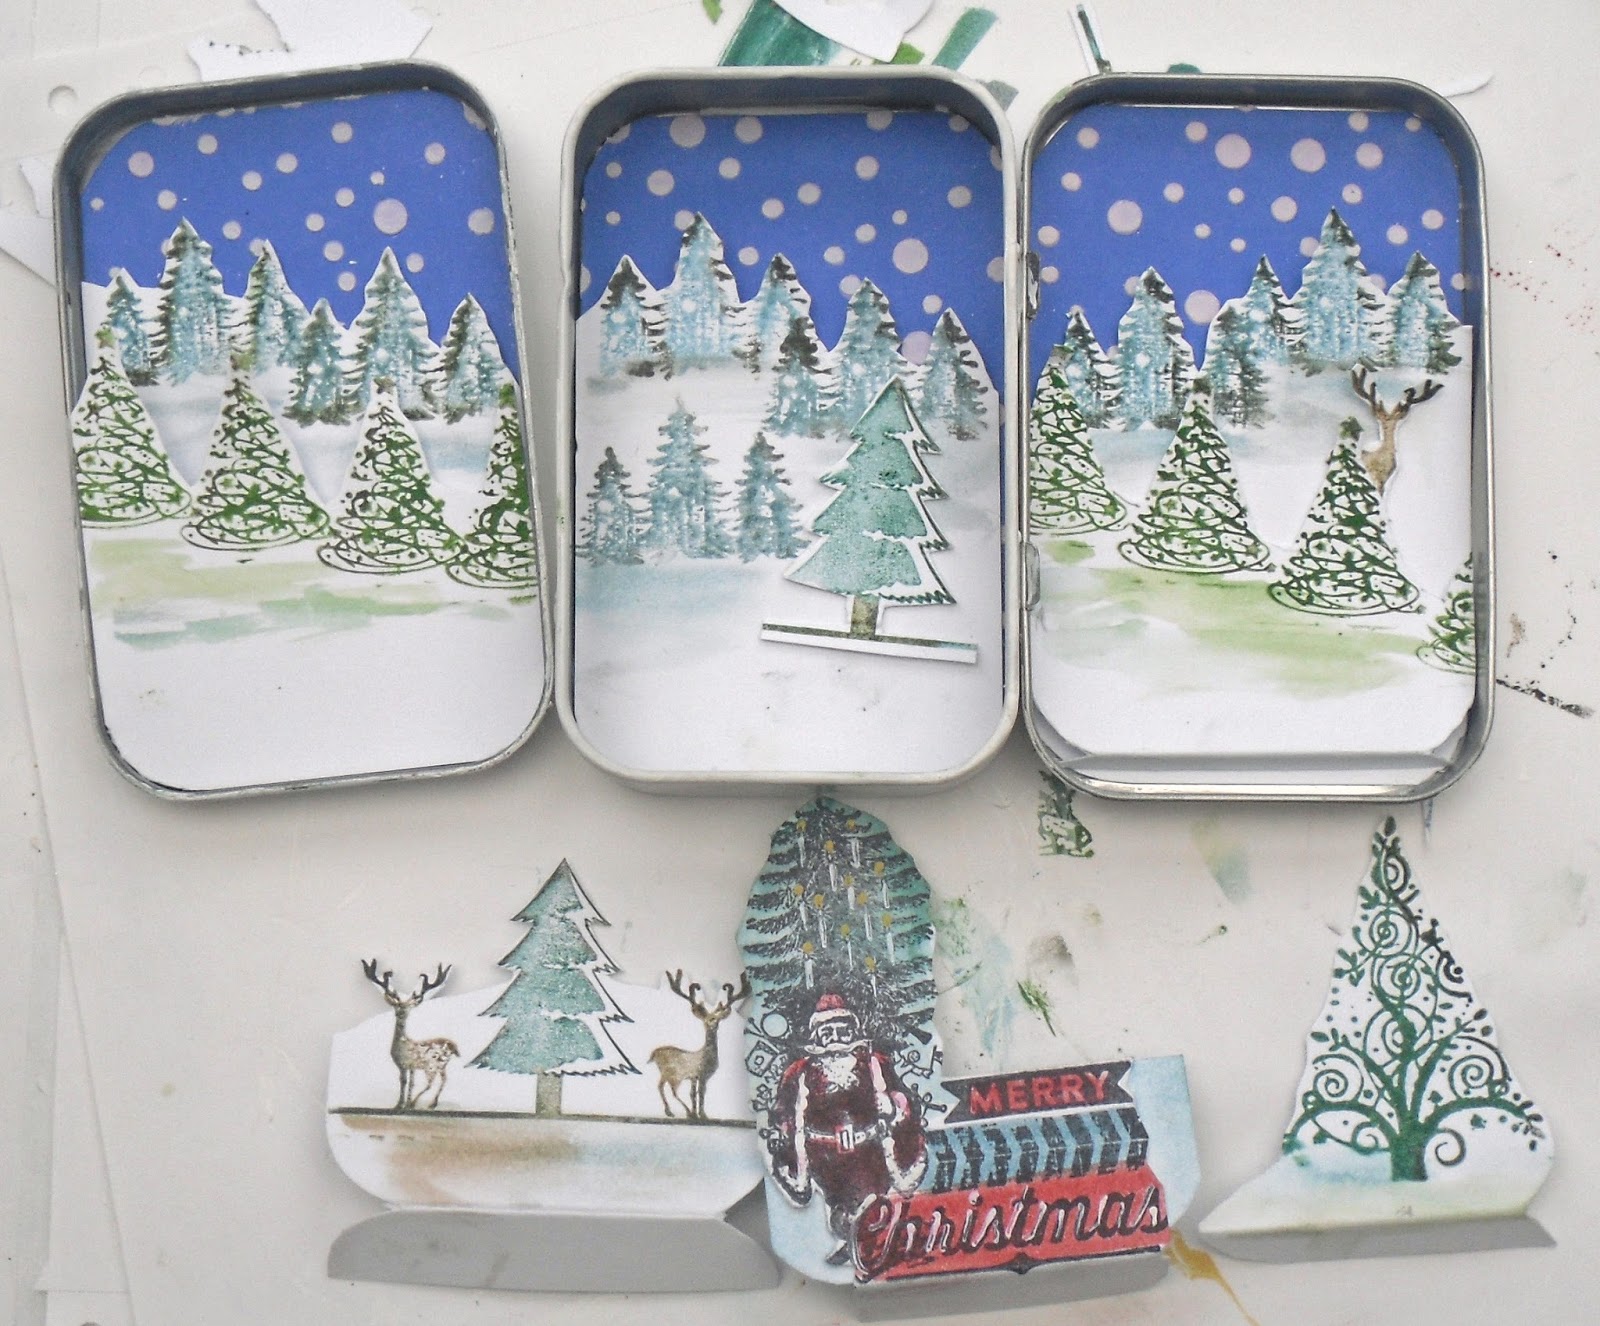
I've taken two small tins and used the base of one and the lids of both to make my triptych.Then I've cut pieces of card to fit inside - bear in mind that the pieces for the lids will be slightly larger.
Colour the card with the Blueprint Sketch ink pad:
Then, using a stencil (this one is made by Kaisercraft), and some Grunge Paste, make a snowy background:
Stick the backgrounds into the tins like this:
Next you're going to look at your stamps closely and pick out elements to stamp up three scenic layers. I've used Distress markers to ink up the stamps as this makes it much easier to colour just the bit you want. The darkest colour is in front, fading out to a pale blue/green at the back: I used Hot Picks XM08 and XM09.
Cut along the tree lines so that when you lay them on top of each other they look like this:
Layer up the backgrounds in the tins, the furthest trees stuck to the base, the middle layer raised with foam pads and then the foreground hinged at the bottom to lie level with the top edge of the tin. Stick the hinge flap to the inside of the base of the tin:
Wire the tins together. Stamp the Father Christmas and his reindeer, cut out and wire to top of tin:
Stamp, punch out and wire snowflakes in the same way. Add glitter and sparkly snow to finish:
You can use anything to make a Triptych - card, Stampbord, MDF, wood etc. Look at things you can take apart and reconstruct. It can be flat or 3D like this one. If it's going to be joined, work out how to hinge it together before you start, it saves a lot of time!.This was a bit fiddly to put together but well worth it in the end - it's going on my mantelpiece at Christmas. So, get triptyching!
Wow Helen, this is fabulous, such a very clever but simple way to create the optical illusion of the landscape and depth. The various trees layer up beautifully, they really do look like they were meant to go together! ~Darcy
We would love you to join in with Challenge #20: Triptychs. If you are inspired by any of our guests who blog with us over the fortnight, then please join in and link up your creativity HERE.
All links go in the draw to win a voucher to spend on products of your choice from the PaperArtsy online store. The Triptychs link will close 17:00 (London Time) Sunday, Nov 8th winner will be announced 2 hours later at 19:00.
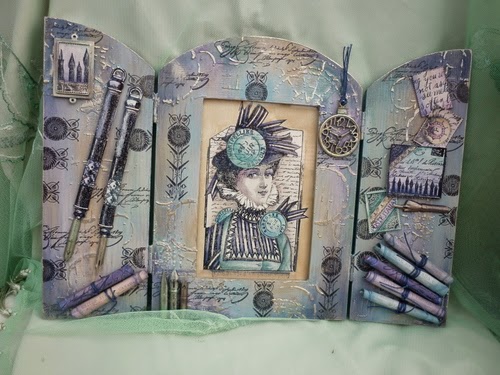
Hi everyone Florence of Mlle d'Antan here, joining you this evening with a post about Triptychs. This is my very first blog post for PaperArtsy and I have enjoyed working on this project. I’m French and live in a small city called Guerande in the west of France. I’m married to a British man and have a 6 year old boy. It is probably because I am French that I chose the lovely Sara Naumann stamps. I’ve been thinking about making a Triptych for a while now and I thought that I will give it a go with this blog post. I am happy now that I’ve made it!
Step One: For the first part of my trio I used a rectangular board, this was painted with Taupe, and then used different stencils with grunge paste. Once it dried, I used Treasure Gold (mainly silver, and a bit of Amethyst) and then stamped a little over the rectangle with black Archival ink.
Step Two: Onto my tiny linen canvas, I stamped some words and add a little bit of Chalk on the sides to brighten it. I finished by adding vintage embellishments in a haberdashery theme. I stamped the Parisian lady from ESN16 onto card, this was added to a vintage frame.
Step Three: For the middle section I used a canvas and covered it with an old book page. Then, I stamped here and there with Taupe and Chalk but also with Black Archival ink. This section was also decorated with vintage sewing elements and images and text from ESN16.
Step Four: For the third, and bottom part, I used a wooden arrow that I painted with Taupe and a little bit of Mushroom and Chalk. I stenciled arrow on the left side.
Step Five: One of my favorite parts now: I read Wanda’s blog post about wearable art, and the fact that she used shrink plastic (literally called “crazy plastic” in French!) inspired me! I stamped my beautiful lady on the white shrink plastic and then heated it (no need to use the oven). Thank you Wanda!
Step Six: I then stamped some words on the arrow with Black Archival ink. To soften the black text, I like to brush over it with a small amount of paint left on my brush. It links the all background. Then, I glued my real cogs (found in a garage sale) and painted them over to harmonize everything. I could not finish this part without adding of bit of … treasure gold of course!
Finally I had to think about a way to hang every thing together. For the hanger with the heart... don’t ask me where I bought it from… garage sale again. These hangers are used for embroideries.
Here is a closer look at the centre section.
I hope that you like this project and I also hope to see your version at some point! This Triptych could work with any other support or shape that matches nicely. Note that you need the perfect glue for heavy embellishments! I think that next time I want to do it just on fabric, it could be fun!
Hi Florence! What a lovely project and oh-la-la you have given it the French shabby chic gorgeous treatment! I adore the dry brushed style and little touches of Treasure Gold! I know how much you love that stuff!! Thanks so much for showing up a vertical Triptych with texture - I'm longing to reach out and touch it! Perfect! ~Leandra
We would love you to join in with Challenge #20: Triptychs. If you are inspired by any of our guests who blog with us over the fortnight, then please join in and link up your creativity HERE.
All links go in the draw to win a voucher to spend on products of your choice from the PaperArtsy online store. The Triptychs link will close 17:00 (London Time) Sunday, Nov 8th winner will be announced 2 hours later at 19:00.
Hello all, Alison here from Words and Pictures. I've got a triptych of frosted glass bottles for you today, together with the plants from which their contents have been distilled. I very often seem to end up working in triplicate, sometimes by accident, but also sometimes by design. I like panels that have an element or two in common, and then variations on a theme as the eye moves across them. This one all started from an idea of trying to recreate those lovely vintage chemists' bottles you find, with embossed writing; so each panel has a bottle, but then the labels and flowers vary.
I wanted to use the Hot Picks Halloween 05 labels (HPHW05EZ) for my bottles...
...and I knew I wanted the flowers in the background, as a reminder of where so many potions and poisons come from.
The perfect quote popped in to my head from Hamlet: "thou mixture rank, of midnight weeds collected" - all about potions made from plants collected at midnight, and then - get this for a triptych - "thrice blasted, thrice infected" !!
I created a brayered background with my Fresco Chalk Acrylic Paints, rather than a crackled one for once - layering up Purple Rain, Lavender, Wisteria, Taupe, Stone, Chalk and Snowflake - and then used Distress Inks with the Clocks stencil to deepen the midnight blues.
I used leftover acetate packaging for my bottles. I used the DANGER stamp from HPHW05 release, stamping it in Versamark and then clear embossing it. I draped the bottles over shallow oval bottle as I heated them (some hair stuff, don't ask me what!) so that I could get the same curvature on all of them.
Once the embossing was done, I gave the bottles two coats of the new Frosting Glaze, allowing them to dry in between. To make the bottles tall enough to make the most of the Hot Picks Halloween labels, I had to hand cut them, based on the Tim Holtz Apothecary Bottles die - but I made sure I left the necks of the bottles the same width, so that I could use the die for the stoppers at least! I painted the labels very simply with washes of Stone and Brown Shed, and I shaded the edges of the bottle with some Cobalt Archival to give them even more dimension.
I stamped my flowers and used Purple Rain, Stone and Snowflake to shade them. The Brown Shed made its way onto the bluesy backgrounds too, giving some colour to the foliage, and I added misty book page clouds drifting across the moonlit sky, as well as some lid-stamping for accents and highlights. Of course there's another clock telling the time in the gorgeous tulip stamp, making sure it's midnight so that the plants are at full potency when they're collected.
I've created some rusty, leathery hinges to hold the whole thing together at the back (Brown Shed with shadings of Purple Rain straight on to Grungeboard so they’re flexible, and then some Distress Embossing Powders in Vintage Photo and Walnut Stain), but I'm guessing nobody will really be looking at that side, so I didn't do much else...
I'm really pleased with my frosted embossed wording - it's got real dimension... though it's nigh on impossible to get a good photo of! A slight shame that the central bottle covers the butterflies, but they wouldn't be out and about at midnight anyway. And if you peer very closely in the right lighting, maybe you can see them inside, their essence captured and distilled as an extra ingredient in the poison!
Oh, and speaking of the right lighting, this is another triptych which responds rather well to candlelight. Now you might catch a glimpse of the butterflies in the bottle...
And the shadows finally allow that frosted embossed writing to pop a little more. Loud applause for the Frosted Glaze... I love it!
I hope you like my poison triptych, and that you'll be inspired to come up with some three-parters of your own! As I say, the formula for me is to have at least one element which is present on each of the three panels (whatever shape or size they may be) and then to ring the changes around that element to create a triptych which "belongs" together.
Thanks so much for stopping by today, and I'll see you again soon, or drop in to see me at Words and Pictures too! Alison (butterfly) xx
There's always something visually pleasing to the eye with a Triptych design. I love how the quote expresses your design Alison and the use of the Frosted Glaze on your bottles was an inspired choice, it adds an "eery" dimension to your theme. Fab start to the new theme Alison, thanks for sharing your creativity. ~Gillian
We would love you to join in with Challenge #20: Triptychs. If you are inspired by any of our guests who blog with us over the fortnight, then please join in and link up your creativity HERE.
All links go in the draw to win a voucher to spend on products of your choice from the PaperArtsy online store. The Triptychs link will close 17:00 (London Time) Sunday, Nov 8th winner will be announced 2 hours later at 19:00.
Hi everyone, Leandra here and today we re exploring the topic of Triptychs.
A triptych... (/ˈtrɪptɪk/ trip-tik; from the Greek adjective τρίπτυχον ("three-fold"), from tri, i.e., "three" and ptysso, i.e., "to fold" or ptyx, i.e., "fold")
...is a work of art (usually a panel painting) that is divided into three sections, or three carved panels that are hinged together and can be folded shut or displayed open. It is therefore a type of polyptych, the term for all multi-panel works. The middle panel is typically the largest and it is flanked by two smaller related works, although there are triptychs of equal-sized panels.
I was obsessed with Triptychs when I first started crafting, and they are easy enough to make from a sheet of card decorated in a masterboard manner, then cut apart. But of course, it can be more complicated than this if you wish to introduce texture, layers, paints and gels or even images. There are numerous products out there in craft world that can be used as a substrate and arranged in a triptych manner, such as card, chipboard, wood or any other surface that suits your needs and direction.
Before we start, let's see who won the Topic 19: Faces Challenge...
Hi, Darcy here. Well, what can I say.. I am beyond thrilled that so many of you jumped right in, and despite reservations and fears you had a go at creating faces. a topic close to my heart, I am so proud of you all. You were inspired, and became inspirational with such a diverse array of styles portrayed.
Please get in touch with Darcy by emailing darcydotneedles@hotmail.com to claim your prize.
Ok, so it's Leandra back to explore the Topic 20 of 2015: Triptychs.....
It's been bothering me that we haven't done a video in a while, and I have quite a few I am itching to film for you. This triptych one shows you some of the newest stencils that recently arrived in from The Crafters Workshop, partnered with Sara Naumann's latest stamps.
If you watch the video, you will see in the picture above after we finished filming I played a bit more adding the leaf stamp and the quote, and some more black branch for the bird to balance on.
In the video I wanted to show you a pretty simple and fast way to make a Triptych (picture above) with brayered paints, stencils, archival inks and a few stamps. The gist was to keep it simple, but think a bit more about the composition by layering the colours and textures. Here's the video.
First up there are so many awesome examples on our own blog from fabulous crafters who have created glorious Triptychs. They are just such a great format that once you see a few examples, you are itching to have a go!
Linda Cain (Feb 2013) created this gorgeous example with Lynne Perella stamps, in fact, in my online searhcing, LPC stamps seem to often feature in triptych art!
And in May 2014, she did this colourful post, again, Lynne Perella stamps!
In April 2014, it was Liz Borer who made this in her go to palette of soft purple tones. Beautiful details on the side panels, also with Lynne Perrella stamps!!
Just recently, in August 2015, Liesbeth Fidder featured this triptych with our brand new Hot Pick stamps, you can see the details of how here.
I found this made by Astrid Maclean using ephemeral style images, love the gorgeous crackled border of the frames!
Diane Salter has glorious artwork on her blog, and if you check out this blog post (September 2011), you can see she made 3 pictures that became an accidental triptych. I adore the inclusion of lace and texture, and the idea of the 2 outer images facing the inner one really appeals.
Nichola Battilana has another example of this arrangement on her blog from earlier this year. She also has a video there to show the process she went through which is worth a look if you are unsure where to start.
I love this idea of a triptych on a pedestal. The 3 niches look to be quite deep.
I love this interpretation by Claudia too. Take a minute to go to her blog and read the beautiful story she has written behind this creation. The corrugated card and cracks work so well. Simple colours and gorgeous aging techniques. So onto more traditional Triptychs....
This gorgeous carved and gilded ivory piece is from Cologne, Germany 1325-50. The detail is stunning, and such religious icons are often represented in triptych form.
This 15th Century wooden piece is more rustic in style. More info here. And I can imagine a modern, non-religious version of this could be great fun to create! Onto more modern, abstract creations....
I stumbled across this encaustic wax layered piece which is gorgeous for its colour and textures...you can find the artist, Laura here. Love the vertical layout too.
Here is another vertical arrangement by Carol Nelson with striking colour and texture.
And what's not to like about some whimsical triptych stones! Proving you can do this on anything and depict anything too!
Don't forget to follow my Triptychs pinterest board if this topic pushes your buttons, you will see plenty more examples to whet your appetite there!
I am really looking forward to seeing what you create over the next 2 weeks! Leandra
Topic 20: Triptychs PaperArtsy Blog Challenge
We'd love you to share your ideas and link up your creativity to this page. Please familiarise yourself with the challenge guidelines below before entering.
All links go in the draw to win a voucher to spend on products of your choice from the PaperArtsy online store. The Triptychs link will close 17:00 (London Time) Sunday, Nov 8th , winner will be announced 2 hours later at 19:00.
1. The challenge is a chance for you to show how you have been inspired by a particular technique of the fortnight. Your entry should contain:
- a mention of which post inspired you and why, and
- a link in your blog post to that original post on the PA blog.
The whole concept of this challenge is 'play along with us'. You are encouraged to put your own twist on ideas you see on our blog. We love to see how you are inspired and your twist!
2. The link you put on our linky page must lead directly to the specific post on your blog where you have explored the technique/ idea mentioned in point 1 above. Don't link to the home page of your blog, or we will be unable to find the post to leave you comments.
3. Spam links will be deleted.
4. We prefer your challenge post is created exclusive to our challenge, but if our topic fits perfectly with another challenge, then of course your post may link to both if you feel it is appropriate.
5. You are most welcome to use stamps/ products/ substrates you have to hand from a variety of companies, we do not expect you to exclusively use PA products - it's lovely when you do though!
6. You can enter as many times as you like in the fortnight. We don't want to restrict your creativity or participation! Link closes at 17:00 Sunday Nov 8th (London Time)
7. The winner of the random draw will receive a £50 credit to be redeemed on the PaperArtsy Website, the credit includes VAT and postage. We request that one of your purchases is an A5 rubber stamp. You can add any other items to your basket, but the final total should not exceed £50
8. Each Sunday fortnight the winner will be announced at 19:00, also, in the same post, the link for the next fortnight will be posted. It's your responsibility to claim your prize coupon from Darcy: email her darcydotneedles@hotmail.com
Good Luck! If you have any questions, don't hesitate to ask!