Sunday 31 August 2014

August 2014 New Products {Clare Lloyd}

Hi everyone, Leandra here. Welcome back!

Well here we are at the final night of 7 days of new product releases, and this one is a surprise for almost everyone as we have kept this release well under our hats! 

Clare Lloyd has been one of our fabulous 2014 Guest Designers, and her quirky hand-drawing skills didn't go unnoticed! We subsequently asked her to do a 'face tags' feature this semester too which many of you have thoroughly enjoyed. So naturally then next step was stamps!

Clare has come up with these fabulous designs which she calls Christmas-Nordic and  lacey in style. We always like to bring something new to the table, and these stamps tick that box. You could use these for altered art, journals. but on the face of it they also look ideal for clean and simple cards too.

We have literally only had our hands on these stamps for a few short days! Clare has whipped up a few altered style projects, and I'm her wingman tonight with a few very simple Christmas cards as below. What would you do with them? I'll hand over to Clare to explain...

Hi there Clare Lloyd here with some news I have been bursting to tell someone! I have been busy designing some new stamps for PaperArtsy’s fabulous Eclectica range.

As I don’t like to be pigeon holed when it comes to craft styles; I wanted to design stamps that would be equally at home on CAS cards or something more arty/mixed media. This would give all the crafters/artists out there plenty of options and scope for their own creative journey. 

My first stamp set ECL01 is very feminine but still has a strong graphic style which I am a fan of. My inspiration was broderie anglaise lace and the images in the stamp set could be used as a focal point to a project or to build patterns and backgrounds. There are loads of sentiments that can be used on cards or art journey pages most of which fit into the lacy frame.

ECL01

ECL02


By Clare Lloyd: Just wanted to say...

Let me share a couple of projects using my first new stamp set ECL01.


I made a background by brayering on Cheesecake, Guacamole and Mermaid Fresco paint onto heavy weight Smoothy card.


Then I created a pretty background by simply stamping three images from the set randomly using Black Archival Ink.


The borders and embellishments on my card were all created by painting Smoothy card, stamping and then cutting out to layer up my finished design. This 5” x 5” card would be fit for all sorts of occasions and I stamped the lacy frame plus my chosen greeting inside the card.


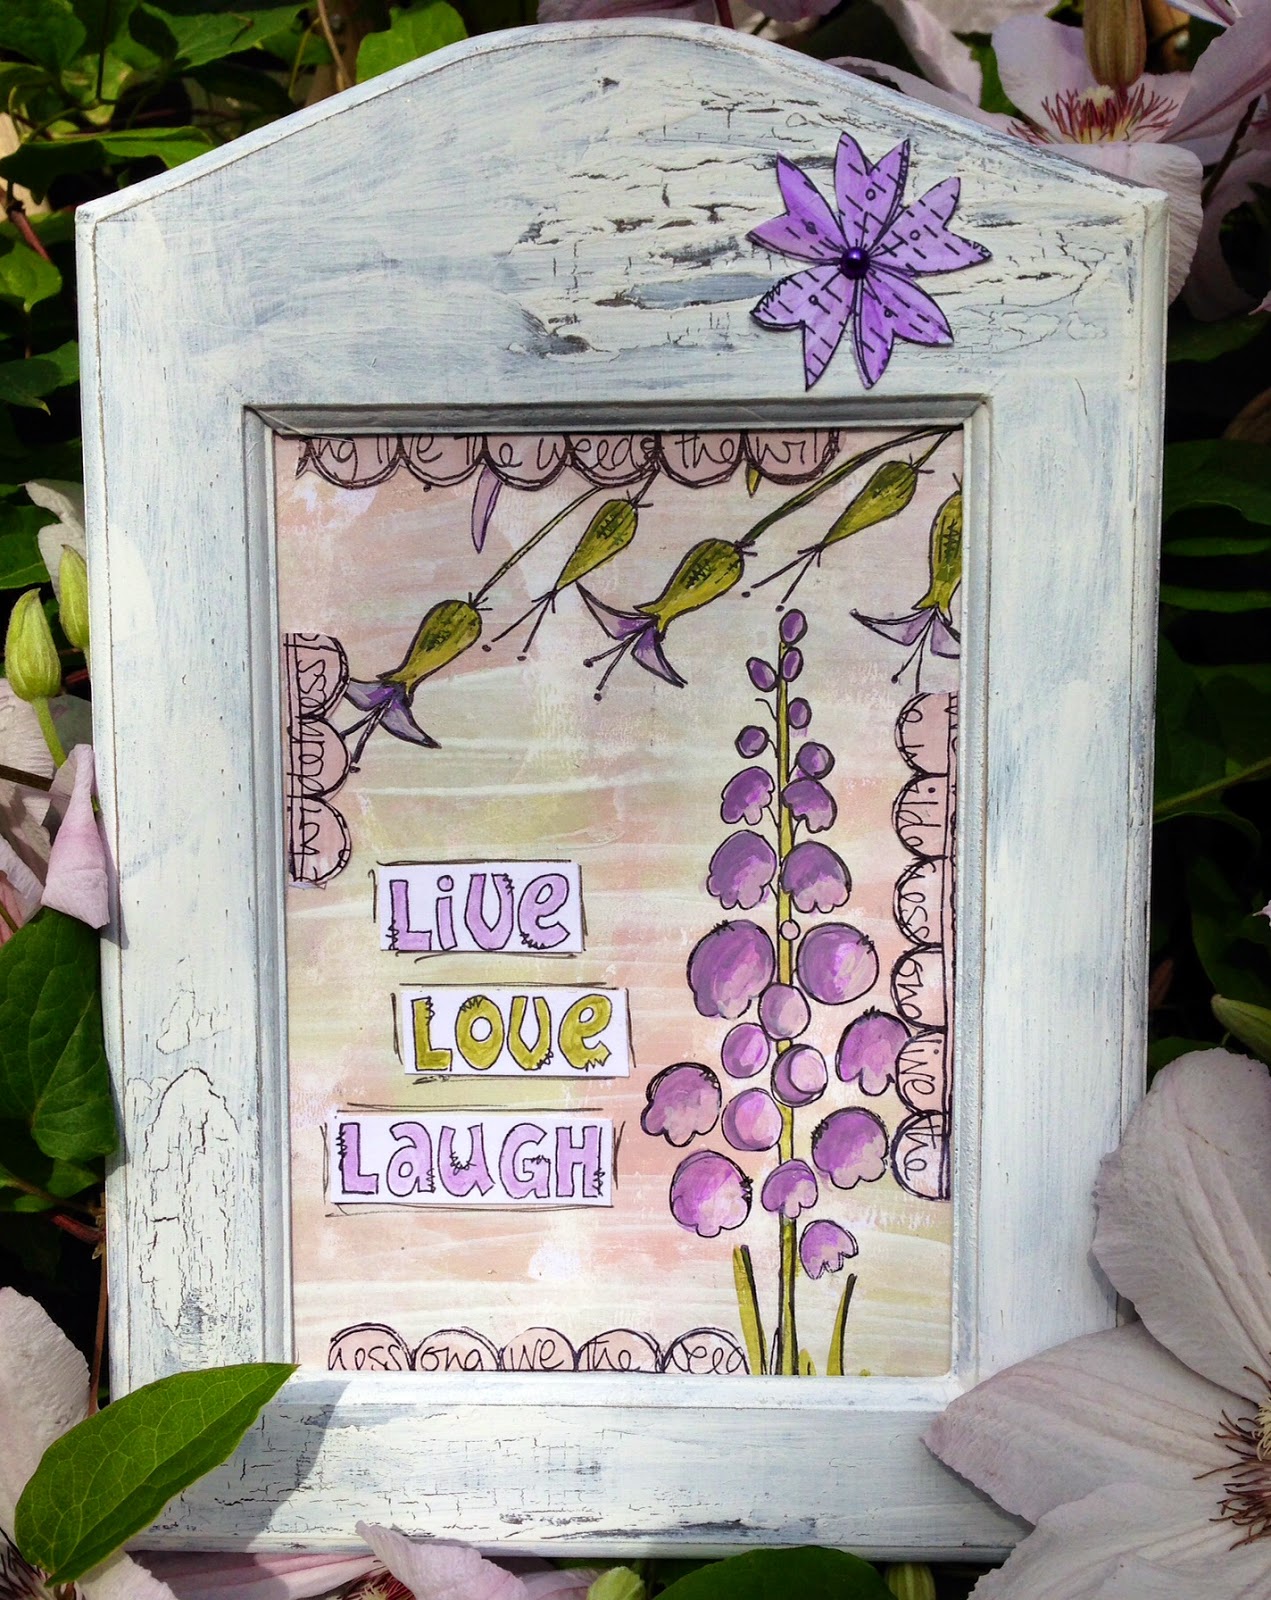
 By Clare Lloyd: Door Hanger


My little decorative door hanger was simply created using Grey/White board painted in Snowflake Fresco paint and then I built up a background by stamping the lacy borders from ECL01. The coloured papers were created using the same brayer technique as above but instead I used Yellow Submarine and London Bus.


By Clare Lloyd: Nordic Christmas

Now onto my second stamp set ECL02 this has a Nordic design vibe and was inspired by Nordic festive knits/textiles. There are lots of images that can be used to build patterns and also has a great frame which many of the elements and sentiments are designed to fit into. This set would be perfect in the run up to Christmas when you want to crank up the card making and produce quick but stylish batches of cards to send to your loved ones.


I used the elements within the stamp set to build a background and also to create the focal point/embellishment. The background was created like this:


I swished the paint brush around onto some Heavy Weight Smoothy Card using Cherry Red Fresco paint (JOFY Ltd Edition Set #2) and then started stamping using Black Archival ink.


Then a layer of stamping using Bora Bora.


I painted on a quick coat of Matte Glaze and added just a touch of Snowflake which I wiped back with a baby wipe. Then came some more stamping with Snowflake.


The finishing touches were to create my border/faux washi tape and heart embellishments. I simply painted card, stamped and added Matte Glaze.


by Clare Lloyd: Festive Canvas

Here is a festive 4” x 4” chunky canvas I made. It was simply painted in Cherry Red Fresco paint and I did some pattern building and borders by stamping with Snowflake. The canvas was painted with a layer of Gloss Glaze to make the red really pop.


I stamped the sentiment within the main frame from the set ECL02 and also created another layered frame using the narrow border. This was all stamped using Carnation Red Archival Ink and I splashed on a coat of Gloss Glaze. I rummaged in my altered art stash to find some wooden/wire elements to finish off my canvas. These were all painted with Snowflake and Gloss Glaze

My little heart topper was created using Grey board and a layer of Grunge Paste which I stamped into.


I do hope you like these new designs and I can’t help but wonder what you will make with them? Something else for me to look forward to! Enjoy!

~ Clare

Wow, such awesome samples Clare, particularly considering you only had about 48 hours to do them! I know how excciting it is to use your very own stamps for the first time...what I call a scary-good experience!

Well as I said earlier, I am Clare's wing man tonight. And I must confess, I used the opportunity to kill 2 birds with one stone. 

Today we have been hosting a retailer training day here in Essex, and the focus of it was to teach 6 x 1 hour classes using as many of the new products as we could. So for me, I decided CAS cards with Clare's stamps was the way to go. So today the retailers made 7 cards in 1 hour. That is some achievement, but I did give them a helping hand with the background....


by Leandra Franich: Mini Gift Cards

Cards like these is exactly how I started crafting over 20 years ago. Simple layers, bold colour, and perfect to accompany a gift. I used to sell this size card to a local gift shop with matching hand-made envelopes. Great to have a stack of these on hand!


Oh yes, and Miss Courtney got busy with Nana (over from New Zealand) last week to make some plum jam, one of our trees is laden this year. Wasn't as hard as she thought!


Oh look, it has friends.....in red and turquoise. So I admit it, I stole the JOFY tradition of kraft card, but when I first saw Clare's stamps, the first thought I had was Carnation Red Ink and Kraft Card. The turquoise background is made using about 4 shades of blue: Turquoise (new JOFY colour), Mermaid, Hint of Mint (new Lin Colour), Chalk and a bit of pazazz from Beach Hut. Using all of them together brayered randomly onto Smoothy Card Stock, you end up with a bit of variation rather than one shade of a flat blue. The white stamping is all with Chalk Fresco paint.

By Leandra Franich: Festive Cards

If you leave your Xmas cards till the very last minute, then this might be the answer below!


What starts small always ends up with a bigger version too. You can see the brayered backgrounds a bit better now in the close-up below.


Same method, a simple colour palette, wood bellies, a touch of bling, twine and voila, instant card. The blue ink is Ranger forget-me-not archival


All year I've been feeling the love for CAS, and it is very satisfying to not always throw the kitchen sink at a project!

Well people, that's your lot for new products until we hit the new year and Trade Show season! This is plenty to keep you busy until then I am sure!

Congratulations to all the designers, new and existing. It's our absolute pleasure to work with you all and help bring your ideas to life through the medium of RUBBER! Whatever could be better! We can't wait to see how these new products spark your creativity, please do share what you make with us via our blog challenges! We really love to see what you do.

Tomorrow a new semester is upon us, so we shall see you back here quick smart after work. We have 3 posts planned for tomorrow evening, so keep your eyes peeled for information about all the new things we have in store!

~ Leandra

Saturday 30 August 2014

August 2014 New Products {Elizabeth Borer}

Tonight we have a brand new stamp designer to introduce. Elizabeth Borer. You will have already seen Liz's work featured on the blog as a guest designer in the past, so you will be aware her style is beautifully feminine.

Liz has a long history working with paints, and has taught many people how to use them to colour images with depth and exquisite shading. She is also extremely competent at drawing images herself, and particularly likes faces as the focal point with scrolls, vines and such. These stamps reflect those well-honed skills, and if you follow her newly established blog, I am sure you will see her using these images in extremely creative ways with paint and more besides.

The style of these 2 sets has a subtle hint of Christmas. Look closely and you will see holly, ivy and mistletoe, and a Christmas Fairy has wings just asking for a touch of sparkle.

Welcome to the PaperArtsy family Liz, we are thrilled to have another designer on board with another unique style to offer our customers!

EEB01
EEB02
Here's Liz herself to give you a taste of what she's created so far, but it's just the start, I'm sure you'll see more of her in the weeks leading up to Christmas. Well done Liz on a beautiful release of stamps!

Hi there everyone , Liz Borer here with a few projects made from stamps from PaperArtsy that I designed. It’s very exciting to see my own designs as stamps and I hope that you enjoy them too.
by Liz Borer: Canvas Frame

Is it a Wall Hanging or a parcel ? This canvas developed a life of it’s own and ended up looking a bit like a parcel! 


I started by painting a couple of coats of Antarctic onto the canvas and when dry I blended Bora Bora, Hey Pesto and South Pacific onto the canvas. I kept the colours to the sides and corners.

Next I took a piece of tissue paper and stamped using Archival Black Ink with the ivy from EEB01 randomly over an area that would cover the front of the canvas. I coloured the leaves on the back of the tissue. The tissue can then  be stuck to the canvas by painting a coat of Matt Glaze onto the canvas and carefully putting it in place before painting another coat of glaze over the top. Be careful while doing this as the tissue can tear, but if you paint gently it is possible to brush out any folds in the paper. 


When dry cut off any extra paper and if necessary use a little more glaze to stick the edges down. I found a stencil that fitted the theme of the project and used grunge paste mixed with a little colour from my palette to create a raised image on two of the  corners. When dry I blended a little more of the base colours around the corners.


Using some ivory card I stamped the fairy in black archival ink and several of the two rounded baubles in Cranberry pigment ink (EEB01). I coloured the fairy with frescopaints mixed with matte glaze which makes them more transparent. I cut out the baubles  and stuck them together to create flowers. 


I cut out a frame for the fairy image and rubbed some TreasureGold onto it. I also rubbed the treasure gold over the raised areas of the canvas and around the edges. Finally I stuck some gold lace to the canvas and arranged the flowers and framed image before sticking them onto the canvas. You could add more embellishments but I liked the stamped ivy showing in the background.


by Liz Borer: Little Canvas Treasure Bags

I found these little bags in a shop and felt that they were in need of some decoration. 

They are all made in much the same way using tissue paper to stamp the image on before applying it to the fabric.The backs of the bags are all done in the same way – cut a piece of tissue a little bigger than the bag (and I found that it was better to cover the whole of the bag because otherwise there is a line showing where the tissue ends). Paint the designs on the reverse of the tissue paper and then stick the paper to the bag using matte glaze in the same way as the canvas. When everything is dry I trimmed the paper and stuck down any loose edges with more glaze.

One of the fronts of the bags was decorated in the same way, stamping the fairy from EEB01 and the ivy from EEB02 onto tissue paper and colouring before sticking it to the bag. 

The other two bags I decorated slightly differently. Again I stamped and coloured the image onto tissue paper however I then stuck this onto a small piece of fine cloth which I had frayed around the edges. When this was dry I stuck the square of cloth onto the bag to create the front of the bag. When the whole item is thoroughly dry it is possible to pull the drawstrings closed but don’t try before it is dry.


By Liz Borer: Winter Treasure Box

I like decorating book boxes and this little one with its recessed center is perfect for a treasure box . 


I started by painting the whole box. The inside and outside were Antarctic and the sides were Nougat. I lined the inside of the box with paper but it can be left painted.  I then blended Bora Bora and Space Cadet onto the outside of the box by dabbing the paint on with a wet wipe. I find this works better if I use one colour at a time and drying between colours. The last colour that I used was Nougat which lightened the whole background a gave it a little warmth.


I thought I would mix one or two of the other new designer's stamp sets into this project and so I stamped the script from ESN11 in Eggplant pigment ink and then the blobs from ESN09 in Denim pigment ink over the cover to create a background. I did this quite randomly and also stamped around the spine and the back of the box. Finally, using black archival ink, I stamped ivy and mistletoe onto the box with EEB02. The mistletoe was coloured with a wash of South Pacific.


The fairy from EEB02 and the words from ESN11 were then stamped onto smoothy card painted with nougat and the fairy was coloured. I cut the fairy out of the ivy frame around her and mounted this onto a gold card. I found a frame in my stash for the words which I painted with a mix of Inky Pool and Eggplant and then rubbed Treasure Gold over the raised areas. This made a perfect frame for the words. 

The background in the recessed area was made from Smoothy Card which I put through an embossing folder and then painted with the same mix of paint. Rubbing Treasure Gold over this made the embossed areas stand out. Finally I assembled the whole project as shown and added some loops of ribbon and flowers to the front of the box.

I have tried to show that these stamps can be used as they are or with other stamps to create a variety of projects for different occasions and I really hope that you will enjoy them as much as I have enjoyed designing them. Bye for now.
~ Liz


We also asked Penny Nuttall to create a few items with Liz's stamps. In her unique way, she has managed to design 3 fabulous projects, and sneak in an Ellen Vargo mash up too!


by Penny Nuttall: Fairy Garden

This diorama or shadowbox is constructed using the PA Chatsworth collection papers, with some added stamping of textured shapes from Ellen Vargo's EEV08 set in Fresco colours Slate (JOFY limited edition set 2), Evergreen (Lin Brown limited edition set 2) and Haystack.


All the fairy, leaf and bauble elements from Elizabeth Borer's guest designer stamp set EEB01 are stamped onto PA Smoothy card and coloured using a variety of Fresco paints, mixed with a small amount of glaze to keep the beautiful detail of these images. They are then glued into the box at different levels to create 3-D depth.


by Penny Nuttall: Fairy Mobile


The framework of this hanging piece is a wooden embroidery hoop, painted first with Hint of Mint Fresco (ELB Ltd Edn Set 2) and then dry brushed over with a wood grain effect in Turquoise Fresco (JOFY Ltd Edn Set 2). The Elizabeth Borer fairies and words are stamped with Black archival ink onto PA Smoothy card and coloured with water based marker pens (eg fibralo).


Each element is double sided, stamped and cut twice and glued back to back. The beaded danglies at the bottom are stamped with Stazon ink onto the plastic packaging of the special edition Fresco paint set! (Waste not....)


by Penny Nuttall: Winter Fairy Canvas

The icy blue-green colour choice gives this 'fairy' canvas a frosty winter look. 


I stencilled PA Grunge Paste to suggest a cracked ice background and shredded a strip of hessian fabric into a bare tree shape, then brushed on Fresco Finish Marlin, Hint of Mint and Turquoise from the latest Lin Brown limited edition paint set #2


After stamping and colouring the three peeping fairies I made the canvas even more icy with a rubbing of Fresco Metallic Glaze.


Tonight we also have Lesley Ebdon as a support artist with Liz's stamps. One of our loyal #PATwits, its so nice to have Lesley's creativity featured here!

by Lesley Ebdon: Fairy of the Heart
Hi Everyone, I’m Lesley and my first project using Elizabeth’s beautiful stamps uses a MDF heart onto which I've used stamps from EEB01.


On the heart itself I’ve painted with Fresco Finish Chalk Acrylics, stamped into Grunge Paste and onto the crackled surface, adding colour to both with Fibralo pens and also adding Treasure Gold to the GP area.  The main image was stamped onto heavy watercolour paper and coloured with Fibralos applied to craft mat with lots of water added and a very watered down Fresco Finish for the background area and skin tones.


To finish the fairy I ‘painted’ on some PaperArtsy Matte Gloss to her wings and dress and sprinkled very fine glitter.  For the die cut flowers I made my own mica sprays with Fresco Finish Paints.

by Lesley Ebdon: Luminary
I painted the wooden frame with Fresco FinishChalk Paints, sanded lightly then stamped a trailing ivy from EEB01 (without using a block) and embossed with gold embossing powder. I also applied a little Treasure Gold to the frame.


I stamped the two fairy images from EEB02 onto heavy vellum and used Fresco Finish paints to colour on the reverse.  I used the lovely bauble stamps from EEB01 to create the other two vellum panels. These pretty images call for sparkle which I rarely use but I dug out my Gelly Roll sparkle pen to add it to the baubles, fairy wings and the ring around the Mistletoe Fairy.


I also added Treasure Gold to the metal corners and the wooden feet.


Wow, triple inspiration tonight! It's so fabulous to ad another new designer to the mix of talented people we represent. Please take a minute to leave Liz lots of encouragement via the comments section, I can't begin to tell you how nerve wrecking it is for these guys when they put new stamps out there for you to use. It's a lot more scary that you might think!

Thankyou ladies for another wonderful night of inspiration. All these stamps are available from your favourite PaperArtsy stockist now. Enjoy!

So who's up tomorrow night then??? Well, you'll have to wait and see!

~ Leandra

Friday 29 August 2014

August 2014 New Products {Jo Firth Young}

Well here we are, just past the halfway point of New Products for August 2014. And we still have loads more to come! Tonight it's the turn of the popular JOFY series of hand drawn stamps created by Jo Firth-Young

This release of 2 flowers sets, and 2 Christmas sets to complement the existing range. She does think things through very thoroughly, does our Jo, take for example that spikey thing top right of Plate 25 below... that is specifically designed to be used with her series of flower heads on stencil PS009, if you look at Jo's blog post here, you can see exactly how she does that. Very clever!

Take a look at her new stamps, and ideas with them below.

JOFY25
JOFY26
JOFY27
JOFY28
Jo also has a brand new Limited Edition Fresco Paint Set (#2) with the gorgeous colours: Cherry Red, Turquoise, Slate and Chalk. We repeated the chalk from set #1 again due to numerous requests for more of that shade! These colours are fresh, modern, and perfect for a funky Christmas !


FFJF2
Here's a sampler showing how the tone of the paints can be altered using Chalk as the mixer. Great to see the various shades of a colour that you can generate so easily.


by Jo Firth-Young: Bauble Cards


Hi everyone, Jo here. Using stamps like these baubles you get a different result every time, but the size of them is perfect for making impact cards. Once you've read through the info below, go to my blog post for even more samples of how I have used these stamps in the last few weeks.. 


The cards above were created by using a 'masterboard' approach. I stamped lots of baubles across a piece of Smoothy card, masking off each image before stamping the next to create simple layers and depth.


I love the new JOFY Fresco Finish colours (Slate is a really versatile addition to the range), and used them to paint the baubles in different shades. I cut the sheet into panels and gave each panel a different background treatment, shading and quote. A good way to make a bunch of cards at the same time.


A close up shows the contrast; on the matte paint I've added a bit of sparkle with Pearl Glaze (Christmas requires sparkle!).


by Jo Firth-Young: Christmas Scrapping

A layout, yes its true...


I think I've often said that Kraft is one of my favourite substrates... its the little black dress of crafting - it goes with everything!

This is a big layout format for me - 12x12" - chosen because I wanted to make full use of the new bauble images and their size... even with the baubles, 2 photos and misc snowflakes there is still open space on the layout I like to see that on a scrapbook page.  The small snowflakes are JM07 and its nice to see how well new and existing stamps can work together.


And a close up...remember if you are colouring with opaque pens, and you lose some of the stamped image in the process, its easy to 'fill' stamped lines using a black fine line pigment pen. I often come back over the top with black, or add contrasting lines with a white pen that mimic or highlight the designs too....warning...it's a bit addictive!


by Jo Firth-Young: Live, Love Card 

A now for a colourful take on 'less is more'....


I like to create cards that have movement and I particularly like this format as it has 'spaces' for word and design elements.

On the new stamp sets I designed several 'block' words to be used together or separately, and I have used a couple on this card along with new flowers. I c
oloured the images with the watercolour Fibralo felt pens, and teamed them with coloured papers and die cuts... but the open spaces mean that it still retains the 'less is more' effect - it's not fussy. 


The 'stitched' lines that I often add onto my cards is now also a stamp (JOFY26), and I'm sure, like me, you'll find yourself using it constantly to frame your layers.

Enjoy!

~Jo


Thanks Jo! We love what you do, and we are sure these stamps will be a massive hit with all your fans! These stamps are great additions, and nice to have images on the larger side, as these work really well in journal pages too! Congratulations!


Next up tonight, Deb (who is also a huge fan of Jo's) has made some fabulous mixed media samples with these new goodies, sit back and enjoy!

by Deb Wainwright: Painty Tag


I used colours from the new JOFY Set 2 Limited Edition Paints brayed onto the tag, which gave a rich background. I built up some interest on the background with the stamps using Watering Can Archival ink. For the feature I kept it fairly simple so that it didn't clash with the busy background.


I kept the colours the same adding shading to the edges of the feature flowers and words. I finished the tag with some colourful fibres at the top.


by Deb Wainwright: CAS Flower Card


For this sample I chose to make a clean and simple (CAS) card. The flower stamp is painted with Slate and Chalk, again from the new JOFY range. I used mixes of those 2 colours to create shadows and highlights which is mirrored by the  card onto which it is mounted. 


by Deb Wainwright: Framed Flowers


The frame has been distressed using crackle glaze and painted in chalk over slate paint. The background was created by braying honey dew, and blush, leaving gaps of white on Smoothy card. A watery wash of chalk was painted in strokes horizontally which created very pale stripes.


The flower stamps were painted using Pansy, and Lilac with Vintage Lace for highlights and the greenery was Hey Pesto with Zesty Zing. It was all finished with a flower placed on the frame. 

Wow Deb, you rocked these samples! Love your shading on those flowers, and that BG in the sample above is a stunner, thanks for your support tonight!

Thanks for keeping up with us this week folks! For a very small stamp company, we certainly release a lot of products, and all our stockists have them in stock now ready and waiting!! 

Oh hang on a minute, its not over yet...we are back again tomorrow night...with a brand new PaperArtsy Designer...Happy Days! See you then!

~Leandra