Saturday 29 June 2024

With 3 Things: Blue Birds {by Dounia Large}


Hi friends, it's Dounia with you for another 'With 3 Things' post. 

This feature on the PaperArtsy Blog is where 3 bloggers are sent 3 items to include in their project. We have no clue what PaperArtsy HQ is going to send us, there might be a slight variation (for example on this round we each were sent different stamps sets from the same release) but generally 2 of the 3 things will be identical.

My mystery package contained the stamp set FP019 by France Papillon, a pack of Printed Tissue PT08 by Alison Bomber and the PaperArtsy Small Songbird die to play with. the next blog topic is 'Ink Pads' which I chose as inspiration and to add another challenge into this project. I focused on a quad of blue Versamagic Ink pads by Tsukineko.


With all of that, I made a trio of tags! They are interactive to fit into the overall theme of 'Hidden'. Though I must admit I was more focused on the technical processes and scrambled at the end to put everything together in a cohesive finished project...

VersaMagic are very pigmented inks and boast great opacity. I wanted to explore their layering possibilities and how different they would look depending on the background. So I started conservatively with two tags with maximum value contrast: one white and one black. I decided to take advantage of the blue gradient to implement one of my favourite stamping technique: building depth with repeat stamping and colour value. 


I started with the colour closest to the background, so the lightest on white and the darkest on black and covered most of the space. This is appear the 'furthest away' as it blends to most with background.


I then picked the next shade and covered slightly less of the tags to create a slightly 'closer' layer.


I think you get the ink: the colour becomes more of a contrast as the background and the stamping covers less space.


Final colour, same process! I loved how the ink shows up on the black but the mass of lines were becoming very confusing - I needed something to make the foreground pop. As Versamagic is a water-based ink, you can dilute it with water when wet (but it will set permanently once dry). I used the transparent tones created with the water blend to colour parts of the lightest stones and highlight them.


To be quite frank, I preferred the tunnel effect created by the berry stamp so I did a version on black, reversing the colour order. I think the depth works on both of them but with very different vibes!


This close-up highlights how the layering near the sides contributes to the depth, not just he colour. Also the black paper is slightly textured, which is really evident in macro!

My next idea was quite experimental for me. PaperArtsy Tissue is printed by the off-set method, meaning actual ink is on the surface. It can therefore theoretically be used for image transfer on a gel plate... As VersaMagic is a slow drying pigment ink, I thought it could be a good candidate for coordinated prints. I set out to try:


I inked by gel pate, took a print with selected section of Printed Tissue (I was careful to put the printed side on the plate, generally), then quickly took a second print with a black piece of paper. Success!


The results are quite subtle but I love the dreamy atmosphere they create. The transfer is often more obvious with bold designs like the titles but the botanicals also work. I had the outcomes with the darker ink, as the other did not create enough contrast for the transfer to be really visible. Also my gel plate is now blue.

Between the print and the coloured tissue, I had quite enough material to die cut birds and finish the tags.


For the current theme 'Hidden', I have added flaps that can open and reveal little surprises!


I am quite happy with this playing session and plan on experimenting more with tissue image transfer. I hope this project inspires you!

Stay creative!
Dounia

Friday 28 June 2024

With 3 Things: Minimalist journal page {by Victoria Wilding}


Hi friends, it's Victoria from Victoria Wilding Creates with you for another 'With 3 Things' post. 

This feature on the PaperArtsy Blog is where 3 bloggers are sent 3 items in the post. We have no clue what PaperArtsy HQ is going to send us, there might be a slight variation (for example on this round we each were sent different stamps sets from the same release) but generally 2 of the 3 things will be identical.


A recent blog topic was books and journals, so it seemed like a no brainer to dig out one of my favourite art journals and create a journal page. Let’s take a closer look…

I was so excited when I opened the package and immediately knew I wanted to create lots of my own paper elements to create a mixed media collage. 

I started out by stamping the largest berries stamp from France’s FP020 set and coloured them with watercolours. 

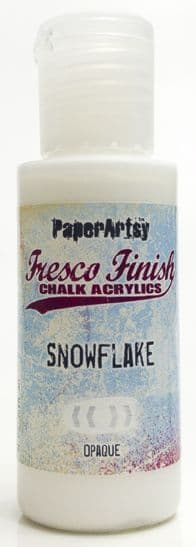
Next I took out the small berry set and dabbed with Fresco Finish Acrylics in Candy Floss, Summer Sky and Wisteria


And stamped onto my card.


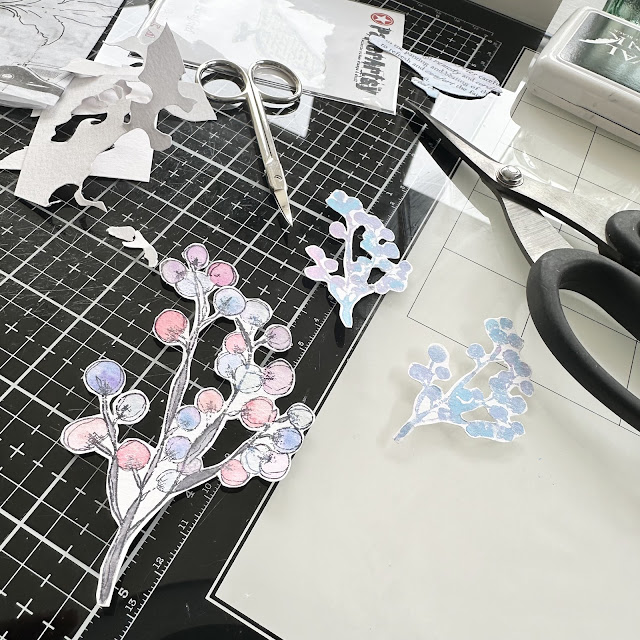
Then I fussy cut out the berries and set aside.


I used up the paint I had out on my mat on an off cut of card and ran the Small Songbird cutting die through my machine.


I then added some text from the Alison Bomber Tissue Paper on top of the bird with some glue.


For some extra detail on the finished page I decided to create some text circles using the off-cut of coloured card, the lotus flower stamp from FP020 and a circle punch.


I then took a larger circle of card from my stash and inked with Distress Oxide in Stormy Sky.


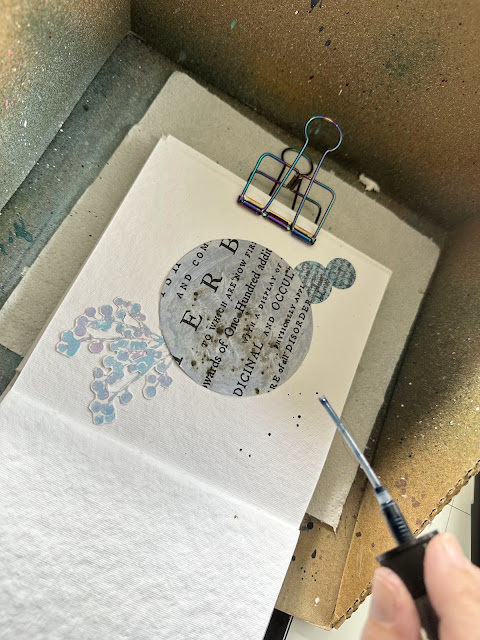
And added some water splatters and ink splatters in Distress Oxide Spray Scorched Timber.


Before gluing more text from the Alison Bomber Printed Tissue Paper.


With all my elements created, I auditioned them on the blank page, testing out my composition.


Before gluing down the background elements where I wanted them and adding some ink splatters to the page.


I added some black backing paper to the die cut bird, to give it more definition and help it stand out against the large text circle, and glued it in place.


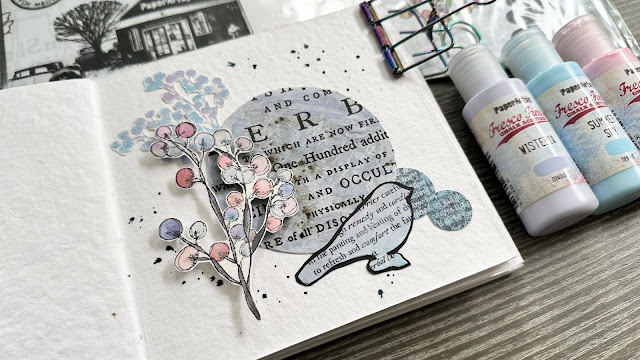
Finishing with the water coloured berries, stuck down on foam pads to give a bit of dimension and help them stand out against all the background elements.


If you look closely you can see some of the shimmer from the watercolours that I used.


I love how the page turned out. I’m drawn to leaving white space on my pages, letting the eye walk across all the elements on the page. It works really well with this page and all those lovely pastel colours and the dark black ink of the text.


I hope you feel inspired to play with your PaperArtsy products. Try creating a handful of elements and then arranging to make your own page. I guarantee you won’t be disappointed! 

Until next time, wishing you a happy, creative week.

Victoria x


Thursday 27 June 2024

With 3 Things: Journal Spread {by Liesbeth Fidder - de Vos}


Hello everyone it's Liesbeth here with you for another With 3 Things post. So much fun!

This feature on the PaperArtsy Blog is where 3 bloggers are sent 3 items in the post. We have no clue what PaperArtsy HQ is going to send us, there might be a slight variation (for example on this round we each were sent different stamps sets from the same release) but generally 2 of the 3 things will be identical.

This are the 3 things: the lovely cutting die Small Songbird, Alison Bomber's Printed tissue PT08 and a zen stamp set PaperArtsy FP021!


It was so exiting and fun to unpack the three things! And I am so curious about what the other two bloggers come up with!

The current blog topic has just been Books & Journals, so I was thinking about an art journal spread, and of course I want to include our quarter theme, hidden'. As always, I just start, have fun and see what will happen!


And this was the result, a journal spread with a hidden text ...... let's take a closer look.


First I covered the entire spread of my A5 journal with a piece of the printed tissue paper using gel medium. After drying I painted a diagonal stripe across the spread with PaperArtsy Fresco paint Snowflake to cover the images a bit. Using Distress inks and blending tools, I sponged overlapping areas with lots of colour.


Here I bleached (with pure bleach and a synthetic brush) the branches, flowers and berries of the tissue paper. With black waterproof ink I stamped the flowers, berries and texts from the  PaperArtsy FP021 stamp set, And also some of the other stamps with the Distress inks I used before. I used every stamp of the set!


I coloured the berries with different gel pens and the big flowers with Distress inks and water and I cut  the bird 3 times out of an old book page, sponged the edges with black ink and glued the birds on the spread...


...as you can see here.


Let's hide something! From another sheet of the Printed Tissue I cut out the same leaves as I used in the first layer, glued it on a piece of white cardstock, cut out and coloured it. I added a tiny hinge and covered the leaves and text with it by gluing the other side of the hinge in the spread. I finished the spread with black edges and white gel pen.


The hidden text! :-)

This was so much fun to do! I love the challenge to play with three things! And now I really can't wait to see what the other girls make! I hope we inspire you, have fun!

Have a nice day, 
                           
LiesbethXX

Blog: Liesbeth's Arts & Crafts (www.liesbethart.blogspot.com)
Instagram:liesbeth_fidder


Wednesday 26 June 2024

NEW PaperArtsy Products: Seth Apter {June 2024}

A note from Leandra:

It's a fresh release full of zing and zest. And that is perfect as summer is upon us all here in the northern hemisphere! Seth is rocking the summer vibes for sure, and that is what is awesome about all his mark-making stamps, any season, any time, they will work year-round in all your art!
 
Seth will be along to share with you LIVE his new products and ideas over in our Facebook Group, 'PaperArtsy People' shortly after this post publishes, and ... don't forget
 
These stamps are available EXCLUSIVELY from our approved stockists. Please check the list at the foot of this post to find a retailer online or geographically near you, it makes sense to order within your country where possible. Our retailers also endeavour to join the designer's live to share their direct shopping links - this makes it super easy for you to find a store with product in stock immediately.

Hi all. Seth Apter here. Welcome to new release week and my three newest sets of PaperArtsy stamps. These have been in the oven for some time and I am thrilled to finally be able to share them with you. And to soon see all the places that your creative minds take these to.


Seth Apter Red Rubber Stamps
Price: RRP €23.00 +VAT    Size:5" x 6" (13 x16.5cm)
All stamps are individually trimmed onto cling foam, with a laminated storage/index sheet

All three sets include the classic design elements of a Seth Stamp...grungy and distressed, linear and organic, abstract and modifiable. There are letters, words, phrases, numbers and design elements that are equally at home being part of a background or taking center stage as a focal point. Each is geared toward making my designs all your very own!


Eclectica³ Seth Apter Set 40 (ESA40)

CHASE YOUR DREAMS
 

I love using text in my artwork and often use it as the focal point. Chase Your Dreams is the perfect example. But it is not the only stamp from ESA40 used here. The splattery splat was stamped three times to guide the eyes around the piece and to echo the circular swirls wrapped around the phrase. Look closely in the background and you will see loose designs from the grate stamp and even the tips of the > X < stamp serving as a loose border. 

 
My favorite part of the phrase stamp are the thin lines running across the stamp. These lines are offered as a guide to you to extend the stamp in your very own personal direction. In this example, I continued the lines with an extra-fine tip pen to anchor the phrase to all four edges of the paper. Stay tuned to this concept as it continues in all the sets.
 
READY, SET, GO 


Much like the first piece, the focal point of Ready, Set, Go is text -- the word WANDER. It also highlights the fact that a single artwork can be made by using a grouping of stamps in any single set in my collection. 


Look closely and you will see seven of the eight stamps from ESA40 used in this piece. And no worries if you cannot find them all. I like to use small portions of stamps so that they become part of the artwork and not quickly identified as a certain stamp. The only missing stamp is the CHASE YOUR DREAMS stamp which needed a rest after being the star of the first piece in this post. 

WANDER


As noted above, all of the text stamps in this release include thin, subtle lines running through the words. They are meant to be used as literal guidelines to enable you to add your own marks to make the stamps your very own. In this case, the lines in WANDER continued as dots and echo the staggered marks in the strip of my washi tape cutting across the artwork. 


Among my most favorite contrasts in art is the one between linear and organic. Sometimes both of those aspects can be in the same element. In Wander, I used my Aladine Dye Spray rather than a traditional ink pad to add the broken ladder stamp. In doing so, a very linear design element is softened and made much more organic and loose.


And speaking of guidelines...I have added an image for each of the stamp sets of just a few ways that the lines within the text stamps can guide you in adding your own, creative touch. 


Eclectica³ Seth Apter Set 41 (ESA41)

SHINE YOUR LIGHT
 

In Shine Your Light, one single stamp is not only the focal point - it is the only point. Other than paint and pencil, the only design element here is the single stamp. 


And once again, the stamp is made unique by extending the thin lines running through the words to the edges of this piece and adding color to the sections created as a result. 


EXPLORE


Explore once again explores the contrast between linear and organic. This linear-based word is stamped along side of several of the open box stamps included in the set. The background was purposely created with a soft blend of colors and enhanced with designs from several circular stamps also from this set. 


The contrast is further highlighted with the addition of the square stack stamp used as a background element at the upper edge.


BLOOM


While my recent releases have focused more on mark making designs rather than the circular designs that were a highlight of my earlier releases, circles are the star of the show in Bloom. 


And because my designs are nearly always abstract, you can turn these circles into anything you like. In this case, they are blooms! 


Once again, some ideas to use the guidelines to add your own creative touch to your stamping.  


Eclectica³ Seth Apter Set 42 (ESA42)

CHOICE
 

I consider myself to be a maximalist but sometimes less can be more. This piece uses two stamps from ESA42 - and a bit of color. I used the guidelines included as part of the design for CHOICE to anchor the stamp to the edges of the paper. In doing so, linear areas were created that were then filled in using watercolor pencils. 


The addition of the concentric circles stamp was used as a softer contrast to the hard lines and another opportunity to use the spacing in the stamp to add color. 


SUCCESSION


Another way to individualize a stamp design is to use it repeatedly. In the case of Succession, a single stamp from ESA42 was stamped over and over, creating a bigger impact, matching the scale of the size of the artwork, and creating a focal point out of an abstract design. 

 
Using another symbol stamp from the same set makes a statement when that stamp is outlined and stamped onto a highly contrasting background color.  

 
NOW OR NEVER


It is all about the layers for me and I wanted to include at least several pieces of art where the backgrounds were created by layering multiple stamps -- some of which might not at first seem to work together. Using softer impressions and a blend of colors helps to unify these layers. 


Repeating the same colors in your focal image, also helps to integrate all the layers. 


And one more reminder -- use the guidelines included in all the text stamps from this collection to add your individual creative voice to all your stamping. 


Thanks a million for looking through this post and for considering adding these stamps to your current set of supplies. Hope that you are inspired by the samples included and that you bring your own, very special creative voice to all your stamping! 

Want to see more? You can always find me at... 


PaperArtsy Stockist List

Our stockists are your go-to  source for all PaperArtsy products, and we suggest that you also use the PaperArtsy People Facebook group to source a retailer in your country. Many are members of our FB group and will happily share links to their online stores.

Australia
A Place to Create, Brisbane a place to create
Bev's Cross Crafts, Spreyton, Tasmania bevscrosscrafts
Crafters Cupboard, Berwick, Victoria crafters cupboard
Hillbilly Scrappin, Nikenbah, QLD hillbilly scrapping
Memories on the Murray, Murray Bridge, SA  memories on the murray
Natalie May Scrapbooking, Dover Gardens, SA natalie may
Scrapbook Superstore & More, South Penrith, NSW scrapbook superstore
The Scrapbooker's Confetti Box, Swansea, NSW the scrapbookers confetti box
The Scrapbook Store, North Perth,WA the scrapbook store 

Belgium
Cart N Scrap Art, Antwerp, cart n scrap art
Créatelier Caracolle, Liège, createlier caracolle

Canada
Clipper Street Scrapbook Company, Langley BC, Clipper Street Scrapbook Co
Glitter & Ink, Belleville ON Glitter & Ink
Paper Art Creations Inc, Leduc, Alberta, paper art creations
Scrapbook Centrale, Dollard Des Ormeaux, Quebec scrapbook centrale
Scrap Addicts, Edmonton, Alberta scrap addicts
Scrap and Bean, Edmonton, Alberta scrap and bean 
Scrapbooking Fairies, Drayton Valley, Alberta scrapbooking fairies
The Paper & ink Boutique, Calgary, Alberta paper and ink boutique
The Scrap Yard, Calgary, Alberta, the scrap yard 

Denmark
Hobbyboden Scrapworld Samso hobbyboden

Finland
Korttipaja, Istunmaki Heidin Korttipaja 
Klemmarikellari, Turku Klemmarikellari

France
Eirl Bancon Cartoscrap, Midi Pyrenees, www.cartoscrap.com
Emispheres Eurl Ruy Montceau,38300   
Fée Du Scrap, Saint Sébastien-Sur-Loire, fee du scrap
Horizon Créatif, Ste Jalle horizon creatif
Instant Créatif, La Possession, La Réunion, i creatif
Katzelkraft, Ingwiller katzelkraft
Kerudoc Creation, St Yvi kerudoc creation
Le Grenier des filles, Pierre Benite
Page de scrap, Saint Pavace, page de scrap
Passion Scrap, Vieux-Conde, Passion Scrap
Scrap by Jo, Saint-Orens-de-Gameville, 31650 Scrap by Jo
Scrap Déco Home, Goutrens, www.scrap deco home
Toutencolle, Dun sur Auron toutencolle

Germany
Stempeloase Munich, Munich stempeloase
Stempelfee Shop, Hilden stempelfee shop
Stempellaedle, Stuttgart, stempellaedle
Tue Was Di Liebst, Bayern, Tue Was du Liebst

Italy
Immagine SAS di Rapaccini, Rome, immagine lab
Il Negozio Della Mamma Di Cle, Torino, il negozio della mamma di cle
Marte Savona, Savona, marte savona
Pezze E Colori, Lissone, pezze e colori 
Piccole Passioni, Siena, piccole passioni

Japan
La Wadao, Odawara, Kanagawa, la wadao
Tiny Dots, Funabashi-shi, Chiba tiny dots

Netherlands
De Hobbystudio, Genemuiden, de hobby studio
Doe@ding,Spijkenisse doe @ ding
Hobbycompleet de Duif, Leeuwarden hobby compleet
Stampingcorner, Capelle Aan Den Ijssel stamping corner

Puerto Rico
Paper Boutique, Fajardi Paper Boutique

South Africa
Kcraft imports Ltd, Centurion 0014  kcraft

Spain
Cien por Cien Manualidades, Barcelona,  100 x 100 manualidades
Ideas 10 Manualidades Y Scrapbook, Bilbao ideas 10 manualidades/
Marakiscrap, Tarragona, maraki scrap
Scrap & Papers Experiences, Barcelona, scrap papers experiences
The Paradise Corner, Barcelona, the paradise corner

United Kingdom
Amelia's Creative Crafts, Studley, Warwickshire  amelias creative crafts
Art from the Heart, Harrogate, Yorkshire art from the heart
Crafts at The Malthouse, Herstmonceux,  East Sussex, crafts at the malthouse
Countryview Crafts, Potton, Bedfordshire countryview crafts
Loobi Crafts, Leighton Buzzard, Bedfordshire, loobi crafts
Procraftynation Ltd, King's Lynn, Norfolk Procraftynation
Sir Stampalot, Peterborough, Cambridgeshire sir stampalot
Stampers Grove, Springbank, Lilliesleaf, Melrose,Scotland stampers grove
The Artistic Stamper Craft Store, Faversham, Kent the artistic stamper
The Forget me not Kraft KabinRochford, Essex, The Forget Me Not Kraft Kabin

USA
Artistic Artifacts, Alexandria, VA artistic artifacts
Artistic Studio Creations, Fayetteville, Georgia Artistic Studio Creations
Craftiness, Chatsworth, CA, craftiness
Everything Scrapbook & Stamps, Lake Worth, Florida Everything Scrapbook & Stamps
Frantic Stamper, Oregon frantic stamper
Free Heart LLC, Denver, Colarado, free heart llc
Joggles, Coventry, Rhode Island, joggles
Messy Papercrafts, Temecula CA Messy Papercrafts
PaperCraft Clubhouse, Westbrook, Connecticut, papercraft clubhouse
Roadtique Boutique, Hilton NY 
Runaway, Art & Craft Studio, NE Salem, Oregon runaway
Scrap-A-Latte, West Babylon NY scrap a latte
Scrapbook-N-Memories, Harrisonville Missouri Scrapbook N Memories
Simon Says Stamp, Columbus, Ohio simon says stamp
Topflight Stamps, Irmo, South Carolina topflight stamps

If you are interested in becoming a PaperArtsy stockist contact Dounia@paperartsy.com for more information

PaperArtsy Links
Facebook Group PaperArtsy People
Facebook Page PaperArtsy