JOFY Collection
July 2021 New Product Announcement
We
all absolutely LOVE a JOFY Christmas release, particularly if making
cards for special friends and family is your thing! She always comes up with the
goods, whether you go simple, or more in-depth, there will be plenty
that works for all of that and more!
Remember,
these stamps are available EXCLUSIVELY from our
approved stockists for the next 4 months. You will find a list of stockists at the foot of this post.
Hi everyone! Jo (www.jofy.co.uk)
here to wish you a very early and sincere Happy Christmas!! lol, Don't
panic, Christmas is still several months away - I'm just getting you in
the festive mood for my blog post this evening and the stamps I'm
bringing you... but don't worry its not all about Christmas.
Christmas
2020 I took a year off from designing seasonal stamps and I'm making up
for it this year! This year there will be 2 JOFY Christmas releases -
I'm overflowing with the joys of Christmas! This is JOFY Christmas 2021
Part 1. Part 2 will be released in September.
I
love these stamps sooooo much!! I hope there is something in this
collection for everyone, and of course you can mix these new stamps with
others you've bought previously - you'll see that I've incorporated
several older stamps in my samples. When I'm designing seasonal themed
stamps sets I always have card making in the back of my mind, but you'll
see during this post that they can be used in dimensional ways too.
I've really been looking forward to sharing with you my newest release for PaperArtsy - lets get going and take a look at the 3 stamps sets and 3 stencils....
.....snowmen, snowflakes and baubles! oh my!
New Stamps
Price: RRP €21.92 +VAT
Size:5" x 6" (13 x16.5cm)
All stamps are individually trimmed onto cling foam, presented in a clear hanging bag
with a laminated storage/index sheet.
JoFY Collection 104 (JOFY104)
I
love mid-century design - the interior design/architecture, shapes,
& patterns - its an era I looked to for inspiration when designing
the large baubles and shapes on this set.
At first glance you might wonder what to do with all the little bits and pieces (I call them 'pebbles') - let me show you...
They
large bauble are perfectly sized for cards - these were both created
using the stamps and the coordinating stencil you'll see later in this
post.
Baubles cards
The
pebbles can be lined up and stamped to use as a background design -
here I used white sparkly embossing powder for a touch of resist and
sparkle (because its Christmas and sparkle is expected!).
The
little pebbles are surprisingly versatile. Simply use the outline, as
shown on the card above, or use them to build something bigger.
Stamping
them onto patterned/coloured papers is one easy way to use them. If you
love fussy cutting and paper piecing then you're really going to love
these!
When
I designed the pebbles I intentionally kept the shapes simple - if
you're going to be cutting lots of something you want it to be easy
don't you?!
I
stamped LOTS of pebbles onto different background papers, painted and
printed ... yay for stamping platforms ... and then I spent a relaxing
time cutting them out and assembling them in different configurations.
I
had quite a few of these pebbles when I'd finished assembling
everything I'd stamped so I created several projects of varying sizes
with them.
Oh Christmas Tree! (Part 1)
First
I used the pebbles to decorate a couple of wood trees I had in my
'Christmas substrates' box (yes, I have one of those lol, I'm very
organised when it comes to Christmas). I mixed up the shapes, sizes and
colours to form a garland.
It's
easy to add details in colours of your choosing: add sparkles, metallic
paints, printed papers - there are just so many options. I
intentionally kept the pebbles quite plain when I designed these (no
inside details) so they could be stamped onto patterned papers to bring
more detail into the layers easily.
For the a second tree I stamped the larger baubles from JOFY 104 onto the same
painted and printed papers to create a coordinated pair of trees. The
baubles are suspended from the frame which is also wound with a string
of tiny lights.
The
strands of pebbles also work really nicely on a card - here I've teamed
them with an appropriate phrase from JOFY69 (more about that stamp set
later). This card shows how the outline and the filled pebbles work
alongside each other.
These stamps are not just for Christmas though.....
I love how the pebbles work on this art journal spread.
How
about some flowers! There had to be some flowers somewhere in this post
didn't there! lol This card makes my retro-loving heart smile....
happy little retro flowers!!
JoFY Collection 105 (JOFY105)
Sir Snow!
I've
designed Christmas stamps for the last 8 years, and every year there
has been a snowman... and this year is no exception. I like to call him
Sir Snow, he's a happy chap with his fancy (if slightly crumpled) top
hat.
This year I wondered if the gender balance of my snowmen needed
to be addressed - there's been lots of snowMEN but never a snowWOMAN...
so I designed a snowlady - and very fancy she is too in her Victorian
style dress and handbag... maybe she's Lady Snow??
I
think Sir Snow looks so jolly on this card mounted onto a spring - when
tapped it looks like he's shivering in the cold. lol It makes a fun
christmas card or detail on an art journal spread.
Its
nice to see how these designs can be used on dimensional projects. I
created this fun little ornament of Sir Snow attached by a spring onto a
vintage cotton reel.... it makes me smile every time I 'boing' it.
Christmas expects fun as well sparkles doesn't it and this ornament
delivers both!
In case you're worried I've moved into the 'cute' side of Christmas let me redress the balance...
While
making my samples for this release I was talking to Leandra about the
Sir Snow ornament and how I had initially given Sir Snow a really
mismatched big googly eye and he looked more Halloween than
Christmas....
"do it" she said "and maybe add scars!" lol
So I did..... I didn't take much convincing that this would be a fun creation...
Nothing
mounted on a spring can be very scary can it?! (even with its own skull
and spider!).. they make me smile.. AND its a good example of using a
Christmas stamp for another event.
(NB.
If there were ever team leaders needed for Father Christmas's Nice and
Naughty lists these two would definitely be top candidates!)
Oh Christmas Tree (Part 2)
Each
year that I've designed Christmas stamps there has always been a
snowman and a tree, and here is this year's tree. I design the majority
of my Christmas stamps with card making in mind - it's when most people
send cards isn't - and lots of my designs can be used to create 'clean
& simple' cards. This card is a good example - using just 2 stamps
(the greeting from JOFY104, tree from JOFY105), white and grey pencils,
white pen, and gold paint (a gold pen could also be used).
Simple but effective... would also look great on black card inked in white or gold....
This stamp could easily be used on patterned papers and paper pieced together to give a more colourful detailed look.
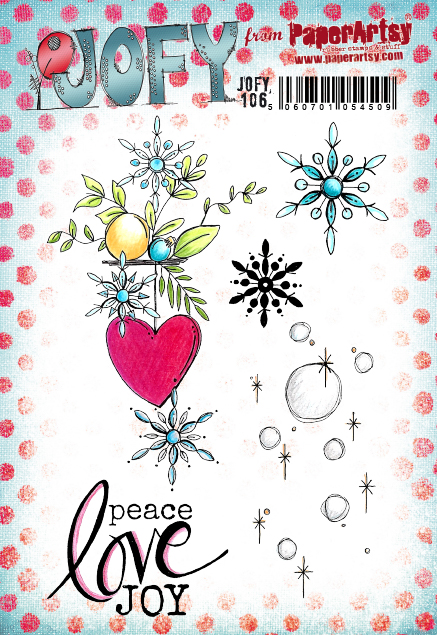
JoFY Collection 106 (JOFY106)
When
I designed the images on JOFY106 I thought that they were ideally
suited for card making - the small details really work for that format.
However, the more I use them the more I see how they can build up to
bigger projects - using them to build up pattern and layouts especially
when used with the coordinating stencil (PS275).
Chalkboard Christmas
This
detailed design is stunning when created in a simple white on black
chalkboard effect....a lovely variation of a 'less is more', 'clean
& simple' card design... clean and simple doesn't have to mean lots
of white space.
However,
if 'clean and simple' to you means white space then here is the same
design with painted snowflakes and shading to make the image subtly pop
against the background.
Peace, Love, Joy
Still
quite a 'less is more' card, this time using the coordinating stencil.
The stencil has circles that perfectly match the sketched circles
stamp. This means you can colour only the circles and, using a stamp
platform, perfectly stamp the lines on top. A quick and easy way to add
colour.
This stamp set has a line and a solid snowflake - great for backgrounds and patterns.
Snow/Joy scrapbook page
This
is one of the bigger projects I mentioned earlier. A 12x12 scrapbook
page - the design could easily be recreated in an art journal.
If
you follow me on Instagram (@jofyjo) you'll know that I've been
painting circles of various shades and tones of the same colour. They
become perfect little 'canvasses' to be stamped on, layered up and
embellished.

They look gorgeous against the background decorated with the set's coordinating stencil of large snowflakes.
New Stencils
Large Size: 6.25" x 9.5" (16 x 24cm) Price: RRP €6.28 +VAT
PaperArtsy Stencil 273 (PS273)
I find a matching stencil & stencil so useful when making projects. For PS273 the stencil and the mask elements are included - this means you can create white spaces and coloured spaces as shown in the photo above.
All the card samples above were created using the stencil and/or mask.
PaperArtsy Stencil 274 (PS274)
The
large tree on JOFY69 is one of my favourite tree designs - I love the
doodles elements and the layers and the possibilities.... but I wanted
it to be simpler and more versatile... so I've designed a matching
stencil.
I hope you like it as much as I do and you find it as useful!.
The
stencil is a bit like a jigsaw. The tree stencil is separated into
pieces, one for each layer of the tree and they all fit in to the master
panel (main stencil). To colour a specific layer of the tree simply add
the mylar panel/mask fitting the layer above and below the layer you
want to work on. In the photo above I've coloured the top layer (1) by
covering layer 2 with the appropriate piece(marked on mylar) - this
keeps the paint in section 1 and protects layer 2 (this will be painted a
different colour). Colour can be added to layer 2 by covering layers 1
and 3, layer 3 by covering layer 2 and 4 etc.
Here are samples of the two trees coloured using the new stencil/mask combo.
PaperArtsy Stencil 275 (PS275)
Creating
a masterboard to cut up and create cards from is one of my favourite
things to do, and at Christmas its a great way to quite quickly make
lots of cards that are the same but different at the same time.
Stencil PS275 is a lovely stencil for this way of creating.
The
group of spots in the bottom left corner of the stencil match the spots
on the stamp set JOFY106 but they can also be used on their own too.
The photo above shows a group of cards created with a masterboard where
the spots were coloured with Metallic Glaze (the shimmery spots shining
on the masterboard panels).
On
the card above I've added a sentiment from a much earlier stamp set -
JOFY17 - the timeless sentiment and font means the stamp will work for
many years.
The
background of a masterboard can be altered by adding a wash of colour
to the edges - I added a light blend of Distress Oxide to the panel
above which accentuated the resist created by the Metallic Glaze.
---
Wow, that feels like a lot of Christmas.... with a few flowers and a touch of halloween thrown in for good measure! I hope its inspired you to think about Christmas (and possibly Halloween too, lol)...
Thank
you, as always, for choosing JOFY products and creating with them - I
really appreciate it - I hope you like these new designs too... I can't wait to see what you make!
Take care, enjoy creating!!
Jo
Socials...
Website: www.jofy.co.uk
Pinterest: @jofyjo
Facebook: JoFY Jamboree! group
Twitter: @jofyjo
Instagram: @jofyjo
Our stockists are your go-to source for all PaperArtsy products, and we suggest that you also use the PaperArtsy People Facebook group to source a stockist in your country. Many are members and will happily share links to their online stores.
Australia
Belgium
Cart N Scrap Art, Antwerp, cartnscrap@gmail.com
Canada
Denmark
France
Horizon Creatif, Ste Jalle h.creatif@gmail.com
Quartier Serre Teston, Ste Jalle, hcreatif@gmail.com
Germany
Greece
Italy
Il Negozio Della Mamma Di Cle, Torino, clelia27@liberio.it
Japan
Netherlands
Norway
Spain
Scrap & Papers Experiences, Barcelona, Info@casonadequintana.com
Taiwan
United Kingdom
USA
Our
brand is only available from established stockists who are VAT/ GST/
sales tax registered and for whom product education is a core principle.
We would rather supply a few hand selected stockists, than the greater
masses. If you would like to apply to be a stockist, you can find our
more about our supply criteria here.
Please note we are not accepting new stockists until we are relocated
into our new building here in France. Covid restrictions have slowed our
progress somewhat, so we hope to be in by the latter part of 2021.
PaperArtsy Links


.png)

