Sunday, 30 June 2013

Winners ....


 Huge thanks to Darcy for another week of inspiring projects on the PaperArtsy blog. It is evident that you guys were hooked on creating your own custom Tissue/Washi Tape along with some Art Journalling. Darcy will be back with us again next month .... can't wait to see what she has in store for us then.

Now onto the winners of Darcy's challenge ....


 Random winner #1 from last week's first draw (every single entry linked): Alison (Craftytrog)


 Random winner #2 (selected from one entry per person linked) is: Gina

Congratulations! Please email Leandra sales@paperartsy.co.uk with your snail mail address and a choice of any A5 size stamp set. 

The week ahead... 

 We welcome back Sue Carrington who will be sharing the first of her three projects tonight (15 mins time), then more from Sue on Monday and Wednesday evening. 

To join in with Sue's challenge, click HERE to upload/share your creativity to be in with a chance of winning some PaperArtsy goodies.

Thursday, 27 June 2013

Darcy Wilkinson #4 Geisha Kitty ....

"Well here we are, my last project for this month. I had a lot of fun making this one. When Leandra first asked me to be a guest designer, she mentioned that she had liked some odd looking dolls that I had made a couple of years ago. So with that in mind I knew I wanted to make an odd doll".

After buying 2 of the Lynne Perrella Oriental Stamps (22 and 24). I decided that my doll would be oriental. How did it come to be a cat? 


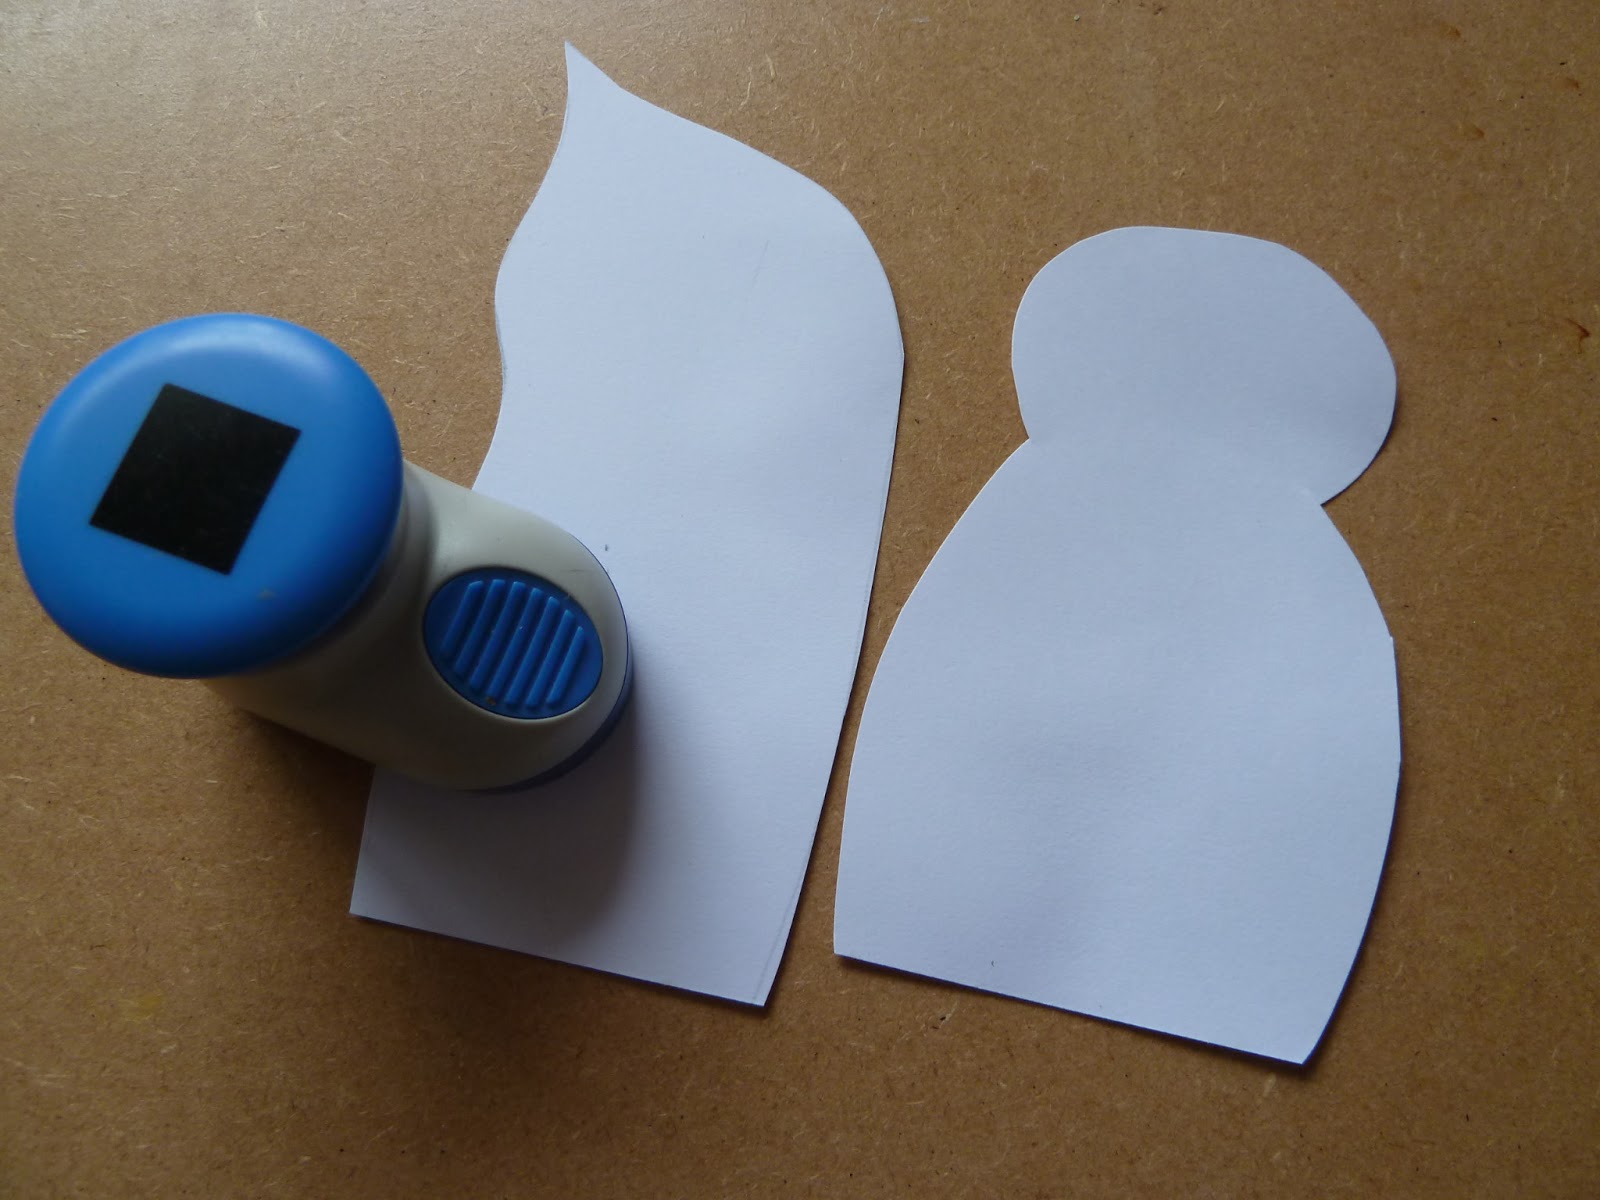
Well I really have no idea, that is just what it wanted to be. So first off I messed around with bits of paper, taping them, folding them, re-doing them till I was happy with my paper pattern. I then cut my pieces out from calico. To add strength, and make the doll pose-able, I also made a wire figure. (Cover it in tape to enclose any sharp ends of wire) As I stitched the fabric pieces together they were slipped over the wire, and then all the joints were stitched up.
The doll was then stuffed with polyester filling, really firmly.

The next step is to add 3 coats of gesso, work each coat into the fabric so that it really stiffens up.
At this point I thought she needed something a bit better than a coffee mug to sit on. So I took a small box, slipped a tall piece of stiff card into the opening and then glued it closed. It was very 'blocky' so I used a craft knife to cut out side sections of the legs and parts of the back rest.
Now she had a chair I could start adding colour.

I grabbed a load of tissue paper, on the white paper I stamped in colour....and on the coloured paper I stamped in black. Rip the tissue paper into strips and small sections. Don't forget to really examine your stamps, and mask off areas to just stamp the bit you want.
I used ...LPC 022..LPC 024.... Mystery 3... HPXT 01.
I started decorating the legs. I used matte medium, brushed onto the doll, then the tissue paper applied, then matte medium brushed over the top of the tissue. Work on one section at a time. The chair came in handy for when she needed to stand and dry.
Keep stamping on tissue and glueing it to the doll. Try and lay the tissue on smoothly, but don’t worry about the odd wrinkle. Cover every part of the body.
I then worked on her head. I scrunched up some tissue paper really tightly into a ball and pushed in 2 short pieces from cocktail sticks. I glued these to the head. The hair area, the sticks and the 'buns' were all painted black. I added glass beads to the sticks.
I stamped the face from LPC022, I then glued this to the face, it didn't quite fit over her face area, so I did it in 2 sections. You don't see the join because the tissue paper blends so well. I used another stamp from that set for the nose. I then stitched the whiskers using fishing line.
Once she is completely covered in tissue paper she needs a couple of coats of watered down PVA glue.
She looked a little under dressed, so I made her a coat and a belt.

Again I cut it from Calico fabric, which I then covered in gesso to make it stiff. Then I covered both items with stamped tissue paper, tearing it into small pieces and collaging it to the clothing. Once done it had 2 coats of watered down PVA glue.
Here you can see just how stiff the fabric ends up.
The coat was slipped over her shoulders, crossed over at the front and held in place with the belt, which is glued at the back. As a side note, I really wanted to put the bow on the belt at the front, but after researching traditional clothing I found that to wear the bow at the front would have meant she was a prostitute....eek! So the bow is now at the back.
She needed a little something extra... I dabbed some Fresco paint onto white card, scraped it across and then stamped images from LPC024 and HPXT 01. I folded the card up into a fan and stitched the ends closed with black thread. I added these small paper faux brads over the stitching.
Next I cut some triangles of white and red tissue, stamped on them and then glued them to another circle of tissue. I added bits of bamboo skewers to make the parasol. The tissue had a couple of coats of watered down glue on each side to protect it, add strength but still allow it to have that thin,delicate feel.
Here she is, the fan is glued between her hands and the parasol is glued against her shoulder.
So that is her all done, I guess we should finish off her chair. First I strengthened the legs by adding extra cardboard to the insides.

I made up a batch of paper clay, and smoothed it out over the chair.

Once dry I added a layer of tissue paper and matte medium, this time I deliberately allowed the paper to wrinkle up and overlap.
Then added Fresco Paint.

First a green layer, then I built up several layers of brown. Ending with French Roast to add the darker shadows.

Finally I used some Onyxite Treasure Gold to add a little sheen.
So she is done, and she has her chair... possibly on a slow boat to China here.
Over to you, have a go at adding gesso to fabric to make it really stiff and then add a layer of stamped tissue paper. Or you could just make some decorated paper umbrellas to serve in your cocktails this summer. How about making an oriental fan and attaching it to the front of a card.

I hope you now have lots of ideas, I look forward to seeing what you make. I was so impressed with the entries last month. To join in with this weeks challenge, simply upload your own creativity HERE.


Bye for now, see you in July.
Darcy xxx


Leandra Says: WOW! She is so cool, love how the paper clay kind of rounded off that chair, that is really clever. I adore your dolls, they are so clever, and full of expression. Thanks for another great month Darcy, see you in July!

Gillian Says: What a finale project Darcy, loved sharing the step by step process in creating this "Oriental Doll". Completely unique .... I love it. xx

Wednesday, 26 June 2013

Darcy Wilkinson #3 Art Journal ....


"Hello again, today we have a journal page to play with".


Step 1, Spray 3 colours of ink onto a non stick craft mat. Spritz this with water and drag your
journal pages through the ink. I opened the journal and bent back half of it so that I was only
dragging one half at a time.


Step 2, Use something that has texture on it as a stamp. Here I used a piece of corrugated cardboard.

After stamping put it to one side so the paint can dry on the corrugate.


Step 3, If you are like me then you use baby wipes to mop up in your craft area. Once used, if the wipe is really dirty with glue etc then it goes in the bin, but if the only thing on it is paint and or ink, then I hang them up to dry. They make fabulous little bits of texture that you can add to journal pages, book covers.. stitch into them, make flowers.... you can do all sorts with used baby wipes.


Step 4, So here I ripped some apart, and then took some of my corrugate, and some other textured paper, and I added a little bling to the edges with these rub on foil transfer sheets.


Step 5, I then glued my strips to the page, overlapping some of them.


Step 6, Now this might look very drastic.. stay with me..
Cut a large oval, or indeed any shape that you like, out of card. Place this over your page as a mask, and paint around it with solid black. I used black gesso, as it really is very,very black, but you could just use black paint. Remove the card masks, and allow the paint to dry.


Step 7, Use a heat tool and hover over the baby wipes. You will see them start to disintegrate as the fibres melt, move your heat tool around to shrivel various areas, be careful to not overdo it, you don't want them to disappear completely.
 

Step 8, Doodle a border using a white gelly pen.


Step 9, Take some Treasure Gold and rub it over the textured,raised areas. These will include the corrugated card, and the bits of baby wipe that are now painted black

I just love these areas.


The Treasure Gold makes the raised areas really pop, especially if you only use it on the black areas.


Step 10, Next I made some more patterned tape. I stuck my tape to a non stick paper and then smeared on various Fresco Paints.


Step 11, Stamp your PaperArtsy Stamps all over the tape, keep it random and have them going in different directions.

  Here is where my inspiration for this page came into its own. I have loved being part of the
PaperArtsy 'family' it has been lovely to make new friends. We are all so different, come from different houses and yet we are all one crafting family. So this page is dedicated to all of you.


Step 12. Now to make some houses. The centre houses will be the largest, they will be joined so fold your card in half, and mark out your house shapes. Add a tab at the edges, a good inch and a half big. These tabs will be glued to the page, and will hold your houses in a 'pop up' state, so make them a decent size, tiny tabs will not work.


Step 13, Mark out where the roof will be and then use Fresco Paints to colour the wall areas.
 

Step 14, Cover the roof area with strips of your painted tape. Then turn the houses over and trim away the excess tape.


Step 15, Make 2 smaller houses. These do not need flaps as they will be glued flat to the page. Paint the wall areas, and add painted tape to the roof areas in the same way as the bigger houses. Use a punch to create window holes.


Step 16. Now to make our family. Get out all your stamps and look at them, really,really examine them. Don't see the images...look for shapes..

Anything rectangular or triangle can be a body, anything round can be a head, look for shapes that can be hats...anything long and in a strip can be arms and legs. You might have faces or full figures, they can be used too.


These are the figures that I made. I stamped everything onto scrap paper and cut out what I needed. I played with the arrangement and then taped them together.


Step 17. Now recreate your figures on fabric. This can be a bit tricky, it's definitely a challenge. But using scrap paper to mask off areas it is possible to build up your figures so you only have the bits that you want and it is all on one piece of fabric. I ironed my figures onto interfacing, doodled a faux stitch around the edges and cut them out.


Step18. The large figures are glue to the large houses, their arms extend over the fold between the houses, and are glued together, so it looks like they are holding hands.. The tabs of the houses are then glued to the page. Keep the fold of the houses in line with the centre of the book, so that when you close the journal the houses will also fold up.


The smaller figures go on the smaller houses.. glue a house to either side of the centre large houses.


Step 19. I took some book pages, swiped on some Fresco Paint, and then drew out my title in black pen, adding a little white gelly pen to highlight. I then cut some of my PaperArtsy packaging into ticket shapes. The title is glued to the page, and the tickets are stapled to the edges.
 

The title reflects how even though this family is made up of different parts, just like my figures, we are still kindred spirits.

  Here it is all finished.


Over to you... create a pop up centre to a journal page, or just create figures from bits of stamps on a tag, have a go at masking off a coloured area and painting the rest black... try using your old baby wipes. … Hope this has inspired you to play..


Leandra Says: So many wonderful ideas. I love the treasure gold on the black edges and texture...looks so much fun!

Gillian Says: Great Art Journalling Darcy, enjoyed the step by step process as I;m completely rubbish at journalling. Perfect quote to for the "PA family".

Tuesday, 25 June 2013

Darcy Wilkinson #3 Tissue Tape Part 2 ....

Tissue Tape Storage Continued ....

"How did you like the tapes from yesterday, did you make some? I bet you now have colourful spools rolling all over the place, so lets make a storage box for them".


I took a delivery box and removed one side. I then cut some really stiff card and glued it to the insides to strengthen the box sides.


Now to decorate it. My inspiration comes from the old boxes and crates that you might find in an old shed. They are a bit grungy and have paint rings on them and old labels. So this is what I set about recreating.

I laid out 4 pieces of paper, dabbed on some French Roast and Taupe.


used a scrapper to drag the paint across the paper. My scrapers are metal, but an old credit card will work just the same.


I then used a brayer to add some Stone Fresco Paint. When brayering on a layer of paint it is very important that the previous layer is completely dry, other wise the brayer will lift off the paint and the surface of the paper too.


Next I got to play with a new tool. I wanted speckles of paint, and in the past I have used 2 old toothbrushes to create the effect. I recently saw this Speckling Brush, and ordered one to try. OMG so much splattery fun was had. I 'speckled' with Snowflake Mermaid and Bora Bora.


Next I added some stripes of French Roast. I painted a wide layer, then wiped it back with a baby wipe, then painted a skinny line on top in the middle. This gives us the effect of gaps between the slats of the crate.

  
I then added paint rings using Baltic Blue and Squid Ink, using a lid from an old jar.


I just love this shabby look.


I used my painted sheets to cover the inside and outside of the box. Then as there were a few strips left over, I decided to make a smaller box and cover that too.


This smaller box, which is to become a drawer... needs a handle.

I took an old drinks can, cut it open...carefully, this will have very sharp edges...


From the metal I cut a handle using PaperArtsy Die, Hardware #1


I didn't want my metal to be quite so shiny silver, so I tarnished it. The easiest way to do this is to hold it over a naked flame. Be VERY careful, use appropriate tongs to hold the metal and do not touch it with your fingers. I have a gas hob, so I switch that on and dipped the metal into the flame, literally for just 2-3 seconds.

This is the result, you can see the difference from the original colour.


I attached my handle with a couple of chunky brads.
   
Here is the covered box and drawer in place.


It needed a little something more, so I stamped some words from HPXT03 and stencilled some lines around them to make them look like old labels. I deliberately did not ink up the whole stamp as I wanted them to look faded and worn away.


I bought some lengths of wooden dowelling . Make sure you take along your spools when you buy the dowelling, it comes in different widths. My DIY store only had 6mm which was too big for the holes in the spools, but my Hobby shop had some 4mm dowels. I also bought some end pieces.

I used a baby wipe to swipe some French Roast onto the wood, this is perfect as it looks more like a wood stain than a solid colour.


To brighten things up I used Bora Bora, Inky Pool and French Roast on the end pieces. Rub on and wipe off, repeat and repeat, building up the layers.


Now to put it all together. Measure your spools, and then make holes in the sides of the box. Make sure there is enough space between each row so that the spools will turn freely.


Make sure your rods have an extra bit outside the box for the end pieces to go onto.

Now start to thread the spools onto the rods and push them into place. Once all your rods are in place you can glue on the blue end pieces.


Use the drawer for leftover bits of tape that are too short to go on spools, or keep your bought tapes in there.


Here we are all done. You can have the box free standing or fix it to a wall. As it is only cardboard you cannot attach screws to it, but it will hang very effectively if you use 'no more nails' adhesive.


Over to you, I hope you feel inspired to make a box of pretty tapes to use on all your other projects.

Why not get together with friends and swap lengths of decorated tape to increase your stash. Don't forget, if you want to join in with any of my challenges, simply click HERE to upload your projects.


Leandra Says: That is too funny! I want one on my wall, gotta get an elf to do this for PA HQ ASAP! We might have an elf tape competition. LOL This idea could be adapted to all sorts!

Gillian Says: Darcy you rock .... this is such a genius idea. Visually it looks stunning and would grace any craft space. Love it.