Showing posts with label 2019 Topic 16. Show all posts

Monday, 21 October 2019

2019 #16 Stamp Carving: NEW Frescos!! {by Lotte Kristensen}

2019 Topic 16: Stamp Carving


Lotte's hand carved image looks amazing with the stencilled gel plate pulled image. Her sore hands as a result of creating the carving were definitely worth the effort. She's waxing lyrical about some of the lovely new Fresco Finish Acrylic 
colours, but why not?- they are pretty delicious!

Hey everyone, Lotte here - I've had THE best time playing with the new Fresco Finish Acrylic Paints - all those new blues and blue-greens, coupled with some neutral shades - they are just a joy to work with!  Because Frescos are such a brilliant quality, they can be used for actual painting, as well as stamping, but I also love using them for gelli printing because of the chalky finish, as this is much less sticky than normal acrylic paints.  So for this project, I've used them for all of these methods!  To aid transparency, I used a couple of drops of paint retarder mixed in with the Frescos when gelli printing, this also gives you a little bit more time to pull the prints before the paint dries.  I also tried my hand at both stamp carving and stencil cutting - I liked making up the pattern, but soon realised why it's so much easier buying these - it took me a good half day each for both, and my hand was really sore afterwards - poor me, right??!  

As these paints are all so new, go to your usual PaperArtsy retailer to get them:


So, I started off with a piece of Regular Smoothy A4 Cardstock and first added a stencilled layer of paint in Sand (mixed with a bit of Fresco Finish Paint Drying Retarder), then in Truffle.  My gelli plate was a bit 'dirty' with some previously used blue paints, which just all adds to the scrumptious effect:


Then I stamped my carving in Fresco Finish Aquamarine - this is definitely my new favourite colour!  This time, I didn't thin the colour, just brayered it out and put stamp on top:


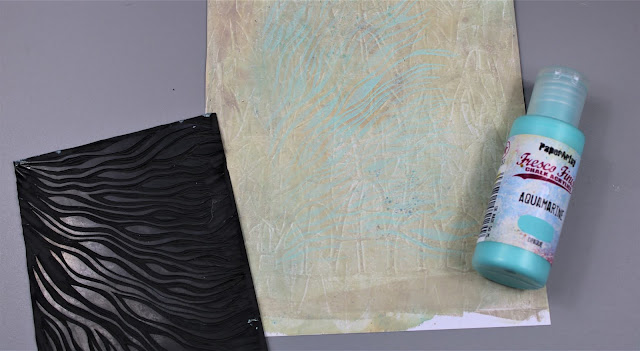
Then I got the stencil out again, and added some dabs through it randomly using Fresco Finish Cerulean - apologies for having a pic of Aquamarine, the rubber gremlins clearly got into my kit!!


Then back to my carving which I stamped in Versafine Onyx Black ink pad:


The pattern is based on the inside of a mushroom, and I added some Truffle along the lines to give more shading and detail:


And a wee close up to show those beautiful Fresco shades:


So, Fresco Finish Paints - yeah, I'm just a total fangirl, and could wax lyrical for a looooong time about all the reasons why I adore them so much!! - the quality, the range of colours, the lack of stickiness (which is particularly good when you use the paints in art journals) - and they last SO long as well!   They are definitely among my most favourite supplies, a really great investment for all the reasons mentioned above.  Okay...…... I'll stop now before I embarrass myself any further.... :D

Until next time!

Lotte x

Instagram: Alice Overground

Sunday, 20 October 2019

2019 #16 Stamp Carving: Triple Anomaly {by Bryan Evans}

2019 Topic 16: Stamp Carving


It's great learning about different products for carving into, but Bryan's is surely the most original (I'm definitely stealing his idea!). He's got three fab projects encompassing different substrates with some gorgeous new Fresco colours.

Hi everyone, it's Bryan here from geezercrafter with you today, and I'd like to share with you  my projects using some carved stamps. I wanted to make some simple but bold stamps that I could use with some of the new colours in the Fresco Acrylic Paint range.


My carved stamps come from an old rubber wellington boot that we use as a door stop!! I kept the design simple as I wanted to highlight the new Fresco colours.


Using the PaperArtsy brayer onto some Smoothy Heavyweight stamping card, I made some marks and patterns with Calypso Fresco Acrylic Paint. I added Cloud 9 and Truffle to get some different shades.


I added a watery mix of Truffle before using my stamps with Cayenne. I tried to make each 'stamp' a different shade by adding Cloud 9 and Truffle to Calypso.


In my large Mixed Media Journal, I made a background using Calypso and Cayenne. My intention was to use the brayer to both add paint to my stamp, and to stamp onto the background. I noticed the pattern left on the brayer, so decided to use this instead.


I continued alternating between Calypso, Cayenne and Truffle. Love the effect of the translucency and opaque effect of each colour.


I have wanted to make a fabric journal for some time now. On a piece of fine weave hessian, I mapped out a design stamping with Cloud 9. The Fresco's are a dream onto this fabric.


I continued adding layers of Cayenne and Calypso; very pleased with the result.


I had a lot of fun with these 3 projects, making shades and tints, and trying out new substrates. I am looking forward to trying some more of the new range of colours to add to my fabric journal. Don't forget to add your creations to the PaperArtsy Facebook page and to Instagram.

Thank you for joining me today, happy creating!!

Blog: www.geezercrafter.blogspot.com 
Instagram: bryanevans7772

Saturday, 19 October 2019

2019 #16 Stamp Carving: Art Journaling with EGL {by Kate Yetter}

2019 Topic 16: Stamp Carving


What does sari fabric, washi tape, fabric scraps and a stamp have to do with a teabag?! Kate has tried lots of techniques and produced an awesome art journal page that incorporates a charming carved stamp!

Hi everyone, it's Kate with you today, and I'd like to share with you an art journal page using my hand carved stamps.

This year, I have made it a goal to improve my stamp carving technique. I have never taken a class but I read several books and watched a lot of videos to learn where to start. With each stamp I have carved, I've learned what not to do, especially when it comes to more intricate images. Today, I am working with a lotus that I specifically carved for this post as well as a few other stamps that I carved within the past few months.


I am not going to lie, I struggled with this project. I haven't had a lot of time to be creative recently and it was a struggle to get the juices flowing. But I worked through the frustration and eventually ended up with something I liked.


Here is the sketch I created for my stamp.


During the carving process, I stamped the image several times to see where I needed to shave off more rubber with my carving tool. I did this until I was pleased with the image.


I spread some Grunge Paste and then stamped into it with a background stamp.


Gold embossing is one of my favorite accents so of course I used it with these stamped medallions.


I really wanted a pocket on this page so I tore some tissue paper and then added washi tape and doodling on top.


I painted some teabags with the intention of embellishing them for the pocket.


l added some Infusions to the background. At this point, I was very disappointed with the way the page looked so I decided to layer some stencils.


I starting the layering process using several Fresco Finish Chalk Paints.


More stenciling and a border was added in gold.


Here are all the hand carved stamps I used.


A teabag embellished with sari fabric, washi tape, fabric scraps and a stamp.


Another teabag for the pocket.


I always love seeing one of my sketches come to life in a stamp that I carved with my own hands. If you have never given it a try you should! There are so many free resources to help you get started. And remember, you might not like your first stamp but don't give up. It can only get better.

Until next time,
Kate

Blog: https://kateyetter.com/
Facebook: https://www.facebook.com/katesscrapyard/

Friday, 18 October 2019

2019 #16 Stamp Carving: Stamping on a Gel Plate with EGL {by Nikki Acton}

2019 Topic 16: Stamp Carving

PaperArtsy EGL01 - Stamping on Gel Plate

Using her gel plate and some inspired 'stamp-carved'-like images from Gwen Lafleur's wonderful new stamps, Nikki has created some art with depth that doesn't look like its just a monoprint. Lovely subtractive techniques make the pieces look like they've got real carvings incorporated.

Hi everyone, it's Nikki with you today from Addicted to Art. I am excited to be using stamps from PaperArtsy's newest designer today, Gwen Lafleur. I have been a huge fan of her work for a while and love these stamps.

I am using set 1 today, EGL01 which Gwen calls her 'Medallions' set. These hand drawn stamps have a hand carved vibe about them (not surprising, Gwen also carves her own stamps). Still being a little obsessed with gel printing currently I decided to combine her images with some mono printing.

PaperArtsy EGL01 - Stamping on Gel Plate

There are three layers to these cards which all feature the repeated motifs of the medallions on EGL01.


PaperArtsy EGL01 - Stamping on Gel Plate

The background, mostly hidden, is a gel print where the paint has been removed. I have brayered paint over the plate and then repeatedly stamped onto the plate, removing the paint off the stamp each time.

For the cut out medallions I have stamped over the same background - in this case in Cobalt Archival ink. 

On the middle layer I stamped the same image a couple of times onto my Smoothy cardstock - in Majestic Violet Archival.

PaperArtsy EGL01 - Stamping on Gel Plate

I love how the removed paint gives this wonderful subtle effect of the stamped image. My current favourite colours on this one; Byzantium, Midnight and Professor Plum.

PaperArtsy EGL01 - Stamping on Gel Plate plus EAB14

The wonderful words are from Alison Bomber's new stamp set - EAB14 - The Happiness Editon.


PaperArtsy EGL01 - Stamping on Gel Plate
 

I repeated the process using a different set of colours - Professor Plum, Autumn Fire and Red Lipstick. This time instead of taking my print as soon as I had finished stamping off the plate, I waited until the paint was dry. I then added a thin layer of Butter Fresco Acrylic and took my print. The wet layer brings most of the dry paint with it - but gives a slightly different effect to the first card. (The darker colour you might see is some Midnight left on the plate from the first print - but this just adds to the background.)

PaperArtsy EGL01 - Stamping on Gel Plate

The medallions were stamped in Black Archival and Orange Blossom. The birthday greeting is PaperArtsy Eclectica³ Mini 18.


Do get your gel plate out and have a go! These images stamp so beautifully they are wonderful for this technique. (Do clean your stamps quickly afterwards though - it's a lot easier to do this while the paint is wet.) I am looking forward to collaging lots of these medallions stamped on different coloured gel prints possibly onto a canvas or board. I also have several stamped which are providing wonderful colouring in playtime!

Thanks for joining me today, I hope you have a creative week.

Nikki x


Instagram: @Nikki_Act
Pinterest: nikacton
YouTube