Hi everyone! It's Autumn Clark from SewPaperPaint here with you today. Summer days are passing by quickly for me, as I'm sure you can relate. The current topic, Ink Pads, had me thinking of quick and easy ways to stay creative during the busy summer months.
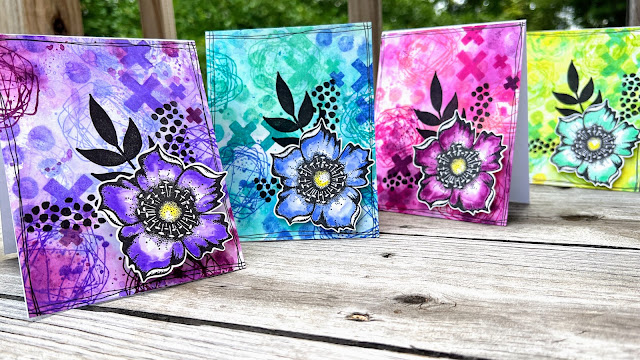
Creating simple stamped projects with ink pads has always been a favorite way for me to play. Getting inky just suits my need to make a mess and be expressive with color. I created a series of cards to give for birthdays and hope they inspire you to get inky too!

I really enjoyed working on these fun backgrounds and love how beautifully these stamps work together for such fun patterns. The bold flowers and punch of black really makes the finished cards pop, something that is especially fun for birthdays.

It took me a while to decide on a set of stamps, as Tracy Scott has so many wonderful background sets that would work perfectly with this project. For my backgrounds I went with the gorgeous PaperArtsy stamp set 25 by Tracy Scott (TS025). I would highly recommend trying stamp sets TS041 and TS085 for similar backgrounds if you have a chance! EM58 has been re-coded now that Tracy is on her own index sheets as TSM02, and EM64 as TSM08

Next, I poured over my Distress Ink Pads to choose three analogous colors in four colorways. I was hoping to both inspire you in your favorite colors AND to give you several options if you have a limited selection of ink pads. I hope you like the palettes I picked: Saltwater Taffy, Picked Raspberry and Seedless Preserves. Squeezed Lemonade, Twisted Citron and Cracked Pistachio. Cracked Pistachio, Peacock Feathers and Blueprint Sketch. And finally, Shaded Lilac, Wilted Violet and Seedless Preserves.
You'll notice I tried to overlap color choices where possible. When using water based inks in this way, it's usually best to pick colors near to each other on the color wheel to avoid making muds when the colors mix. I cut my four card panels from an 8.5x11" piece of Bristol cardstock so I would end up with four finished creations.
The process for each card follows the same process. First I tapped the lightest color twice and parts of the two darker colors once, all right next to each other onto my kraft mat. I spritzed them with water a few mists, then dipped the panel into the colors.
While the panel was wet, I grabbed Tracy's mini stamp 08 (TM08 - formerly EM64) and inked it with two colors at a time repeatedly stamping all over the panel so the wet on wet ink would smear. If it dried too fast, I spritzed it with more water to encourage the ink to bleed.
It would have been really simple to do an entire sheet of card with one color as a masterboard, and then cut into four panels after. If that is easier for you, then go for it!
I loved this look right away, but added some additional stamping. I stamped the crosses and scribble circles over in solid inks without the bleeding technique.

Once my inky backgrounds were dry, I overstamped the leaves and added some dots from Tracy's mini stamp 02 (TSM02 - formerly EM58).
Next, I stamped our the smaller flowers and used my Distress Inks to color them. I cut them with a small white border to give them a small frame and pop of white.
I used Seedless Preserves for the pink card, Cracked Pistachio for the yellow, Blueprint Sketch for the blue and Wilted Violet for the purple.
This stash building project was loads of fun and I hope the various colorways inspire you.
The fun part will be picking a color to give specific friends throughout the coming months on their special day. As we wrap up the Ink Pad Topic, I hope you're encourages with the plethora of ideas for your next stamping project. Happy inking, Autumn
Blog: SewPaperPaint
YouTube: SewPaperPaint
Facebook: Autumn Clark
Instagram: @sewpaperpaint
Pinterest: SewPaperPaint


.jpg)
No comments:
Post a Comment