Today I will use the
third piece of fabric from the first day to make something quite different. The
frame is from a well known Swedish shop, it has a very deep centre for the picture. I painted this initially with Nougat to start with but things changed as the project went along. I find that
it is best to paint one coat of paint onto wood surfaces, dry and sand well before a second coat. This results in a nice smooth surface. I carefully cut out the centre of the fabric panel and adhered the panel to the
front of the frame with book binding glue and trimmed away any excess fabric.
I then started
painting the fabric using Mermaid. Next I painted random areas being
careful not to paint over the stamped lines.
I then mixed Honey Dew and Hey Pesto to paint other areas.
I then used yellow and orange mixed with a little Matte Glaze (to thin the
colour and make it more transparent ). These colours can be painted over
stamped lines because of their transparency. I have included a picture of my
paint swatch showing the colours that I used .
The next colours are
Blood Orange and Eggplant. I kept adding
colours randomly, blending them together until I liked the result. There are
areas that are not painted where I have
stamped cards etc. from HP1212.

Next the face fromLPC013 was stamped onto white card. The background was painted using
Mermaid and a very light wash of colour
was painted onto her face.
I started adding
colours from my colour palette around the face starting with yellow on the
right and working through orange, red and purple round to the left.
I added a wash of
yellow to the adornments around her head and then some orange. I then stuck on
some pearls and sparkles.
I realised that the
cream paint did not add to the design and painted the sides and the centre
aperture with Mermaid. I had a piece of tape with jewels attached which I also
painted with Mermaid. When dry it was stuck to the top of the aperture.
I added some black
lace to the bottom of the picture and trimmed it to the size of the aperture.
Using three layers of foam board on the
back of the picture brought it forward in the frame where it was stuck in place.
I came across this very large
button in my stash which I painted with Mermaid. The surface of the button is
concave {rather difficult to stamp}, so I stamped on tissue paper and adhered
this to the button with matt medium.
 I washed some off the
red paint around the edge and then some orange then added a little White Fire Treasure Gold. I took an artificial flower
and pulled it apart. Next I washed a little Blood Orange around the edge of
the petals (later I felt that there was too much pink and washed some of the Orange colour on as well ). Using some spider fabric I cut some pieces about 2
inches by 4 inches, cut around the top to curve it like a petal and tied nearer
the bottom with thread to gather the fabric. I then stuck the flower petals
onto the back of the button and then added the spider petals trimming as needed
.
I washed some off the
red paint around the edge and then some orange then added a little White Fire Treasure Gold. I took an artificial flower
and pulled it apart. Next I washed a little Blood Orange around the edge of
the petals (later I felt that there was too much pink and washed some of the Orange colour on as well ). Using some spider fabric I cut some pieces about 2
inches by 4 inches, cut around the top to curve it like a petal and tied nearer
the bottom with thread to gather the fabric. I then stuck the flower petals
onto the back of the button and then added the spider petals trimming as needed
.
The mannequin is cut
from card using a Tim Holtz die which I then embossed. I painted it using Little Black Dress, then rubbed Treasure Gold over the raised areas. Next I
made the skirt from spider fabric which
was tied with thread as shown to gather it. I painted some of the remaining
petals from the flower as before and stuck both pieces onto the mannequin.
The sides of the frame
were painted using colours from the palette which were swiped over using cut
and dry foam. I started with red then purple. I then went back using a little Mermaid and then a little White Fire Treasure Gold. I realised that without
some orange this looked odd and so I
added a little orange .
To finish I added some
lace to the frame which I had painted with White Fire Treasure Gold, and other metal embellishments also coloured
with white fir and then aquamarine treasure gold. I added some little flowers, faux pearls and beads to finish the project.
 This takes us to the little plaque from
yesterday which was stuck onto some Greyboard and painted as above. The edges
are painted with a mix of Claret and Eggplant. The little sign I wrote myself
and a few embellishments were added .
This takes us to the little plaque from
yesterday which was stuck onto some Greyboard and painted as above. The edges
are painted with a mix of Claret and Eggplant. The little sign I wrote myself
and a few embellishments were added .
That’s all for now –
see you next month .
Leandra Says: What a wonderful 1st week of projects Liz, it has been a pleasure to see you share them with us. This project depicts your style beautifully. Love it!
Gillian Says: Oooo this is beautiful Liz, love the addition of the warmer colours, really bring the project alive. One of my fav LP images too. Treasure Gold embellies add that real finishing detail.


 I washed some off the
red paint around the edge and then some orange then added a little White Fire Treasure Gold. I took an artificial flower
and pulled it apart. Next I washed a little Blood Orange around the edge of
the petals (later I felt that there was too much pink and washed some of the Orange colour on as well ). Using some spider fabric I cut some pieces about 2
inches by 4 inches, cut around the top to curve it like a petal and tied nearer
the bottom with thread to gather the fabric. I then stuck the flower petals
onto the back of the button and then added the spider petals trimming as needed
.
I washed some off the
red paint around the edge and then some orange then added a little White Fire Treasure Gold. I took an artificial flower
and pulled it apart. Next I washed a little Blood Orange around the edge of
the petals (later I felt that there was too much pink and washed some of the Orange colour on as well ). Using some spider fabric I cut some pieces about 2
inches by 4 inches, cut around the top to curve it like a petal and tied nearer
the bottom with thread to gather the fabric. I then stuck the flower petals
onto the back of the button and then added the spider petals trimming as needed
. 


 This takes us to the little plaque from
yesterday which was stuck onto some Greyboard and painted as above. The edges
are painted with a mix of Claret and Eggplant. The little sign I wrote myself
and a few embellishments were added .
This takes us to the little plaque from
yesterday which was stuck onto some Greyboard and painted as above. The edges
are painted with a mix of Claret and Eggplant. The little sign I wrote myself
and a few embellishments were added .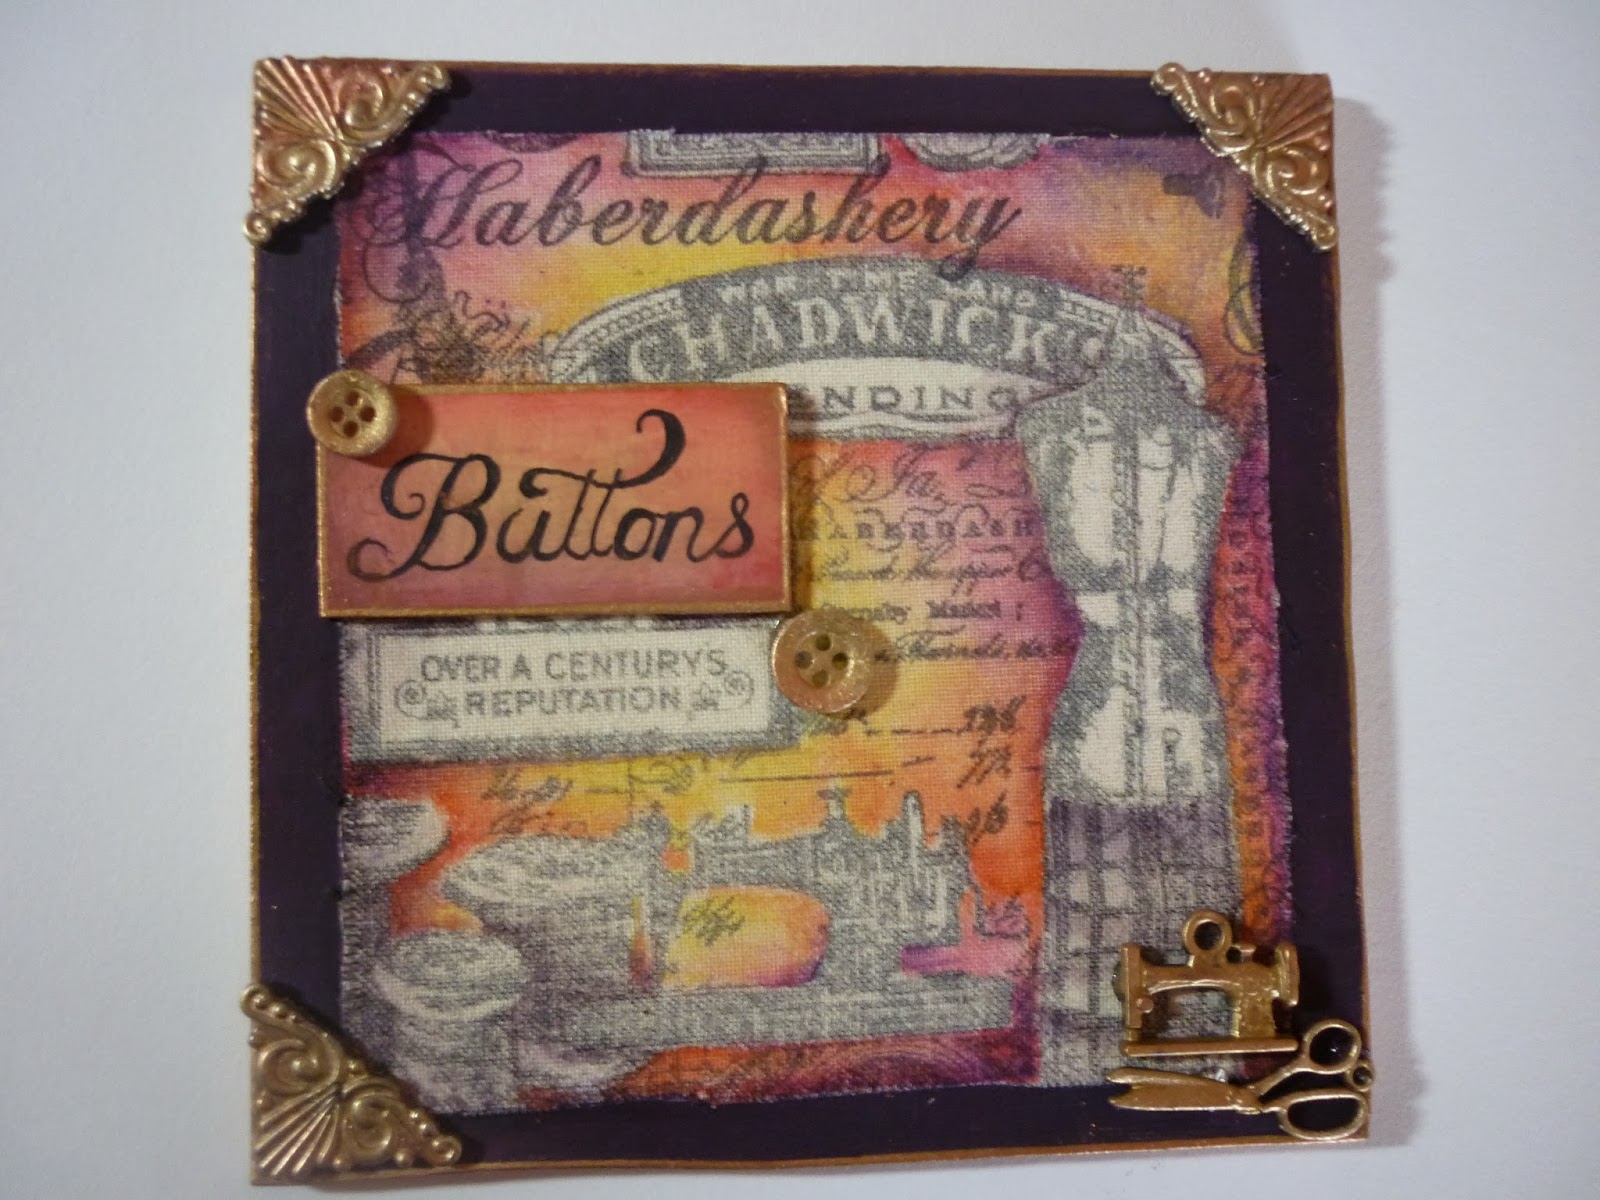


27 comments:
This is absolutely beautiful Liz, I love it!! The mannekin looks stunning, against the frame.
It's gorgeous and so elaborate!
B E A U T I F U L project!!! Stunning colours and full of texture and lots of interest. Wonderful, thanks Liz:-)
Another gorgeous project Liz. You have such a good eye for colour and your attention to detail is amazing.I love the fact that you have used fabric in all your projects this week......girl after my own heart.
Lin
Wow this is absolutely stunning. I'm blown away xx
Stunning! That's proper gorgeous hunni. I love it! xx
This is so gorgeous. I love the painting on the Lynn Perrella image, beautifully done. The embellishments are so rich and the fabric looks fantastic: a wonderful project executed with so much care and attention to detail. Julie Ann xx
Lovely projects! x
Wow!!!! No wonder they pay you the big bucks!!
sandy
Gorgeous and great work!!!bizz
Now that is gorgeous!!
Absolutely gorgeous in every way. So textural and gorgeous colours,
Lucy x
Yum yum what a fab idea, I think I have one if these frames somewhere .......
This has to be my fave love it. What embossing folder did you use on the mannequin?
Happy craftin
Rebecca
Oh wow! Such a gorgeous project! Inspiring!
Michelle
Stunning project - the detail is just beautiful!!
Oh WOW!! And I love to see how the paints work delicious on the fabric. The finished piece is amazing!
Oh Em Gee! This is so me! I love it.
Hugs, Neet xx
Goodness, these are so beautiful, I am in complete awe over your projects this week Liz.
Absolutely stunning!!
Just found this lovely blog via Sara's link over @ www.cardmakingparadise.com
I'm so glad I checked it out as what she says,
"The PaperArtsy blog is becoming a wonderful showcase of talented people. Take a look at this - there is lots of inspiration in this piece!", is soooo true.
This project is absolutely gorgeous.
Thanks for sharing the wonderful photos, tips and inspiration.
Susanne
Absolutely beautiful Liz ! Sue C x
another lovely project to round of an innovative and thoroughly fascinating week. thanks Liz.
STUNNING!!!!! This is such an inspirational piece. Thanks you so much for all the detailed descriptions on how you achieved this fabulous creation. The colours you have worked with are superb and all the added detailing......well I am in awe!!!
Love the stamps you have used and can't wait to have a little go at something similar....on a smaller scale at first. thanks again for this wonderful showcase.
Carol xx
Absolutely stunning. Fantastically gorgeous. Well done on such a beautiful creation. Just love it.
That frame is truly beautiful. Such a gorgeous piece of art.
Thanks for the detailed instructions and all the photos.
Wow wow wow another truly awesome creation. I can't wait to play next month :-) Kezzy xxx
Post a Comment