
 |
| by Lin Brown |
 |
| by Leandra Franich |
 |
| by Leandra Franich |
12 x 12 papers were now far more commonly used by stampers as are Journals, canvases and so forth. So it seemed to make sense to enlarge some of the Ink and the Dog designs to suit 'bigger' creative options. Vintage Ink and the Dog with a vast back catalogue to draw on filled that opportunity perfectly.
The images are still in very much in vogue today, as the Vintage category has certainly had 'legs' for the last 10 years, and is considered a mainstream style in 2013 I think every year for the last 10 years I have read in numerous crafty trade publications and magazines that 'Vintage' is the new 'trend'. For me, Vintage is a genre that has historically, and always will be here, it is certainly not a 'new, emerging trend'. More like the magazine editors are the new kids on the block who haven't actually read their own title's 'emerging trend' statements year on year for the last 10! LOL
Within our Vintage Collection there are currently 10 different A5 plates available both un-mounted £15.50 (incl 20% sales tax) or EZ mounted (£20.50 incl 20% sales tax).
 |
| by Leandra Franich |
 |
| by Lin Brown |
So who is up tonight? Another fabulous bunch of #PATwits of course!
Who: Jacqui's Crafts
Twitter: @jax1369

Jax Says: I am originally from
Lancashire (God’s own county) but now live in the outback that is known as
County Durham with the current Mr Hall. I started out my crafting career making cards
from kits and progressed to rubber stamping about 4 years ago. I enjoy anything messy and since discovering
the #PATwits about a year ago have seen my style in altered art develop, and I
am happiest when elbow deep in ink, pan pastel and paint.

The Challenge: I started
by basing the frame with Cinnamon Fresco Finish and left that to
dry. I then over laid the Cinnamon with
Blood Orange to give a Mahogany style finish, and dry brushed lightly with Aquamarine
Treasure Gold.

I stamped my focal image, which I can honestly say is one of my
favourite images, but it was a tad too big for the canvas, hence it’s off-set. I stamped it in Onyx Black Versafine and left it
to dry. At this point I ran out of
steam and drying was about 4 days J.
When I came
back to it I had watched a PaperArtsy Tutorial on Translucent paint, so I
thought I would put it to the test, I used a single dot of Beach Hut and some
spritzed water to create a wash, I wanted to make the “Gent” stand proud of the
main image so I traced around his outline with the wash and then backfilled to
the edge of the card I had stamped the image onto.
Then using Bora Bora
I base-coated the canvas. I used the watches and the text from ID09 in SepiaVersafine to give a “feel” of it being dedicated/commemorative, and dry brushed
it again with Aquamarine Treasure Gold (again a personal favourite). I then
plaited the ribbon and attached the Token to look as though it was a medal.

I
used a touch of vintage photo distress ink to “take down” the whiteness of the
stripe in one of the ribbons. Attached
the ribbon plait to the back of the canvas and glued the “medal” to the
front.
Jax
Who: Jacqui Chimes
Twitter: @Jacqui1906
 |
| Vintage Collection 05EZ |
Jacqui says: I live in Warwickshire and have been ‘making things’ as far back as I can remember (a long time!). Stamping, Paper-crafting and Scrapping (in the form of mini albums) have been my main love for about 15 years. My style generally is quite ‘neat and ordered’ and not too ‘frilly’. This challenge threw me a little outside my comfort zone but was fun.

The Challenge: My pack included a hanging Icon, the stamp set, a bunch of small blueish paper roses, 3 wooden scalloped circles, and a silver bird charm.
The Icon was covered with a patterned paper and washed with Vintage Lace Fresco. I used my own stencil and Snowflake paint for another layer, then with a baby wipe sparingly added Mermaid, Beach Hut, Claret and Pumpkin Soup.
Next Grunge Paste was added through another stencil in 2 places. Once dry more paint was added, and I stencilled through some sequin waste with Claret and Beach Hut. Lastly AquamarineTreasure Gold was added on top of the Grunge Paste and around the edges of the Icon.

I also used a PaperArtsy Mini 61 and Versafine black ink to stamp a little text randomly over the piece. (A Lin Brown inspired method to this point).
The house was stamped with
Versafine Black onto Smoothy stamping card and cut out. I layered it twice more
with card to give a solid chipboard feel. The house was stamped again onto
patterned papers and was paper pieced as shown.
I used Glossy Accents to fill in the top central ‘square’ and when dry added
Black Diamond Stickles to the ‘spade’ symbol. The Mystery section was
re-stamped, cut out 3 times and layered up and then covered in Glossy Accents I
used my own brads each end and then glued it on the top.
The ticket from the stamp set was stamped and cut out 3 times, layered and
glued along the bottom of the icon. I added the house and then painted the
silver bird charm with beach hut and added Aquamarine Treasure Gold over it
with a few tiny touches of Claret and Pumpkin Soup paint.
Two of the wooden
‘flowers’ were painted with the paints to match the background and stamped with
another stamp from the set as shown. These were placed at the top right of the
piece (I had smudged a bit of the text stamping and needed to cover it up!).
The blue flowers were tinged with Treasure Gold and then glued in place along
with three claret coloured smaller flowers from my own stash.

Who: Massofhair
Twitter: @massofhair
stamps Massofhair used:
 |
| Vintage Collection 07EZ |
Massofhair says: I have been crafting for most of my life but took it up
seriously after I took ill in 1998. I don’t yet know what my style as I enjoy so
many different ways to craft. My first love is rubber stamping, but over the
last two years have taken a keen interest in using a Janome Embellisher, needle
felting both wet and dry, jewellery making and sewing (very basic sewing). Also
love to upcycle and re-use where I can.

The Challenge: For the Memo Board Base I took a piece of old pine shelving I had in my back yard, sanded it down using a hand held electronic sander, dusted. I painted 3 layers of metallic paint, leaving to dry for 60 minutes before adding the next layer. When this had dried for 24 hours I sprayed Blackboard Paint over the top. This created a metallic/blackboard base for the Memo Board.
At the bottom I added 3 hooks to hang the magnets when not in use. I painted the hooks using Bora Bora Fresco Paint, added a strip of handmade washi tape.

For the stamped feature panel (top) I added Grunge Paste and Puff Paint through a stencil. I used Bora Bora, Mud Splat and Smoked Paprika Fresco Paints to create background colour. I used London Bus and Hey Pesto to colour the textured flowers and accented with Ruby Treasure Gold.
Next I stamped the images onto Shrink Plastic and onto PaperArtsy Heavyweight Smoothy Card using Versafine Ink Pad, cut them all out. Punched holes in the shrink, then shrunk, added magnets. I coloured the smoothy stamped images with Fresco Paints and then added Satin Glaze to seal them, used red tape to attach to the grey board substrate I also added magnets to the backs, and a fine dusting of White Fire and Onyxite Treasure Gold.
When the Memo Board was finished I realised there was something missing, I needed a chalk holder. With the left over grey board I fashioned a small box, adding a little piece at the end as a stopper so the chalk wouldn’t fall out (as below). Added 4 magnets to the back and now the Memo Board is complete.

Hope you like the project it has been quite a challenge :)
Who: Hazel Agnew
Twitter: @craftroomgran
blog:
Stamps Hazel used:
blog:
Stamps Hazel used:


Hazel says: I am a recently retired primary school teacher specialising in Art and Music. Always dabbled in arts; on retirement started card-making. My style is experimental, the messier the better. Still a newbie.
Onto some crumpled tinfoil, I added Fresco Paint and Treasure Gold (see closeup shot).

I stamped two main feature stamps on white card, distressed edges, and sprayed Perfect Pearls Heirloom Gold to tone down.
I used calico fabric to make a 'roller towel' effect to fit through the frame. It was painted with Fresco mermaid and vintage lace. Over stamped with the sentiments from the stamp set, and MN48 ,aged with distress inks and sprayed with heirloom gold.
I Grunge Pasted plywood frame with butterfly and flowers, then crackle glazed finish with Toad Hall fresco on top, mermaid underneath.
Lastly I stitched the calico in place
I'm quite pleased with overall effect but probably is a bit too fussy!!
Who: Kirsten Sheridan
Twitter: @IsisArts

Kirsten Says: Hello, my name is Kirsten, I’m originally from Dublin, Ireland, but have been living in Kent, UK, for a number of years. I’m a big fan of the arts in general, with a special interest in theatre. I can spend hours wandering around museums and art galleries or with my head in a book – when I’m not in my craft room, that is! I’m never sure how to describe my style of crafting, or even if I have one, but as I’m hopeless at being precise, or tidy, I suppose it falls into the messy, grungy, distressed category. I love unusual images and lots of textures, so PaperArtsy products are perfect for me.

The Challenge: When I saw the items Leandra sent me for the #3UP challenge I remembered her mentioning that her first love was sewing so I decided I would make something in honour of her.
I began by turning the door hanger into a clock. I painted it first with Snowflake Fresco paint, then with Beach Hut, adding a very thin layer of Crackle Glaze on top. When that was dry I over painted with Claret.
The main image was stamped onto Smoothy paper with black Archival & painted with Frescos. I backed it with a piece of Crunchy paper, which I brushed with Spanish Topaz and White Fire Treasure Gold.
I used foam board for the triptych, initially covering it with a sheet of PA’s Thorndon Hall papers (now discontinued). I then decided it was too dark, so I covered it with Crackle Glaze and painted it with Ice Blue fresco. When that was dry I used Blood Orange fresco through a stencil (Roman Letters) and added the flourish stamping, and then swiped some Beach Hut with a baby wipe on top. The roof is a piece of Metal Card. I used assorted tools to add the details, painted it with Chocolate Pudding, French Roast & Little Black Dress frescos, then adding White Fire TG. When all that was done I added the shelves and the embellishments.

The outside is decorated too, you can see that on my blog. I’m on twitter and I’m always delighted to connect with a fellow #PATwits , so please feel free to add me to your following list, I shall reciprocate.
Huge thanks to Leandra and Mark for allowing me to be a part of this 10th birthday #3UP challenge, I’ve thoroughly enjoyed myself. Thank you also to them for all their hard work, dedication, inspiration & for being generally fabulous. Happy birthday PaperArtsy & here’s to the next ten years.
Who: Sarah Philpot
Twitter: @Sarahmf84
stamps Sarah used:
 |
| Vintage Collection 04EZ |
Sarah Says: Hi my name’s Sarah, I’m 29 years
old and live in Feltham in Middlesex. I absolutely adore the crafting
world and love to look at all the amazing creations done by others and
in magazines. However, I find it difficult to sit down and actually
create something so this challenge was brilliant. I’ve never used mdf
substrates before, sticking mainly to making cards so I was pretty
nervous about what to do but I’m really happy with the end result.
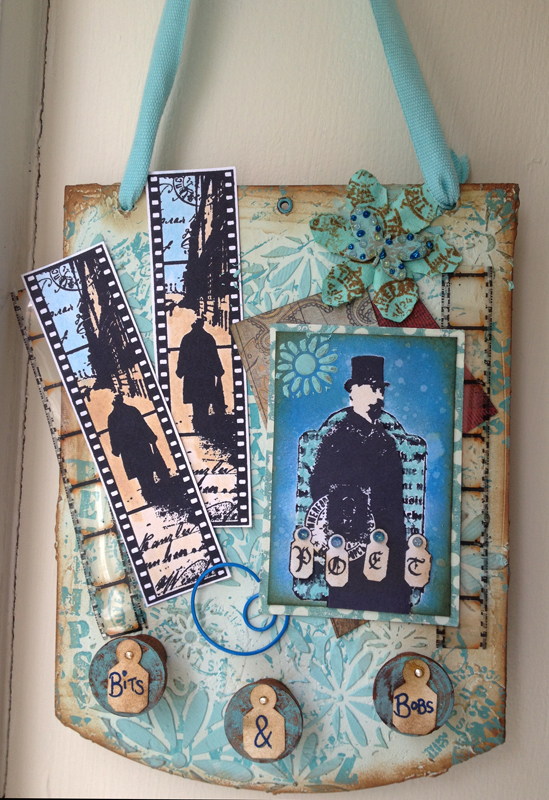
The Challenge: I firstly covered the board with Grunge Paste
mixing a bit of Bora Bora Fresco Paint into it to make a nice background
colour. Next I stamped the postmarks, letters and vintage writing from
the stamp set in Bora B too. I also
scraped some Grunge Paste through a flower stencil to add depth.
I
cut 2 cotton reels in half and inked them in Distress Ink and stuck
them to the bottom of the board. I then stamped the photo film scene
and the man onto Heavy smoothy stamping card and coloured the photo film scene with
distress inks. I then added some different coloured paper behind the man
and fixed that to the board and stuck the 2 film strips on.
I finished
with some Idea-ology film strip down the sides, stickles, a flower and a
butterfly. Lastly I put some mini tags on the cotton reels saying ‘bits and
bobs’ and went round the edges of the board with distress ink. The
ribbon threaded through the holes at the top to hang the board is
actually the handles out of a shop gift bag!

I hope you enjoy this piece
as much I loved making it.


30 comments:
WOW! how creative have all of today's #3uppers been! Four really stunning projects, which have left me speechless in admiration. Well done ladies.
an amazing collection of #3up projects. well done everyone - so many varied themes x
Another night of amazing projects... Well done to everybody.
Gorgeous make s x trace x
Lovely, lovely projects! I am in awe! Julie Ann xx
Well done to everyone else in tonight's post, some amazing projects! :-)
What fantastic projects! Love them. Well done ladies! xxx
wow!! awesome job ladies... I have a few of the stamps used....Thanks for reminding me!
Well done!
Those #3UPpers are awsome!
Wow more amazing projects from our fellow PA #3up twits.
Great to see all the different ideas everyone has come up with - awesome!!
Sam xxx
I'm very proud to be part of this group of #3UPers, wonderful projects from you all. Thanks again to Leandra & Mark for allowing me to part of the fun - and for the fab goodies too.
Wow! All great projects- I particularly love Kirsten's sewing inspired project- those details are fab!
woohoo - well done chaps. another fab collection of projects.
Fabulous again, so inspirational!!
Anita x
Oh my! These are all wonderful! Such great inspiration! Thanks so much!
Wonderful projects again tonight. Beautiful colours, and lots of details! Thank you all!
More fabby and inspiring work - well done, twits! My wish list has grown again...
PS Leandra, love how you're weaving in the history of PA through the stamps :)
Well done girls..beautiful projects again tonight!!
A-MA-ZIN well done everyone, it's all very exciting isn't it :)
Happy craftin
Rebecca
Incredible rich and varied work, well done everyone.
Wow another fantabulous set of projects, I will be getting some of this range of stamps x
What fantastic variations and inspiration here !
These are all fabulous projects, I love the sewing one the best though.
Cazzy x
fantastic projects from everyone, especially love the clock :)
Here we go again with more fabulous inspiration. Absolutely awesome projects again ladies and once again all so different.
Hugs
Lesley Xx
An awesome selection of creative pieces, well done everyone xo
Fantastic projects & inspiration! Well done everyone!
Alison xxx
Another batch of fantastic projects - well done you all!
So much creativity on show tonight, fab work folks. Loving the #3up challenge x
Glorious work all round - such fabulous projects with so much colour, detail and individuality - amazing!
Alison x
Post a Comment