
2021 Topic 12: Sustainable Crafting

Creating
your own paper might seem a step too far, but Autumn brings an
achievable project that seems simple but results in something beautiful.
Granted, you might need to carve out a little time, but isn't creating
about the cathartic process as well as the end result?
~ Keren.
~ Keren.
Hi everyone, it's Autumn Clark from SewPaperPaint with
you today, and I'm here to share with you my upcycled project making
handmade paper. As a stamper, my primary need is for paper! For this
topic I thought back to last year's lockdown when I ran out of white
card and ended up taking old scrapbook paper and using the backs for gel
printing. I thought of taking a step further now and making my own
paper using shredded paper from the endless supply at my work. I was
very pleased with my paper and have made a journal and several cards
from the stash.
I
chose this process because I could enjoy a day on my patio soaking in
the sun, as a break from creating indoors. I have been wanting to try
paper making for months, after seeing a video by Sharmane Coquilla
and her lovely Instagram reels. She made it look so easy and
satisfying and it truly is! I hope you will be tempted as well...
I
often start a project with a sketch and am always pleasantly surprised
when my finished work resembles my starter idea. My hope was to fill a
small journal with my handmade papers with its jaggedy edges showing,
coordinating with very textural cover art.
I
have recently developed a love for fountain ink pens, feather pens and
glass dipping pens. I cannot wait to try out my new collection on these
rough pages in my new journal. I always enjoy experimenting with
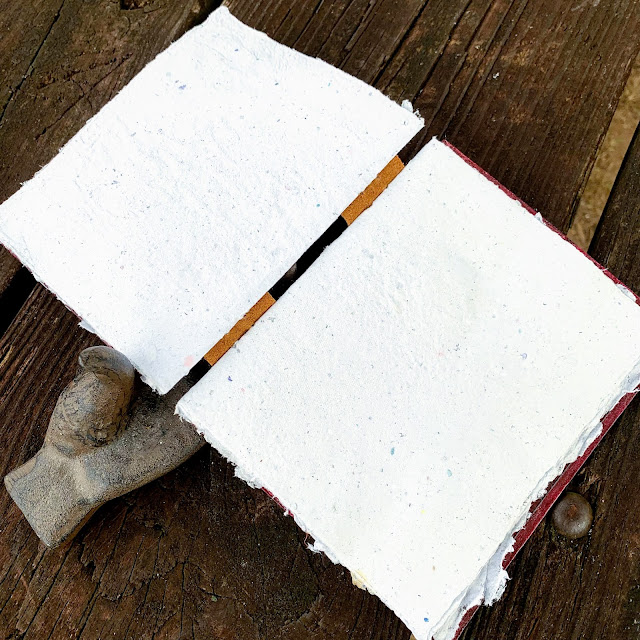
bookbinding and this version was new to me. I thought it would be neat to have an exposed signature binding to show off the textured pages.

A
while back our leather sofa broke beyond repair (think four kids
bouncing on it). I cut all of the leather portions away and have saved
them. I firmly believe reusing & repurposing is one of the most
sustainable concepts. For my book, I picked the most worn leather and
cut two strips from it to bind my journal. I folded in half each of the
five sheets of handmade paper and made a guide to poke my holes with an
awl and stitched the journal as shown.

To
make the handmade paper I simply added one very large handful of
shredded paper to my food processor, then covered it with water and
blended, adding more water half way and blending more than you would
think necessary. Next, I dumped the pulp into a plastic container of
water, larger than my paper screen. (You can make your own screen
following numerous tutorials, but I purchased a very cheap one because I
don't have the wood working tools to make one.) I submerged my screen
and lifted the pulp in an even layer. Then I transferred it to a towel
covered with an old cotton pillowcase. Then I pressed the back with a
dry rag to remove as much water as possible and lifted the screen
gently. My mistake was not considering my table surface. My dried
paper had embossed into the pattern of my trellis topped iron table!
Yikes! To remedy this, I misted the dried paper with water and pressed
it with a hot iron. Next time I will pick a flat surface and also iron
my cotton drying surface to avoid creases. But honestly, handmade paper
is supposed to look handmade, so I have no qualms over my first work.
From one batch of pulp you can get maybe 4 sheets of paper, then you
repeat the process. Nearer to the end my paper got thinner (and very
easily torn), so I learned to keep adding pulp faster.

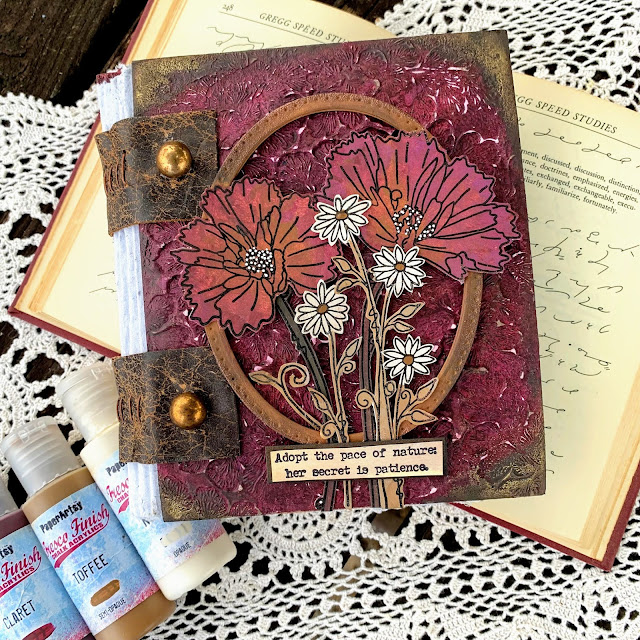
For
my covers, I slathered two thick chipboard panels, which were upcycled
from the backs of watercolor paper pads (always save those!), with PaperArtsy Grunge Paste. Because Grunge Paste is so thick, I was able to make impressions into it with stamps. I picked PaperArtsy Eclectica³ {Scrapcosy} Collection (ESC25)
because I thought the ornate leaf stamp would make an incredible repeat
pattern and work beautifully behind my chosen flower stamps. Tip:
when you apply moisture to the front of chipboard, try to apply moisture
to the back to keep it from warping (Grunge Paste front/gesso back).


I
gessoed the backs and let these panels dry for a day, then left them
under a stack of books for a day to flatten. I built layers of color
overtop by mixing one dollop of each color of PaperArtsy Fresco Finish
Chalk Acrylics with an equally sized dollop of Matte Glaze and sponging with cut and dry foam. I started with French Roast, then Claret, then Amethyst. Finally I sprinkled Black Current Infusions onto the damp panels and sponged Matte Glaze on top. You can see how much difference the Infusions make!


I used my stamp platform to stamp, then paint, then restamp the flowers from PaperArtsy Eclectica³ {Kay Carley} Collection (EKC48). I used the above mentioned PaperArtsy Fresco Chalk Acrylics with the addition of Nougat and Toffee. I chose a sentiment from PaperArtsy Eclectica³ {Alison Bomber} Collection (EAB21): The Nature Edition.


Leandra
always encourages us bloggers to share our fails, so let me say that I
made an attempt at dyeing my first lot of paper by adding a half of a
bottle of Violet Storms Infusions
to my vat of water, but it did not turn out well (it was more grey than
violet). I've since read about dying handmade paper and it seems that
paint is a better alternative. I can't wait to dump a bottle of
PaperArtsy Fresco Finish Chalk Acrylics into my next vat! Nevertheless,
I ended up using the stained paper as a mat for a batch of cards.
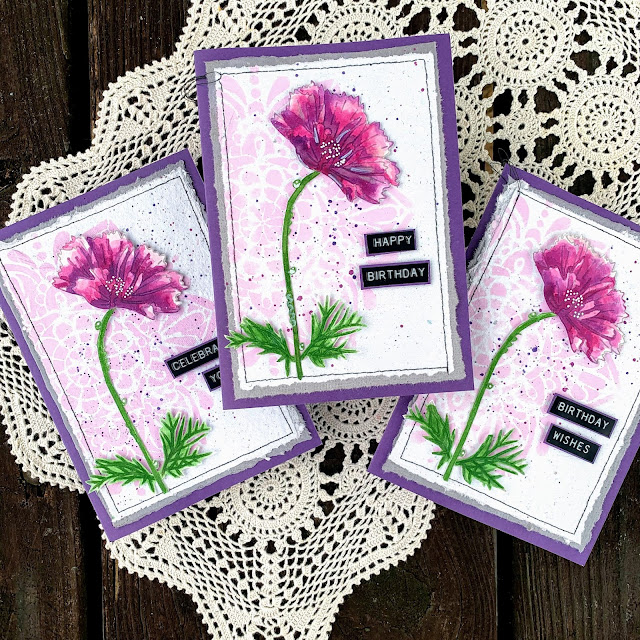
See
how nicely they layer together! I used some of my handmade paper
scraps to test how watercolor and paints worked. Watercolor was a no-go
due to the density and irregularity of the paper, so I used PaperArtsy Smoothy card for my focal stamping and watercolor. But paint was a total win! I chose PaperArtsy {Tracy Scott} Stencil (PS210) and sponged Taro Milk Tea Fresco Chalk Acrylic onto
my panels. I chose purple cardstock for the bases that I've had for
decades as one final sustainable push. Purple is usually the last color
I use, so it was fun to nudge myself out of my comfort zone for a
change.


These
projects are quite different, but I hope they've shown you just how
versatile Kay's stamps can be. I think they play just as well whether
earthy or vibrant, for cards or mixed media...

I
hope you've thought up a few items you've been saving or have in excess
that you can put to work in your own art. Sometimes you will find the
most creative freedom when working with "junk" because it's not so
intimidating, being something it won't hurt to mess up.
It's been a pleasure to share with you today! xx, Autumn
Blog: SewPaperPaint
Facebook: Autumn Clark
YouTube: SewPaperPaint
Instagram: @SewPaperPaint
Pinterest: SewPaperPaint


5 comments:
That's so beautiful, Autumn and great recycling
Wow Autumn, this was an epic undertaking!! Love your paper experiments! I wonder if beetroot would have been a good option to stain your paper!! Leandra x
Your handmade journals are always so special, Autumn and this one is no exception especially as the paper is all made by yourself and the bindings will no doubt hold memories. Fabulous textural cover gorgeously decorated.
Your cards are a wonderful additional project too and you made easy work of using a colour palette that you say is out of your comfort zone.
You were all over this Sustainable Crafting theme .
Thanks for sharing
x
Such a nice project Autumn! I love your covers in every step of the painting process. Such a great idea to create your own paper! It looks awesome! 🥰
Thanks for sharing!
Big hug!
Raquel
Completely stunning, Autumn... those leather binding straps, the rich claret colour tones, and your trademark dimensional layering come together with the words to make for a magical and inspiring cover for this beautiful handmade book. Wonderful.
Alison x
Post a Comment