Showing posts with label Autumn Clark. Show all posts

Wednesday, 5 February 2025

Jumbo Zine with NEW PaperArtsy Stamps {by Autumn Clark}


Hi everyone it's Autumn Clark from SewPaperPaint here with you today.  I've taken a little creative break for the past few months, but am happy to be getting back in the swing of things and playing with some incredible brand new products from the new in-house stamp line by PaperArtsy, which is a bit more modern in style and you can read all about HERE.  


Because it's been a while since I had a good artsy "play", I decided to do something that would be really fun and get my creative juices flowing.  My friend and I recently attended a class at our local library on simple bookmaking and did a folded paper zine, or one page wonder book at the class.  One of the teachers had made a book from a large piece of newsprint and I thought it would be fun to try out this bookmaking style with a large sheet of paper too.  


I purchased a huge sheet of drawing paper and grabbed an plastic squeegee to use to pull the paint in thin layers over the paper.  I decided upon three colors of PaperArtsy Fresco Chalk Acrylic Paint to coordinate with the new PaperArtsy Mattints in High Vis, Mojito and Acid.  


I started dribbling my paints over the paper and scraping them at random.  I used a combination of Fresco Chalk Acrylics in Weathered Copper, Cerise and Deep Sea, which ironically are all Tracy Scott colors, but I didn't realize that at the time.  You can see I left a good bit of white space with which to cover by scraping the various Mattints over these initial layers.  


Next I started to build some pattern by sponging Cerise through PaperArtsy stencil 447 (PS447) using a foam sponge.


I really wanted to build up different types of texture and pattern, so I took out some art crayons and did a rubbing by placing the stencil under the paper and coloring over the paper covered stencil with the crayon on its side.  I really like the unique marks this created!


I thought I would try to use my small round gel plate as a stamp over PaperArtsy Stencil 449 (PS449).  I applied Deep Sea with a brayer and pressed the plate over the stencil onto the paper.  I wasn't quite as happy with this as I imagined.  


Last, I used a spray ink through PaperArtsy Stencil 448 (PS448).  I really like how this looked in the overlap of the various paints.  Honestly, all of this was really fun and relaxing.  And the best part was just letting go and seeing what happened with the layers.  I wasn't sure if I would use a ton of paint making this project, but each color only took a few drops to scrape all over the panel and the squeegee did the work of thinning it down.  


I did some random stamping and then folded up my zine as shown below.  It was really cool to see the different marks on each page and the crossover of pattern from page to page.   

via


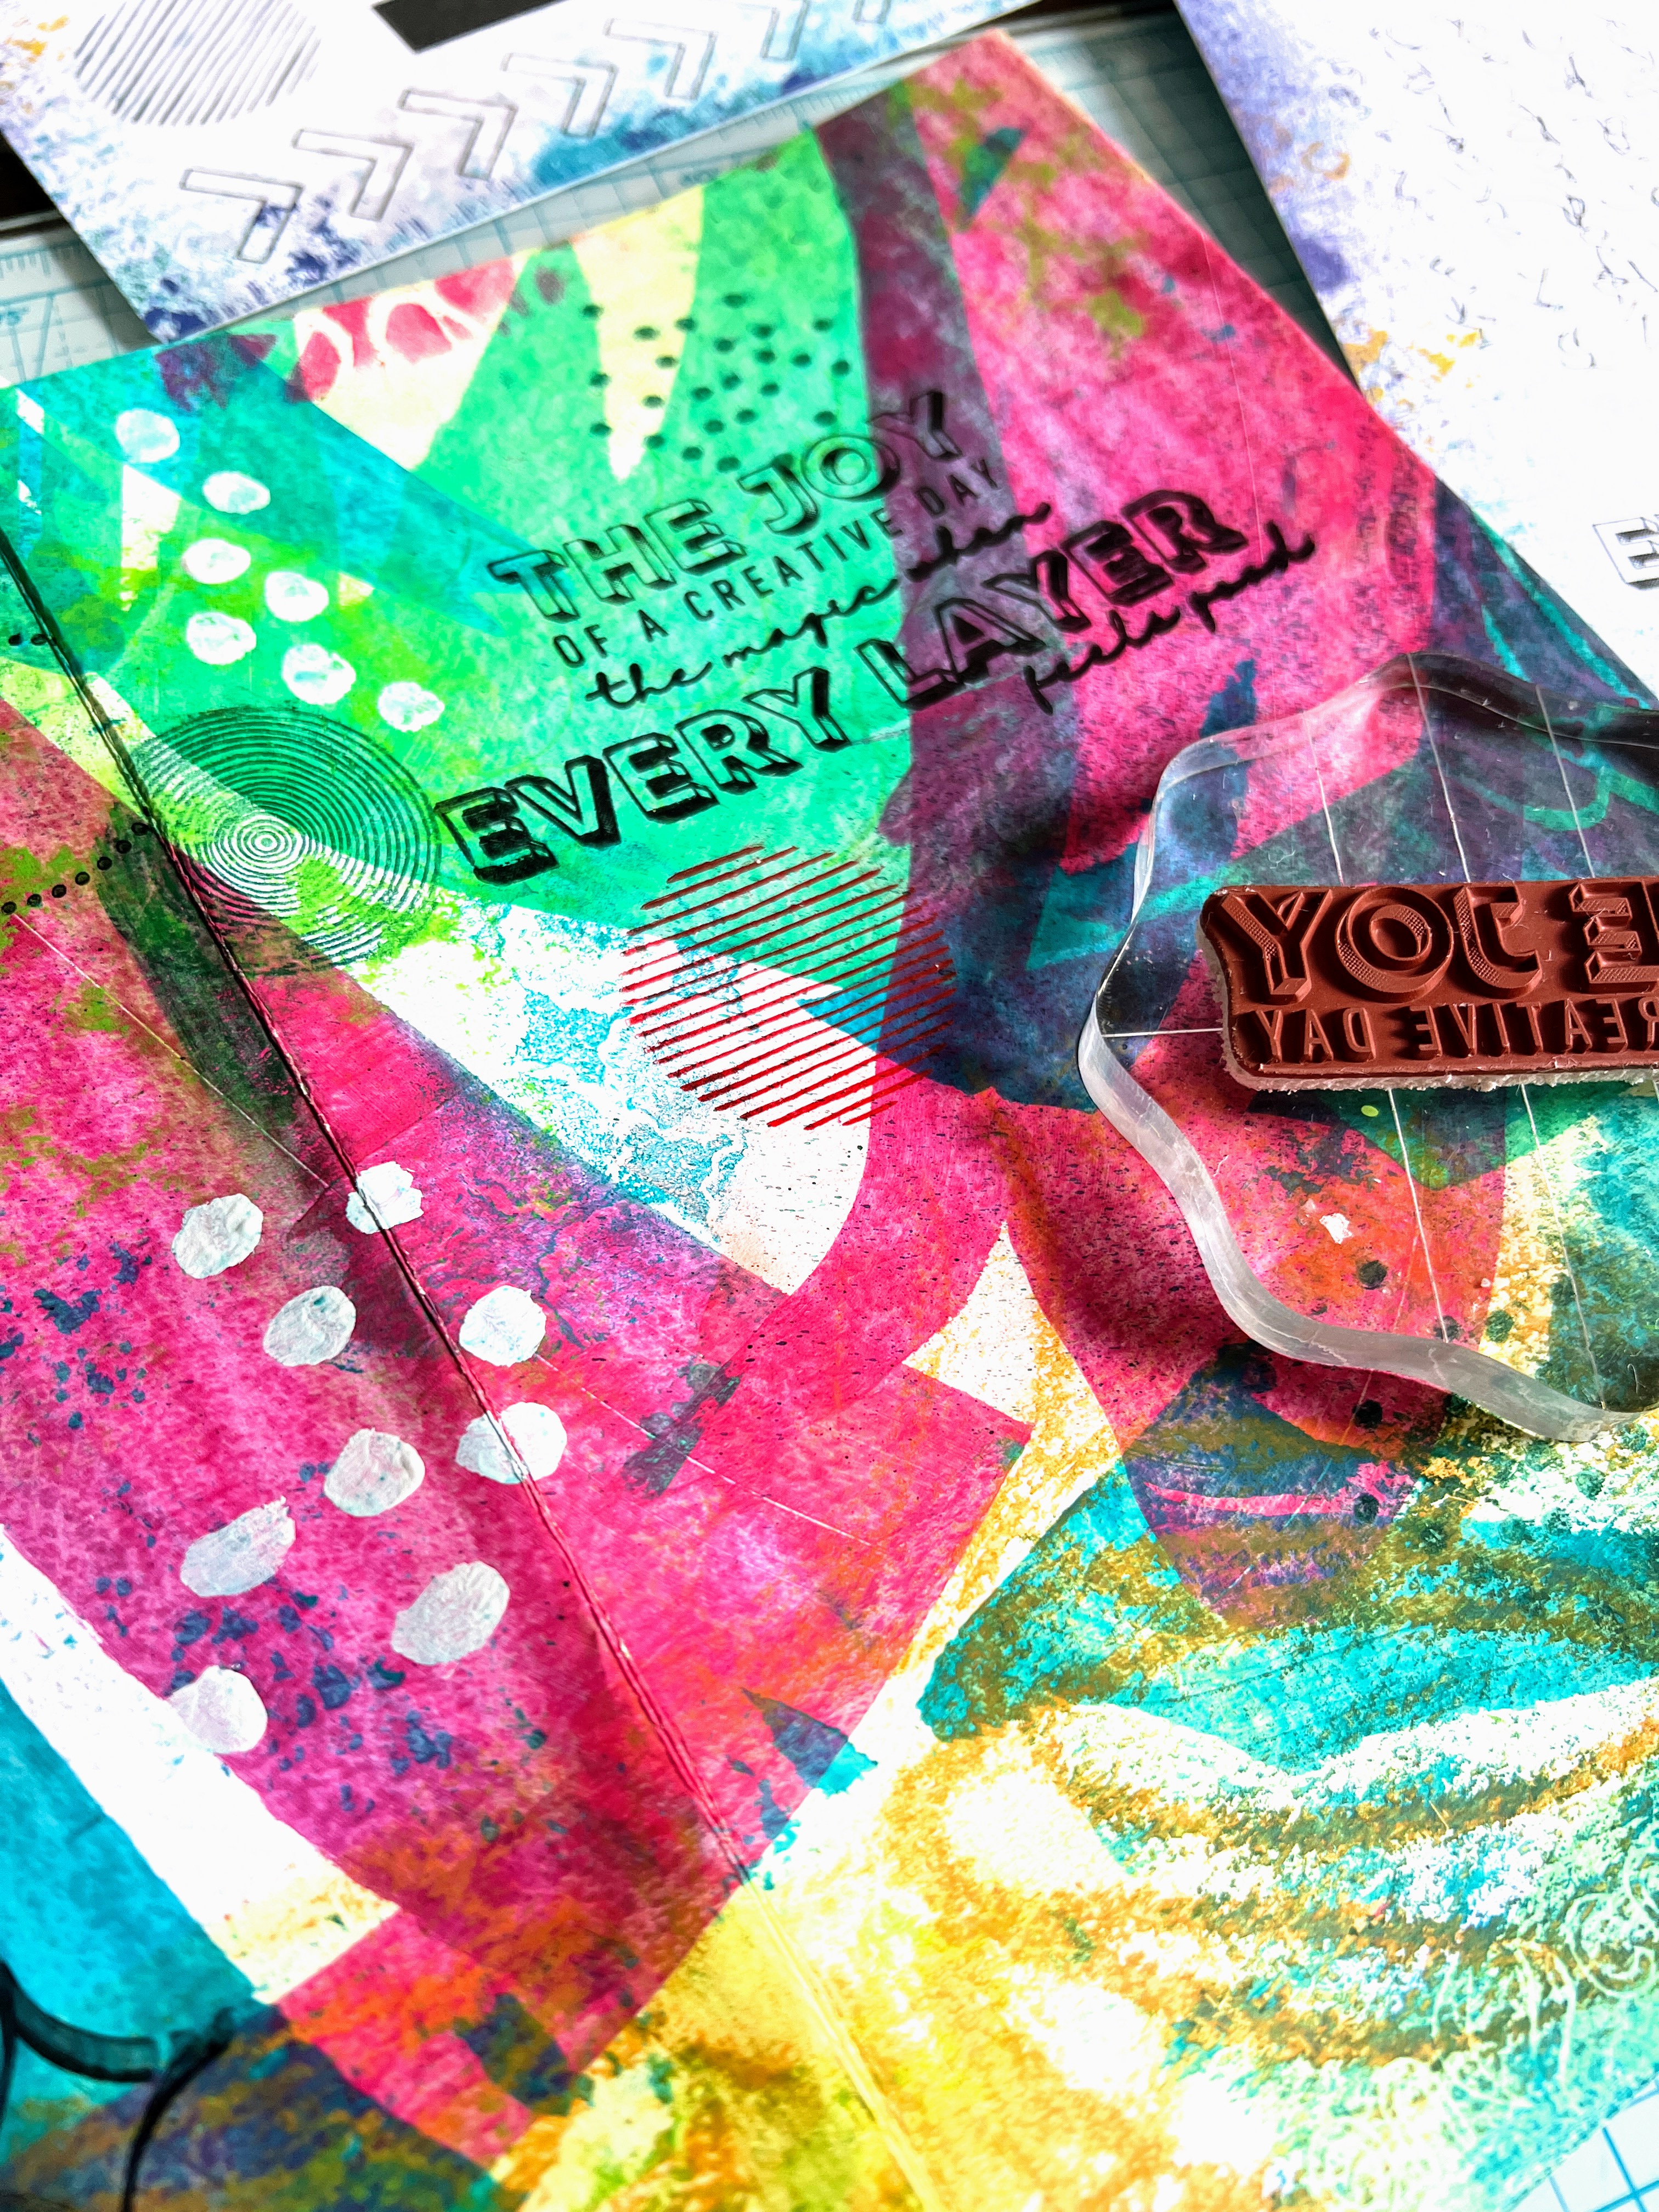
At this point, I began to do some fine tuning to complete the flow of color and pattern on each individual page.  The two sentiment stamps from the inaugural in-house PaperArtsy stamp designs in stamp set 1 (EPA01) were exactly the right statement and design to complete my cover.  I combined the sentiments into one larger statement and colored in the block letters with a white pen.  


I continued stamping more circles and dots from PaperArtsy stamp set 3 (EPA03).  The line of dots stamp worked really well to curve and stamp around the various swipe marks for emphasis.  


Last, I stamped the awesome circles and dots from PaperArtsy stamp set 2 (EPA02) to help fill out the page.  Then I used PaperArtsy Fresco Chalk Acrylic in Cloud 9 to free paint some dots and create a shadow around a rough bird sketch on some of the pages.  This will allow for journaling in or around the birds.


This project was a joy to create and I hope it will inspire you to make a zine of your own, no matter what size!  There are variations where you can add pockets or more pages, so make sure to Google the concept.  I personally think this is a great way to get to know new stamps and I'm so looking forward to using these gorgeous background stamps for other projects in the near future!  

These days I find that I really need more spontaneity and freedom in my creative routine and making what I call "artsy papers" really brings that out in me and helps me to see that each mark can be incorporated and there is no need to fear messing up because you can keep layering until you're happy.  I'm so happy that I tried the crayon rubbing and already have other ideas of how incorporate this into my art in different ways, which wouldn't have come about if I hadn't been brave enough to possibly "make a mess".  Ha ha!  I hope you'll join me in this pursuit.  xx, Autumn 


YouTube: SewPaperPaint
Facebook: Autumn Clark
Instagram: @sewpaperpaint
Pinterest: SewPaperPaint


Wednesday, 21 August 2024

2024 Topic 6 : Scrapcosy - Mash Up Tags {by Autumn Clark}


Hi everyone!  It's Autumn Clark from SewPaperPaint with you today and I am ever so excited to have the chance to play with stamps for the Scrapcosy topic, as you all know how much I adore Raquel and her incredible designs!  I chose to do a Mash Up post to show how beautifully Scrapcosy stamps pair with Gwen Lafleur stamps.  Both designers have a beautiful illustrative style, Raquel with a more true vintage aesthetic and Gwen leaning toward a more bohemian vibe.  Nevertheless, the styles of illustration pair beautifully.  My task was made simple, minus the decision on which two stamp sets to marry...


My favorite part of this process was creating my own ephemera from each stamp.  I just love how these images can be personalized in any color palette, but ultimately I chose to work in an autumnal scheme, because  fall is almost upon us and is most beautiful in the foothills of South Carolina.


I was away from home, so I thought what better time to do a post featuring very few products.  I picked a trio of Distress Ink Pads, one bottle of PaperArtsy Fresco Chalk Acrylic (Heavy Cream) and just two stamp sets, Scrapcosy stamp set 26 (ESC26) and Gwen Lafleur stamp set 19 (EGL19).


I started by getting inky!  I dipped a pair of Bristol panels into Distress Inks in Fired Brick, Rusty Hinge and Vintage Photo, repeating the process until I was happy with the color.  


I don't know about you, but sometimes just diving in with color seems the best way to kickstart my mojo.  Next, I stamped my focal imagery then played around with composition using the actual red rubber stamps as puzzle pieces to determine my layout.  


Then I started coloring my focal images to coordinate with my inky backgrounds and began stamping the backgrounds in various colors.
 

At this point, I was still contemplating our quarterly theme of "Hidden" and decided it would be a lot of fun to let some of these very rich colors and image outlines become hidden or subdued in the background.  


I grabbed a bottle of Fresco Finish Chalk Acrylic in Heavy Cream and brayered lightly over the center of each panel.  I just love how the Distress Inks rose to the surface, as shown in the mushroom definition on the left, and the black permanent ink stamping receded, as shown with the birds.  This instantly gave the tags a more vintage vibe.


I decided this patch of "free space" would be a great spot to add some journaling.  So to carry on with the Hidden Theme, I attached my focal images to smaller inky tags and adhered them with masking tape hinges to the larger tags.  It was a great space to incorporate additional stamping.


I used the Scrapcosy text stamps to highlight each mini tag.  The collage elements remind me of gathering nature's treasures on a stroll through the forest.


I made one tag flip to the left and the other flip to the right.  Do check out the PaperArtsy Instagram page for a reel of these tags in action...


I decided the shadowy birds needed a little oomph, so I fussy cut another colored bird and layered it over to complete the collage I was going for, with the smaller bird facing the "mama bird". 


I am looking forward to adding personal writing on these spaces in the future.


I hope you've enjoyed this Mash Up of Scrapcosy and Gwen Lafleur stamps!  Perhaps you're thinking of the sets you own and how they can be combined.  I would love to see what you come up with!  xx, Autumn


YouTube: SewPaperPaint
Facebook: Autumn Clark
Instagram: @sewpaperpaint
Pinterest: SewPaperPaint


Saturday, 27 July 2024

2024 Topic 5: Ink Pads {by Autumn Clark} on the PaperArtsy Blog


Hi everyone!  It's Autumn Clark from SewPaperPaint here with you today.  Summer days are passing by quickly for me, as I'm sure you can relate.  The current topic, Ink Pads, had me thinking of quick and easy ways to stay creative during the busy summer months.


Creating simple stamped projects with ink pads has always been a favorite way for me to play.  Getting inky just suits my need to make a mess and be expressive with color.  I created a series of cards to give for birthdays and hope they inspire you to get inky too!


I really enjoyed working on these fun backgrounds and love how beautifully these stamps work together for such fun patterns.  The bold flowers and punch of black really makes the finished cards pop, something that is especially fun for birthdays.


It took me a while to decide on a set of stamps, as Tracy Scott has so many wonderful background sets that would work perfectly with this project.  For my backgrounds I went with the gorgeous PaperArtsy stamp set 25 by Tracy Scott (TS025).  I would highly recommend trying stamp sets TS041 and TS085 for similar backgrounds if you have a chance! EM58 has been re-coded now that Tracy is on her own index sheets as TSM02, and EM64 as TSM08


Next, I poured over my Distress Ink Pads to choose three analogous colors in four colorways.  I was hoping to both inspire you in your favorite colors AND to give you several options if you have a limited selection of ink pads.  I hope you like the palettes I picked:  Saltwater Taffy, Picked Raspberry and Seedless Preserves.  Squeezed Lemonade, Twisted Citron and Cracked Pistachio.  Cracked Pistachio, Peacock Feathers and Blueprint Sketch.  And finally, Shaded Lilac, Wilted Violet and Seedless Preserves.


You'll notice I tried to overlap color choices where possible.  When using water based inks in this way, it's usually best to pick colors near to each other on the color wheel to avoid making muds when the colors mix.  I cut my four card panels from an 8.5x11" piece of Bristol cardstock so I would end up with four finished creations.


The process for each card follows the same process.  First I tapped the lightest color twice and parts of the two darker colors once, all right next to each other onto my kraft mat.  I spritzed them with water a few mists, then dipped the panel into the colors.


While the panel was wet, I grabbed Tracy's mini stamp 08 (TM08 - formerly EM64) and inked it with two colors at a time repeatedly stamping all over the panel so the wet on wet ink would smear.  If it dried too fast, I spritzed it with more water to encourage the ink to bleed.


It would have been really simple to do an entire sheet of card with one color as a masterboard, and then cut into four panels after.  If that is easier for you, then go for it!


I loved this look right away, but added some additional stamping.  I stamped the crosses and scribble circles over in solid inks without the bleeding technique.


Once my inky backgrounds were dry, I overstamped the leaves and added some dots from Tracy's mini stamp 02 (TSM02 - formerly EM58).  


Next, I stamped our the smaller flowers and used my Distress Inks to color them.  I cut them with a small white border to give them a small frame and pop of white.


I used Seedless Preserves for the pink card, Cracked Pistachio for the yellow, Blueprint Sketch for the blue and Wilted Violet for the purple.


This stash building project was loads of fun and I hope the various colorways inspire you.  


The fun part will be picking a color to give specific friends throughout the coming months on their special day.  As we wrap up the Ink Pad Topic, I hope you're encourages with the plethora of ideas for your next stamping project.  Happy inking, Autumn 


YouTube: SewPaperPaint
Facebook: Autumn Clark
Instagram: @sewpaperpaint
Pinterest: SewPaperPaint