

Well, what can I say, an utterly amazing 8 days of contributions comes to a close tonight. We are so proud to have been able to share with you the development of our company over the last 10 years via this fantastic tribute achieved by you, our talented and very willing blog followers! Featuring a different collection over the last 8 nights has been so much fun, and so totally inspirational.
 |
| By Jo Firth-Young |
It is fitting to end with the stamps designed and created by Jo Firth-young. I can probably count on one hand the crafty people who I met in the first 6 months after our arrival here from New Zealand in May 2001. Jo was one of them, and I instantly loved her attention to detail. I started teaching classes in a local hall, and she was one of the regulars. The club was called PaperArtsy, and still exists to this day renamed as Fiddley Diddley.
 |
| By Jo Firth-Young |
When we started designing and manufacturing stamps, Jo would always make samples for me, then for magazine articles, and I guess, in hindsight, its quite an oversight that I didn't think to ask her to design stamps much sooner. However, everything happens for a reason in a particular order!
 |
| By Jo Firth-Young |

This is one of the original sketches she was working on that prompted me to suggest she do some stamps.
 |
| By Jo Firth-Young |
 |
| By Jo Firth-Young |

And here are a few of the techniques I have been demoing with her (and Lin's ) stamps with Frescos.


By building up layers in the background, adding stamped images, and the creating depth and vivid colour with Fresco shading, you end up using the paints in quite different ways.
I can't get enough of doing this with her stamps, it really is lots of fun!


So folks, this is the final night of #3UP contributions. As you know these people all received stamps, a substrates, and my favourite bright and cheery colour scheme of Pink and orange. Most people freak out, so that may have had 'easy' stamps to work with, but the colour was certainly more the issue for some! But i think they have done a fab job, take a look!
Our contributors tonight are:
Who: Clare
Twitter: @MrsPards
Stamps Used:

Clare Says: I have been crafting for just over 5 years, mainly scrapbooking and
card making. I live in Laindon with my husband Stuart and 9 year old
step daughter Scarlett. My style of crafting is very much shabby chic,
vintage. I take loads of photos so Scrapbooking is an ideal way to use
them with lovely papers, Distress inks, pan pastels, ribbons and
gorgeousness mostly purchased locally. I am planning to move all my
craft stash out into a large workshop/shed, when our garden is finished
later this year, that will be a huge project, can't wait!
Here is my Scrapbook layout I'd like to enter into the 3Up challenge. It's been quite hard as I'd never used Fresco paints, painted stamped images or used Treasure Gold or Crackle Glaze, so here is my attempt to use as much of the stash you sent me.
Here is my Scrapbook layout I'd like to enter into the 3Up challenge. It's been quite hard as I'd never used Fresco paints, painted stamped images or used Treasure Gold or Crackle Glaze, so here is my attempt to use as much of the stash you sent me.

The Challenge: The 'crackle' panel was coloured with Fresco paints in Rose, Sherbet, Lilac, covered with Crackle Glaze then painted with Snowflake. The stamped flowers are coloured using Rose, Sherbet, Very Berry, Smoked Paprika. Grass is Sage, Hyde Park, Limelight.
The smaller chipboard panel was coloured with Very Berry, Smoked Paprika, Limelight and Treasure Gold Brass highlights. The tag was coloured with Rose, Sherbet, Very Berry and lilac. The Bird and swirl were dry painted with a sponge, I used Guacamole, Smoked Paprika, Very Berry and Nougat.
 I used a Birds of a Feather Stencil and Grunge Paste for the branch and birdhouse, then coloured with Limelight and Snowflake And Rose.
The photos were all taken by me.
hope you like.
I used a Birds of a Feather Stencil and Grunge Paste for the branch and birdhouse, then coloured with Limelight and Snowflake And Rose.
The photos were all taken by me.
hope you like.
The smaller chipboard panel was coloured with Very Berry, Smoked Paprika, Limelight and Treasure Gold Brass highlights. The tag was coloured with Rose, Sherbet, Very Berry and lilac. The Bird and swirl were dry painted with a sponge, I used Guacamole, Smoked Paprika, Very Berry and Nougat.

Who:Beth McFall
Twitter:@Psunfire60

Beth Says:First
I had to decided what I wanted to do with the small wood 'bunting/pennant' substrate. To me it
looked like a slice of pizza, a pennant or the body of an angel. So that's how I
got the the angel Idea.
The Challenge: I took a cardboard photo box and painted the
box itself with Fresco Paint Blood Orange. The top I coated with Fresco
paint Rose. Then I took my Blood Orange, Very Berry, Smoked Paprika and
a little white Snowflake paint and used ink blending foam to get the look I
wanted on the top.

I painted the angels dress blood orange and used Snowflake paint to stamp the flowers. My favorite part of the box is the flowers stamped in Smoked Paprika next to the angel. I like the way it's almost hidden by the surrounding colors.

Around the outside of the box I again mixed the colors and stamped the sides with multicolor flowers. Thanks again for letting me give this a try. And your paints are fabulous.
Who:Claire Sweeney
Twitter: @Claires10


Claire Says: Hi Everyone, my name is Claire Snowdon (I was Claire Sweeney
til quite recently!) and I live up near Durham with my husband and my two
beautiful cats who are most definitely my babies!
I am relatively new to crafting and am definitely new to the
PaperArtsy brand – but already I love it and my collection of Fresco Finish
paints and stamps is growing rapidly! I am mainly a card maker but I do enjoy doing
different projects and altering items – the world of mixed media is something I
would definitely love to explore a bit more soon. I love all things inky and painty but
stamping is my all-time favourite technique.

The Challenge: My special PaperArtsy 3Up parcel contained a paper mache wall hanging and my colour swatch was reds, oranges and yellows. These are
colours I usually steer well clear of – but this is a challenge and so I
started by using Fresco Finish paints in
the following colours to create the background on my wall hanging: PumpkinSoup, Blood Orange, Claret, Zesty Zing and Smoked Paprika. I put these onto my wall hanging using cut
and dry foam and blended them into each other while still wet.
I stamped the main image onto tissue paper using Onyx Black Versafine ink and heat set. I then coloured the image using slightly watered down Fresco Finish paints in the same colours as the background colours.

I stamped the sentiment from the JOFY set using Onyx Black Versafine also. I then stamped some extra stars onto the heavyweight smoothy card, coloured them in the same way as I did the main image on the tissue paper, and cut them out. I stamped the circles from the stamp set straight onto the edges of the wall hanging using Honey Dew Fresco Finish paint – then to blend this into the whole project I added a little Pumpkin Soup over the top to embed it into the background.
I plucked around the edges of my stamped tissue paper and then added it to my wall hanging using matte glue and seal. I then added Treasure Gold in Renaissance around the edges of the wall hanging and blended with my finger. Finally I added the stars in the bottom corner to finish off my project from the mini JM06.
Claire x
Who:Dawn Heald
Twitter: @dawn_heald
Stamps Used:


Dawn Says: I love to make and create. I started with card making and
rubber stamping basics and now I'm more into mixed media and have
started exploring the world of art journalling. I enjoy trying new
techniques, learning from magazines and blogs and also experimenting. I
prefer to make my own embellishments and love to colour.

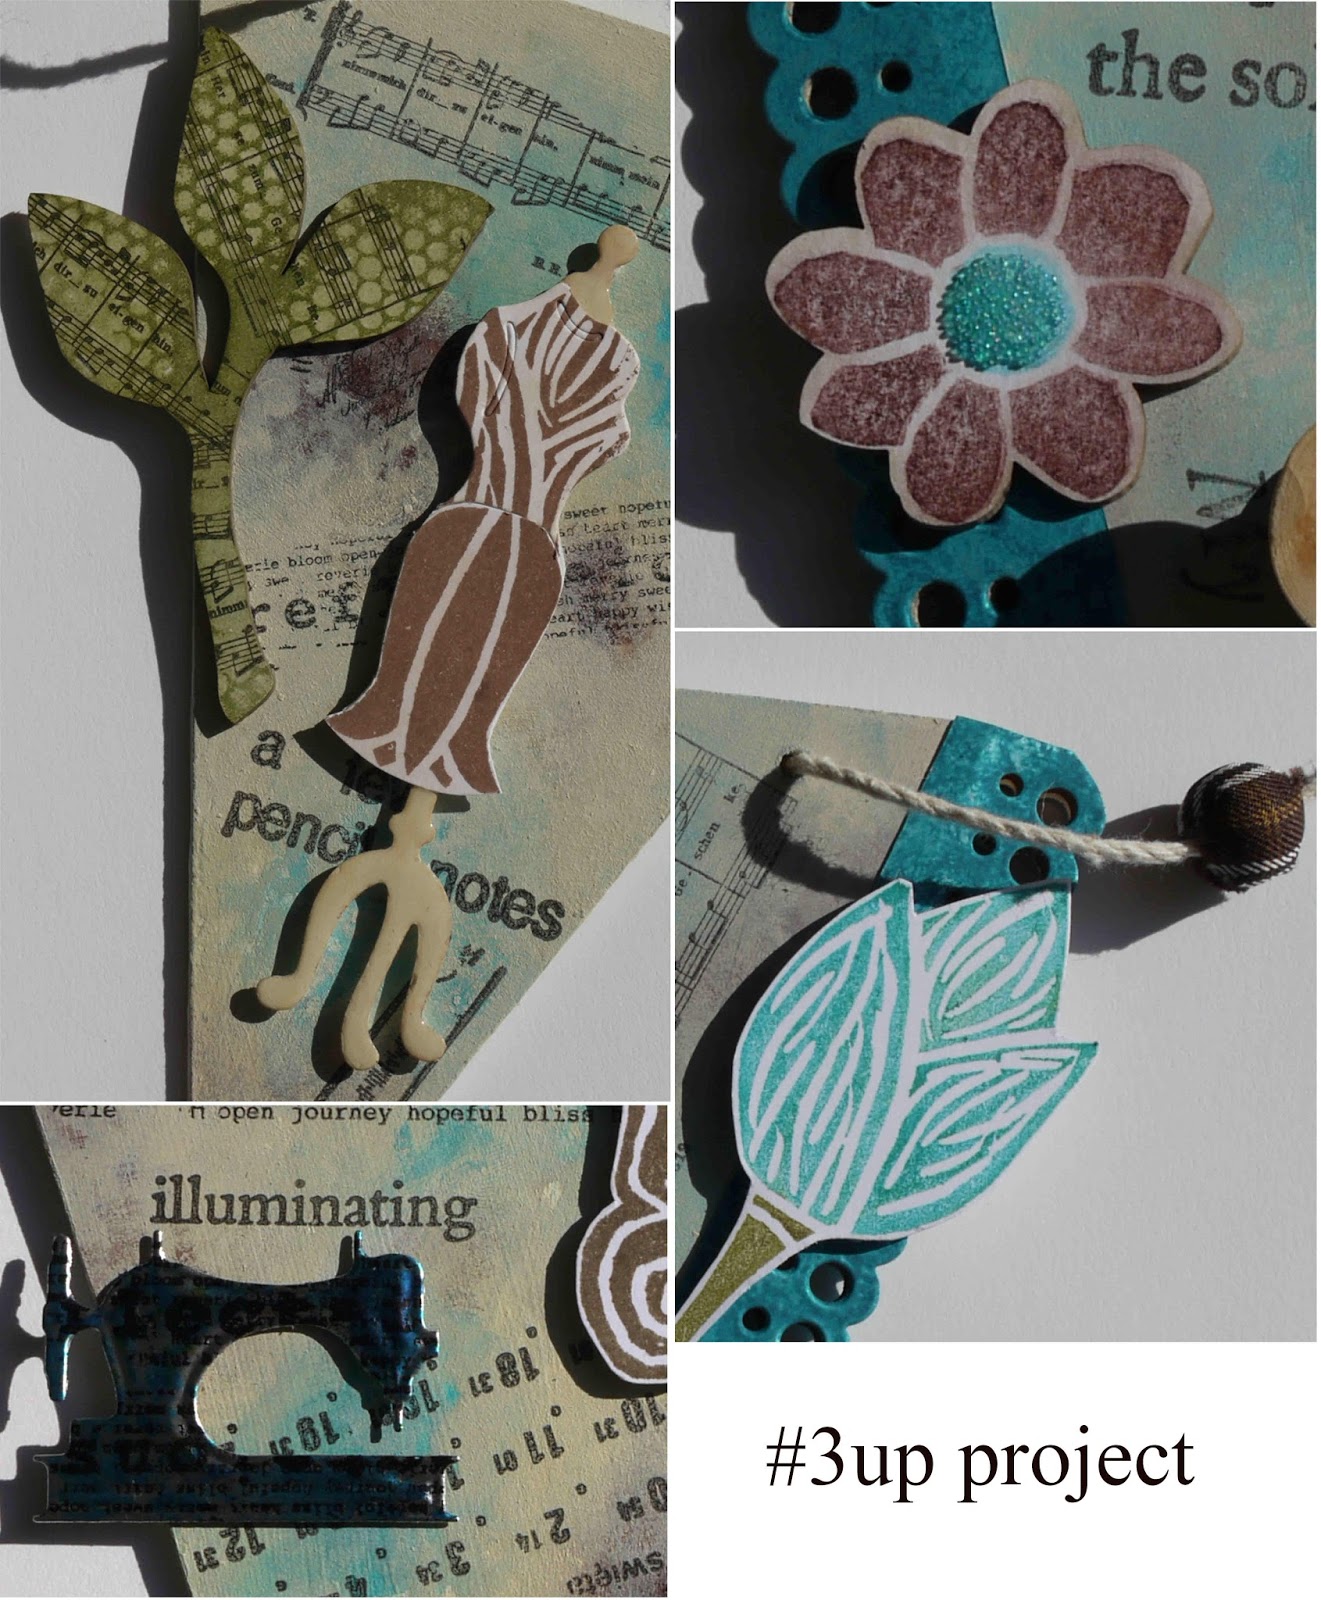
The Challenge: Wow how lucky was I? Totally unexpected, and I was the lucky person who got the brand new JOFY summer stamps in my
challenge pack and was so thrilled, big smiles here. Also included was
the Artemio house frame, embellishments, colour swatch, stamping smoothy Heavyweight card
(which is superb) and some patterned paper pieces.
I prepped my frame with sandpaper and gesso and filled any
little holes with Grunge Paste. Next I painted all over in Fresco Smoked Paprika and Butternut, applied Fresco Crackle Glaze then Fresco Nougat
paint. A bit more sanding and a rub over with gold gilding wax.

For my main scene I applied a thick layer of gesso onto card and sprinkled a heavy layer of salt on top. When dried brushed off excess and painted with Fresco Haystack, Butternut, pumpkin soup paints.
My
sunset was an experiment, painting with Grunge Paste. Using Fresco
paints in Smoked Paprika, Blood Orange, Very Berry, Rose, Haystack and Zesty Zing, I mixed small amounts with GP and painted them on with
coffee stirrers. Then put the sand and sky together for my background.

I stamped and painted images with watered down fresco paints using same colours. Notice the large bunting, this is the roof from the large main beach hut stamp (Jofy16). I stamped onto the pattern papers and shaded with Polychromo pencils and used brads to join the pieces. I also painted and stamped a domino. I used the teeny tags as frame corner adorners and added some real shells painted in Nougat and Treasure Gold. The ribbons I used for hanging my frame.

I used everything in my pack, even though the teeny tiny tags stumped me at first along with the colour scheme but then I saw sunset colours and the idea was born. I really had fun making this, thanks to Paper Artsy for the opportunity as it must take some organising too.
Happy Crafting
Luv Dawn
Luv Dawn
Who:Jules
Twitter: @pinkjules50
Blog: http://redfishdesigns100.blogspot.co.uk/
Stamps Used:

Jules Says: I am a Yorkshire lass
and I have been making cards for 6 years, a hobby my mum got me
into. I loved every minute of this challenge, it took me a very long time to
make this as it's my first ever box and I have only just started getting into
altered art projects.
When the postman brought me my happy mail I couldn't believe
how generous Leandra had been and knew I had to push my limits to make something
special. Red is what I had in mind for my project, luckily I
was given these colours. I decided straight away I wanted to make a box and to try and do
something a bit different with the stamps. I bought some extra supplies from PaperArtsy, and got started.
.jpg)
The Challenge: First I painted a base coat of snowflake on the the plaque and box. By a mixing Pumpkin Soup and London Bus I made my own
orange and painted the inside.
I made a card plate and stamped the larger JOFY
flower, blended a mix of frescos for the
outside and then used a harlequin (lid) and brickwork stencil (box) with Blood Orange over
the top. Carefully I stamped a flower scene on 2 sides of the box and coloured
in (I wish I had seen the video from Leandra but I did this).

I made a flower
by stamping the large flower head several times and gluing them together, I used the leaf stamp cut
out and painted green. I used grunge paste and the harlequin stencil for the
lid and painted the whole thing.

I used crackle glaze on the lid and finally stamped the greeting and
more flowers, I stuck the whole thing together and added some metal
embellishments. Using Ruby Treasure Gold I made some "feet" from
large wooden beads. I also wanted to use ALL the stamps, so I went on to make an acetate tag
set for ready-made toppers for quick cards later. PHEW!!!!

Who: Lou Withers
Twitter: @LouWithers
Stamps Used:


Lou Says: It's really great to be part of this celebration. I decided that I would only use products from PA for this apart from the wire danglers ! This was what I received from Leandra along with a board substrate.

The Challenge: I cut up the board into thirds as it originally looked like an mdf album cover which didn't really get me motivated. So I joined the two ends then used the middle for the top.
I made one but didn't really like it. So, as I do sometimes, I walked away and came back the later with a different idea that I feel worked better.
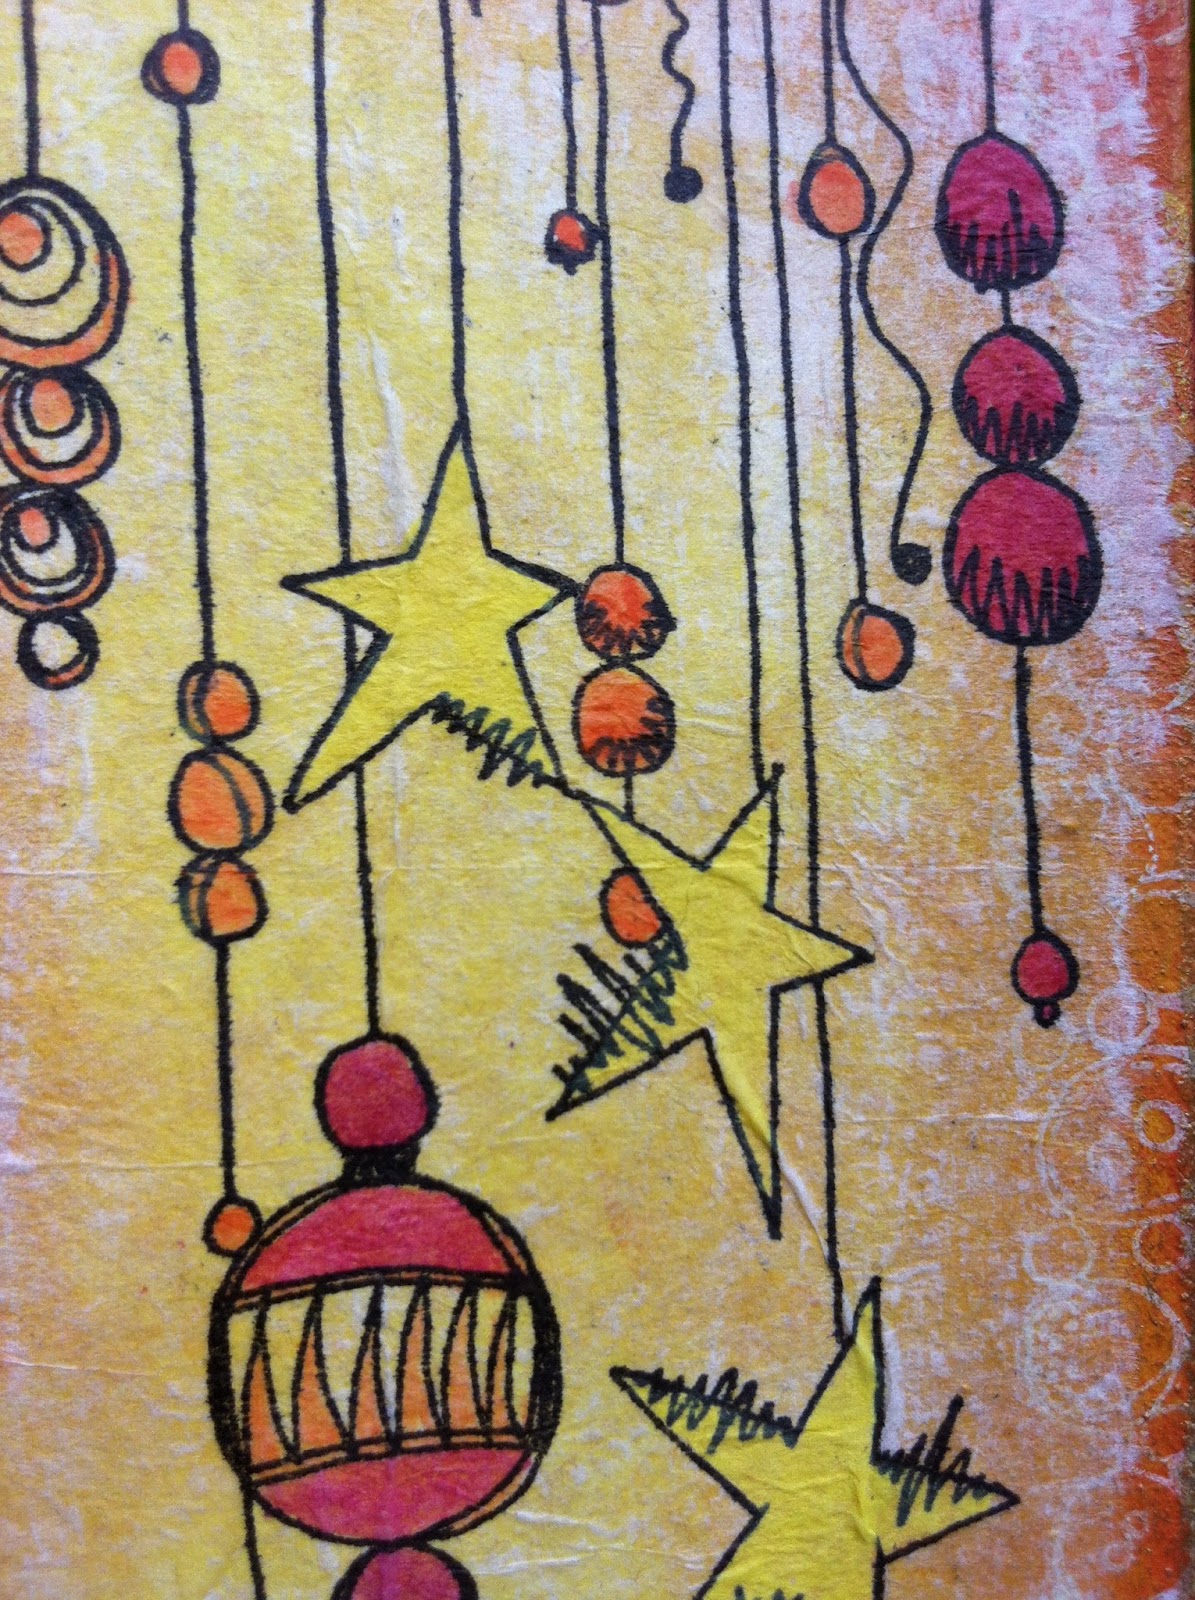
I used several colours of fresco, starting with the lightest all over and gently brushing darker colours around until the darkest colour is only at the very edges. It gives a brilliant glow effect.

I stamped the edges with versamark and embossed in an ultra thick powder given to me years ago by Leandra, I applied the same powder to elements of the other baubles.

I stamped the JOFY large bauble frame image in Versafine Sepia all over for the background .
Then I stamped the other elements onto the papers in my pack and decoupaged them onto the background.
I went over some of the lines with a fine marker to further define them and add some shadows.
I decided that I would just add more holes to the existing ones with coloured wire and beads.
To join them all together I made some spirals and jump rings to assemble the piece.
Although I have left the top empty I did make the word 'star' from pink wire to add to it.
This is an alternative funky Christmas decoration that would also work with other stamps for any time of year or occasion. I loved the challenge. It's toooo easy to stay in our comfort zones.
Cheers muckers, please be honest with your comments. Lou
Didn't they do well!! {a final note from Leandra}
Or should I say didn't you all do well!! Over the last 8 nights we have seen such a huge variety of projects, all created by very new to extremely experienced Crafters. What an absolute treat for us all, I simply CAN NOT thank you enough!
For me the greatest pleasure is to see the excitement, improvement, confidence, camaraderie and skill-sharing that develops from such a simple event as a #3UP challenge. It can be a bit scary to have your work displayed so publicly like this, and and I commend every one of you for stepping out of your comfort zone and tackling the challenge full on. All of you had a go, and many tackled products you have never even used before. Congratulations, you are such a wonderful, fantastic bunch, it's been an utter pleasure to feature you on this blog!
When you are put on the spot in this way, you usually create something that completely surpasses your own expectations, and this gives you such a buzz. There is no right or wrong, you can do clean, simple, soft, busy, bright, soft, scrapping, cards, assemblage ...it really doesn't matter as there are no boundaries. What you make doesn't have to fit into a certain box, and certainly doesn't have to be totally perfect. For me, if a challenge enables you to try something new, use colours you haven't thought of before, or overcome a technique you have previously struggled with, then this is the perfect opportunity to expand your crafting horizons taking you more confidently into the future, with a greater range of skills. This is a learning opportunity for both the participant and the observer.
It has been wonderful to see you all encouraging each other. We all have to start somewhere and we never stop learning, there is also something new to enjoy. If you throw your name in the hat and participate in something like this, you will not get stuck in a rut, quite the opposite should happen, you should come out of the experience invigorated, inspired and up for anything !
It will be at least 4 months before the next #3UP, which should fall between Christmas and the New Year, we will start to take sign ups 2 months ahead due to Christmas, and how stretched we all get for time then, but of course, there is always the weekly challenge on this blog that you are most welcome to join. Just follow the blog and the ideas presented by our weekly guest Contributors, and jump in, have a go, and link what you have made to our linky tool each Sunday. You have an entire week to join in, from Sunday 7pm until the following Sunday at noon to get an entry made and linked.
Don't forget, every night on twitter around 7pm (London time) there is always a bunch of us chatting about the blog post of the day, or what we are up to, so if you want to make some new buddies, get on twitter and have a wind down and cuppa with us at the end of the day.


.png)

