Showing posts with label Miniature. Show all posts

Friday, 3 January 2025

2024 - Year in Review - Topics 1, 2, 3 {on the PaperArtsy Blog}


Greetings from PaperArtsy HQ,

We love this time of year as we take a look back at the wonderful contributions on the blog for the year that has just concluded.

Did you learn something new this year? Did you achieve a personal goal, or tick something off the bucket list? Were you challenged in ways you least expected? Every year seems to bring unexpected twists and turns, and we hope that you are finishing the year strong, happy and keen to learn more new crafty techniques and ideas from our capable bloggers. 

Today we look back at Topic 1: Miniature, Topic 2: Mattints and the designer focus for Topic 3 was Vintage PaperArtsy stamp collections.

The theme overarching these topics was Glazed. We used top layers, shiny or sparkly layers in so many ways. We do love a theme that is easy to apply to any topic, and throws another challenge in the direction of our bloggers. 

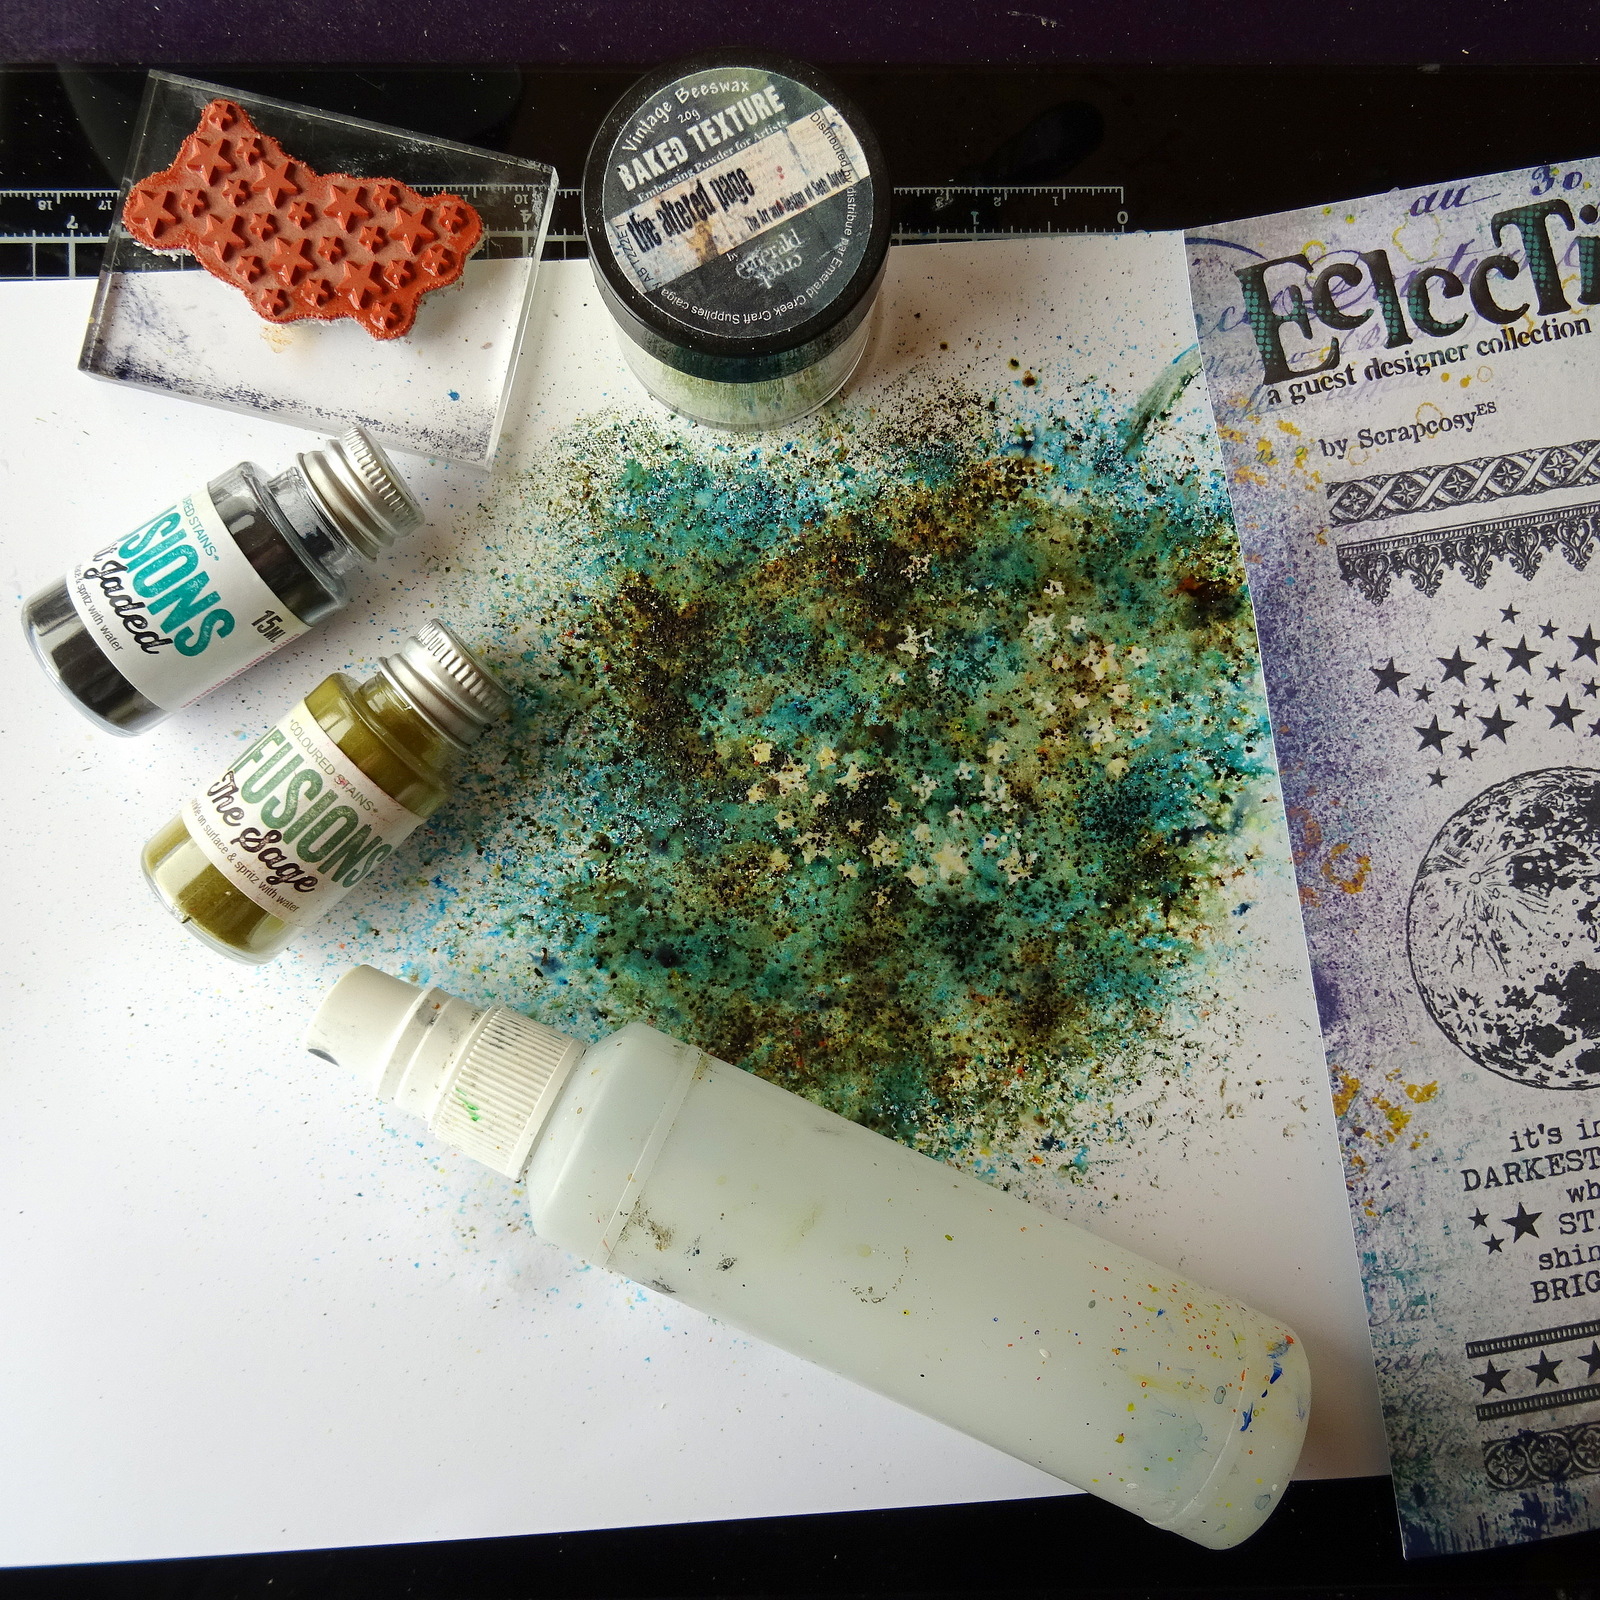
Speaking of challenges, this year we also introduced the concept of 'With 3 Things' where bloggers were sent 3 things and challenged to do something. For example, a colour, a stamp or a stencil. It is interesting to see how each blogger interprets similar products in their own creative way, highlighting how versatile products can be.

We are fortunate to have such wonderful bloggers who share stunning ideas. Let's take a look back at some of the highlights from these 3 topics.

Topic 1: Miniature

We started the year small, with miniature art! This is always a favourite. Why is it that we find all things small cute, like mini books, fairy gardens or decorated inchies? From scaled down projects to tiny magical worlds, this topic intro post is big on inspiration and mini eye-candy!

As mentioned above, a new format on the blog this year was 'With 3 Things', where 3 bloggers craft with 3 (almost identical) products. 'Miniature' was perfect to launch this concept!

In this first challenge, we particularly loved this decorated paper clip by newbie to the team, Mi Mii, who also brings a touch of French creativity to the blog. Head to her original post HERE to appreciate all the details of this little mash-up!


Speaking of trinkets, did you spot Renata Peley's amazing spread of shrink plastic critters? Super fun and vibrant. Be sure to check her original post HERE as she really breaks down the process and explores different shrink plastics and colouring media. Perfect to get you started!


We loved this 'world in a tin' by Riikka Kovasin (Paperiliitin). She beautifully included the 'Glazed' theme to add dimension to her elements. Check out how real that key looks! Her original post HERE is also well worth the read as an interesting example of the twists and turns a project can take along the way, and how different the outcome can be to what was initially planned.


We simply can't leave out everyone's favourite type of miniature project: mini books! This fantastic specimen is by the talented Jenny Marples.  It is barely 12cm, or one Fresco bottle, 
tall! There's so much to feast the eyes on as all the pages are delicately decorated. You can see all of them in her original post HERE.


Topic 2 : Mattints

Introduced at the end of 2023, Mattints are the newest PaperArtsy colour product. These tinted matte glazes (Mattint = Matte Tint) are also excellent glues and sealants and super versatile to pair with other products. Completely transparent, with a subtle buildable tint, they pair wonderfully with infusions, but naturally, we are still discovering a myriad of new ways to use them! Check a few of those ideas in the Topic intro post, as well as the release posts announcing the following 12 colours during the year:
  • November 2023: Warm fall colours with Glow, Nutty, Fern and Shark
  • February 2024: Bright summer colours with Squeezed, Jam, Dragonfly and The Pink
  • September 2024: Subtle winter colours with Greenstone, Ash, Ladybug and River Deep
Our first pick is this very educational exploration of Mattints by Amanda Pink (p1nkart). She shows the colours on many different substrates and also tries several way of applying them, as well as some colour mixing. So head to her original post HERE to get started!


We absolutely love this fantastic experimental pieces by Floss Nicholls (flossWORKSHOPart)One Mattint, so many techniques! Check her original post HERE for a full mixed media journey and her video HERE for more detail on her process.


Staying with tags, Nikki Acton (a2a.craft) created these two beautiful pieces with vibrant colours. Check out the contrast between the grungy images and the popping colours! Her original post HERE is an interesting read, exploring how to build colour, both in depth and complexity.


Let's not forget this sampler journal page by Victoria Wilding. She combines the Mattints with many other crafting staples to creates original and striking effects. Each square is well explained in her original blog post HERE so make sure to to give it a read!


Topic 3 : Focus on Vintage PaperArtsy stamp collections

PaperArtsy is now 20 years old! We thought this milestone was a great opportunity to celebrate our OG collections, the ones that started it all and coined the PaperArtsy style. From the initial A6 Ink & the Dog and Urban Snapshots stamp sets, to the continually expanding 'Minis' and 'Hot Picks' Collections, and let's not forget the 'bigger is better' Vintage Ink & the Dog series. You can check out the topic intro to learn more about PaperArtsy history and feast your eyes on some of the fabulous makes created along the way!

We hope you didn't miss this simple but very effective jewellery set by Ann Barnes (aksbarchitect CREATES). The stamp design certainly is the focus here - so striking! Her process is quite detailed so do not hesitate to head to her original blog post  for more info.


This super series of vintage cards by Autumn Clark (SewPaperPaint) really embody the mix of grunge and details characteristic of PaperArtsy stamps. There are two other pieces in this set, so take some time to enjoy the eye-candy in her original blog post HERE.


We can't leave out this fantastic 3D perpetual calendar by Etsuko Noguchi.  Notice how the celestial lady is peaking over the date! This is an involved project, with lots of (literally) moving parts, so check her original post  
for all the details and a reveal of the colourful interior.


All the projects were amazing and we could have picked so many to highlight, but in the end this series of mini houses full of quirky characters by Liesbeth Fidder-de Vos stole our hearts! Go to her original post 
HERE to see all the layers she used to create amazing depth. We really love the mica rooves!


This was a fantastic start to the year, full of ideas and colour! 

We are sure you'll find something to inspire you and entice you to visit some of the bloggers posts. 

Join us soon for part 2!

Monday, 4 March 2024

2024 Topic 1: Miniature {by Claudia Neubacher} on the PaperArtsy Blog


Servus, everyone!

It's Claudia from VonPappe II here with you today.

The current topic and theme - "Miniature" and "Glazed" - here on PaperArtsy both make me a very happy crafting girlie, as I loooove to do (very) small formats and to play with embossing enamels and glazes of all kinds!  And when it all comes together in a nature inspired project I am in crafty heaven! 


This little diorama (it's actually smaller than my flat hand!) in a flipped over miniature canvas makes my heart sing! And working with the awesomely beautiful stamp designs from the Scrapcosy stamp sets (in this case ESC05 and ESC24) just guarantees you'll love the result! So let me take you through the really easy steps so you can create your own tiny nature (or other) wonderland dioramas! Let's jump right in! 


Besides the two gorgeous stamp sets I picked a bunch of colours from my PaperArtsy Fresco Finish Chalk Acrylic paints that I thought would work best to paint the stamped moon, acorn, mushrooms, the cute snail and leaves. My plan was to use the paints in a highly diluted water-colour-y way so I could layer them until I was content with the result. As my snail is making its way through the forest in the middle of the night, I picked two PaperArtsy Infusions tones to create a small background with. And for the soft satin gloss of the mushrooms and the snail's skin I decided to use Fresco Finish Pearl Glaze - just perfect for a lightly moist appearance! And for the real bulky gloss UTEE (Ultra Thick Embossing Enamel) is always my first go-to medium! 


I had several small canvases of slightly different sizes to chose from - most of them gathered in one or the other dollar shop - because I wanted the mushrooms to fit perfectly and look kind of "gigantic" in the diorama. This way the look gets drawn right in and makes you feel as if you took a very close magical peek right into a world that only looks tiny to us but is full of wonder and "giants" when seen with the eyes of a small snail. 


As you can see the two canvases only differ very little in size, but actually the little difference was quite a crucial one I found. While the mushrooms fit into the larger flipped over canvas just as a whole, I had to cut off their hats' tips to fit them into the smaller one - and that made them look so much bigger! So I went for the smaller canvas - also because its frame wasn't covered by wrinkled canvas, which would make it so much easier to cover with paint! At that time I wasn't sure if I was going to use all the paints I had gathered, but sometimes mixing in little tones of a contrasting colour makes a huge difference. If you want to go for a more plain look, two greens, a grey, two browns and maybe a blue will do the job just fine. 


My focal colours I picked were Fresco Finish Chalk Acrylics Hyde Park (FF50), Magic Moss (FF130), Blueberry (FF106) for a contrast, Chocolate Pudding (FF42) and Taupe (FF60). 


Putting a bit of time and effort into building your diorama scene will pay off later! So take your time and try different versions until your arrangement really wows you! 

I had stamped the moon and ornate border from the Scrapcosy stamp set ESC24 and the acorns, the maple leaf, the snail and mushrooms from stamp set ESC05 in black archival stamping ink before I loosely fussy cut these to position them inside the flipped over canvas.


My first idea was to use the maple leaves as embellishments on the four corners of the slightly larger canvas, but I found these were way too big and thus would draw the focus from the scene. 


I also didn't like that the mushroom looked a bit lost in its spot and not at all "big". So I stamped the larger mushroom as well and went for a really "crammed" scenery in the smaller canvas. 


And that definitely made a huge difference! I loved how the two funghi looked as if they were way too huge for the small format! And I decided to use only one of the maple leaves on top as a kind of "shrine roof top". 


But I still didn't like how "lost" the snail at the bottom looked. I needed something that would make for a "forest ground". So I only used a part of the acorn twig design from the Scrapcosy stamp set as that had the perfect size and look (and also another acorn on it to add to the scene). 


Oh, yes! Much better this way! The more layers to create with my little diorama, the better! 

Time to create the background to put into the canvas! I stamped the stars from the Scrapcosy ESC24 stamp set onto a piece of heavy printer paper using clear embossing ink. Then I heat embossed these with Emerald Creek Baked Texture Vintage Beeswax to create a resist layer. Once the embossed stars had cooled down, I sprinkled PaperArtsy Infusions The Sage (CS02) and A Bit Jaded (CS03) across the paper and spritzed everything with water to activate the colour crystals. 


I dabbed off any excess using kitchen roll and put the background aside to let it dry naturally. 
In the meantime I painted another printer paper with a thin layer of PaperArtsy Fresco Finish Chalk Acrylic paint Sage (FF66) and heat dried that thoroughly. 


Then I stamped the moon stamp from the Scrapcosy ESC24 stamp set with embossing ink onto the painted paper, added UTEE over the still wet ink and melted it with my heat tool. 
 

I had also stamped the lovely ornate border from that stamp set in Ranger black archival stamping ink four times onto a paper that I had previously painted with Fresco Finish Magic Moss (FF130). 


Once all had dried I fussy cut the moon and the border elements and also cut out the dry background so it fit into the canvas opening and put everything in place to see how my diorama looked so far. I didn't glue anything in place yet (just in case I needed to make a little change of plans). But I was really content so far to be honest. 


Time to get out my stamping platform to stamp and paint all the elements for the little forest scene! The cool thing with the Ranger Stamping Platform is that you leave the stamps and stamped images in position so you can stamp, paint and then stamp over the paint one more time to make the detail you have painted over visible again. The magnets fix the paper in place, so nothing gets out of place during the process. I mixed and watered down the paints on the non-stick sheet of my Ranger Glass Media Mat. Additional tones I've used were: PaperArtsy Fresco Finish Chalk Acrylics Mud Splat (FF61), Stone (FF59) and Mahogany (FF124). 


You can see in the image above how the line work from the images got lost under the paint layers. And the image below shows the difference - after having stamped over the dried paint again. 


I could finally get to the glazing part of my project! First I covered the acorn with four layers of UTEE. This is very easy to do: you cover the part of the image you want to add the UTEE to with embossing ink (I smudged some onto my palette using an embossing dabber and used a detail brush to apply the ink to the image) and then add the UTEE and heat it up. As soon as the first UTEE layer has completely melted and is still hot, you sprinkle more UTEE on top and re-heat. You can repeat this step as many times as you want, depending on how bulky you want the UTEE layer to become.


I did the same on the snail's house. 


The mushrooms and the snail's body received a thin coat of PaperArtsy Fresco Finish Pearl Glaze (FF53). I simply applied that with a soft brush. I hope the light shows the soft pearl gloss! 


The canvas frame got a coat of PaperArtsy Fresco Finish Chalk Acrylic Blueberry (FF106) for a bit of a colour pop in all the green, brown and grey. 


The finished heat embossed snail and acorn got fussy cut as well as all the other parts that were to go in my canvas. Time to assemble my diorama and get it finished! 


I encountered a little problem at that point - I had cut one of the mushrooms too short so there was a nasty gap at the bottom between mushroom and frame. I decided to embrace this little accident and cover the gap with a piece of dyed mummy cloth (you can use any kind of gauze). 


I used PaperArtsy Infusions The Sage (CS03) and A Bit Jaded (CS02) again to dye my small piece of fabric. I just sprinkled some of it onto the dry gauze and then added water from a spray bottle. Then I worked the inks into the fabric by smushing it in the wet ink puddle. Afterwards I used my heat tool for drying and glued it in the corner using DecoArt matte Decou-Page. 


I used sticky foam pads and stacked these to achieve different levels of depth while fixing everything in place.


The tiny star embellishment found its way onto my diorama when I found that the maple leaf "roof" on top of my diorama-shrine should protect a little something in this spot. And I also decided at this point to move the moon a bit to the side instead of going for a symmetrical design. This way a bit of movement gets indicated and one can imagine the moon going down which makes the scene become even more lively. 


I love the various glossy textures and how they define the objects in their very nature! 


The PaperArtsy Fresco Finish Chalk Acrylic Blueberry (FF106) that contrasts and highlights the moon and the ornate border was the perfect choice! It also contrasts the dashes of orange-brown tones from the Fresco Finish Mahogany (FF124) in the scenery and makes them look even warmer.  


I am also really happy with the depth that I achieved by layering the elements each on a different level! 

Using flipped over canvases to create dioramas in is such great fun! And as there are a lot of different sizes you will always find the perfect frame for all the lovely stamp designs from the wide PaperArtsy range! You could also do a diorama in an emptied middle size matchbox, a chocolate box or tin can. Pick your favourite theme and colours and off you go!

Claudia xxx