Hi everyone, it's Martha (@CraftingMartha) here with you today, and I'm so excited to share what this topic 'Tetradic Colours' inspired me, when it comes to colours I certainly don't shy away :)
I must admit that I was a little hesitant at first, this new 'chapter' in colour theory seemed complicated to me, but then I took a few minutes to look at the very interesting introductory post that you can find here and immediately had no more doubts and felt like playing with colours.
With the theme of the quarter 'Tracks', I thought of a road map and using PaperArtsy Fresco Finish Chalk Acrylic together with a Gel Plate, to make the image transfer of a road atlas. So here was born the idea of creating a travel journal from scratch.
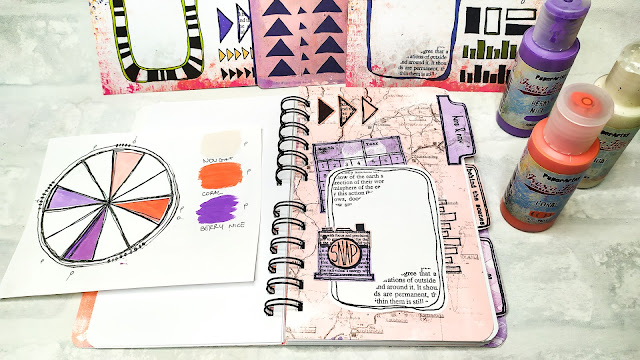
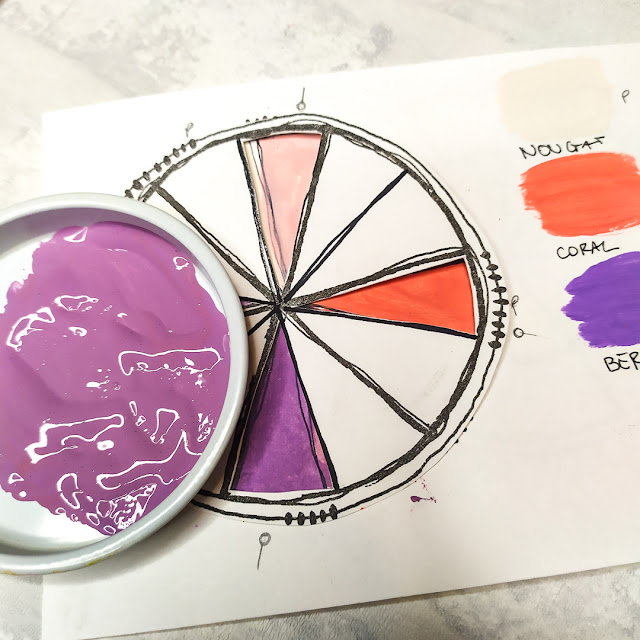
The initial fun part was to create my own colour wheel by choosing alternative colours so I chose PaperArtsy Fresco Finish Chalk Acrylic - Coral (FF122) instead of red, PaperArtsy Fresco Finish Chalk Acrylic - Nougat (FF39) instead of yellow and PaperArtsy Fresco Finish Chalk Acrylic - Berry Nice (FF216) instead of blue.
To help me choose the right colour combo I made another wheel with 'windows' recreating the 'square scheme' ( by the way, did you recognize the wheel? It is from an old stamp set EEA03).
After my colour wheel was created I realized that two of the three new-born colours, already exist in the wide range of PaperArtsy Fresco Finish Chalk Acrylic (maybe also the third, but I don't have it....yet :) )
So I'll use PaperArtsy Fresco Finish Chalk Acrylic - Peachy Keen (FF157) and PaperArtsy Fresco Finish Chalk Acrylic - Globe Thistle (FF174).
So I'll use PaperArtsy Fresco Finish Chalk Acrylic - Peachy Keen (FF157) and PaperArtsy Fresco Finish Chalk Acrylic - Globe Thistle (FF174).
The third of my new colours was created mixing two parts of PaperArtsy Fresco Finish Chalk Acrylic - Berry Nice (FF216) and one of PaperArtsy Fresco Finish Chalk Acrylic - Coral (FF122)
I have to admit that this early stage in mixing, creating and choosing colours was very fun and inspiring. Of course this was not the only wheel I made, because once you start playing and experimenting it's hard to stop, but in the end I chose this one, a little bit out of my comfort zone.
Now with my colours ready, it's time to make some gel printing. I decided to use 220gr white cardstock and pull a bunch of prints from my gel plate using different techniques.
The first one is the image transfer, for which, instead of magazine pages, I used road atlas pages.
If you are not very confident with image transfers I suggest you to try with glossy atlas pages, it gave me great results the very first time and using PaperArtsy Fresco Finish Chalk Acrylic - Little Black Dress (FF19) success is guaranteed - don't mind the yellow area, my gel plate has lived a good life and is stained by Alcohol Ink, but it still works :)
At the end of the post if you are curious you will find a short video on how I did this image transfer.
I find that using a stencil on gel plate is one of the easiest ways to achieve great prints and this one PS017 by Emma Godfrey is perfect for the theme 'Tracks' with all these triangles as harrow to follow and zig-zag paths.
The last way I used the Gel Plate is with stamps directly on the plate while the paint is still wet, being careful to clean them immediately, to prevent the paint colour from drying on it.
Now I'm quite happy :) I have lots of gel printed paper to play with to create my own travel journal.
I have decided on the size of my pages which will be 11 x 18.5 cm, I cut out plenty of them so that I have more options.
For all intents and purposes, they will be the dividing inserts in my journal, so to make them sturdier I glued on the back strips from the scraps.
I cut out 120g white sheets and two slightly wider (12.3 x 18.5 cm) white cardboard covers and then perforated them with the Bind-it-All.
Decoration time has come, and the stamp sets by Emma Godfrey seemed perfect for my project, I have selected two of them EEG01 and EEG03
I stamped on the scraps of paper I had left over,
and fussy-cut lots of elements to have my own embellishments matching the pages.
Among all the stamps I have a crush on this little photo camera that I find easy to cut for paper piecing.
And so yes, I made too many, but it was so much fun (I have to find another way to use them later).
On the back I decided not to use embellishments but only stamps (EEG01 EEG03) and stencil (PS017) perfectly matching. Some words from both the stamp sets have created an interesting pattern.
I'm very satisfied with my pages, front and back, I like the cohesive look I achieved.
With all my elements I'm ready now to assemble my travel journal with the Bind-it-All and black spirals.
This was a project that I loved to build step by step, starting from the chose of colours, than made my colour wheel, making my own papers and embellishments.
Normally I use lots of bright colours, but following this topic I discovered a kind of new sensation. At first I thought I was limited to using only those 4 colours, but then as I went on with the creation, I appreciated having this guideline and actually not having to think further about which colours to add, gave me more freedom to play with the elements I had.
I hope you will give a try playing with colours, Gel Plate and assemble your personal journal, that can be a travel journal o every kind do you prefer.
Have fun
Martha
As mentioned earlier in the post, here is a short video about my image transfer.
Instagram:craftingmartha
Facebook:Crafting Martha
YouTube:Crafting Martha
Blog:alazyscrapper
Pinterest:alazyscrapper


No comments:
Post a Comment