Showing posts with label Coral. Show all posts

Thursday, 21 November 2024

2024 Topic 10 : Gilded {by Liesbeth Fidder-de Vos}


Hi everyone!

Liesbeth here with you today. I would love to show you my gilded book/starbook with wonderful women faces, gilded and framed behind glass!

My inspiration and starting point this time was the beautiful Lynne Perrella stamp sets by PaperArtsy: LPC069 and LPC070. Love the fact that the faces of the stamps are in profile, perfect to cut and frame.

I used three different ways of gilding: gold leave flakes, golden paint and rhinestones. And of course I didn't forget our current theme ,Nature'!  Let's start! 


Maybe you already know I never have a (ready from start to end) plan for a project...never..., only some ideas and some starting points. For this gilded star-book I new I needed the two lovely Lynne Perrella stamp sets LPC069 and LPC070, a metallic paint, PaperArtsy Fresco Finish matte glaze and gold leave flakes. I was planning on using the beautiful platinum PaperArtsy Fresco paint White Fire but later on I changed that to Gold.


The surface I used are 6 cardboard microscope slide mailers and glass slides. They are used in the medical world to protect and send medical preparations to the labs. I used 2-place mailers, they are also available with 1 or 4 places. In combination with the glass slides they are so great to create with!


First I made the book, I piled up 6 slide mailers and glued backsides onto front sides.


I coated the entire book with a layer of gesso and after that I started with adding some Nature, our theme! There fore I tore out some small pieces of Alison Bombers PaperArtsy printed tissue paper (PT08). I glued it onto the front, back and left ,pages' of the book using PaperArtsy Fresco Finish Matte Glaze. Works perfect!


I chose 4 beautiful colours of PaperArtsy Fresco Finish paints: Summer Sky, Glass Blue, Inky Pool and a bit of Coral, applied it in spots with sponges, covering every part of the book.


I painted the edges of the frames with the dark Inky Pool to accentuete the depth. With a bit of watered down Coral paint I coloured parts of the Printed Tissue paper, like berries, acorn and so on.


At this point I was sure  the pages needed a bit more...but I didn't know what... So I decided  to first create the glass slides.
 

Time to use the gorgeous images of the Lynne Perrella stamp sets (LPC069 and LPC070)! I stamped the different women on white cardstock with dark blue ink (Tsukineko Versafine Clair-Twilight, and cut them out a bit bigger, outside the lines, to be sure it fits.


Using Ranger Distress Inks (Salty Ocean, Chipped Sapphire and Abandoned Coral) and blending tools I coloured the faces, large areas of colour. I think it's about the same colours as the paints I used. With a little bit of watered down bleach and a synthetic brush, I bleached some details of the images here and there to highlight them.

 
One of the glass microscope slides was my template: I cut 12 slide size cards out of the stamped images. I hope this makes sense ... if not...see photo below ;-)
With a bit of tacky glue I glued some shiny gold leave flakes at the edges here and there. I have a little box with multi color flakes...no idea what brand it is. Once the glue is dry, you can make it shiny by gently polishing it with a paper towel. I applied a very small drop of Glossy Accents on every corner of the stamped paper and added the glass, and I glued the whole thing in the niche.... 12 times!


Some more for our current theme Nature: Onto the left pages I stamped some small parts of the stamps like this rose. Again with Tsukineko Versafine Clair - Twilight. I inked them with just a corner of the ink pad. The other stamp is a kind of a swirl...you can see it on other pictures. Above the glass slides, into the thumb grooves I put  golden rhinestones.


I gilded the spine and the edges of the book by sponging some PaperArtsy Fresco Finish-Gold.


The final finishing touch was adding some small parts, like words or this circle below, from the Alison Bomber Printed Tissue (PT08) and...a extra tiny bit of golden paint.
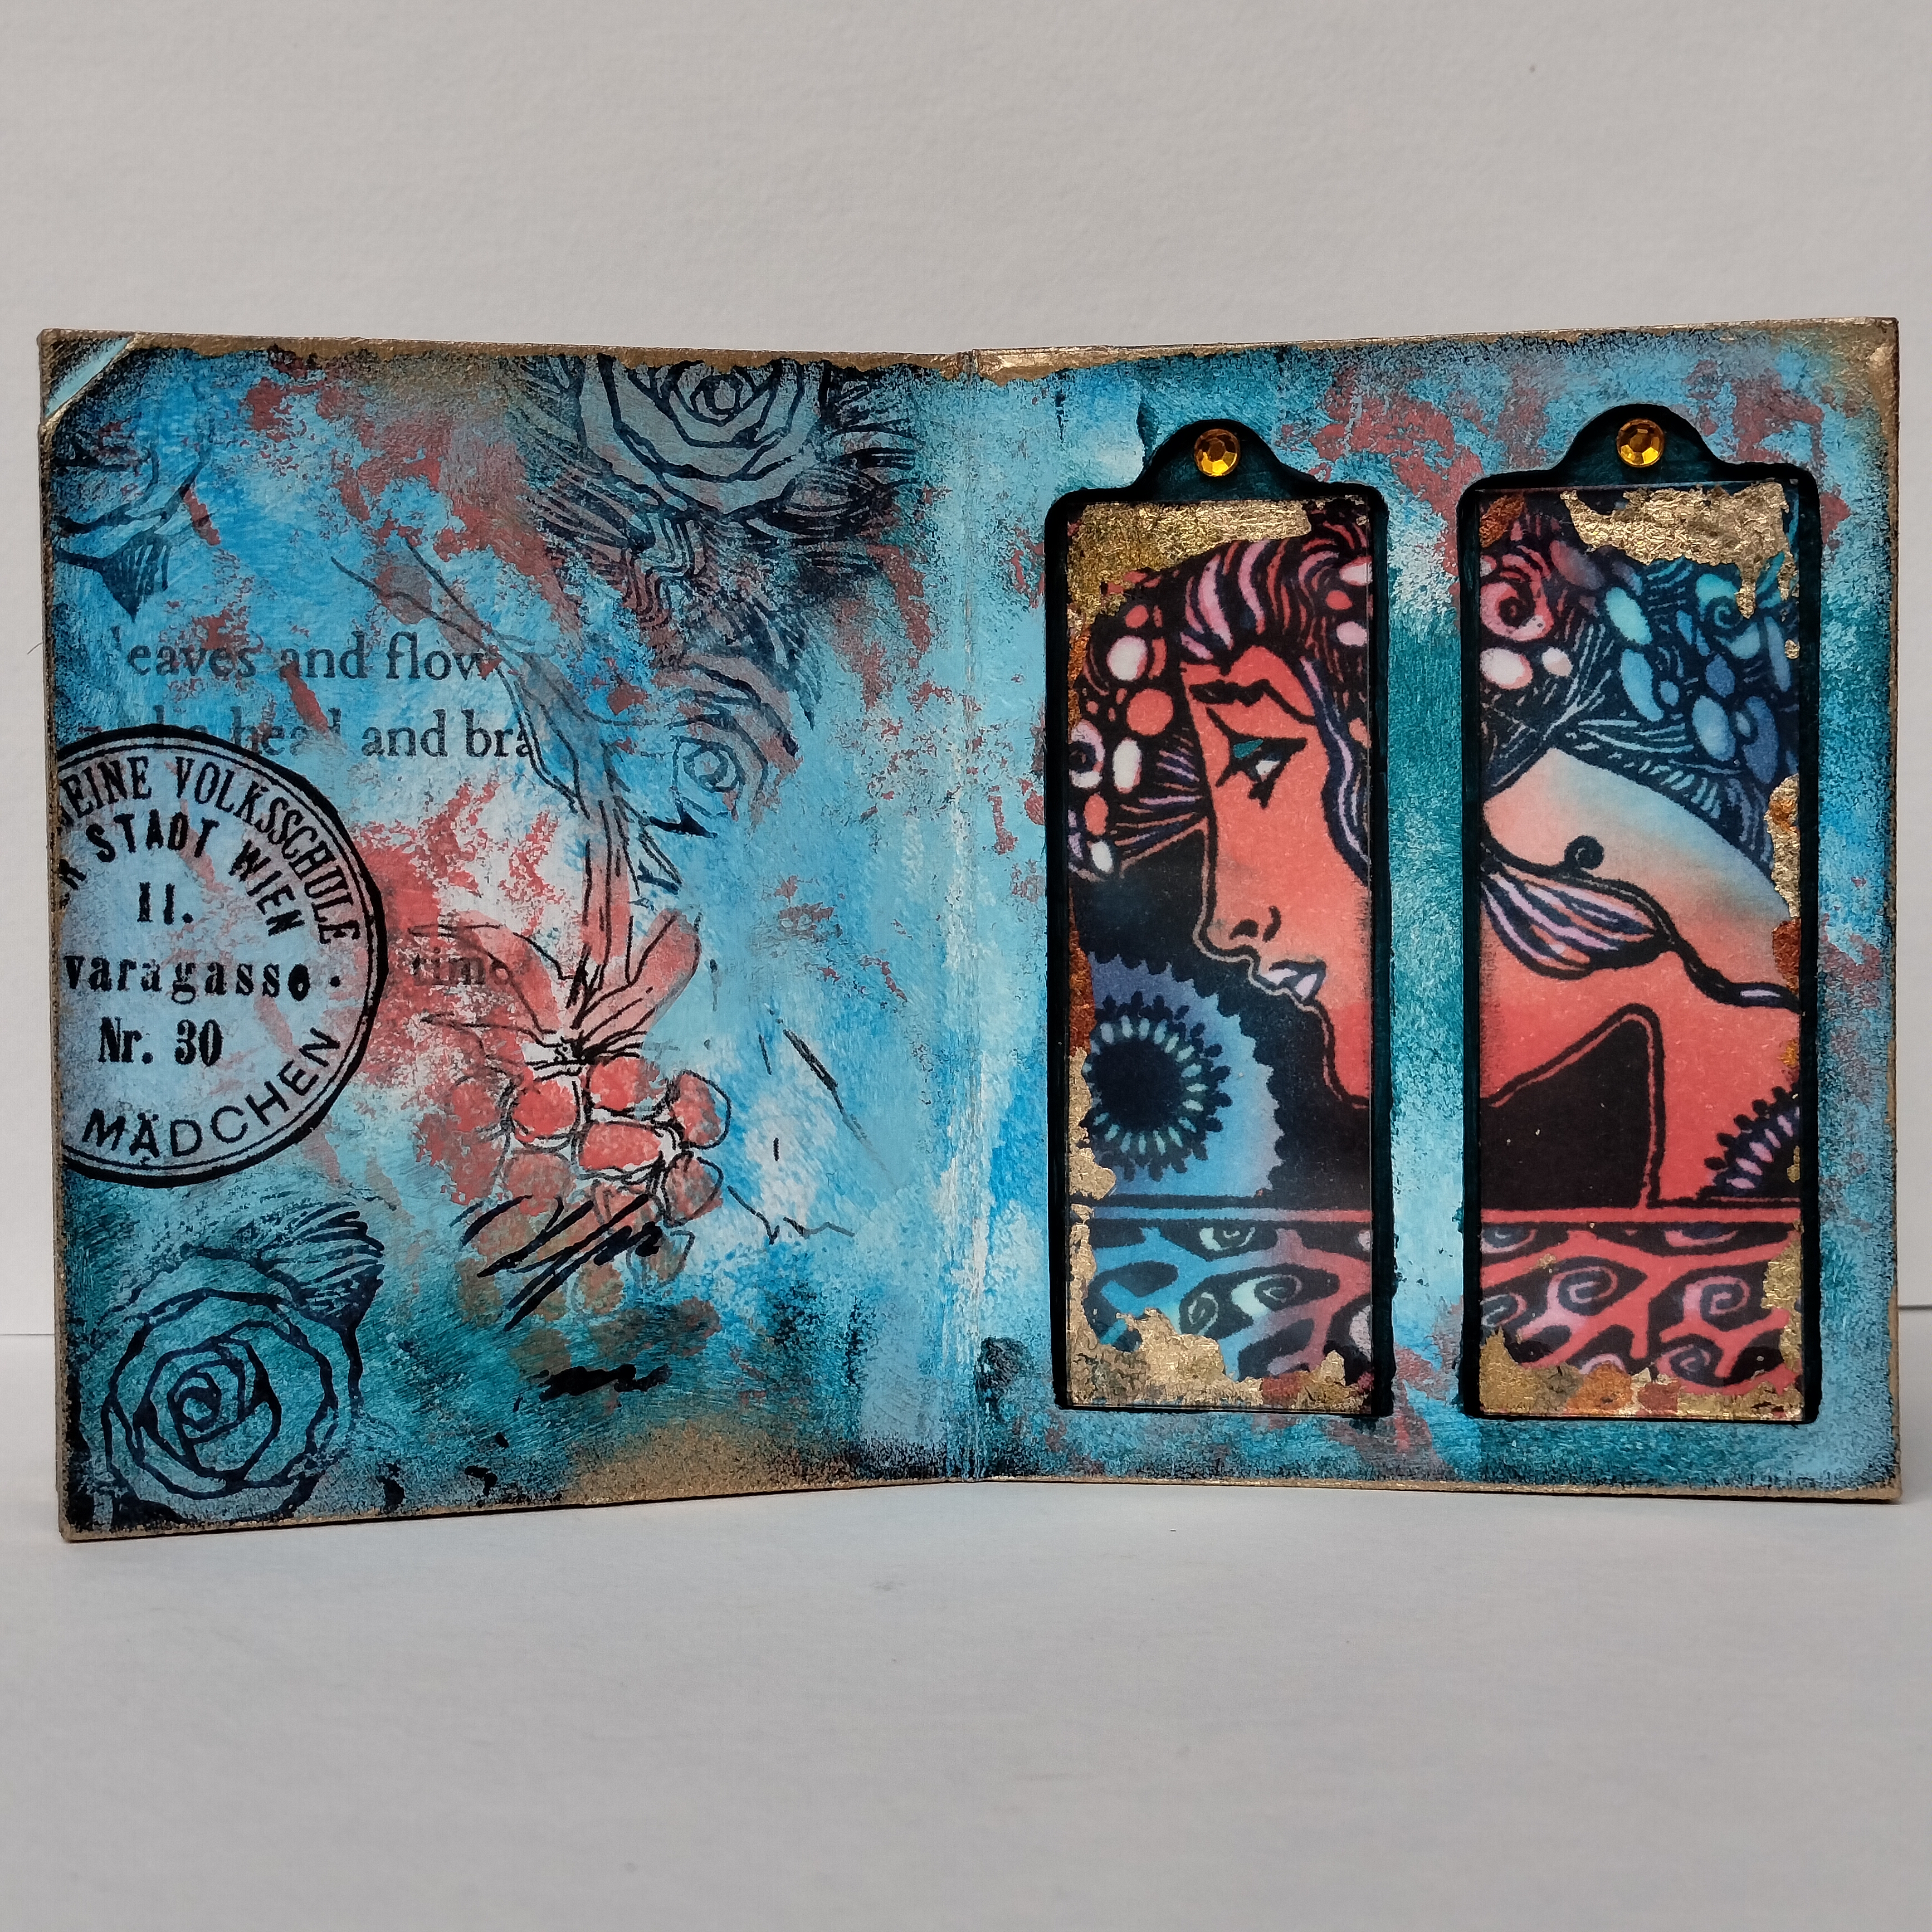

The book is ready! Here I show it as a star-book I think the images of the stamps and the printed tissue are perfect together..although the style is completely different, it works!


One of the pages.


For the front of the book I used some left overs from cutting the stamped images and glued them at the edges. No waste!


The backside of the (almost) closed book. I used a cut out stamped image from one of the PaperArtsy Lynne Perrella stamp sets (LPC069).


An overview of the book among most of the materials I used. 


Another detail picture of one of the pages. Oh how I love this stamp from LPC070!


I had so much fun with this gilding adventure! It is a pity that on the pictures the shininess is not very visible. In real life the book is glossy and shiny and bling bling, believe me!

I hope I inspired you to create some gilded projects yourself! Have lots of fun, see you next time!

Liesbeth XX

Friday, 5 July 2024

2024 Topic 5: Ink Pads {by Claudia Neubacher} on the PaperArtsy Blog


Servus, dear creative friends!

It's Claudia here with you today to share an easy to do birthday card with a hidden surprise!

I love PaperArtsy's actual "hidden" theme and combined with the new "Ink Pads" topic, it made me think of two birthday cards to make for my wonderful son and for my evenly wonderful niece. I had two amazing nature themed PaperArtsy Hot Picks stamp sets in mind that have stamps on them that can easily be transformed into "moving images" that reveal another - hidden - image...a kind of birthday (card) surprise, if you want.

My idea was to use these alongside with some heavy water colouring - so the choice when it comes to stamping ink that shows every tiny detail of the stamped image AND withstands loads of water being added by a brush was an easy one - a Tsukineko VersaFine Clair (Nocturne) ink pad!

To create soft water colour-y effects with the PaperArtsy Fresco Finish Chalk Acrylic paints I needed to go with tones that either read "translucent" or "semi-opaque" on their labels. I went for three basic colours (red, blue and yellow) and one particular orange tone that I knew I could not mix with the basic colour tones.

But first things first - the finished project (and the PaperArtsy products I used):


The two birthday cards look as simple as they are in the making - I promise! And all I needed were the two stamp sets, four PaperArtsy Fresco Finish paints and one PaperArtsy stencil.

But this picture does not reveal the hidden surprise...a hint: its making involves a tiny bit of paper mechanics (of course I will show you how to do it a bit later in this post).


Here - once again - the supplies I needed to create my cards. The stencil I used to create the quote is not shown as that was a spontaneous idea. You'll find info on it later in the post. 
The card stock shown in the picture is PaperArtsy Smoothy Heavyweight A4 White Stamping Card (SCA4H), but you can as well use heavyweight smooth printer paper if you are not sure about your stamping skills.


The Tsukineko VersaFine Clair ink pads are my go-to ink pads when it comes to very fine detail stamps or techniques like heat embossing or colouring in stamped images with water colours. They are quick drying, light fast and fade resistant and absolutely waterproof (as they are oil based pigment inks). And they are also perfect for the technique I want to show you in a sec! ;)


You can see how the image details are still crisp though I have really given this stamped image a heavy dose of water colouring. No smearing at all (though I always heat dry the stamped images to make sure they have really dried...the Tsukineko - VersaFine - Clair inks really do dry quick, but I like to play it absolutely safe).


And this squid buddy's background image withstood the same treatment with heavily diluted PaperArtsy Fresco Finish - Glass Blue (FF102) just as safely. This paint is translucent - so it is perfect for letting the details of the stamped images show through.

But what is wrong with this image? Why does it show mirrored and how could that happen"?


Of course this was no accident! I needed this particular image to be mirrored, because I wanted my "hidden surprise" to swim to the left and needed the space to its right to hide it (the top banner picture already showed the little trio of fish that can be pulled out of the nautilus). Mirroring stamps is quite easy to do, but it takes a bit of practice (so if you do not want to mess up on the heavyweight PaperArtsy card you should try it several times on cheap smooth heavyweight printer paper).


What you need for this "trick" is a brayer - most preferably an orange or light grey one where you can see the inked image you are taking from the stamp. The Tsukineko - VersaFine - Clair ink pads provide a really deep and strong pigment (you can see that by how "wet 
with pigment" the inked stamps are) - so they also help you as you do not need to hurry during the process.

You thoroughly ink the stamp (just like you always do) - I have "fixed" mine to my non-stick craft sheet for that purpose - and then you carefully roll the brayer across the inked stamp without changing the direction. Pay attention to not smudge any detail. Rather work with no pressure than too much - that helps avoiding sliding off with the brayer. The most tricky parts are the start and the end of this rolling process as these are the moments when you slip and smudge most easily.


Then roll the reverse image from the brayer onto the substrate where you want the image to appear on your project. I prefer to use a silicone mat for this as it helps with not losing any detail while rolling the brayer across the paper or card.  
For the "hidden surprise" repeat this process on a scrap of left over smooth card so you have a second reverse image of the nautilus.

This technique definitely needs a bit of practice. Not smudging the image when taking it onto your brayer is the hardest part, but you will quickly get the hang of it! Of course this technique only works with "narrow" designs, as the brayer's circumference defines the size limit of the image's width.

It's a technique that comes in especially handy when you need symmetrical designs (like for example two hands pointing towards some focal image in the centre of your project from the left and the right). In my case I just needed the nautilus to look to the other side (and I can live with the reverse text as it still adds lovely texture to the background).
 

Time to get into the "paper mechanics" zone!

That sounds more tricky than it actually is. What's important is that you use images that work together - one with a possible "opening" for the other to appear in it.

The lovely images I've used come from the two marvellous PaperArtsy Hot Picks stamp sets 


The fish from the HP1111 stamp set is just the perfect size for the opening of the nautilus from stamp set HP2302! And its giant squid and the metering rule were a perfect match too. On the rule you can circle the age of the birthday child (I did so using a red marker).


I stamped the fish three times, creating a straight line from left to right onto a strip of heavyweight smooth printer paper. I needed a sturdier paper so the paper strip would not bend when pushing the pulled out strip back into its "hiding corner".


Just look at how fine the Tsukineko - VersaFine - Clair pigment shows all the pretty detail of the stamped image!


Then I took a pencil and a ruler and drew the outlines of my paper strip plus a wider tab at the right end and cut that out. The tab is going to get folded over in the middle so it gets twice as thick (to make sure it will keep the paper strip from getting pulled out completely). Maybe you can see the dotted line in the center that I drew to mark the fold line...

Most important is that this tab at the end of your strip is at least four to five millimetres wider each at top and bottom than the incision the strip is going to be pulled through. You can eyeball that. In case you forgot to make the tab you can still glue one to the strip's end afterwards.


I used a detail knife and cutting mat to cut the opening slot of the nautilus. Then it was time to test if the strip and the opening went together well...


Just perfect! Yay! Now would be the time to adjust to opening's width, if you haven't cut it wide enough the first time.


This picture of the backside of the card shows the opening and the tab at the end of the strip that has been folded over and glued to twice its thickness this way.


As the back of the card was going to be covered by another piece of card the exact same size, I shortened the upper end of the tab that was in the way of the double sided sticky tape I was going to use later. One wider tab end is enough in this case as the strip runs close alongside the card's edge. This way it cannot be pulled out accidentally as there is no room for the strip to move sideways towards the card's edge. In any other case two tab ends would be crucial!

Now that I was sure all my paper mechanic parts were working, I could move on to paint the stamped images and finish off the cards by adding sentiments and such.


I did the background first by adding a wash of heavily diluted translucent PaperArtsy Fresco Finish Arcylic paint - Glass Blue (FF102).


To paint the nautilus I used PaperArtsy Fresco Finish Chalk Acrylic paints London Bus (FF37), Yellow Submarine (FF73) and Coral (FF122). All of these are either translucent or semi-opaque, which is important for a soft watercolour-y effect. White highlights were added using my white Sharpie pen.


Don't forget to also paint the opening of the nautilus image on the card! The other painted image will be fussy cut and glued on top of the stamped image using sticky foam pads.


Next were my "fish gang" - I only used a thin layer of Fresco Finish - Glass Blue (FF102) as a base layer, let that dry and then added a watery layer of Yellow Submarine (FF73) on top to create the green tone on their bodies.


The strip's background was painted using up the Glass Blue left over paint on my palette. As you can see I thinned that even more to create a lighter blue than with the fish heads and tails.


I found my card looked a bit empty in the top right corner, so I decided to add a quote using the cool PaperArtsy Stencil - PS297 (designed by Sara Naumann).


I painted that using Fresco Finish - Yellow Submarine (FF73) again.


Before I fixed the painted nautilus image to the card I inked the edges using a blending tool and Ranger Industries - Archival ink (Jet Black). Its pigments are less oily (and also my ink pad is  quite dry already), so there is no risk of smearing on black ink when blending.


Voilá - the nautilus and a little fish peeking! The dimensional sticky foam tape adds lovely depth which also helps direct the focus towards the image with the hidden surprise.


I used my Faber-Castell PITT artist pen to add the "Alles Gute zum Geburtstag" (= German for happy birthday) quote to the fish strip. Once everything was done and in place, I used thin double sided sticky tape around the edges to glue another piece of card to the card's back to hide the mechanics (and some smudged on fingerprints as well).


As you can see I also did another birthday card using the giant squid and ruler images to create a hidden surprise that can be pulled out - using the same paper mechanics technique. 


For this variation I needed to only stamp parts of the images, which can be easily done by only inking the areas you want to stamp and also wiping off any excess ink (using a baby wipe).


I painted the squid's images using PaperArtsy Fresco Finish Chalk Acrylic paints - London Bus (FF37) and Glass Blue (FF102), mixing all the tones I needed using these.


I tested the cards on hubby (without telling him that there was a hidden surprise) - to see if one gets tempted by the card's designs to pull out the fish and the squid from their shells....and it worked! :) 


It was such great fun making these and I cannot wait to give them to the birthday children this June and in August!!!!
Have fun creating your own "hidden-surprise-birthday-(or other)-cards"!!!!

Hugs and happy crafting!
Claudia xxx