
Eclectica³ Collection {Scrapcosy}
November 2021 New Product Announcement

A note from Leandra:
Raquel has totally packed this release with so many options for you to create from 'coffee time', to beautiful flourish patterns and a range of amazing labels and words. Of course there are stencils too, and matching label shapes, so I think there's heaps of value in this release with all the amazing combinations! All these elements combine to provide you with some classic stamps that will certainly be useful for years to come.
Remember, these products are available EXCLUSIVELY from our approved stockists for the next few months. It makes sense to buy local within your country, see the list and links at the bottom of this blog post.
Hi everyone, Raquel here!
I'm so excited to share with you my newest release for PaperArtsy. 3 stamps and 3 large coordinating stencils. For this release I've brought to life different ideas that have been at the back of my mind for quite some time and at the same time I wanted these to match really well with my latest release with WOW embossing powders from few weeks ago. The TRIO of WOW embossing powders is called "It's cold outside" and the powders have 3 names related to hot beverages, Luxurious Chocolate, Pumpkin Latte and Caramel Vanilla, and I went for this theme because I had already in mind to create ESC27 (I designed these powders a year ago... so it's really been a long journey for these products to finally come together and it's great they have been released pretty close in time. You can imagine how excited I am!). The powders look also lovely with bolder stamps as the flourishes on ESC28, or the label frames on ESC29. I have a favourite and I'm sure that by the end of the post you'll know which one it is...
I'm so excited to share with you my newest release for PaperArtsy. 3 stamps and 3 large coordinating stencils. For this release I've brought to life different ideas that have been at the back of my mind for quite some time and at the same time I wanted these to match really well with my latest release with WOW embossing powders from few weeks ago. The TRIO of WOW embossing powders is called "It's cold outside" and the powders have 3 names related to hot beverages, Luxurious Chocolate, Pumpkin Latte and Caramel Vanilla, and I went for this theme because I had already in mind to create ESC27 (I designed these powders a year ago... so it's really been a long journey for these products to finally come together and it's great they have been released pretty close in time. You can imagine how excited I am!). The powders look also lovely with bolder stamps as the flourishes on ESC28, or the label frames on ESC29. I have a favourite and I'm sure that by the end of the post you'll know which one it is...
Back to today's release... although these stamps don't follow a unique theme, I feel that they complement each other really well and these are going to become some of my new staple stamp sets. They are very versatile and can be used all year round. From cards to art journals, scrapbooking, DIY ephemera, DIY wrapping paper and pattern play. Many possibilities, many patterns and many occasions where these could fit in. I'd love to read what you think about these and what use you would give them.
I love tea, as you may know by now, since I devoted 4 stamps on that theme a while back, but I love coffee as well, so this time I wanted a set for coffee lovers (and hot chocolate lovers) like me, hence ESC27 was born. I drew my favourite coffee type, a yummy cappuccino, the coffee beans and splatters had to make an appearance too. The small mug (favourite at home for a rich thick and small hot chocolate) is the perfect canvas for sentiments. And to pair the hot drinks, you have a selection of sweet treats, some tiny macaroons and a huge cupcake (perfect for birthdays too)!
I love flourishes and I've been wanting a set like ESC28 for a while. With bold images, to create your own patterns for backgrounds in different projects and in different sizes. This is not a set to use on its own (unless you're creating DIY wrapping paper, which would totally be a great idea) but I can see me coming to this one for many, many projects.
And I love vintage labels, I can't resist them. If I see a scrapbooking paper, a fabric or any other shape or form where labels appear, I just need to have them. So as I've done in the past, where I've created stamp sets like ESC15 or ESC19 where I can stamp and cut and use as many postage stamps as I want, I decided to bring this time labels and signs that I can mix and match to again have an endless source of vintage ephemera. And it will not be the last stamp set that I'll design of this kind... because I can't have enough!
New Stamps
Price: RRP €21.92 +VAT
Size:5" x 6" (13 x16.5cm)
All stamps are individually trimmed onto cling foam, presented in a clear hanging bag
with a laminated storage/index sheet.
Size:5" x 6" (13 x16.5cm)
All stamps are individually trimmed onto cling foam, presented in a clear hanging bag
with a laminated storage/index sheet.
Eclectica³ Scrapcosy Set 27 (ESC27)

As mentioned in the intro, I released some tea stamps a while back, in 2018, ESC13, ESC14, ESC15 and ESC16. For that release I drew all my favourite cups and teapots, but there was one that didn't make it. That release was too delicate, all including vintage china, all about tea. It was obvious that this specific mug was on a different vibe, it's made of enamel and I love to drink coffee on it (a short cappuccino) and I also love drinking a thick hot chocolate as we do it in Spain (you know, like the one that goes with the "churros"). I bought it in Vietnam, it's pale blue and it's tiny and stinking cute! See picture below. So now I'm bringing it to you, almost at its real size, it's the drawing on the top left corner, I've paired it with the aniseed star and it's asking for a sentiment to be stamped on it!

The cappuccino mug is also on a plate where you can either stamp one of the sentiments as well (as you will see on a sample) or include some of the little elements to decorate it, like the macaroons or the small pastries or a couple of coffee beans. I remember taking the picture from that cappuccino, we were with some friends at a brunch on a sunny day, pre-covid times... I drew the image from this picture I took then (people probably think I'm crazy when they see me taking so many pictures, but you know, I always have big stamps..., I mean, big plans on my head...)

All this set brings me a feeling of wrapping up in a blanket and drinking a hot beverage at home or at a coffee shop and at the same time, the cupcake and the macaroons remind me of those lovely looking pastry shops like Laduree where you could get a tiny sweet treat for yourself, having a more fresh vibe. For me this set has a masculine and a feminine side at the same time. I can see this as the perfect set to create different cards to gift coffee shop giftcards inside (for teachers or colleagues), or to create a birthday card where the cupcake can be your birthday mini cake, or just to create a card for a friend to invite them to a coffee together. Of course these would also be prefect for a coffee themed art journal, but I didn't have time to create one just yet...
Coffee Time

I really enjoyed putting this card together: from creating a patterned paper by repeating the 3 coffee beans all over, to stamping, colouring, cutting and shaping the cappuccino mug, with the little pastry and the spoon to get a super 3D focal point.

I love how the cream for the cappuccino looks after embossing it with one of my newest WOW embossing powders, Luxurious Chocolate, from the "It's cold outside" TRIO. It's a mix of brown and gold. And to make the coffee more realistic, the creme is on a lower level than the mug which I elevated with 3D foam. It casts a natural shadow. Maybe now I'd like to add an extra detail: a couple of coffee beans either in the saucer or on top of the patterned paper, which actually looks like a mantelpiece. I would either stamp the 3 beans and add glossy accents on top or I would use the stencil PS292 below with quick cure clay to create a 3D element like I did on my previous release with a mushroom.
Sweet treats

I created these 2 samples, with a more feminine vibe. I had in mind one of those fancy and elegant pastry shops or tea shops (like Laduree or Fortnum and Mason) where you can have an afternoon tea and some sweet treats. I'm using also the flourishes from the next stamp set ESC28 to add that air of elegance against a bluish vintage background (Fresco Finish Blue Oyster acrylic paint with a top layer of Satin Glaze mixed with Infusions Golden Sands, see video at the end of the post). The flourishes are so useful to create background elements!

The cherry on top was finished with a good amount of glossy accents. I don't use it very often, but here the cherry was yelling for it! The sentiment was stamped on the oval label from ESC29 below and I love how the composition turned out, however I have another variant that I would like to try: my first idea was to use the muffin as a birthday mini-cake, so I have 2 options for that (option 1) I could stamp the sentiment on a mini rectangular piece of paper attached to a toothpick, so I created a mini flag that I can stick to one side of the cream on top of the muffin or (option 2) I can substitute the cherry with a mini candle. And of course you can dress up the muffin as you like with candies, chocolate chips, more cherries and give the cream the flavour or colour that you want, strawberry, chocolate, etc. Or you can transform it further, remove the bottom part and attach the cream and cherry to an inverted cone and there you go: from muffin to icecream!
Eclectica³ Scrapcosy Set 28 (ESC28)

Raise your hand if you love flourishes! I do! And it's been a long while that a stamp set like this has been on my to-design list. I recently came across some vintage flourishes and I decided to bring these in. I've reshaped them and transformed them so they are symmetrical and they have the shape that I want. Some of them are bolder, like the bottom left corner, so instead of adding a metallic corner on your project, you can stamp it and emboss it in gold. Some of them are more delicate, like the bottom one and some of them appear repeated in different sizes (like the diamond one), so you can create the same repeated pattern adapted to the size of your project: for example, if you work on a tag you may want to use the small one, but if you work on an art journal or you want to create your own wrapping paper, you could use the big one. You can create many patterns as you will see in the samples below, snowflake shapes, stripes, mandalas, you name it!
A Pattern Paper Collection

I wanted to try the different possibilities and patterns I could get with ESC28. I didn't know what surface to try these on at first, until I remembered about all the kraft paper I've been keeping from different Amazon parcels. They add A LOT of paper to make sure your goods fit OK and don't move in the standard (pretty big) boxes they use, so I thought it was time to upcycle some of that paper and create my own wrapping paper, or at least a bunch of samples.

Now that I've practiced (I used distress oxide inks) I know what I can get, so I can extend the pattern as much as I want or combine different patterns and get a unique wrapping paper for some of my Christmas presents this year.

Some of them are pretty simple: just select a stamp and stamp it all over with same colour ink and as close or as separated as you want. I love the pattern I get with this damask, that's why I added the same design in smaller size, to be able to repeat the pattern on a smaller project surface.


You can also select just one stamp but then change positions and colours of the ink and get the pattern you want. This one reminds me of a tapestry.

Same stamp as above but now combined with 2 mini flowers and arranged in circular position and now you get a snowflake like figure. This one is perfect for Christmas! I loved it so much that the stencil PS293 has this same shape, so you can be quicker to create a similar pattern and use different mediums like Grunge Paste.

And what about creating a pattern that resembles tiles? You can use both corner stamps to get a similar effect. I love this combination of colour and these 2 stamps together.

Eclectica³ Scrapcosy Set 29 (ESC29)

I love ephemera and I love creating my own, so it was just a matter of time for another vintage label stamp set to come out from me. On my first one, ESC21, the labels had a different purpose, they were meant to be used for bullet journaling. For this one, ESC27, the purpose is different, I wanted to have empty vintage labels that can be filled with many different title options, I wanted all to mix and match: 4 vintage style signs that will fit on all 4 labels plus the bonus little vertical stripe to add the "shake the bottle before using" on it or leave it empty and use it as a mini ribbon, or cut the stamp in half to separate the lines and fit in larger words or sentiments inside.
The "Druggist and Apothecary" sign is mostly reshaped from a real vintage label, and the rest are made by me trying to follow similar shapes and styles. I wanted to add a coffee themed one so it can be used with the first stamp set ESC27, you can see a coffee bean from that set. And for the "Tea Rooms" one, you may recognise the teapot: it's the same drawing I made for ESC15, with the quote Keep Calm and Drink Tea. It's actually the silhouette from one of my teapots at home, which I bought in Broadway, in the Cotswolds, hence the address I chose for the sign. The "Hotel Royal" one, is completely fake, but I love it. I choose that name because it reminds me of James Bond and Casino Royal... (and now that I've written that I can't stop hearing the James Bond theme on my head... LOL). I thought that a hotel label would be a nice one to have if you want to scrapbook a holidays layout or for a travel journal. And the stripe of words that starts with HELLO SPRING with all those sentiments can be used all year round, from spring to winter, on different festivities and special days, so you can scrapbook to your hearts content. You could use the stripe as it is, and create a subtle repeated pattern or you can (as I had in mind) cut the rubber into individual parts so you can rearrange all words and create different titles with different fonts: Happy holidays, Summer memories, Hello winter and many more. And guess what, all the words will fit as well on the vintage frames from ESC09 (yes, that's 20 stamps back, that's how far I like to think on reusing stamps... hehe) and the sentiments from ESC09 will fit on the larger label, so you have an extra set of sentiments in a different font to use with this set.
Label background papers

The obvious choice for this set is to create labels, stamp, cut them and use them in projects or store them as ephemera but what about using the labels to create backgrounds? I've done a couple of samples for you.

This one has a pretty vintage look, uniform colour and will nicely disappear in your page once you choose a nice focal point.

To colour the inside of the labels a bit darker, I've used the stencil PS294 below. I've added ink through the label shapes so I get a light frame around (no ink). You could do the opposite and use the mask to just colour the frames and leave the center white or you could use the masks as I did here too, to protect the labels from some of the dark splashes I did on the background.

This other sample is very different and will stand out a lot. Very bright and colourful (at least for my style) and it can be a piece on its own. Or just cut one extra label and place it on top of the surface. Make it pop more by placing a dark ribbon or a lace across. You could also transform a cardstock stamped like this into an advent calendar. This is an idea I've had long time ago (since I actually released ESC09), you could cut partcially the labels from the surface (except for one hinge), so each label becomes a door. You would glue the the paper (not the label-doors) to a think cardboard where you would also cut same shape holes to create pockets underneath each label. You could store inside the pockets something really tiny: a button for each day in December, a note with a wish or a sentiment, a metallic embellishment or a piece of chocolate (pick a very thick cardboard or layer 2 together so the chocolate fits). And instead of the vintage labels, you can stamp a number for each day in December. The numbers from ESC21 would fit nicely.

You could also use the labels to create coasters. Stamp them on square card stocks and add a thick layer of UTEE on top. I did some coasters a long while back with my tea set collection. I can imagine the same concept with these labels.

And although I've stamped here just these 4 vintage signs, all the sentiments in the stamp set can be cut and stamped, so these labels can play the role of framing a title on your art journals, bullet journals, calendars, etc. Also, you can use the words in the stencil PS294 below.
A Vintage background

In this case I selected the column of sentiments and used it directly to create a pattern, like a word cloud. Then I used Infusions golden sands and some Vintage Photo Distress ink to create this coloured and textured background.

I just love how this looks! And you should touch the paper... After so much water and infusions and ink, the Smoothy heavy cardstock becomes so soft! Like soft leather.

If you're creating a card for a specific season, you can use the same concept, leave the background stamped like this, but change the colour of Infusions (or paint your paper first with any colour of your choice of Fresco Finish Acrylic paints) and stamp the sentiment for the season you want in one of the labels, cut the label and arrange it on top. For example, for spring I would go for a green background, the "Hello Spring" stamped on the oval frame and I would stamp, paint and cut the flowers in ESC18 (some of my favourites) and arrange all together.
Infusions background
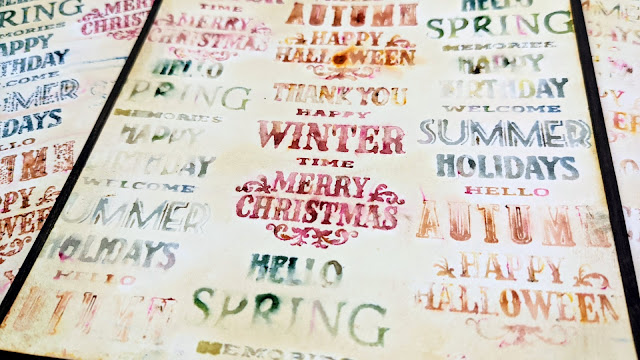
If the background before was too dark for your taste, you could try with rubbing different colours of infusions in your stamp with your fingers, then mist some water (2 to 6 mists depending on your water sprayer) on the stamp and stamp in your paper. Get more than one piece of paper ready because with one application you get many stamping repetitions (I recommend having 3 or actually, get 6, so you try the technique twice. It's tricky to figure out the right amount of infusions and water you need the first time).

The first stamping session will be very crisp and lots of condensed infusions will be seen, you'll need to spritz a little bit of water (1 or 2 mists) in between each stamping. Just look at how dry or wet your stamp is in between stampings and you'll roughly know.

Now, spritz more water and do the second round. This time the images will be less sharp, but you'll still be able to read most of it. This is my favourite way of using this technique.

I mean, look at that AUTUMN! Isn't it yummy? That's Infusions Sunset beach doing it's thing with the oranges and pinks. Looooove that colour.

Then, carry on with much more water to get a watercolour effect. This is also a fantastic result if you just want a more blended background. If you run out of colour, dare to "ink up" your stamp with the leftover water you will have by now in your craftmat (by the way, I forgot to say: use a craft mat for this technique. I love the PaperArtsy one because it's white and you can see the colours of your paints, infusions and inks).
New Stencil
Large Size: 6.25" x 9.5" (16 x 24cm) Price: RRP €6.28 +VAT
PaperArtsy Stencil 292 (PS292)

You know I like a patterned stencil... so what would be better than a repeatable pattern of coffee beans to pair this with ESC27? A double layer pattern of coffee beans on a larger stencil, of course! You can apply a light brown ink through the full beans at the bottom, re-align the stencil and apply a darker ink on the half beans on top. If you're using a pigment ink instead of a dye ink, you could use the light ink on top instead. Also, you can use Grunge Paste to add dimension, either on the 2 layers of beans or just on the top one. Also, these beans don't need to be made out of coffee, you can use the bottom ones on their own, they could be jelly beans! Just change the colour of the ink to red or green and maybe apply later some gloss medium (or glossy accents if you want an enhanced 3D version of jelly beans). These would be a great background for a fun shaker card.
Coffee Roasters

I love how the background turned out on this one. So dark, like a coffee! The beans stay in the background but they are really powerful. I wanted them this dark so the grunge paste of the 2 flourishes would really stand out. It's the perfect frame for a label, especially if it's about coffee. Swap the sentiment for a happy birthday and place inside a gift card for coffee and you've got a Christmas present sorted.

In this case I used ink for both layers of the the coffee beans, but imagine using Grunge Paste tinted in 2 different shades of brown. They would pop up from the paper even more.

This card although seems finished, it's actually kept together by using a 2p coin and magnets (I'll show you in the facebook live later on). These keep the label and the background in place because I had come up with 2 options, 2 labels and 2 frames for this background... I couldn't decide if I wanted a frame and a label with or without gold embossing, so at the moment is a flexible sample that sometimes it looks like this.

Brown and muted like a coffee...

And sometimes it looks like this. With touches of gold, impacting a bit more. Luxurious Chocolate WOW embossing powder used in this one. Which one do you prefer?
PaperArtsy Stencil 293 (PS293)

More patterns! I have in my list of projects to do a doll house, so from this stencil, the top part specially, would be perfect for a wall paper on a miniature scene. The culprit is Alison Bomber and her project of a miniature fire place using some of my stamps from ESC15 as tiles, mind-blowing, go check it out. So the idea has been there for a while and I thought now it was the time to create that pattern! Also, while pattern playing with ESC28, I came across a shape that I liked so much, the snowflake, that I wanted to be able to repeat that pattern in an easier way, so I turned it into a stencil. This could be used to create a quick big repeated pattern for wrapping paper on Christmas, for example, white pigment ink like stazon snowflake on craft paper. Or stencil it onto a tote bag! And the flowers on the left, they look great too as a repeated pattern. You can fill the centres with a pen or add some of those 3D paints that create like 3D pearls (how where they called? Something about pearls, right? I have some, I'm sure... I'll need to dig on my craft supplies)
Monoprinting patterns

I love how these 3 cards turned out. At first I just thought of painting my paper with one colour of paint and applying Grunge Paste through the stencil to show you the different patterns you get, but then I remembered this technique and I thought these backgrounds would look much more interesting.

I selected some Fresco Finish Acrylic paints, as you can see above, grabbed a piece of paper and started to use it as my brush, one paint at a time and colouring 4 different pieces of paper at the same time, to build a series. I learned this technique from Courtney and Leandra at one make and take at Ally Pally and I've also seen Seth doing magic with this.

I think the trick is selecting a range of warm and cold colours and then light and dark tones and if on top of that you add a final touch of gold (or any other metallic) you can't go wrong.

If what you get is too cold for your taste or you want even more texture, then you can add some infusions on top (I added golden sands, yellow one, in one of the papers) and every white spot that could still be seen from the paper would tint into the Infusions colour and would completely shift the result on your card. Just compare them together.

And you can even add another layer on top: embossing powders. I just splashed some water on top and sprinkled in different parts my 3 new embossing powders: Luxurious Chocolate, Pumpkin Latte and Caramel Vanilla. They just add a little touch. Sara showed me that technique.

However, this time I preferred to use the original backgrounds, so I set the infused one aside and used the other paper pieces.

I framed all of them using a slightly larger cardstock, painting the edges with 2 layers of French Roast Fresco Finish paint. I've actually done that for most of my samples in the release. It's the perfect colour (my favourite) to dress up your cards.

And once the background is ready, I go and add Grunge Paste through the stencil.

For the snowflake one I decided to repeat it in a circle, although you can't see the other snowflakes, it still seems it's part of a bigger pattern. You could just leave the snowflake in the middle and it would also look nice.
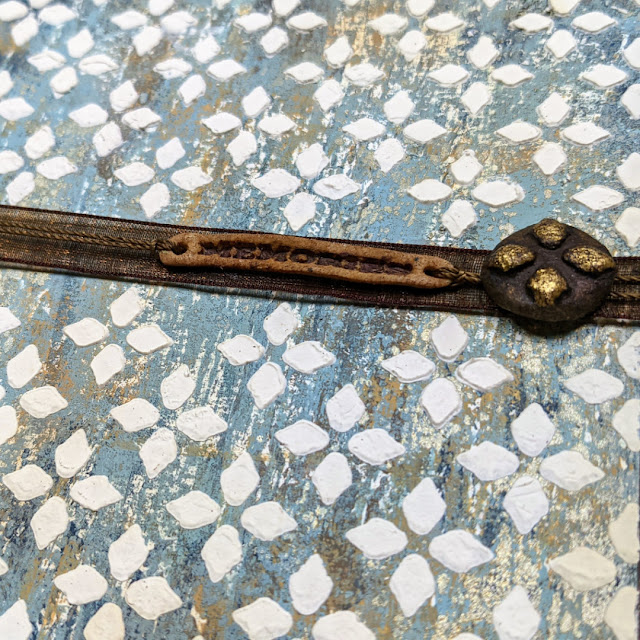
Then for the flowers one, I initially didn't want to show a full pattern so I added some flowers at the top and some at the bottom, but then I changed my mind and of course, the 2 sections of flowers that I had already started stenciling wouldn't match... For that you would need to repeat the pattern methodically, by repositioning as you go though the paper. So I finally decided to continue the 2 patterns (top and bottom) until they met somewhere in the middle and I would divide them with a ribbon.

Then I thought that a ribbon on its own would be too boring, so I took my quick cure clay and stamped the word Memories from ESC29 on it and coloured it with inks and infusions. I also did like a button using the biggest circle on PS294 and one of the same pattern flowers for the centre which I embossed with Luxurious chocolate.

I assembled all with some thread on top of the ribbon and I think it's a very simple, yet effective card. I love how it turned out!

I decided to do something similar for the final pattern. This time I chose the words Thank you. This one didn't turn out that nicely (need more practice on the stamping side!) but overall it looks nice.

I specially love this pattern against the background... It's so easy to cover a large area with this one!
PaperArtsy Stencil 294 (PS294)

This one pairs really well with ESC29, the masks and stencils fit on the labels, so you can either create an inner coloured frame on the labels or colour the inner part of the label in a different colour. I decided to do multi layers for the "road sign" shape, so all the masks and accents can be applied in different colours. Finally, since I love tags and I like to create my own, but I find it really difficult to decide what sizes I want, I decided to help myself and create a mask and a stencil for the tags, so you can trace with a pen or colour with an ink the tag and know where to cut with scissors or with a trimmer. The sizes of the tags allow you to create 12 tags from the big size on an A4 size paper and 17 of the small ones. And both tags nest nicely, you just need to chop the big one from the bottom a bit and there will be a nice even frame all around. The circles are there for you to make the holes and the decorations you normally see on manila tags.
Some quick Halloween tags

It was Halloween time when I created these. Sadly I couldn't share these with anyone, since the release was a secret! But I still had fun creating them. I used one of my oldest stamp sets ESC06 to stamp the branches, the pumpkin and the skeleton (and also the spider you'll see later).

For the back I thought that the flourish from ESC28 would really match a Halloween theme, and of course the sentiment comes from ESC29 (can you see the little bat upside down?).

To create these I just used a piece of Smoothy heavy cardstock and I applied some vintage photo distress ink through the tag stencil with a foam applicator. So I didn't trace the edges of the tag with a pen, they defined themselves with the ink. Then I would cut all the tags and decorate both sides.
Some Christmas cards

I can't explain all the steps that took me to arrive to these tags, but I can show you different stages of the process. They started like the Halloween tags, I stamped and coloured some images from ESC07. I selected the Merry Christmas sentiment from ESC29 and this time I embossed it with Luxurious Chocolate.

I made a mistake and a stain appeared somewhere in the deer tag, so I started adding distress ink (Vintage Photo) to try and cover it and I went too heavy on it but I just realised when all the 3 tags had been applied the same amount of ink. So at the first stage, they looked like this. Very brown.

Then I repainted the images with glaze and infusions and tried to lighten up the background, adding heaps of water, blotting the excess and letting dry. Then I started adding a white pastel, followed by picket fence (white distress ink) with my finger and they ended up like this.

The background was definitely lighter, even a bit blueish, but they still seemed like something was missing. I looked at them and thought that the backgrounds reminded me of the sky on a very misty and cold winter day, so I decided to add snow with a white gel pen until I was finally happy with them.
That was all for today I hope you liked the release. I've video-recorded almost all my samples, so keep an eye on my YouTube channel because the how to videos will keep coming. Today I'm sharing the first of them:
I would love to read your comments about the release. I would have liked to make more samples since I have too many ideas to share, but I didn't have enough time to do them all just yet... They'll keep on coming though on my social media, so I hope to see you there!
Website: https://scrapcosy.com/
YouTube: https://www.youtube.com/c/scrapcosy
Instagram: https://instagram.com/scrapcosy/
Facebook:
- This is my profile: https://www.facebook.com/raquel.burilloperez
- And this is my Scrapcosy's crafty party Facebook Group, for everything Scrapcosy. Come and join me! Share all your creations with everyone in the group!
Teaching Schedule:
This time I'm not teaching any classes, but you can watch any of these 2 classes available on replay or come to my scrapcosy YouTube channel:
- If you want to learn many infusions techniques, you can join the class I taught at Stampers Grove last February
- If you want to try bullet journaling in a vintage style you can join this class at Loobi Crafts
PaperArtsy Stockist List
Our stockists are your go-to source for all PaperArtsy products, and we suggest that you also use the PaperArtsy People Facebook group to source a retailer in your country. Many are members of our FB group and will happily share links to their online stores.
Australia
Bev's Cross Crafts, Spreyton, Tasmania https://www.bevscrosscrafts.com.au/
Crafters Cupboard, Berwick, Victoria www.crafterscupboard.com.au
Memories on the Murray, Murray Bridge, SA https://www.memoriesonthemurray.net/
Natalie May Scrapbooking, Dover Gardens, SA https://nataliemay.com.au/
Scrapbook Superstore & More, South Penrith, NSW https://www.scrapbooksuperstore.com.au/
The Scrapbooker's Confetti Box, Swansea, NSW https://thescrapbookersconfettibox.com/
The Thread Studio, 6 Smith Street, Perth http://www.thethreadstudio.com/
The Thread Studio, 6 Smith Street, Perth http://www.thethreadstudio.com/
The Scrapbook Store, North Perth,WA http://thescrapbookstore.com.au/
Time To Create, www.timetocreate.com.au
Time To Create, www.timetocreate.com.au
Belgium
Cart N Scrap Art, Antwerp, www.cartnscrapart.be
Créatelier Caracolle, Liège, www.createliercaracolle.be
Canada
Clipper Street Scrapbook Company, Langley, BC. www.clipperstreet.com
Paper Art Creations Inc, Leduc, Alberta, www.paperartcreations.com/
Scrapbook Centrale, Dollard Des Ormeaux, Quebec www.scrapbookcentrale.ca
Scrapbook Centrale, Dollard Des Ormeaux, Quebec www.scrapbookcentrale.ca
Scrap Addicts, Edmonton, Alberta www.scrapaddicts.ca/
Scrap and Bean, Edmonton, Alberta scrapandbean.com/
Scrapbooking Fairies, Drayton Valley, Alberta www.scrapbookingfairies.com/
The Paper & ink Boutique, Calgary, Alberta www.paperandinkboutique.com/
The Scrap Yard, Calgary, Alberta, www.thescrapyardcalgary.com/
The Scrap Yard, Calgary, Alberta, www.thescrapyardcalgary.com/
Denmark
Hobbyboden Scrapworld Samso www.hobbyboden.dk
France
Eirl Bancon Cartoscrap, Midi Pyrenees, www.cartoscrap.com
Fée Du Scrap, Saint Sébastien-Sur-Loire, www.feeduscrap.fr/
Horizon Créatif, Ste Jalle www.horizon-creatif.fr
Instant Créatif, La Possession, La Réunion, www.icreatif.re
Katzelkraft, Ingwiller www.katzelkraft.fr/en/
Kerudoc Creation, St Yvi www.kerudoccreation.com
Le Grenier des filles, Pierre Benite
Page de scrap, Saint Pavace, www.pagedescrap.fr/
Scrap Déco Home, Goutrens, www.scrapdecohome.fr/
Toutencolle, Dun sur Avon www.toutencolle.fr
Finland
Heidin Korttipaja, Istunmaki, www.korttipaja.fi/fi
Piia Paper, Kittilä, www.piiapaper.com/fi
Germany
Stempelbar, Berlin, www.stempelbar.de
Stempeloase Munich, Munich www.stempeloase.de
Stempelfee Shop, Hilden www.stempelfee-shop.de
Stempellaedle, Stuttgart, www.stempellaedle.de/shop
Greece
Scraps N Pieces, Kallithea www.scrapsnpieces.gr
Italy
Immagine SAS di Rapaccini, Rome, www.immaginelab.com
Il Negozio Della Mamma Di Cle, Torino, www.ilnegoziodellamammadicle.com
Marte Savona, Savona, www.martesavona.it
Pezze E Colori, Lissone, www.pezzeecolori.it/
Piccole Passioni, Siena, www.piccolepassioni.it
Piccole Passioni, Siena, www.piccolepassioni.it
Japan
La Wadao, Odawara, Kanagawa, www.lawadao.com
Tiny Dots, Funabashi-shi, Chiba www.tinydots.shop-pro.jp
Netherlands
De Hobbystudio, Genemuiden, www.dehobbystudio.nl/
Doe@ding,Spijkenisse doeading.nl/
Hobbycompleet de Duif, Leeuwarden www.hobbycompleet.nl
Stampingcorner, Capelle Aan Den Ijssel www.stampingcorner.nl
Norway
Hobbygarasjen, Kopervik, www.Hobbygarasjen.no
Spain
Cien por Cien Manualidades, Barcelona, www.100x100manualidades.es
Ideas 10 Manualidades Y Scrapbook, Bilbao ideas10manualidades.com/
Marakiscrap, Tarragona, www.marakiscrap.com
Scrap & Papers Experiences, Barcelona, www.scrappapersexperiences.com
The Paradise Corner, Barcelona, www.theparadisecorner.com
Sweden
Butik Elva, Staffanstorp, www.butikelva.se
Taiwan
Mandy's Cards, Taipei www.facebook.com/mandy.card.77
United Kingdom
Amelia's Creative Crafts, Studley, Warwickshire www.ameliascreativecrafts.co.uk
Art from the Heart, Harrogate, Yorkshire www.afth.co.uk
Blade Rubber Stamps, London www.bladerubberstamps.co.uk
Crafts at The Malthouse, Herstmonceux, East Sussex, www.themalthouse.co.uk/
Fave Rave, Stourbridge, West Midlands www.shabbychicstencils.co.uk
Loobi Crafts, Leighton Buzzard, Bedfordshire, www.loobicrafts.co.uk
Papermaze, Ipswich, Suffolk www.papermaze.co.uk/
Stampers Grove, Springbank, Lilliesleaf, Melrose,Scotland www.stampersgrove.co.uk
That's Crafty, Romford, Essex www.thatscrafty.co.uk
That's Crafty, Romford, Essex www.thatscrafty.co.uk
The Artistic Stamper Craft Store, Faversham, Kent www.theartisticstamper.com
The Forget me not Kraft Kabin, Rochford, Essex, www.TheForgetMeNotKraftKabin.co.uk
USA
Artistic Artifacts, Alexandria, VA www.artisticartifacts.com/
Artistic Studio Creations, Fayetteville, Georgia www.facebook.com/ASCbyCrystal
Craftiness, Chatsworth, CA, www.craftinessonline.com/
Ephemera Paducah, Paducah, Kentucky www.ephemerapaducah.com
Everything Scrapbook & Stamps, Lake Worth, Florida www.everythingscrapbook.com
Frantic Stamper, Oregon www.franticstamper.com
Free Heart LLC, Denver, Colarado, www.freeheartllc.com/
Golden Hills PaperCrafts, Fairfax Station, Virginia, www.goldenshillpapercrafts.com/
Joggles, West Warwick, Rhode Island, www.joggles.com
PaperCraft Clubhouse, Westbrook, Connecticut, papercraftclubhouse.com/
Qingquing's Stamp Shop, Portland, Oregon
Runaway, Art & Craft Studio, NE Salem, Oregon www.runawayart.com/
Simon Says Stamp, Columbus, Ohio www. simonsaysstamp.com
The Ink Pad, New York, www.theinkpadnyc.com
Topflight Stamps, Irmo, South Carolina topflightstamps.com/
Our brand is only available from established stockists who are VAT/ GST/ sales tax registered and for whom product education is a core principle. We would rather supply a few hand selected stockists, than the greater masses. If you would like to apply to be a stockist, you can find our more about our supply criteria here.
PaperArtsy Links
Facebook Group PaperArtsy People
Facebook Page PaperArtsy
Twitter twitter.com/paperartsy
Instagram instagram.com/paperartsy
Pinterest uk.pinterest.com/paperartsyhq
YouTube youtube.com/user/PaperArtsy


12 comments:
Fantastic release which compliments your previous releases really well. Congratulations. Gorgeous samples too!
Raquel, I have been biting my nails in anticipation for this release! I adore your design concepts based on vintage imagery and hand illustration and these are every bit that and more! Wow! My coffee loving heart is beating hard over the stamps and amazing labels and the flourishes are totally gorgeous. I can't wait to get my hands on these beauties and thank you for the enjoyable, bubbly post and your attention to detail again and again. xx, Autumn
Ohhh Raquel these are beautiful stamps and stencils!! I can't believe how much you have fitted onto every set! Those coffee beans are the coolest, stamped and stencilled!!!I know you will point out ideas that would never occur to me too! Looking forward to seeing the LIVE in PA Peeps!! Congratulations on another amazing relase!
Love the dimension on your coffee cards and that label set covers every occasion and more. I think I might need a coffee bean stencil. Hugz
Wow! What a great release and what beautiful samples!
Thank you so much for creating a coffee set. I like tea, but I love, Love, LOVE coffee!
I also love the flourish and labels sets and all of the stencils!
Love the damask motifs and labels! Great detail on the cappuccino too... Lovely samples.
Thanks James!! :)
Thanks so much Autumn! I'm really happy you liked these! I'm looking forward to seeing what you create with them!! 😘😘
Thanks so much!! The more I use them, the more I like them! Big hug!
Thanks so much! I'm really happy you liked these!😘😘
I'm happy to read this from a coffee lover! So happy you like these!
Thanks so much!! Big hug!
Post a Comment