Showing posts with label Reinkers. Show all posts

Wednesday, 13 November 2019

2019 #18 Shaving Foam: Wings, hats and numbers with I&D {by Corrie Herriman}

2019 Topic 18: Shaving Foam


Our bloggers have found this topic a bit of a challenge, and very messy! But it smells nice, and Corrie has certainly put this foam through its paces  with inks and stencils to create some interesting marbled backgrounds! ~ Leandra.

Hi everyone, it's Corrie here with you today, and I'd like to share the projects I made with the shaving foam technique.
I chose this topic because I had never tried the shaving foam technique before. I really enjoyed creating the final projects with the backgrounds I made with the technique but  making the actual backgrounds not so much. It is very messy ! On the upside: it smells really nice !  So let's start ! 


These are the backgrounds (all on PaperArtsy {Smoothy Card} stock) that I created. I used Distress Oxide reinkers and a cheap can of shaving foam. If you want to do this, make sure to use foam and not gel. Here is the first finished project:


Start with a plastic tray or paper plate, squirt on the shaving foam and smooth out a little. I used a pallette knife for this. Then use your reinkers to drop colour all over the foam. I used three shades of blue: {Tumbled Glass}, {Faded Jeans} and {Broken China}.
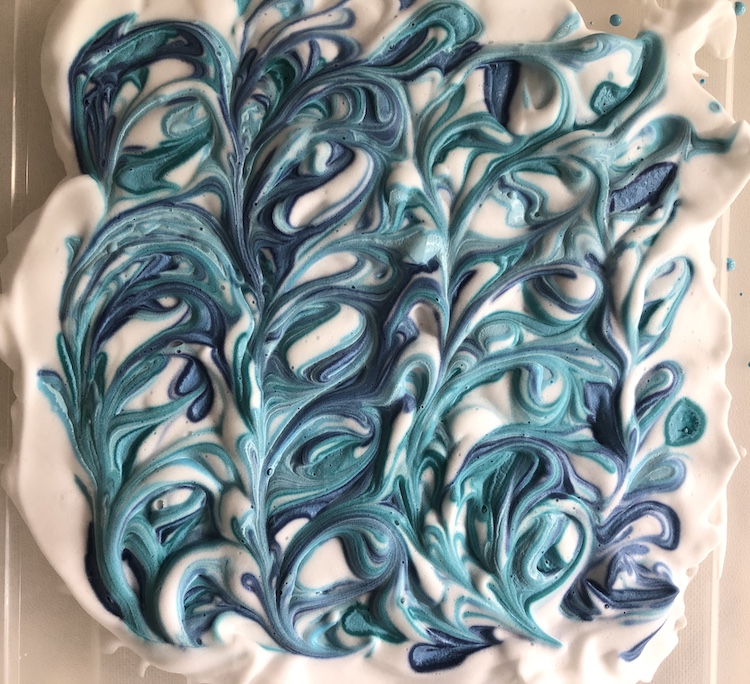

Next use a cocktail stick or a knitting needle to create patterns, making sure not to mix the colours up too much, then put your card in and press gently into the foam and take it out again. Use an old credit card to scrape off the foam and you end up with a nice marbled background. 


I forgot to take a photo of when it was just printed. So here's one where I already started decorating it.

I stamped the background randomly using I&D {MN29} and {MN75} and then used a brayer and Fresco Finish Chalk Acrylic in {Antarctic} to tone it down a little. I was then ready for the main image:


I altered the image by masking off the butterfly on his head and replacing it with a hat. 


He is from I&D set {Wings2/WGS2}, the hat and the sentiment from I&D set {Pierrot2/PT2}.


Interesting fact I saw on YouTube: if you leave your foam with ink sitting for 4-5 hours and then take a print, the effect is totally different as you can see in the photos above. I think I prefer this to the sharp marbling.


For the next project I used greens and a beige: {Antique Linen}, {Twisted Citron} and {Peeled Paint}.


I used these ATC's for the next project: 


These were made in the same way as the card by stamping the background randomly with I&D stamps {Man of Numbers 2/MON2} and {MN23}.


For the main images I used I&D {Wings2/WGS2}. I added some colour the the faces and stamped the big butterfly with Distress Oxide Ink so I could add a little more colour to it. I just glued it over the top for the finished result. 


This card is my favourite of the four projects I did, I love the colours and those girls are sooo cool! Here's how:


I used the colours {Mustard Seed}, {Fossilized Amber}, {Spiced Marmelade} and {Carved Pumpkin}. First I took some prints as before and then I used a stencil {PS016} by Emma Godfrey to make another background:


Cool I think. So this became the background for my girls.
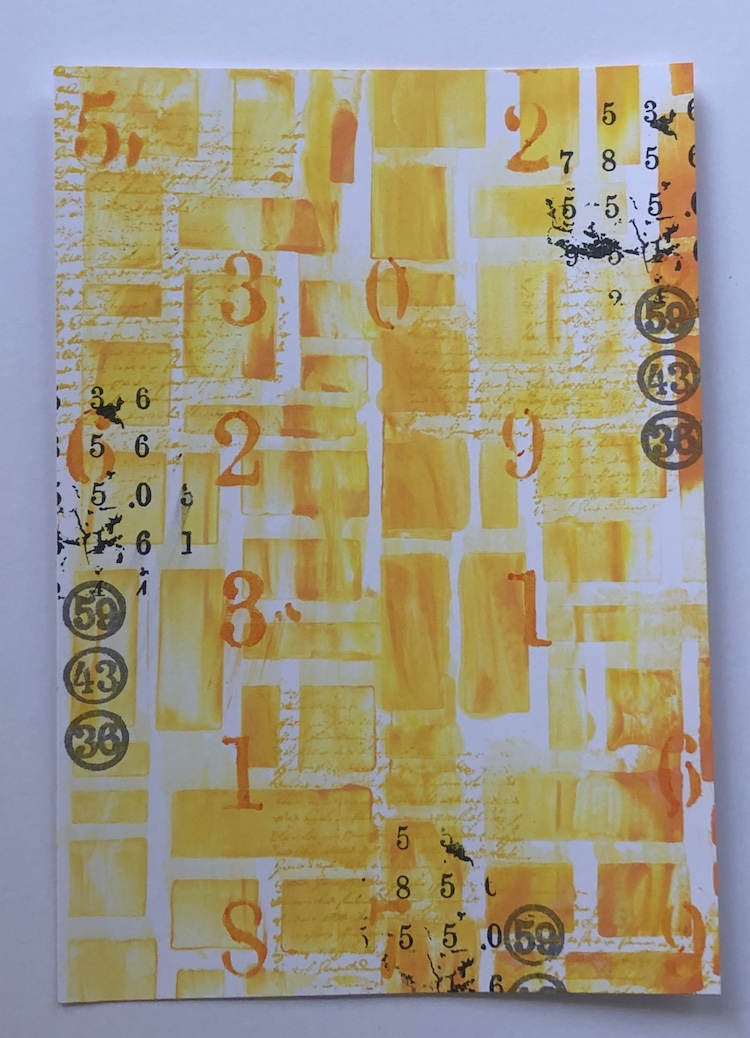

Again I stamped the background randomly using stamps I&D {MN23} and {MN75} and a small stamp from I&D {Pierrot2/PT2}. To add some more interest I added some stencilling with PA stencil {PS021}.


I decided that because they are "mad as a hatter" to add some bunting to the top of the card. I just used one of the hats from the set for this.


I also have a bonus project. After I took the prints that I wanted I used the leftover colour in the shaving foam and scraped it over another piece of Smoothy Card through a PaperArtsy mask {PM007} by Emma Godfrey to make another background. I then used this background for a journal page. You can see all the backgrounds I made in the photo at the top of this post.


Again I created this in the same way as the other three projects by stamping and stencilling the background. I used PaperArtsy stencil {PS021} and stamps I&D {MN23}, {Man of Numbers2/MON2}.


I added the Man of Numbers and the sentiment along with some doodling along the edges and it was done.


As I said at the beginning, I really enjoyed making the finished projects on the backgrounds I made with the shaving foam and reinkers and it smells divine ! It is very messy though so if you are thinking of doing it make sure you have enough kitchen roll to clean up. I do like the results; my favourites are the blue ones I took after the foam had been sitting for about 4 hours. The foam disintegrates and takes the ink with it, it looks a terrible mess but makes lovely backgrounds. 
Thank you so much for spending some of your time over here at the blog today! I really appreciate it. Please visit me in my other locations too:


Thursday, 27 September 2018

2018 #16 Reinkers: Custom Colours with EEV {by Lucy Edmondson}

2018 Topic 16: Reinkers


I do love a custom-made ink pad, and Lucy shows why they can be such a great idea in this post! Even though she has made it for a specific stamp, I bet you can use the same ink pad for lots of other stamps too!  love that gradient of colour !!~ Leandra

Hi everyone, it's Lucy from Lucy's True Colours here with you today, to share a variation on Tim Holtz's custom ink pad, updated with Distress Oxide Reinkers, with a project using Ellen Vargo Eclectica stamps to make some useful gift bags.

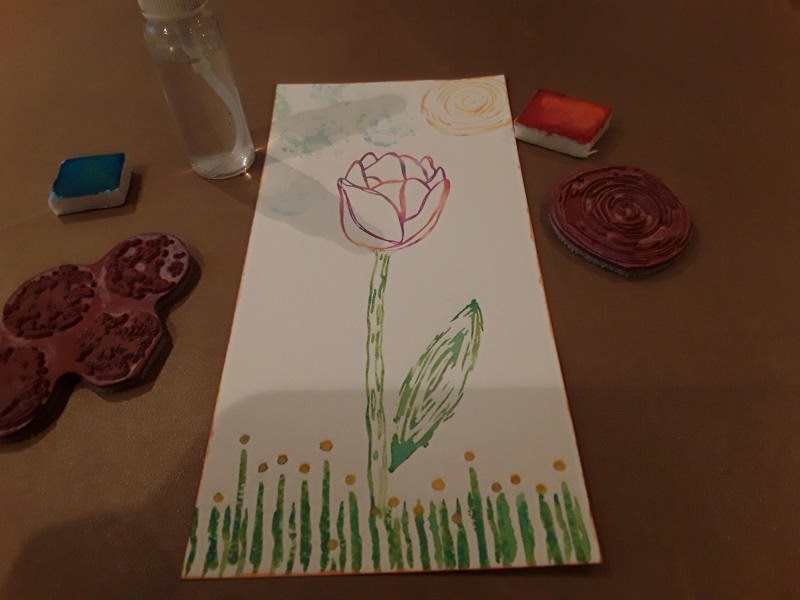
I remember being completely blown away when I saw Tim's idea for custom ink pads using cut n dry felt, details here. I couldn't believe it could really work, but I thought it was a complete game changer. I loved the idea of not always having to have a black outline on images, and I thought it would be ideal when you want a huge number of images such as Christmas cards or wedding invitations. This post is by way of an experiment as I wasn't sure if it would work with Distress Oxide reinkers. When I realized that it does, but that you have to spritz your stamp with water, I changed tack and decided to do a faux watercolour project, using watercolour paper. I found you could use either Archival or StazOn to stamp your image onto the felt, but for simpler images such as the stems of the flowers, I simply added a couple of shades of green reinker directly onto a piece of felt and dabbed it onto the stamp. I kept all my pieces of felt in self-seal bags once I had inked them.

The other use I put the reinkers to was making a background using photo paper with a simple spritz and dip method. I loved the marbling effect on the photo paper but I didn't like using it in some ways as it tended to warp and was generally not a very user friendly product.


Whilst making this project, I was working with four sets of Ellen Vargo stamps, one was a set of three flowers which each had a sentiment, and the other three were abstract background stamps. As I looked at them, I wondered if I could perhaps use some of the abstract elements to create a design around my flowers. I thought the concentric circle shape could be my sun, the similar square shape could be a tub, the large bubbles could be clouds, the two sizes of lines could be grass, and the lines with dots could be tiny flowers. It was fun looking at the stamps in a new way to create some detail around the flowers. 

I decided my project would be gift bags as I find it incredibly useful to have these to hand to give little gifts to friends if I am going to someone's house for example, and I felt the custom ink pads would enable me to quickly replicate the design and make plenty.


You'll need to stamp your image onto the felt side of the cut n dry felt using a permanent black ink. I was only concerned about having the flower heads. 

The flowers are Eclectica Ellen Vargo EEV10


I inked up the felt with the following colours of Distress Oxide reinkers, working upwards from dark to light, Fired Brick, Spiced Marmalade, Carved Pumpkin, Mustard Seed, and Squeezed Lemonade


I then inked up a small piece of cut n dry felt with Peeled Paint and Lucky Clover reinkers and used this for the stem. I pressed the flower head firmly into the prepared custom pad then spritzed the whole stamp with water, before pressing into the watercolour paper and leaving a moment. The leaf is from Eclectica Ellen Vargo EEV02.


For the grass I used the same green cut n dry felt and the two line stamps from Eclectica Ellen Vargo EEV05.


Here's a picture of the tulip stamp, just to mention the colours I have used here. They are Seedless Preserves, Picked Raspberry, and Dusty Concord. I think they have oxidized a bit more here. 


For the tiny flowers at the bottom I have used a stamp from the same set as before, Eclectica Ellen Vargo EEV05, and added little drops of Mustard Seed reinker using a paint brush.


For the clouds I've used the large bubbles from Eclectica Ellen Vargo EEV06 with Broken China, and for the sun I have used the concentric circle from Eclectica Ellen Vargo EEV02. For the tub with the echinacea stamp I have used the square from Eclectica Ellen Vargo EEV02 with the same colour combination as I used for the tulip.


I made a background for my watercolour panels using photo paper with Broken China, Peacock Feathers, Blueprint Sketch, and Salty Ocean.


To finish off, I painted some resin flowers with Fresco Finish paints in China, Tango, Bubble Gum, and Plum, to tie in with the colours used. I added the sayings which went with the flowers stamps, and a piece of lace down the side of my panels, and adhered them to my Kraft gift bags.


As this was very much an experiment for me, I wanted to give an honest appraisal of whether it was worth doing or not. I feel the Tim Holtz custom ink pad with the Distress Reinkers and the felt is definitely worth doing but I didn't think it was so great with the Oxides as it was a completely different effect, as you needed to spritz it. Also the ink wicked a lot on the felt so if you weren't using complementary colours this might be a problem. I also felt the oxidization effect didn't particularly show up. I felt it was really worth using the felt for the mini Oxide ink pads though. I also felt the Oxide reinkers were beautiful instead of the pads for dip and spritz backgrounds. Having tried these techniques I felt that for me, I would be quite happy using just reinkers and felt and not using the pads. The ink is so concentrated and so versatile. I really enjoyed using the Ellen Vargo stamps in a different way! I will definitely be using Tim's technique for my Christmas cards this year, but maybe with his original Distress Inks!

Blog: Lucy's True Colours
Facebook:
Twitter: @CraftyLuce


To join our challenge and win a £50 PaperArtsy gift voucher:
Simply make something arty relevant to the topic, and link your creation from any social URL (eg. Instagram, Pinterest, Blog Post etc) sharing your original make to this challenge page.

The current topic link Topic 16: Reinkers will close 17:00 (London Time) Sunday, September 30th 2018, and the winner will be announced 2 hours later at 19:00.

All links go in the draw to win a PaperArtsy £50 gift voucher. Please make sure we can contact you as a prize winner - it helps if you share your contact info from the platform you opt to use. 

Prize conditions: Please note if you are a successful prize winner our online shopping cart will give you £50 off the subtotal of products in your basket. This means you will need to pay the relevant postage on the order.  We cannot figure out how to create a prize with a  zero value, but I guess even paying the postage only is still a good deal right!
Good Luck! If you have any questions, don't hesitate to ask!

Wednesday, 26 September 2018

2018 #16 Reinkers: Coloring fabric with EEG {by Anneke de Clerck}

2018 Topic 16: Reinkers


 Wow, this looks like so much fun!! Fabric, paper, stitching and plenty of inky goings on! Anneke has created a truly wonderful project for you in this post! ~ Leandra

Hi everyone, it's Anneke here today. I'd like to share an art journal with you I made for the current "Reinkers" challenge.

I admire the work of Roben Marie Smith. She often works with fabric and ribbon and I see lots of stitches on her projects. Inspired by her I decided to make my own project using fabric, ribbon and stitches.

First I spent an afternoon coloring strips of fabric, ribbon and gauze with the regular Distress Ink reinkers. The next day I used the result of this coloring session to create an art journal. It was super fun and easy to put together. For the inside pages I've chosen a good quality watercolor paper. That's the benefit of making your own art journals, you can fill them with any type of paper you like working on.


For the base of the cover I used a piece of firm turquoise felt (17 x 30 cm). I stitched colored strips of fabric (+/- 2,5 cm wide) on top of the felt. 


To color the strips I applied 4 drops of the regular Distress Ink reinker on a craft sheet and sprayed water on top. I put torn strips of white fabric into that puddle. On some strips I worked with only one color, on others I used 2 matching colors.


Depending on the amount of water I added I ended up with softer or brighter colors.


I used the following Distress Ink reinkers: Shaded Lilac, Tattered Rose, Twisted Citron, Broken China, Picked Raspberry, Ripe Persimmon, Cracked Pistachio, Squeezed Lemonade, and Weathered Wood. I noticed it took some time for the colored strips to dry. 


After drying I machine stitched the strips on the felt with a simple straight stitch using turquoise thread. I started on the right side of the felt panel, aligned the edge of the first strip to the edge of the felt panel. I put each strip partially on top of the previous one before stitching. After covering the whole felt panel with strips of fabric I folded the leftover fabric at the top and bottom to the backside and attached it to the felt with double sided tape.


I alternated blue/green strips with pink/orange/lila strips. Love the distressed look of the torn strips. 


At the backside I covered the felt with a sheet of canvas paper. After decorating the canvas I used double sided tape to attach it to the felt.


I painted the canvas using a flat brush and a mixture of Fresco Finish Chalk Acrylics Snowflake and Bubble Gum. 


I overstamped the inside covers with stamps from the EEG17 & EEG22 stamp sets.  While art journaling the inspiring quotes will help me over the fear of the blank page :)
Love the font style of the quote stamps as well, they are very versatile!


The felt base of the cover is very bendable/flexible. I didn't have to make crisp folds at the spine as I'm usually doing while making covers. 

I added 2 signatures to the colorful cover. I started by cutting 10 sheets of watercolor paper from a watercolor paper pad by Prima (size 17 x 26 cm). I folded 5 sheets in half and nested the pages into each other, repeated this step for the second signature.


I set 6 eyelets into the spine. Two in the middle of the spine and the others 2 cm from the head and tail.


With an awl I made 3 holes in each signature and I used a three hole pamphlet stitch to attach the signatures to the cover. I did the sewing with turquoise waxed thread.


I colored a bunch of white ribbon with the Distress Ink reinkers as well. 


As my fingers were blue and green already anyway, I also colored a few strips of gauze.


I used the ribbon to make a removable closure for the art journal. I wanted the closure to be an eye catcher so I stamped the big flower from the EEG22 set on watercolor paper using Archival Ink Jet Black. I water colored the flower using Distress Ink re-inkers Twisted Citron, Cracked Pistachio and Broken China. I cut it out, set an eyelet in the middle of the flower and attached 2 long strips of ribbon by making a knot.


To decorate the cover I made a collage using gesso-ed book text, colored gauze, a pink strip of fabric, green ribbon and a stamp from the EEG17 stamp set. I stitched the collage to the cover before adding the canvas backside.

Because Distress Ink reinkers have intense colors I ended up with brightly colored strips of fabric. That's just what I'm fond of! And I love the Distress Ink color palette, don't you?

I rarely use my sewing machine while making art. I love seeing stitches on other crafters cards, books or art journal pages but most of the time I'm too lazy to pick up my own sewing machine :) On this occasion I had the courage to thread my machine and I didn't regret it. I have to do this more often. 

I kept the decoration of the cover simple. I wanted the flower and the collage/quote to be the focal points. I'm very happy with how the closure turned out. That flower designed by Emma Godfrey is one of my favorite stamps.

I hope I could inspire you to colour some fabric or ribbon yourself and maybe make your own art journal filled with your favorite type of paper. Don't forget to link your project to the challenge page.

I can't wait to see what you come up with!


To join our challenge and win a £50 PaperArtsy gift voucher:
Simply make something arty relevant to the topic, and link your creation from any social URL (eg. Instagram, Pinterest, Blog Post etc) sharing your original make to this challenge page.

The current topic link Topic 16: Reinkers will close 17:00 (London Time) Sunday, September 30th 2018, and the winner will be announced 2 hours later at 19:00.

All links go in the draw to win a PaperArtsy £50 gift voucher. Please make sure we can contact you as a prize winner - it helps if you share your contact info from the platform you opt to use. 

Prize conditions: Please note if you are a successful prize winner our online shopping cart will give you £50 off the subtotal of products in your basket. This means you will need to pay the relevant postage on the order.  We cannot figure out how to create a prize with a  zero value, but I guess even paying the postage only is still a good deal right!

Good Luck! If you have any questions, don't hesitate to ask!