Showing posts with label JOFY103. Show all posts

Monday, 2 January 2023

2023 Topic 01: Shrines {by Victoria Wilding} with JoFY stamps


Hi everyone

Victoria here with you today.

I hope you all had a magical festive season and welcomed 2023 with peace and happiness. The start of a new year is always so full of possibility, with new opportunities and adventures ahead, but, it is also a time of reflection and looking back at memories past. The topic 'Shrines',  naturally led me to thinking about how we remember those no longer with us, who won't join us on 2023's journey.

Pocket shrines have been used in many religions, over hundreds of years, as a way of keeping faith close during travels. Traditionally containing imagery of religious icons and prayers, they are extremely personal pieces and highly portable. The concept of something, or someone, leaving a mark also ties in nicely to the first theme of 2023 'Tracks'. Tracks leave a mark and this led me to thinking about the many ways marks may manifest. I started to consider the physical marks left behind by a person, through objects and possessions (e.g. jewellery, photos, clothes) and the emotional marks made in the memories of those they leave behind (e.g. characteristics, sayings, favourite pastimes and music).

It struck me that instead of using a pocket shrine as a religious object, one could also be made to celebrate the life of a loved one and so, I decided to create a deeply personal pocket shrine project, for my Mum, who I sadly lost in 2021. This would literally carry her with me into the new year, keeping her memory alive and make another kind of mark, one on the present from the past.


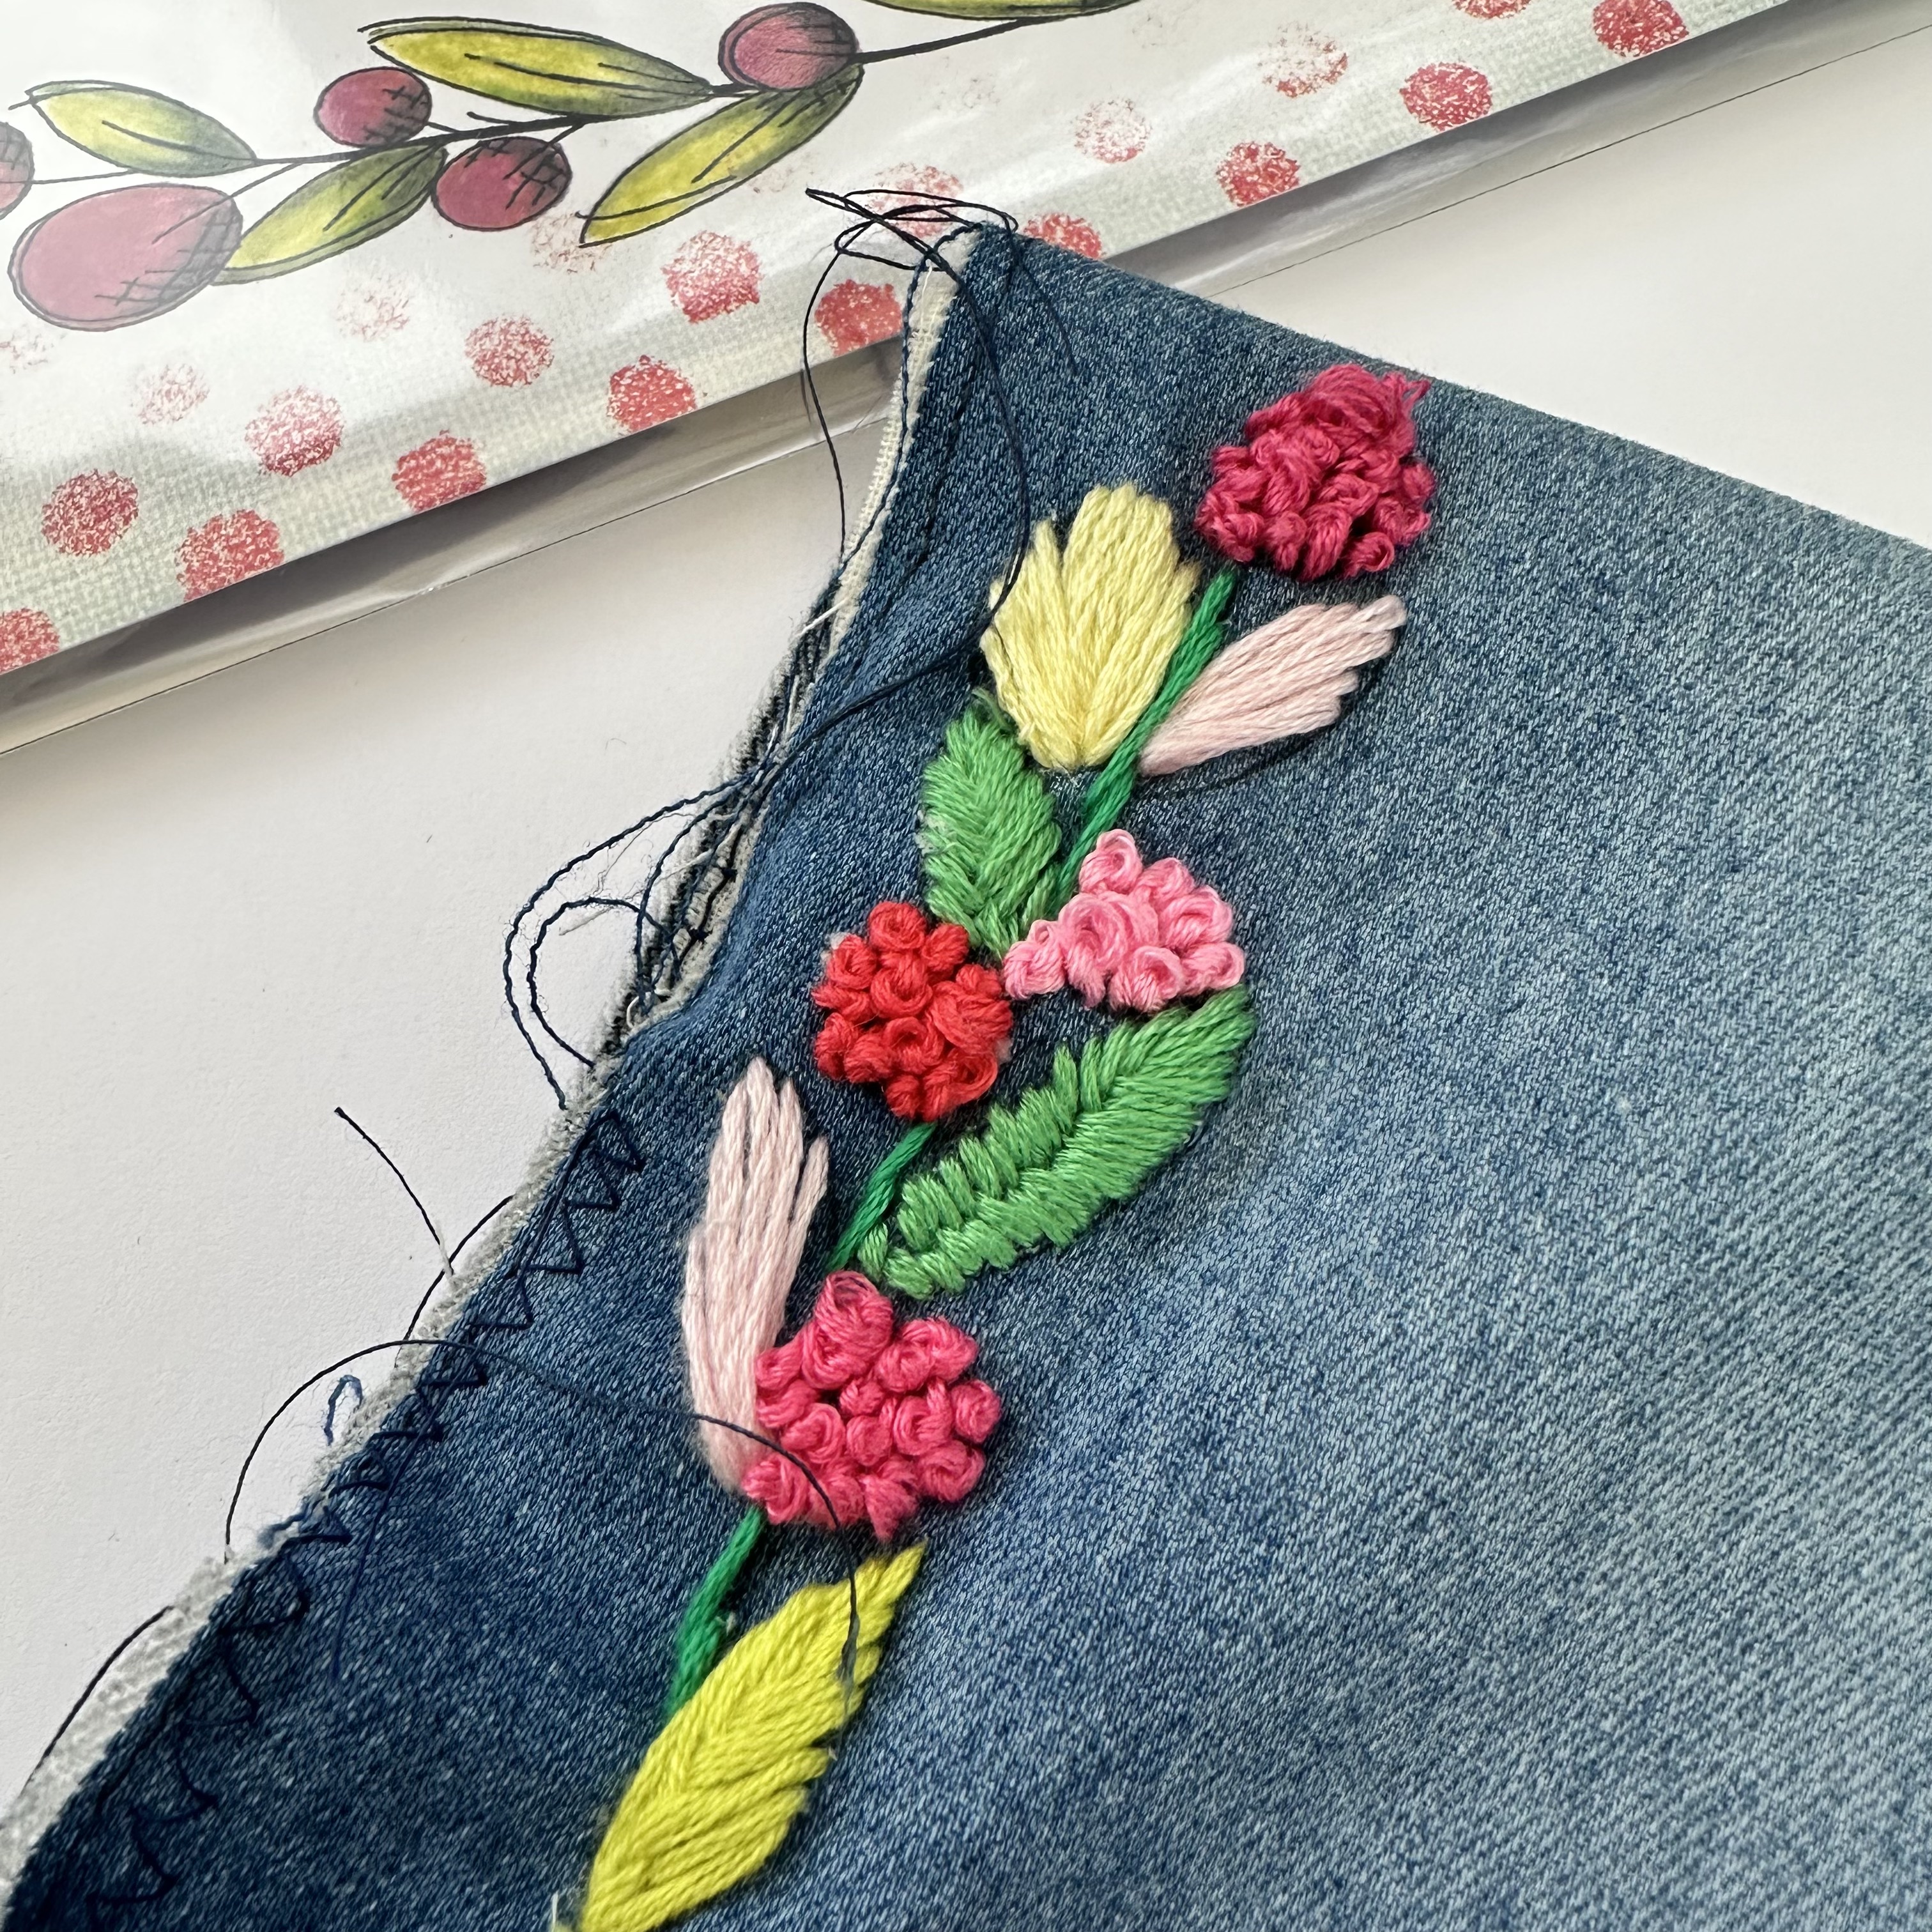
My finished pocket shrine is perfectly imperfect. It's a little treasure trove of Mum and provides a beautiful visual reminder of her. It celebrates who she was and offers a way for me to figuratively hold her close. And it got my new year off to a positive start, encouraging me to grow by developing new creative skills with embroidery, almost like Mum was giving me a little nudge.


I started out by deciding what objects and materials to use for my pocket shrine. I wanted to use fabric from Mum's old clothes as the main substrate and gathered some photos and jewellery that she was really fond of. In her final years she had dementia and she kept a small jewellery box of treasures close at hand which offered comfort and reassurance in her times of confusion. These were the perfect choice for inclusion in my pocket shrine.

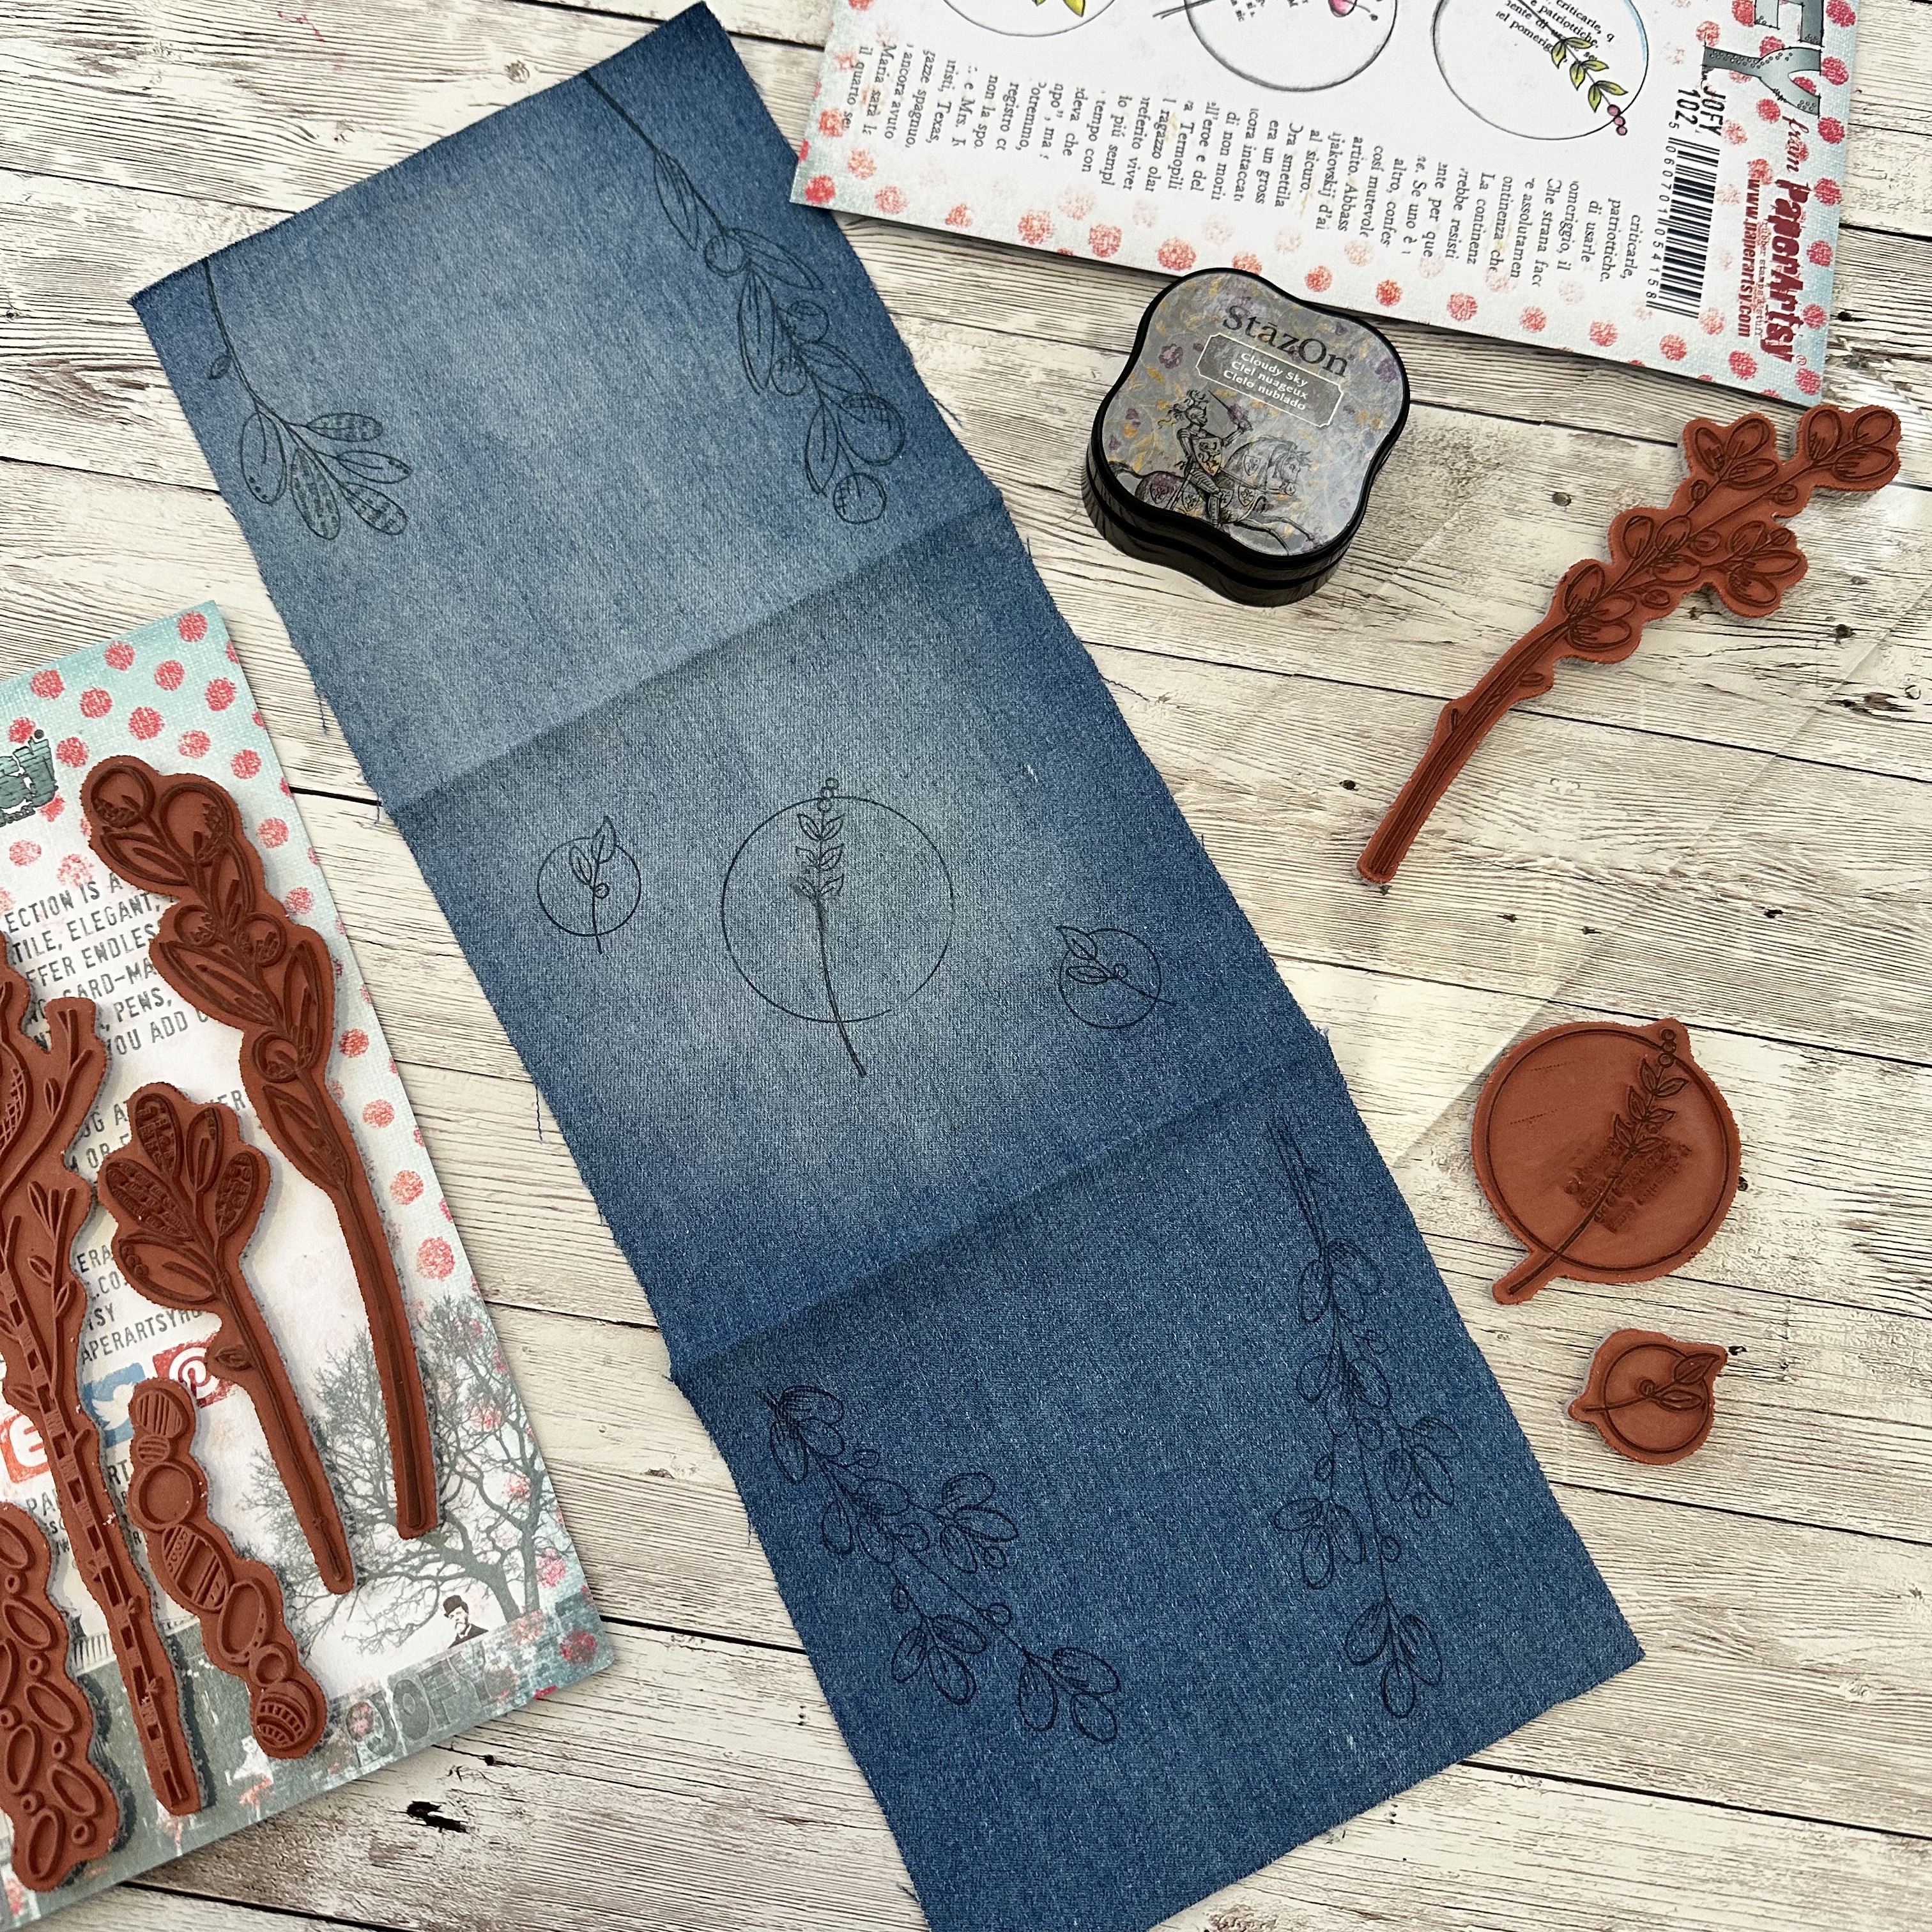
I wanted to keep the project within my pretty floral style. My love of flowers comes directly from Mum and she nurtured my creativity from a really young age, so the combination of the two was always a very natural direction to take my creative practice in. I selected two PaperArtsy A5 stamp sets by JOFY (JOFY102 and JOFY103) and decided to use the simple outlines as a template to create some floral embroidery as a focal point on the finished piece.

Finally I decided to construct a tri-fold shrine case from fabric using a rectangular template which would be easy to put together with my limited sewing experience. My plan was to decorate the outside using the JOFY florals before placing Mum's jewellery and photo's on the inside.


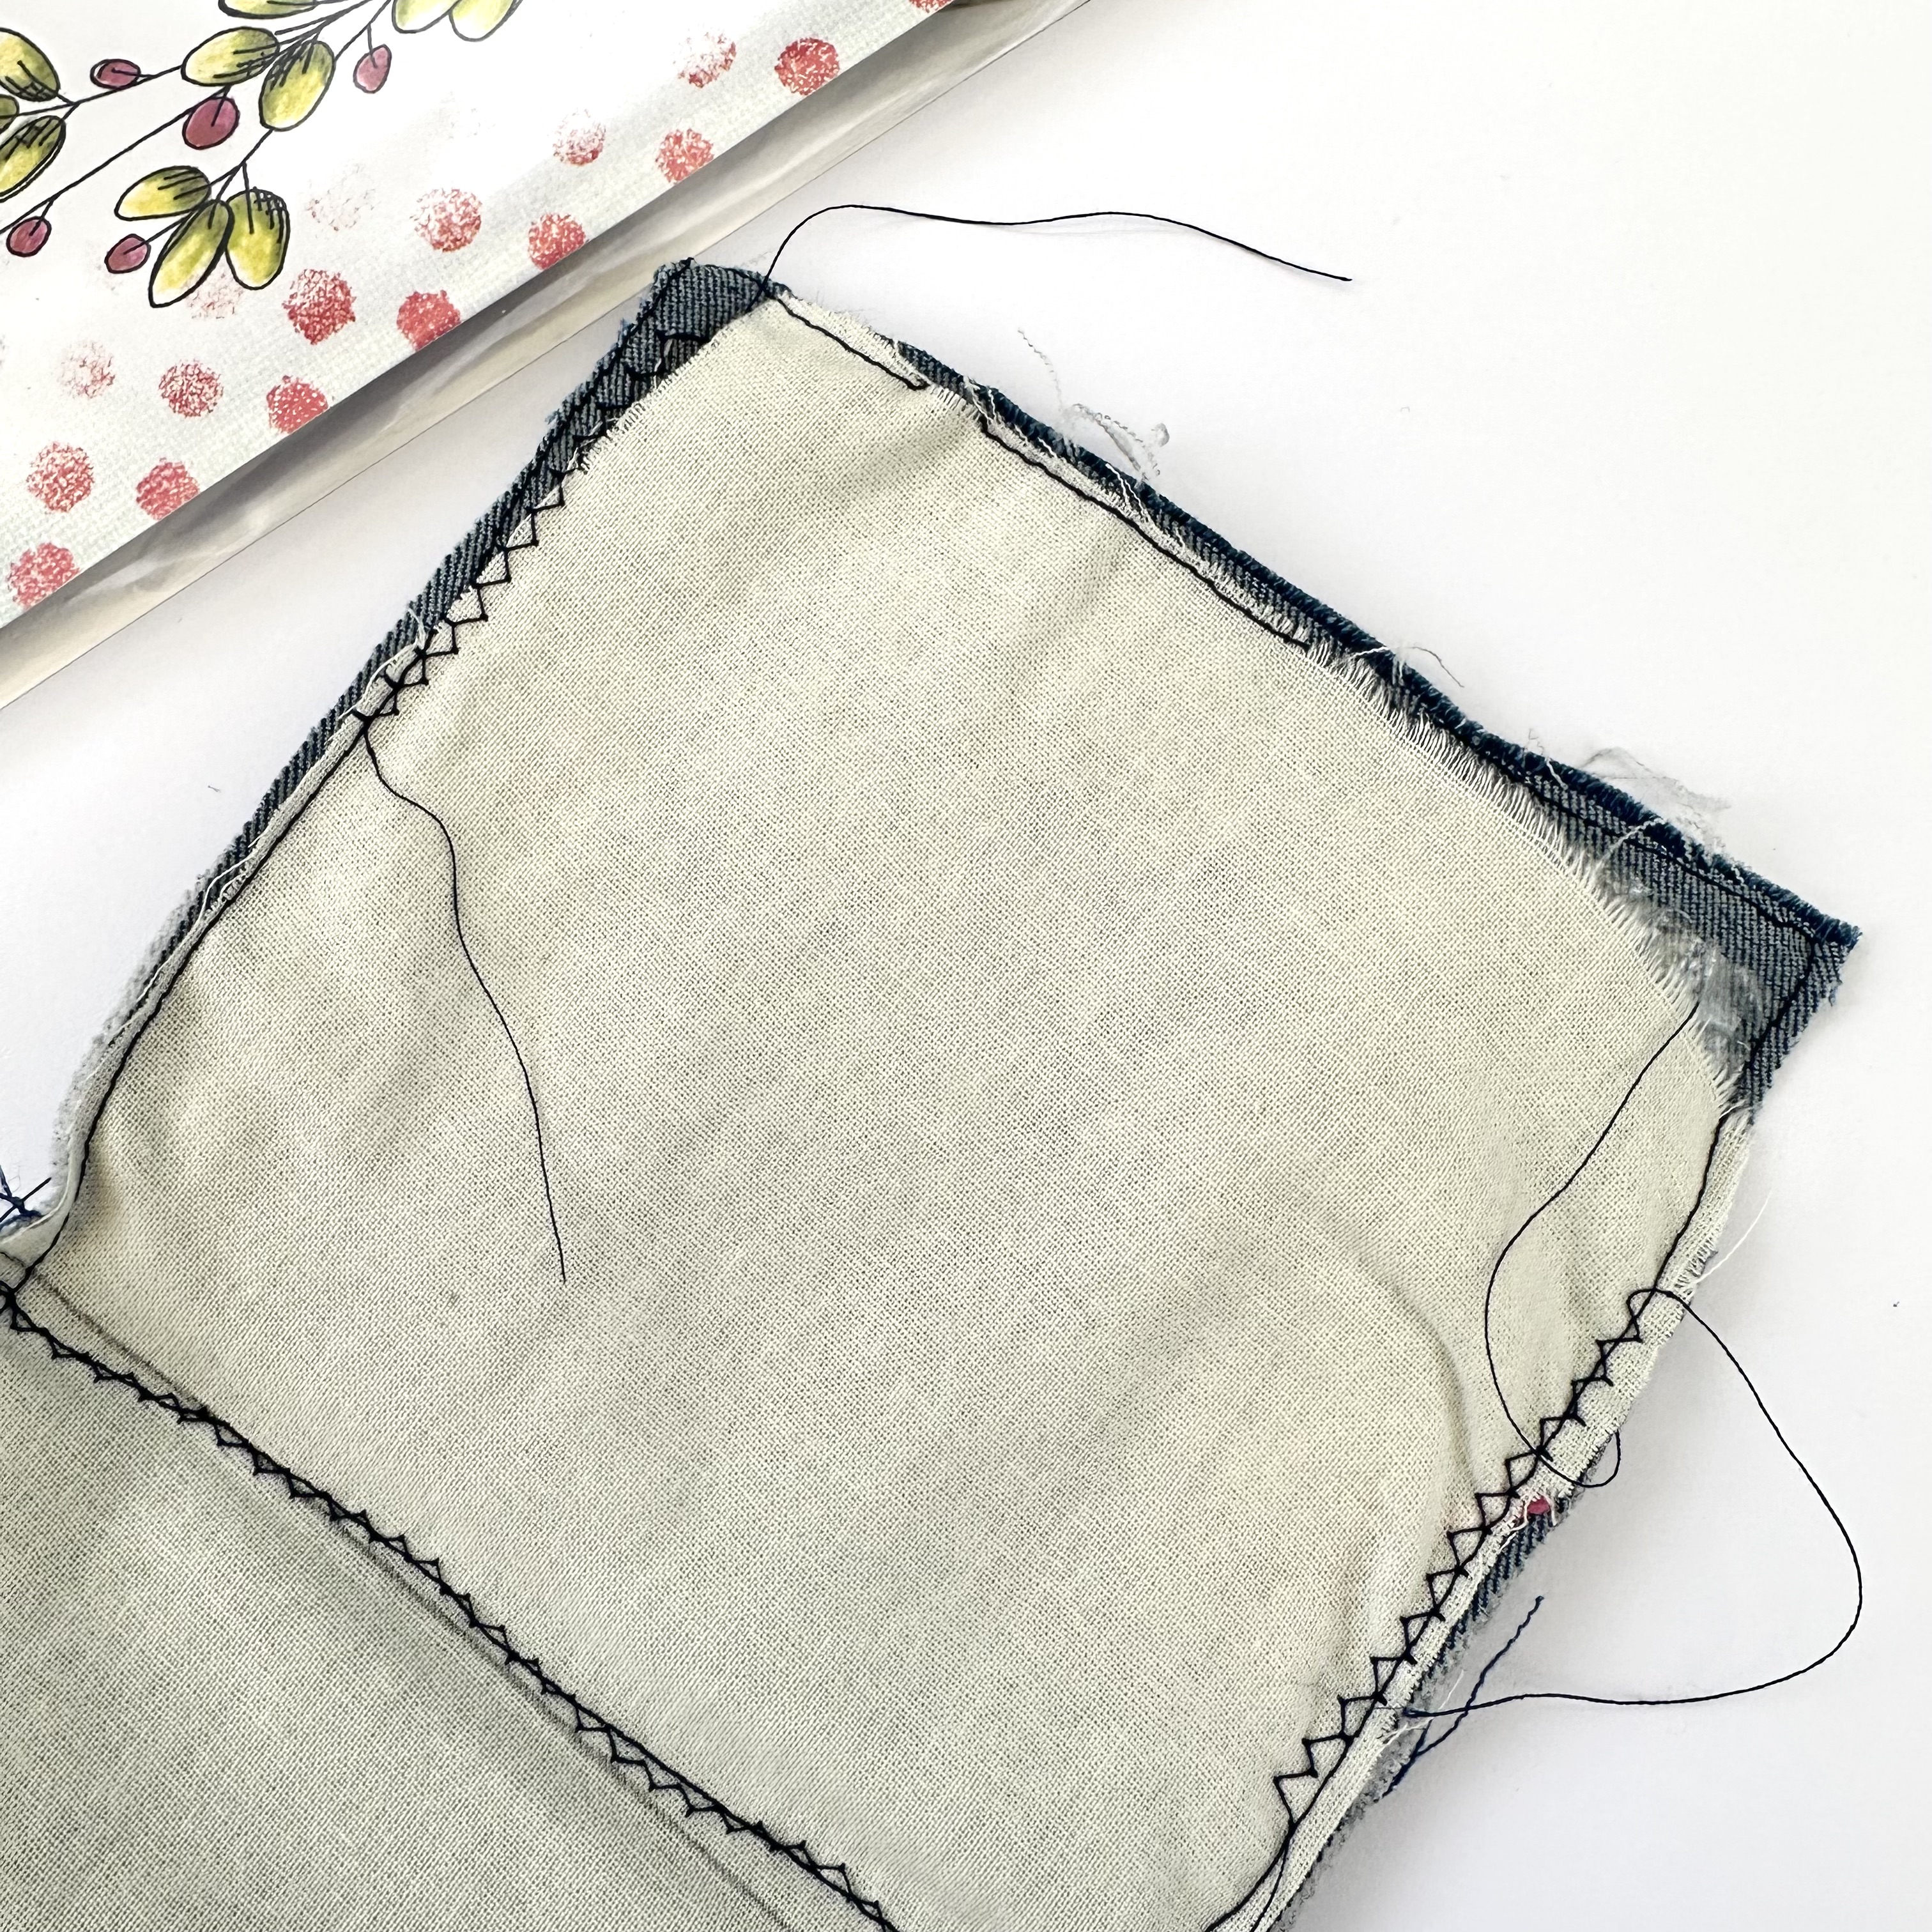
I selected one of Mum's denim skirts (some of her favourite items in her wardrobe) to use for the fabric in the project. I marked out a rectangular piece of fabric (15 x5.5 inches) and split it into three sections (5x5.5 inches) before cutting it out.


Next I ironed in a folding line for each section to help me place the images on the top side. I then repeated these steps with a second piece of fabric (natural cotton) which I could use as a lining on the inside of the project.


I then selected some of the stamps and stamped out the images on the top of the denim using StazOn (Cloudy Sky) as I needed the outlines to be clearly visible but not too dark, just in case my embroidery revealed some of the outline. Remember that the finished panels will be folded, so the direction of your stamping needs to change according to each panel so that stamps are all the right way round once finished.


With the main elements of the pocket shrine, cut out and ready to go, it was time to learn some embroidery stitches and start work on the decoration.
 

Embroidering the flowers was always going to be the most time consuming part of the project, especially since I haven't done any embroidery before! To keep costs low since I'm not sure how much embroidery I'll do in the future, I bought a cheap pack of embroidery threads in a large range of colours from Amazon. I did a quick search for instructional videos of basic embroidery stitches on YouTube and with my iPad at hand, got comfy in front of the TV and made a start on filling in the flowers and leaves.


It's slow progress and I do begin to wonder initially if I've bitten off more than I can chew! I selected threads in a range of pinks and greens, to provide a nice contrast to the blue denim background. After a couple of attempts the stitches really started to take shape and I started to get a bit faster. I used the 'French Knot' stitch for the flowers, the 'Fishbone' stitch for the leaves, the 'Stem' stitch for the stems and a 'Split' stitch for the circles.


With the embroidery complete I needed to assemble the outside and inside fabrics. I hadn't initially considered how bumpy the underside of the embroidery would be so needed some padding between the two fabrics. I decided to use what I hand to hand and this happened to be some used plastic bubble wrap!


I cut three squares and secured it with double-sided tape to the back of the denim fabric first before placing the natural cotton on top.
 

It was then time to stitch the two panels together on my sewing machine. I have limited sewing experience so kept this really basic with open outside seems, stitching all around the outside edges. I then stitched along the two folding lines to create extra definition for the folding sections.


This was never going to be a perfectly finished fabric construction due to my limited sewing experience, but on the plus side, I actually really like the handmade quality of imperfections! This can most clearly be seen on the inside construction on the pocket shrine where the natural cotton is exactly cut in the top and bottom corners. 
To enhance the imperfections as a feature, I also kept the loose threads from the stitching to add an extra element to the project.


There are also some loose stitches to the embroidered flowers as it was tricky to pull the stitching tight without the use of an embroidery hoop. With hindsight I would definitely purchase one to keep the fabric flat and help with stitch formation when following the outlines.


With the pocket shrine construction complete it was time to include the jewellery, photos and sentiments.


Deciding which sentimental items to place inside was the trickiest part of the project. There's so many ways you could do this, but in the end I decided on the same design for each section so that the focus of the eye was on the objects themselves. I cut out four pieces of card (4x3 inches) and used a corner punch to give them a decorative edge. I also printed a range of photos, of Mum throughout her life, on my home printer. Finally I selected two PaperArtsy Fresco Finish Acrylics (Venice Blue and Steel Grey) to provide some background colour for the card and my trusty fountain pen to hand letter the text.


I decided to use my gel plate to apply the colour to the card, as this would give a more grungy finish. I started by applying the PaperArtsy Fresco Finish Acrylic in Venice Blue.
 

I then switched out the Steel Grey colour for Snowflake in order to soften the overall effect of the colour and make sure it wasn't too dominant. I wrote out the text on plain white paper and ripped around the edges and then glued these to the background cards, together with the photos. The cards were secured to the pocket shrine using fabric glue. The final step was securing the jewellery pieces with pins.


My finished pocket shrine turned out so much better than I expected. The embroidery adds a really unique touch to the stamp designs and the sense of accomplishment when all those little elements are complete is amazing! I love the texture that the embroidery adds to the stamp designs and can definitely see me incorporating this into future projects.

The outside feels like a real extension of Mum, and me living on in her memory; her denim and love of flowers, combines with the crafty, creative streak she helped to nurture. And the inside clearly shows this pocket shrine is in honour of my Mum, Christine Rowan, for who 3 really was the magic number!

I hope you feel inspired to create a shrine of your own, remembering someone special in your life as you embark on a new year of memory making and adventure.

Wishing you a creative, happy week

Victoria

Tuesday, 20 April 2021

NEW PaperArtsy Products: JOFY {April 2021}

  JOFY Collection
April 2021 New Product Announcement
 

A note from Leandra:
We have some breezy flowers from Jo for this release. Plus, lots of interacting elements, which gives you many creative options! We love that versatility that the JOFY series brings, once you see what Jo has been up to you will soon grasp how user-friendly these are going to be.
 
Don't forget we have Jo sharing these stamps live in PaperArtsy People shortly after this post publishes. It's really nice for you to meet the designer and hear direct from Jo herself about this new release, so I hope you can catch her LIVE or on the replay in your own time.
 
Remember, these stamps are available EXCLUSIVELY from our approved stockists for the next 3-4 months, see the list and links at the bottom of this blog post. 
 
Hi everyone, Jo with you today to share with you my latest release of 3 stamps and 3 stencils.  I think this release is full of 'details' - bits and pieces that will accompany previous designs and still work well on their own....   Let's take a closer look.

  New Stamps
Price: RRP €21.92 +VAT
Size:5" x 6" (13 x16.5cm)
All stamps are individually trimmed onto cling foam, presented in a clear hanging bag
with a laminated storage/index sheet.

  
JOFY Set 101 (JOFY101)
 
The designs on this stamps set were taken from a page in one of my mini junk journals - a 6.5x10cm doodled page developed into a full size stamp set!


I created a trio of tags showing different stamps and some simple examples of how they could be used. 

The tag on the left shows how one stamp can create a simple background; I couldn't resist adding a few hand drawn lines and shading! 

The centre tag  was created with a gel-printed tag (using stencil PS250) and shows how the little detail stamps on this set (spots, dots, line and ring) match both PS250 and PS249.

The right hand tag has the spotty panel and the jumbled alphabet  - a simple but effective tag that could be easily embellished further.


The jumbled alphabet has been in my mind for a while (don't worry, ALL the letters of the alphabet are in there) - it's a great background stamp see the sample later on. 

I love spots and dots as part of a pattern and the spotty panel stamp matches stencil PS249 in a multiple of ways - here's a sneak peek - more details coming up later when we take a look at the stencils.


JOFY Set 102 (JOFY102)

These stamps originated on the pages of my '100 day project' - the theme of which was 100 days of circles, because, well, I love a circle!


The vertical strip of book text has a torn edge on both side so it can be used on the left or right hand edge of a page - or right down the middle as you'll see in a sample coming up.


On this sample I wanted to show you that stems don't always have to be used in their entirety - just stamping the tops around the edge of a panel creates a nice effect - using a mix of colours and a touch of embossing glitter.


On this sample I used the book text strip down the centre as a base for all the details.


Its nice to have designs in different sizes - this dinky little design look good on its own or as a detail on a larger piece as in the photo below.


JOFY Set 103 (JOFY103)
 

The stems in this stamp sets were inspired by my plants in my garden - but not necessarily when they were alive - the main stem was inspired by a Nigella seed head - I'm always amazed how that flower transforms into its seed-head.
 
These designs were also intended to work with stencil/mask PS251.There are lots more samples using this stamps set in the video you'll find further down this post.
 
No description available.

I was having so much fun with the jumbled alphabet idea I created a vertical version - great for edges.
 

I also included 2 border patterns in this stamp set - they look great when 'tiled up' to form a pattern as shown in the samples above, I used an ombre ink pad to achieve the shading.


New Stencils
Large Size: 6.25" x 9.5" (16 x 24cm) Price: RRP €6.28 +VAT
  
PaperArtsy Stencil 249 (PS249)

I wanted to design a stencil that would create a patterned base for stamped flowers, die cuts, or other embellishments.  Below is the stencil/stamped interpretation of the original journal page I showed earlier.
 

I decided to open up the pattern options and added horizontal and vertical lines.  All the patterns fit the solid rectangle so there are even more more options....

Here are the basic shapes this stencil produces.
 

... and here are some of the options/variations on how the stamp and stencil can be combined ...... (you'll see more in the video later in this blog post).


PaperArtsy Stencil 250 (PS250)

The spots and waves create a very useful back ground pattern that can be loosely matched up to cover large areas.
 
 
The two plain circles at the top of the stencil are designed to match the circle stamp designs on JOFY102. They can also be used to draw around and create a design as show below in my junk journal ... I really like the 'simplicity' of this.


PaperArtsy Stencil 251 (PS251)

PS251 comes with both the stencil and the mask parts of the design. So you get both the inner shape and the outer hole.


I'm so happy with this stencil/mask!! I take lots of photos of shadows created by flowers, vases or ornaments and one of those photos was the starting point of this design.  It works really well with gel-printing using the mask element of the design - shown on the sample on the left above and in the photo below.
 

The stencil part of the design looks great against PS250 and teamed with a simple stamped stem (JOFY74).


Project: Gel Printed Journal


I played around with all the different bits and pieces that are in this release's stamp sets and created a 'sampler' mini book - junk journal style.  The attached video shows a quick flick through.

Below are a couple of pages from the book showing how stamps from different sets have been used together.


I'm really enjoying these new designs - I think they're a great addition to the JOFY range and will work really well with so many of my previous designs.

I look forward to seeing what you make with them!
 
Take care
Jo


Socials...
Website: www.jofy.co.uk
YouTube: jofyjo
Pinterest: jofyjo
Facebook: www.facebook.com/JoFY.JoFirthYoung  & 'JoFY Jamboree!!' Facebook group
Instagram: jofyjo

Teaching Schedule:  All workshops are currently provided through Facebook Live.
25 April 2021  The Forget Me Not Kraft Kabin,Date, www.theforgetmenokraftkabin.co.uk
01 May 2021  Stamper's Grove, www.stampersgrove.co.uk
08 May 2021  Loobi Crafts, www.loobicrafts.co.uk
22 May 2021  The Artistic Stamper, www.theartisticstamper.co.uk
25 June 2021  Crafters Cupboard, Australia, www.crafterscupboard.com.au  

PaperArtsy Stockist List

Many of our stockists worldwide have their physical stores impacted in different ways due to COVID-19. Please contact a stockist direct to find out if you can visit them. Many are also using FB Live Streams to share with you new product arrivals or offer a personal shopping service via video calls.
 
Our stockists are your go-to  source for all PaperArtsy products, and we suggest that you also use the PaperArtsy People Facebook group to source a stockist in your country. Many are members and will happily share links to their online stores.

Australia
Bella Paperie, Brendale, Queensland, www.bellapaperie.net.au
Bev's Cross Crafts, Spreyton, Tasmania https://www.bevscrosscrafts.com.au/
Crafters Cupboard, Berwick, Victoria www.crafterscupboard.com.au
Memories on the Murray, Murray Bridge, SA  https://www.memoriesonthemurray.net/
Scrapbook Superstore & More South Penrith, NSW https://www.scrapbooksuperstore.com.au/
The Scrapbooker's Confetti Box, Swansea,NSW https://thescrapbookersconfettibox.com/
The Thread Studio, 6 Smith Street, Perth http://www.thethreadstudio.com/
The Scrapbook Store, North Perth,WA http://thescrapbookstore.com.au/ 
Time To Createwww.timetocreate.com.au

Belgium
Cart N Scrap Art, Antwerp, cartnscrap@gmail.com
Cotrain, Kontich, www.cotrain.be
Expression Hobby, Marcinelle www.expressionhobby.be

Canada
Clipper Street Scrapbook Company, Langley, BC. www.clipperstreet.com
Paper Art Creations Inc, Leduc, Alberta, http://www.paperartcreations.com/
Scrapbook Centrale, Dollard Des Ormeaux, Quebec www.scrapbookcentrale.ca
Simply Scrapbooking, Prince George, BC https://www.facebook.com/simplyscrapbooking/
Scrap Addicts, Edmonton, Alberta https://www.scrapaddicts.ca/
Scrap and Bean, Edmonton, Alberta http://scrapandbean.com/ 
Scrapbooking Fairies, Drayton Valley, Alberta https://www.scrapbookingfairies.com/
The Paper & ink Boutique, Calgary, Alberta https://www.paperandinkboutique.com/
The Scrap Yard, Calgary, Alberta, https://www.thescrapyardcalgary.com/ 

Denmark
Hobbyboden Scrapworld Samso www.hobbyboden.dk

France
Eirl Bancon Cartoscrap, Midi Pyrenees, https://www.cartoscrap.com/blog/
Fee Du Scrap, Saint Sébastien-Sur-Loire, https://www.feeduscrap.fr/
Horizon Creatif, Ste Jalle h.creatif@gmail.com
Katzelkraft, Ingwiller http://www.katzelkraft.fr/en/
Kerglaz, Basse Goulaine, https://www.kerglaz.com/  
Kerudoc Creation, St Yvi www.kerudoccreation.com
Quartier Serre Teston, Ste Jalle, hcreatif@gmail.com
Scrap by Nini,  Uzerche, Limousin https://scrapbynini.fr/ 
Scrapo'naturel, Tourville La Riviere, www.scraponaturel.fr/livraison 
Toutencolle, Dun sur Avon www.toutencolle.fr

Germany
Paperbasics, Hessen, www.paperbasics.de
Stempelbar, Berlin, www.stempelbar.de
Stempeloase Munich, Munich www.stempeloase.de
Stempelfee Shop, Hilden www.stempelfee-shop.de
Stempellaedle, Stuttgart, www.stempellaedle.de/shop

Greece
Scraps N Pieces, Kallithea www.scrapsnpieces.gr

Italy
Immagine SAS di Rapaccini, Rome, www.immaginelab.com
Il Negozio Della Mamma Di Cle, Torino, clelia27@liberio.it
L'artistica Glo, Cinisello B (Mi), www.artisticaglo.it
Marte Savona, Savona, www.martesavona.it
Pezze E Colori, Lissone, http://www.pezzeecolori.it/ 
Piccole Passioni, Siena, www.piccolepassioni.it
Scrap it Easy, Rome, https://www.scrapiteasy.com/it/

Japan
Tiny Dots, Funabashi-shi, Chiba www.facebook.com/TinyDots

Netherlands
Doe@ding,Spijkenisse https://doeading.nl/
Hobbycompleet de Duif, Leeuwarden www.hobbycompleet.nl
Stampingcorner, Capelle Aan Den Ijssel www.stampingcorner.nl

Norway
Hobbygarasjen, Kopervik, www.Hobbygarasjen.no

Spain
Cien por Cien Manualidades, S.L., Bizkaia, Catalunya,  www.100x100manualidades.es
Endulze & Crista S.L, Pampalona, Navarra,  www.endulze.com
Ideas 10 Manualidades Y Scrapbook, Bilbao https://ideas10manualidades.com/
Marakiscrap, Tarragona, www.marakiscrap.com
Scrap & Papers Experiences, Barcelona, Info@casonadequintana.com
Scraphouse S.L. Barcelona www.scraphouseshop.es
The Paradise Corner, Barcelona, www.facebook.com/theparadisecorner 

Taiwan
Mandy's Cards, Taipei www.facebook.com/mandy.card

United Kingdom
Amelia's Creative Crafts, Studley, Warwickshire  www.ameliascreativecrafts.co.uk
Art from the Heart, Harrogate, Yorkshire www.afth.co.uk
Blade Rubber Stamps, London www.bladerubberstamps.co.uk
Countryview Crafts, Potton, Bedfordshire www.countryviewcrafts.co.uk
Crafts at The Malthouse, Herstmonceux,  East Sussex, http://www.themalthouse.co.uk/
Fave Rave, Stourbridge, West Midlands www.shabbychicstencils.co.uk
Loobi Crafts, Leighton Buzzard, Bedfordshire, www.loobicrafts.co.uk
Stampers Grove, Springbank, Lilliesleaf, Melrose,Scotland www.stampersgrove.co.uk
That's Crafty
, Romford, essex www.thatscrafty.co.uk
The Artistic Stamper Craft Store, Faversham, Kent www.theartisticstamper.com
The Forget me not Kraft Kabin www.TheForgetMeNotKraftKabin.co.uk

USA
Artistic Artifacts, Alexandria, VA https://www.artisticartifacts.com/
Artistic Studio Creations, Fayetteville, Georgia www.facebook.com/ASCbyCrystal
Craftiness, Chatsworth, CA, https://www.craftinessonline.com/
Ephemera Paducah, Paducah, Kentucky www.ephemerapaducah.com
Everything Scrapbook & Stamps, Lake Worth, Florida www.everythingscrapbook.com
Frantic Stamper, Oregon www.franticstamper.com
Free Heart LLC, Denver, Colarado, http://www.freeheartllc.com/
Joggles, West Warwick, Rhode Island, www.joggles.com
PaperCraft Clubhouse, Westbrook, Connecticut, http://papercraftclubhouse.com/
Runaway, Art & Craft Studio, NE Salem, Oregon http://www.runawayart.com/
Simon Says Stamp, Columbus, Ohio www. simonsaysstamp.com
The Ink Pad, New York, www.theinkpadnyc.com
Topflight Stamps, Irmo, South Carolina https://topflightstamps.com/

Our brand is only available from established stockists who are VAT/ GST/ sales tax registered and for whom product education is a core principle. We would rather supply a few hand selected stockists, than the greater masses. If you would like to apply to be a stockist, you can find our more about our supply criteria here. Please note we are not accepting new stockists until we are relocated into our new building here in France. Covid restrictions have slowed our progress somewhat, so we hope to be in by the latter part of 2021.

PaperArtsy Links
Facebook Group PaperArtsy People
Facebook Page PaperArtsy