Showing posts with label EGL10. Show all posts

Thursday, 20 May 2021

2021 Topic 6 Mandala Mix with EGL {by Kate Yetter}

  2021 Topic 6: Mandala Mix


With a watery looking Infusion based background and lots of embossed texture, Kate has created mandalas with a creative twist. There's so much depth on the stacked layered mandala focal points which draws your eye into this beautiful card.
~ Keren
 

Hi everyone, Kate with you today, and I'd like to share with you a mixed media card.

I love layering stamps so the mandala theme was perfect.

I started off with Infusions in the background.


To add texture, I embossed fish on the background.


Next, I picked out stamps that I thought would layer well and stamped them out in black ink and embossed some in gold.


I felt the background needed a little more texture so I added some stamping and embossing in blue using some Ink & The Dog stamps.


Lastly, I layered a few of the stamps as a focal point.


I really enjoyed making this Mandala themed card. This was the second card I made as the first one didn't turn out. I really wanted to make a large mandala but I liked the background on this one and wanted to show it off so I used a smaller mandala. I want to give this theme another try but with a larger focal point. I hope you will give this a try and play around with different sized stamps to make a mandala.

Until Next Time,
Kate

Instagram: https://www.instagram.com/kateeyetter/
Pinterest: https://www.pinterest.com/katesscrapyard/ 


Saturday, 17 April 2021

2021 Topic 4 Free to Fly with LPC {by Kate Yetter}

 2021 Topic 4: Free to Fly


Clearing up and decluttering has never been so creative. Kate has an artistic idea for using up all all those lovely bits and pieces on your desk. In true Kate form, she's created something fabulously eclectic and classy. 
~ Keren.

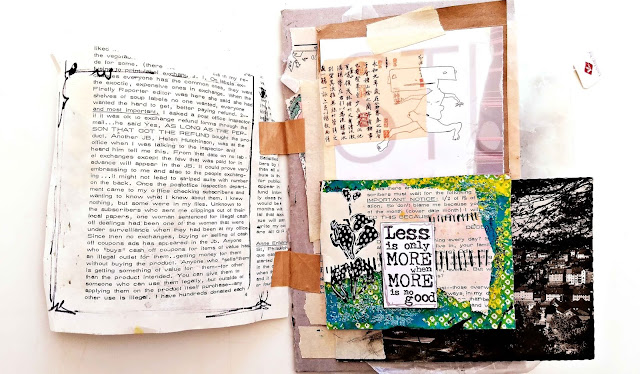
Hi everyone, it's Kate with you today, and I'd like to share with you my mini junk journal.

I decided to make a journal with this theme because it was a project with which I could be creative and because I thought it would be a great way to display my stamps, as well as use up the mountain of scraps on my desk.

I never tire of making journals because they are in a book format. Flipping through and seeing all the stamps, ephemera and journaling makes me happy.


The base of my journal is a piece of cardboard that was sitting in my scrap bin.


 I collected a bunch of scraps and put them all within reach.


I stamped this Lynne Perrella image, colored it with Fresco Finish Chalk Paints and then added some doodling.


All sorts of bits and bobs were added including postcards, book paper, vintage maps, envelopes, wax paper etc... every thing was connected using masking tape.


Using some stencils and black gesso, I created a background for stamped embellishments.


Pockets and envelopes are a great place to hide little treasures.


Even old palettes can be incorporated in a journal. I love the pop of color.


The perfect place to practice my doodling.

This Asian script stamp is one of my favorites to use in backgrounds.


I used infusions and a stencil to create this page. The watercolor effect from the Infusions is lovely.


I had this postcard covered in old tea bags and embossing sitting on my desk for years. I took it out, embellished it with stamps and covered the tea bag tags in stamps. It ended up being the perfect last page to my journal.


Neatly tied up in a bow.

If you have extra scraps (I know you do), compile them together and make a journal. All you need is some tape to attach everything together. I hope you will give this a try. Don't forget to have fun and be creative. 

Until next time,

Kate Yetter

Blog: https://kateyetter.com/
Facebook:
Twitter:
Instagram:https://www.instagram.com/kateeyetter/

Pinterest:https://www.pinterest.com/katesscrapyard/ 

Tuesday, 13 April 2021

2021 Topic 4 Free to Fly with Lynne Perrella stamps {by Etsuko Noguchi}

 2021 Topic 4: Free to Fly

Etsuko's beautiful butterfly notebook draws you like a moth to a flame with those wonderful sparkling eyes. Rather than a defense against predators, the eye spots beckon you inwards towards a notebook full of wonderful fairies. I love how she's created wings using so many different stamps and stencils.
~ Keren

Hi everyone, it's Etsuko (My favorite thingswith you today, and I'd like to share with you 'A dream flying' with beautiful new Lynne Perrella stamp collections.

When I chose the theme 'Free to Fly' I immediately thought of this huge butterfly stamp and decided to use it to make a little note book with Lynne's new fairies image in the center of their wings.


I often use a Gelli Plate to create backgrounds, as the results are sometimes unexpected and fun, and allowing me to quickly create a base for the background.


I started by making these papers for the covers and the pages using Fresco Chalk Acrylic paints on Gelli Plate. I used lot of Fresco Chalk Paints by Blueberry, Mauve, Forget Me Not, Nougat, Snowflake, Pool, Sky, Turquoise, Blue Oyster, Guacamole, Deep Sea and Byzantium.


I used the butterfly stamp LPC041 to create the cover image and then a template to cut out these butterfly shape of the notebook's right and left pages.


I stamped Scrapcosy ESC18 script on a sheet of copy papers with Watering Can Archival and I cut the butterfly larger than the original and made a border.


This is a diagram of the layers when pasted together to make a notebook. I used Smoothy Heavyweight A4 white card for the white center paper and for the rest of the papers I used thicker copy paper.


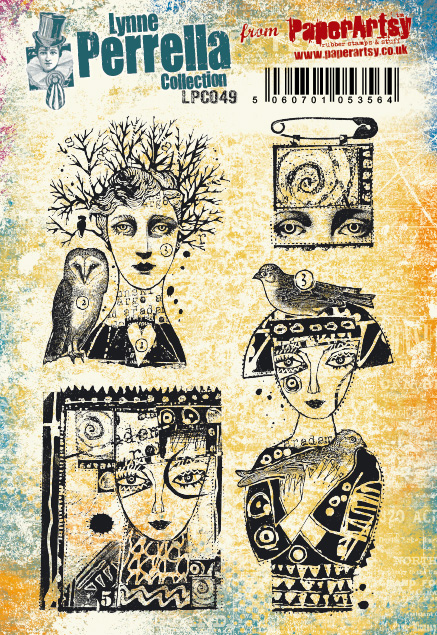
The central image of the fairies is stamped and cut out from LPC049 and LPC050 on Smoothy Heavyweight A4 white card. 


I stenciled the wings on the right page to look like butterfly wings with crests.


On the left side of the pages, where the back side of the fairy's head is blank I have pasted a some images from small stamps.


After attaching the fairies to their wings, I wondered what to do with the paint on the fairies, but in the end I just coloured them. I'd like show you how to do it after this.


The covers are made using the gel-printed single sheet of paper and the wonderful image of the LPC041. I used the same collection for the back cover.


It's such a great image that the stamp also makes alone a big impact, but I used embossing powder on the butterfly to create the embellishments.


Here please enjoy the whole notebook in video form.


I made a mash-up of various stamps and stencils with Lynne's stamps, here are some of them.


The first page is from fabulous Alison's quote 'wings' EAB11 stamp, which is a great fit here, and the background is the same gel-printed paper and Gwen's EGL02 stamp. The stenciled PS034 fairy wings crest are done with Navy embossing powder.


Page2: I added Gwen EGL05 leaves on the left page. For the fairy on the right I gave her a bird and for the wings I used Lin Brown PS044 and Scrapcosy PS134 stencils.


Page 3: These small flying butterflies EGL10 were the inspiration for de idea of filling individual spaces. I also gave her a bird and used the letter 'R' on wings Scrapcosy PS064 stencil.


Page 4: Gwen's EGL05 bird also makes an appearance, here she has a collaged hairpiece and clothing. On the wings is Lin Brown PS006 ferns stencil that I first got and is my favorite.


Page5: On the left, Gwen's EGL02 pretty flowers are scattered, on the right she is the mash-up of old and new ( LPC005 and LPC049 ) as the stamps have a very similar touch. The wings crest is using the JoFY PS011 stencil.


Page 6: On the left using Gwen's EGL11 stamp and for the crest on the right wing I used the same PS034 stencil as on the first page.


Here's the last pages, again using Alison's quote stamp EAB11. Well these fairies have flown off into the silence of the night.


I also used LPC049 stamp to make a safety pin brooch.

I was very happy to have the opportunity to create this project using my favorite Lynne Perrella's new release, and I will be using these stamps again for various projects.
Thank you so much for visiting here.
Please take care and stay safe all.

Etsuko xxx
 

Blog: My favorite things
Facebook: Etsuko Noguchi
Instagram: Pixienest
Pinterest: Etsuko N