Thursday 21 March 2024

2024 Topic 2 : Mattints {by Alison Bomber} on the PaperArtsy Blog


Hello all, Alison here with you today from Words and Pictures. I've been playing with my new botanical textures stamps along with experimenting with creating some Mattints textures.

Given these new stamp designs only launched a couple of weeks ago, I'm still exploring them, and I know we're all exploring what the amazing Mattints can get up to (answer: SO much!). 

Texture is the name of the game in this tag book. Tags are the perfect experimentation substrate for me... you can make lots of them, and if something doesn't work out, you haven't broken the bank in the meantime. And with all your tag experiments, you've got the makings of a tag book ready to play.


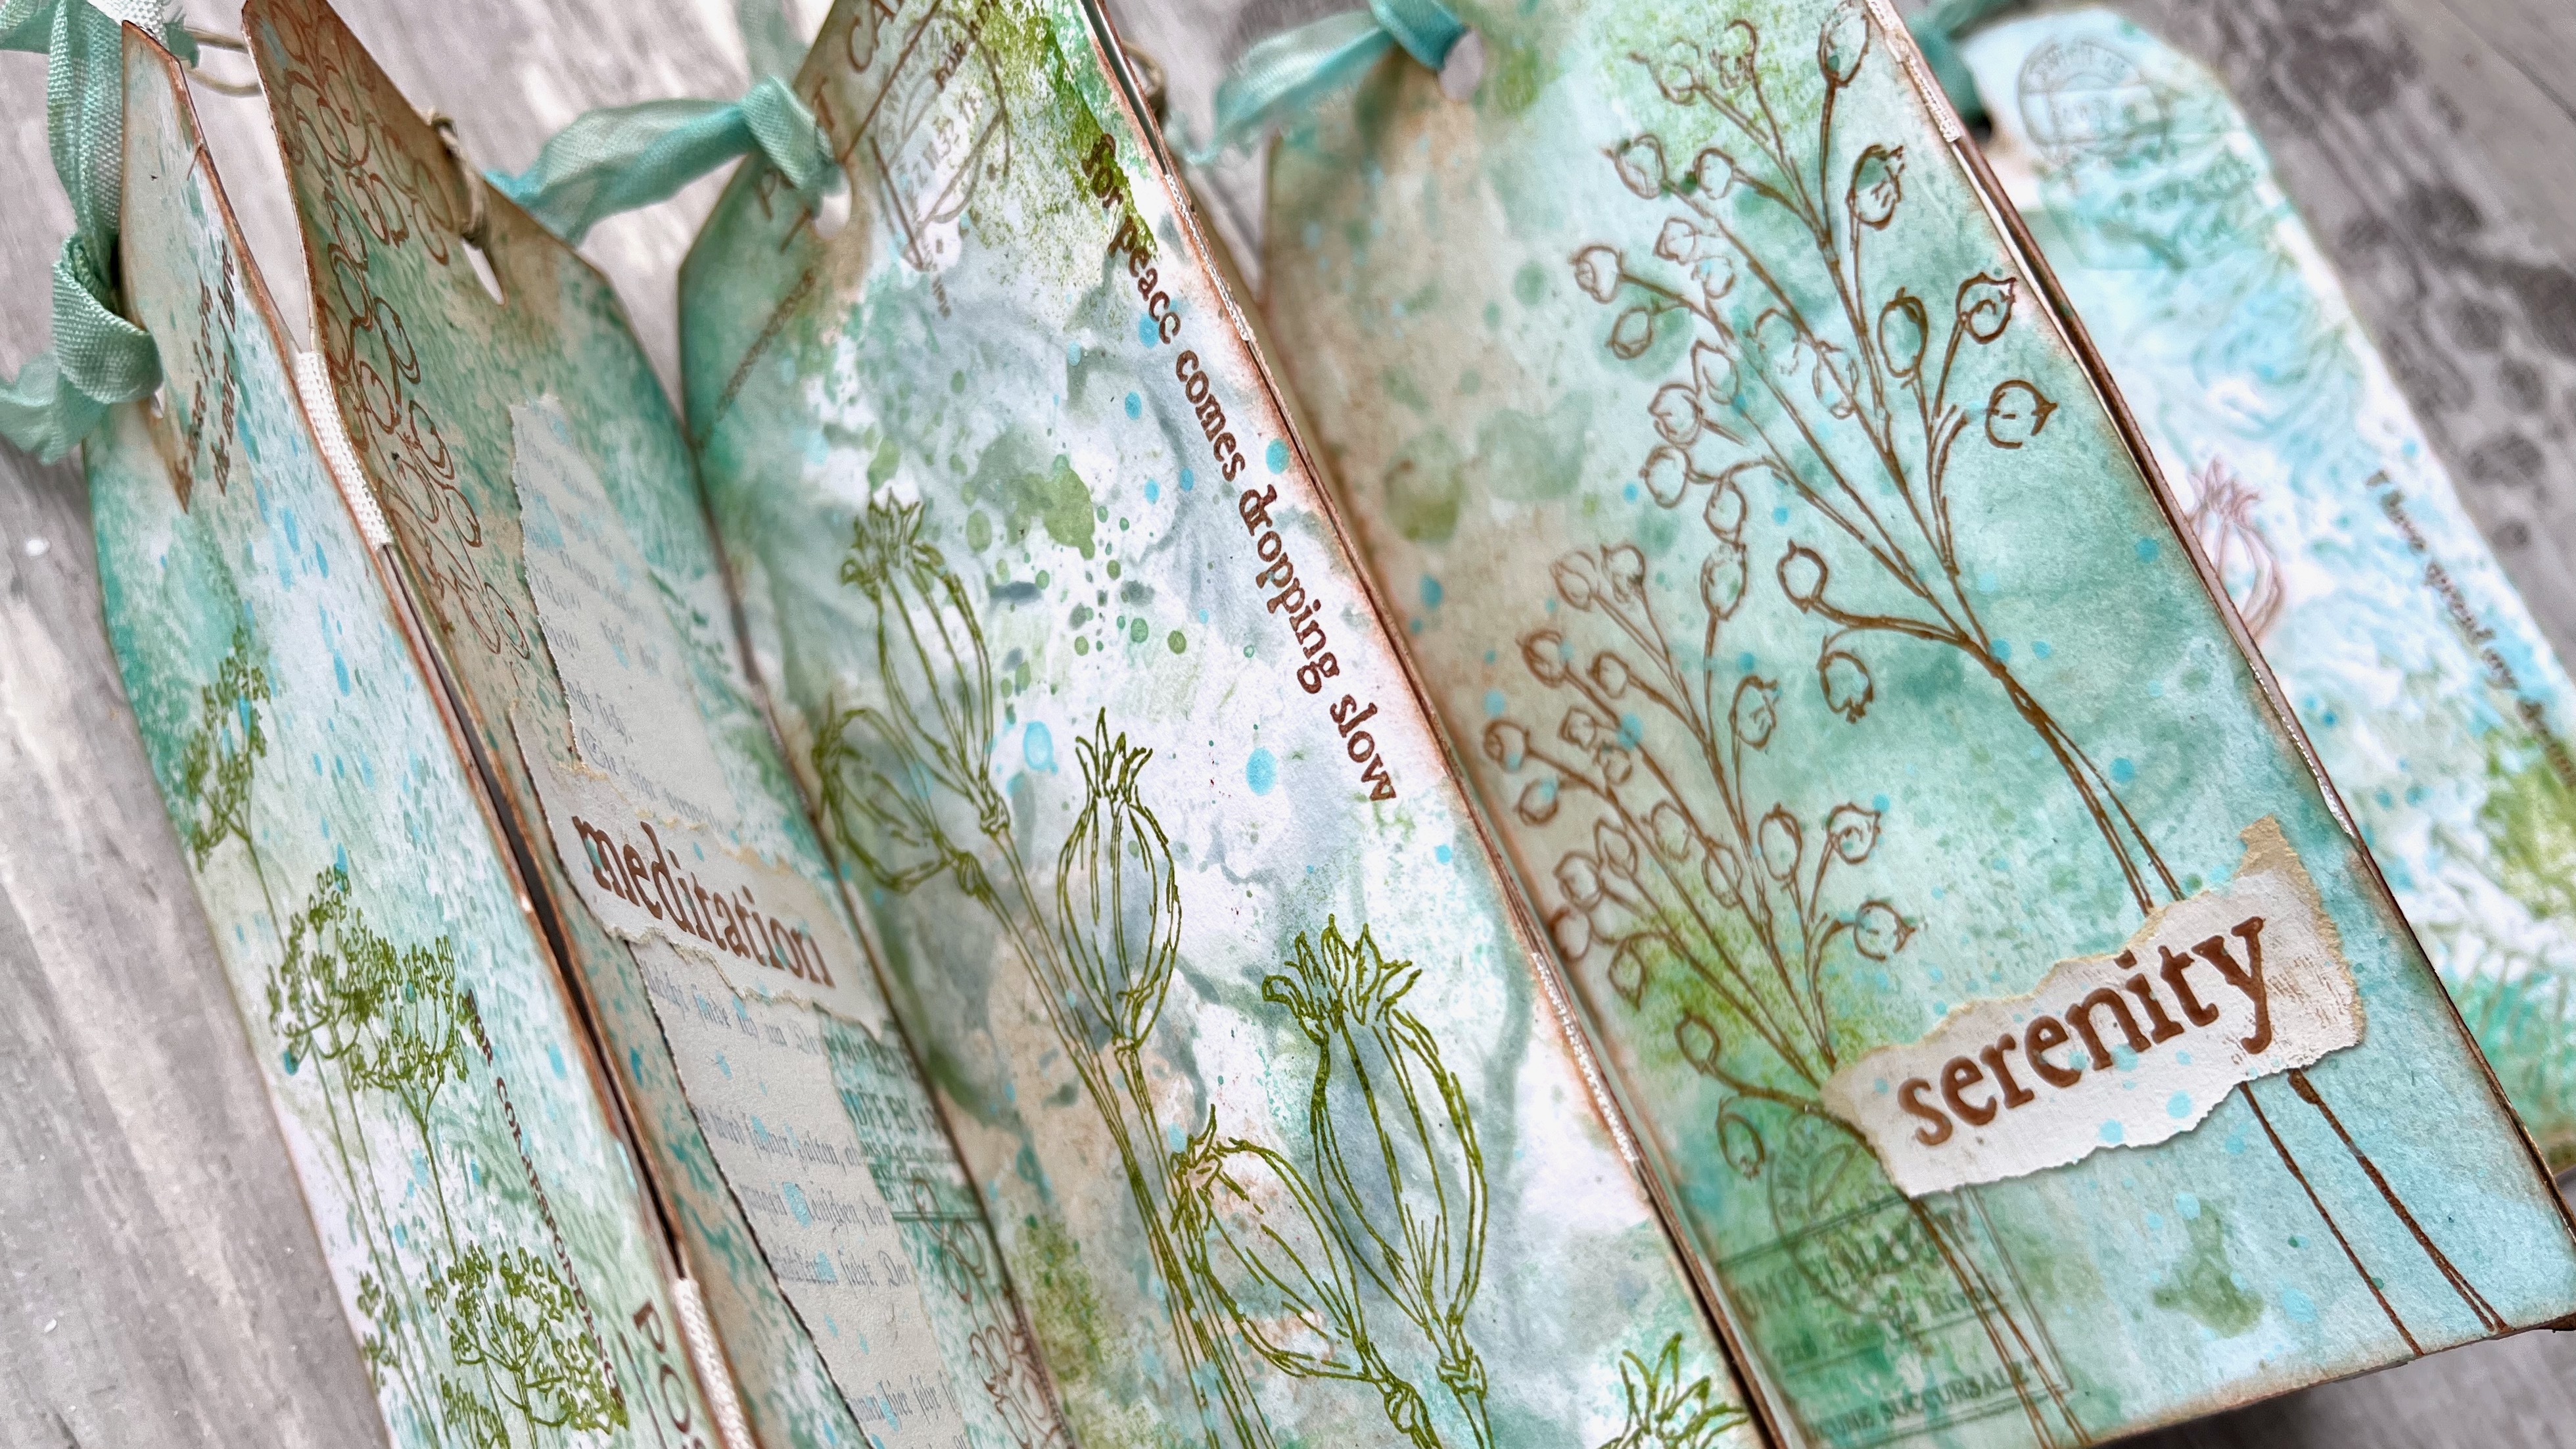
The problem with a tag book, of course, is that it's tough to share the look of the thing in a single photo!


So I'm sharing a couple of angles here so that you can get a look at what's going on both on the individual tags... 


... as well as a glimpse of the overall look of the book.


I'm really pleased with the simple binding technique I used here - you'll find out all about it as you read on.


I'm still enjoying the winter-spring transitional palette of soft blues and greens, with a touch of brown for the bare trees (and mud), so three of the Mattints I chose to work with are from the original four colours, Shark, Fern and Nutty. But I couldn't resist the allure of the beautiful Dragonfly from the more recent colours released. It adds a lovely springtime brightness to the muted natural colour tones of the others.  

And I'm mixing and matching my three new stamp sets too... EAB36 Bells Edition, EAB37 Poppy Edition, and EAB38 Umbellifers Edition, making the most of the loose botanical sketches and the words, with a bit of additional texture from the background blocks. 


Here's the full collection of Mattints textures I created before I added any extra layers... so how did I make them?  Well, in various ways - read on!


The first batch are as easy as can be - just a little bit of simple gel-printing... brayering the Mattints onto my small gel plate and pressing my die-cut tags down onto them. I cut the tags from fairly cheap sketchbook paper, and applied more than one colour to the plate at a time (without worrying about cleaning up in between times either - I like a messy grungy look if it happens!).


For another batch, I simply put blobs of the Mattints direct onto my craft mat, spritzed them with a bit of water, and smooshed the tags down into the resulting puddles and droplets. With different amounts of water, you get different consistencies and therefore different textures, and by drying after each smoosh or dab, you can build up layers.


With lots of Mattint in the mix you get the almost tree-bark texture as you peel the tag up. With more water, you get the droplets which add lovely textural splotches. I layered some splotches over some of the gel printed backgrounds too.


And for a couple of tags, I brayered Mattints from the craft mat onto the background stamp from EAB37 Poppy Edition and stamped that repeatedly over the tag to get full coverage (that's the one in the middle of the bottom row, and the one towards the top left of the photo).


I love the variety of textures here, and also that the Mattints can give you such subtle colour tones. It means that it will be all the easier for the next layers (the ones we're about to add!) to  have a strong presence over these gentle tones (and the chance for many more layers in that case!). 
 

I was enjoying the texture play, so I decided to bring the textured blocks from the stamp sets into action too.  I used them very sparingly, just pressing a corner or edge of a stamp into a corner or along the edge of a tag. And I stamped in tone-on-tone colours for the most part - Ranger Distress Ink in Salvaged Patina, and Ranger Archival in Leaf and Olive. (The edging from EAB38's block is on the left, and the gelprint texture from EAB37 is on the right hand tag, as well as in the top corner of the one on the left.)


Next, I used a natural sponge to add Nutty Mattint in various places. I love how this warms up the colour palette, and gives a sort of rusted vintage look to parts of the tags. It's so good over the textured areas too... the translucent glaze of the Mattints means the colours blend, so over white paper it's properly rusty, and over the blue greens, it changes colour.  (You'll see that more clearly in some of the finished photos later on.) 


Then I had a wonderful time with my three new stamp sets, mixing and matching and combining words, botanicals and ephemera stamps on each tag. Again, I used inks that would tone with the Mattint colours - Ranger Archival in Sepia, Leaf, Garden Patina, Pebble Beach, and Coffee.

I added some torn book page fragments for extra texture and detail (gesso'd beforehand to whitewash them), and used the margins of the book pages (where there's no text) to stamp the words and phrases. I love those torn edges!


I ended up with 14 tag backgrounds that I really liked, so I lined them up in two sets of seven before I did the stamping, ready to create an accordion book structure. I arranged them so that different background styles were next to each other. That meant as I was stamping, I could spread out which stems went where. And for the binding I used some cheap seam binding ribbon.


I glued two strips of ribbon onto the backs of one of the sets of seven tags (leaving just a little gap between tags), and then glued down the second set on top. That means each "page" has a bit more stability (now that it's two layers), and the accordion can fold in both directions (meaning I have to choose from four possible covers!!). I'm really pleased with this simple binding technique. All I had to do was trim the excess ribbon from the edges, and it all works beautifully.


I'm not going to lie, I've got a LOT of pictures of the finished project... 


I've already mentioned there are 14 different tags to show you, and four different possible book covers.


You can just scroll through them really quickly, and it will give you a feeling of what it's like unfolding the concertina.


And you'll have to decide which one is your favourite... I can't.


I don't want to leave any of them out of the spotlight!


Plus I also used Mattints to tint the leftover seam binding trimmings. I had four pieces after cutting them off, so I alternated them in the tops of the tags with some of my favourite fine twine.


Because the Mattints are also a glue medium, the ribbon sets in those crinkles beautifully - no need to worry about them going floppy!


As often seems to be the case with my projects, it's not easy to capture all the details in one go, so I ended up with a lot of eye-candy photos...


Lots of different angles and page combinations... 


Because, of course, part of the joy for me is how different images bump into other images...


... how different words meet other words...


... how one texture looks next to a different texture...


... and how colours (even subtle ones) contrast and change the look of the colours next to them.


I suppose that's what I was talking about with the phrase "visual poetry" during the live launch of these new stamps.


That repetition and variation asks us to look with fresh eyes as the colours, images and words move and mutate.


And this accordion book encourages that meditative frame of mind, I hope.


Or maybe it's just me...!!


I had a really lovely time with this gentle accordion album. I'm ready to try some bright colours with these stamps next, I think. Maybe it's time to add some of those other new Mattints into the mix... Jam and Squeezed here I come!

I hope you enjoy the visual poetry of all these words and pictures, and I hope you'll be inspired to explore some texture experiments with the Mattints too. Thanks so much for bearing with me through this huge art gallery of a post, and happy crafting all!

Alison xx


I'm also currently one of the twelve teachers on Fodder School 3... my month is yet to come (with my exclusively designed PaperArtsy Fodder Berry Edition stamps and specially curated paints sets involved) and you can still sign up any time.

21 comments:

Christine said...

Superb! Love the colour choices

Helen said...

Absolutely gorgeous!!

Etsuko said...

Absolutely stunning! Love the colours and grungy technique. xx

Mags said...

Absolutely gorgeous tag book ! I love all the photos, pure inspiration and beauty !

Anonymous said...

These are beautiful!

Cigale said...

Enchanted and inspired. It's like a written course, love it.

Stef said...

Gorgeous tag book Alison. Thanks for your very detailed explanation into how to achieve something similar! Stef

Elodie said...

magnifique!!!!!

Colleen said...

The details here encourage the reality of creation of these lovely, inspiring tags.

Alison said...

Thank you so much.

Alison said...

Thank you, Helen!

Alison said...

Thank you so much, Etsuko.

Alison said...

Thank you, Mags, so happy you like it.

Alison said...

Thank you.

Alison said...

Thank you, Tineke, and also for your lovely comment on the blog. Hope you enjoy playing with some of the techniques when your Mattints arrive!

Alison said...

Happy you like it and that you found all the making-of details useful.

Alison said...

Merci beaucoup!

Unknown said...

This is really visual poetry! So beautiful with those texture and colors! Beautiful!😍

Unknown said...

Margo

Words and Pictures said...

Thank you (twice!), Margo!
Alison x

Anonymous said...

This is so lovely, the colours are great, enjoyed the different angles on your pics 💕