
Hello, Dounia here to present the 3rd theme of 2023 that will cover the summer quarter: TRANSPARENCY!
As you are probably now aware, this year we are introducing quarterly themes that complement the 3 topics within each quarter. We want them to spark new thoughts and challenge you to sneak a response to this theme into any project you might be currently working on. These themes are designed to be quite open, we hope you get inspired and maybe might learn something new. Our fantastic team of bloggers will incorporate these themes in their projects in addition to the monthly topic and we love to see all the ideas they dream up! We can't wait to see what you make of it too!
For this summer, our theme is : TRANSPARENCY and will apply across the next 3 topics (Art Dolls, Master Colour Wheel and our Lynne Perrella designer focus). In this post, we will explore different ways to introduce transparency in your projects and suggest related materials, supplies and techniques.
This is not a new concept so we hope to possibly rekindle your love of all things transparent and maybe even help you discover new ones! As usual, we have tried to present you with a mix of artistic and crafty inspiration, coming from this blog and beyond, and offer both beautiful and inspiring visuals and practical and educational links. Let's start with the word cloud our bloggers were given for inspiration:


Let's first explore materials that play with transparency and can be the substrate or a building block of your project. Natural solid transparent material are actually quite rare but Mica sheets are an old favourite and I am sure most of us have some at the back of a drawer! Book binder Gina Pisello celebrates the inherent beauty of mica in her book but it can also be be cut, layered, embossed and more, as explored in this Collection of Mica ideas by Kathleen Musker as well as in topic 2020 #4: Mighty Mica!

Another staple of transparency is, of course, glass. Sleek and shiny, it brings its own texture and brightness. Isn't it interesting that coloured glass will evoke stained windows and medieval times, while clear colourless panes will seem modern and clean? Nothing better than glass slides to create an sciency vibe! See more on this blog with topic 2016 #10: Bottles

Glass however is heavy and fragile, and not very versatile. Acetate is the star of artificial alternatives, available in different thicknesses for all our bending, sewing or piercing needs, among others. It is amazing at being 'not there' for a floating effect.

While still a non porous surface, we now have whole ranges of products to colour, stamp or emboss it for maximum fun. But its tendency to 'resist' water media can also be exploited, like with this Ink on Acetate technique by Lynn Nafey. All in all, acetate is great material to play with linking layers or to create delicate transitions.

I would like to think I am not the only one to keep and reuse the acetate from packaging! But it is not the only source of clear plastic you can creatively recycle! Plastic bottles come in all sizes an colour, making for an abundant and versatile material, easily cut with scissors or dies.

The possibilities are infinite, se these Beautiful Ideas for Jewellery made from recycled plastic bottles by Recyclart for inspiration and this Jellyfish earrings tutorial by Upcycle with Jing a more practical approach. And why stop at jewellery? This is a art bowl by Gülnür Özdağlar, a recycled plastic artist. Do not hesitate to explore her website as she also has amazing jewellery. If you are interested in transforming bottle, visit this Bowl tutorial on Autodesk Intructables. It involves melting plastic so work in a well ventilated area! Another interesting packaging material to melt is bubble wrap. The Refab Diaries explains to make it into textured sheets and beads.

Another plastic is famous for being hearted: shrink plastic! If it is often frosted, clear versions exist, with amazing results!It is not just for kids! Check this Shrink Plastic Projects & Tutorials List on the Spruce Crafts for inspiration in a multitude of styles . Artist Julie Haymaker is also a specialist with a focus on 3D elements for fun and intricate pieces.

In these themes, we try to be as open as possible and embrace all the versions of a concept so we are now moving on from purely transparent materials to explore translucent ones. What is the difference you might wonder? Well a picture speaks better than a thousand words so:
While something transparent while be clear and see-through to allow a good view of what is behind it, something translucent will still let light through but only give a fuzzy, blurry, muted image. Many papers have translucency and will allow you play with layering while softening the background. Think of washi, tracing paper or vellum, like in this beautiful project from our blogger Nikki Acton:
A thrifty translucent material is tea bags! They also have a lovely colour that mesh beautifully with the semi-secret atmosphere they can create. They are more versatile than you might think! Please enjoy this Collection of Beautiful Tea Bag Art by House Martin. And for practical tips and tricks check this article by Book and Paper Arts.

Since we are apparently trying to use the packing materials, let's not forget the humble tissue paper. Its super-power is to be translucent when dry but to become transparent when went and glued down! It opens so many possibilities, as demonstrated here by Leandra. Issue paper sure is a favorite here at PaperArtsy, and it was already the focus of a topic full of ideas in 2018 #19: Tissue Paper. Using coloured tissue paper, you might also want to try Tissue paper Bleeding, as explained on the S&S blog!

Now, what if you want to use your usual (non transparent) substrate? Do not worry, they are loads of products that can help you layer and create transparency. One of the oldest technique, dating from the fist century AD, must be Encaustic painting, or using beeswax as a medium and binder. Its capacity to build thin translucent layers for complex colours as long been exploited for beautiful lifelike portraits.

If you are intrigued, check this Starting Guide by Art in Context for a better idea of what is involved. Bored Art collected Wax Painting Ideas for Learners, mixing classic encaustic with melting wax crayons to appeals to all styles an levels. We also explore it on the blog in 2016 #3: Wax as wax transparency also lends itself beautifully to abstract and mixed media work.

While it is classically melted in thin layers, wax consistency changes with temperature so 3d work and inclusions are also possible. This completely different look also showcases its soft satiny natural finish.

However, working with a hot , medium not always ideal or desirable so modern chemistry has come up with numerous alternatives compatibles with all type of paints and inks, also known as gels and mediums. You can even use them to reproduce encaustic, as explained in this article Faux Encaustique by Pop ton Art.

Now, it is not easy to where to start so do not hesitate to check this guide: What is Gel Medium by the Graphics Fairy. The naming and branding is often not very helpful so here is Complete guide of mediums by Artists Network to better navigate your option. Leandra did an amazing breakdown over several videos on the blog, available here: 2015 #15: Gels and Mediums. In short, gels and mediums are amazing tools to modify the consistency, transparency and finish of your paints and inks. With them you can create textures, build layers and choose to make your work glossy or matte and a lot more! So mush to explore...

Speaking of glossy finishes, let's not forget other transparent embossing powders. A little zap of heat for a pop of shine! A staple of card making and scrapbooking perfect for a touch of unstated and classy texture. When you involve UTEE (Ultra Thick Embossing Enamel) you can can take things even further and higher, like on this shrink plastic bracelet by Carol Quance:

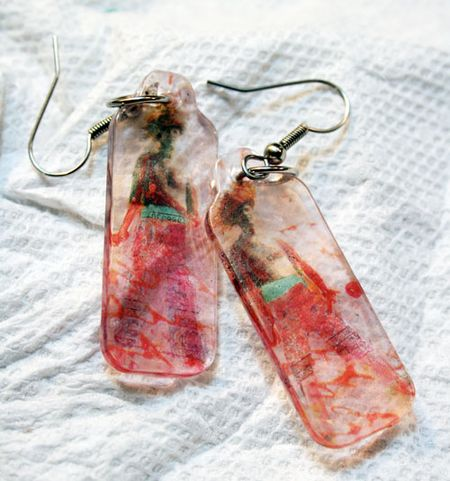
If, again, you prefer not to use heat, clear enamels are available, you just need patience... lots of it... Of course the refence for solidity and lasting is actual resin, a pinnacle of transparency and glossiness! So much chemistry and smelliness might be a bit intimidating but resin is becoming more and more accessible in a regular craftroom. If you to try it, Cloth, Paper, Scissors put together a nifty Downloadable Guide to Resin Jewellery. Also be sure to check topic 2017 #6: Resin and UTEE on this blog for varied inspiratrion!

Until now, we have mainly explore clear, colourless option for transparency. What of coloured media! Well lots of paints and ink are naturally translucent, intuitively allowing to build layers.

While we will instinctively think of loose media like watercolour of course, and not to toot our own horn, we would like to remind you that the PaperArtsy Fresco Acrylic Paint range contains both opaque and Translucent colours. Perfect to layers but also to play with light and contrast on transparent substrate...

Another possibility to work on non porous surfaces is alcohol inks. Amazing on transparent surfaces and transparent themselves, available in bottles or pens, they are incredibly versatile!


Here, we are pushing the envelope beyond strictly transparent (or translucent) thing toward supplies that give the impression of transparency and layering. Welcome to everything see-through! Textile offer lots of ethereal possibilities, starting with lace. It is now part of every crafter and it never disappoint, adding intricate detail and a sophisticated air of mystery.

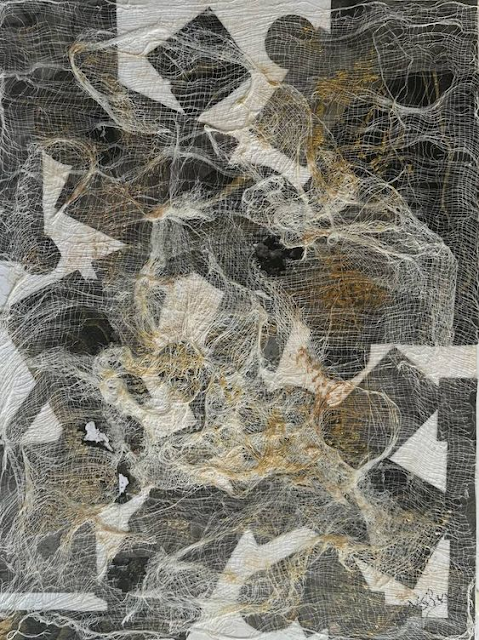
Cheesecloth and mousseline, with their various thread density, are another great option to softly veil without hiding. They create fantastic texture, organic and flowy, that will enhance and complement most design.
Let's not tulle, crinoline and other stiff open-weave fabric. They can make an amazing substrate, light, airy and delicate while still strong enough to keep everything upright! Their subtle hazing effect is perfect for soft and subtle projects.
Nature is another amazing purveyor of lacy elements! Think of all the treasures of autumn: holey fallen leaves, translucent lunaria seedpods or delicate frozen spiderwebs. So many beauties to harvest or emulate! These are not actual leave but mixed media and embroidery pieces!
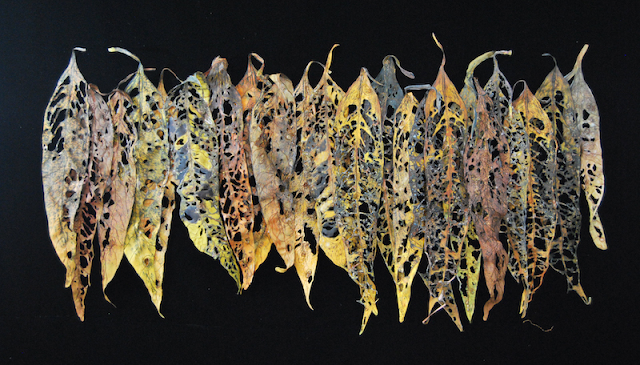
A natural lace that has snuck into our craft rooms is the delicate skeleton leaf. It will add a organic touch to any project and can be a supporting actor or the star of the show! Do you know you can make your own? You mainly need time and patience! Here in a guide on How to make Skeleton Leaves by Naomi Loves discussing three different techniques. Once you have them, decoration possibilities are numerous like painting, inking, cutting but also printing, as explained in How to print on Skeleton Leaves by Cloth, Paper, Scissors.

Leaves are not the only only the give plant skeleton. Hydrangea flowers are famous for it, and can be helped using the same methods as leaves. Maple fruits also dry veiny and translucent. And look at the physalis flower, letting us have a peek at its fruit. In French, those are called 'amour en cage', meaning 'love in a cage'...

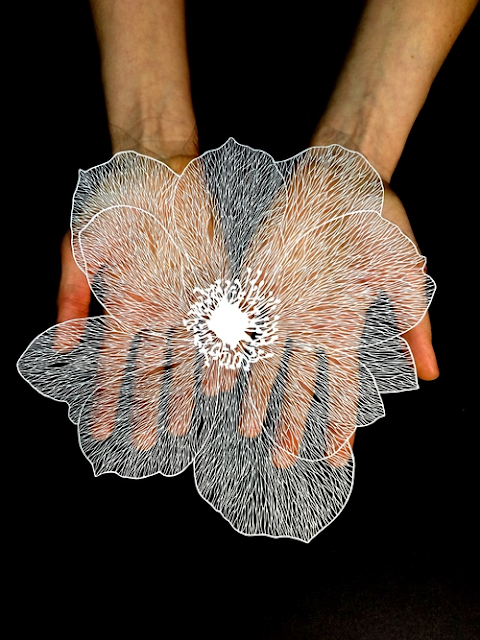
With so much beautiful inspiration, it is no surprise we would like to emulate it! Hand cut paper lace is an incredible art form, reserved for the patient and meticulous. I am speechless looking at those weightless and subtle creations.
Inspiration for complex and delicate patterns is all around us, and not just in nature. Architectural, industrial or abstract elements also yield beautiful results. Yet another dimension appears when you take advantage of their 'transparency', start to layer them and play with the invisible and shadows.

Probably a bit more manageable, all those concepts are applicable to card or journaling via lace pages. Do not be intimidated, they are easier than you might think! For example, here is a quick guide to cutting lace pages by Balzer Designs. Our fabulous designer Tracy Scott is a specialist and even has pre-cut lace booklets to keep you started!
Again, multiplying layers creates even more dimension, nooks and crannies to hide secrets or reveal only part of the story... For example, look at Julia Strand's carved books, where she reduces a whole tome to its essentials or chooses to connect selected part via transparency. For a more organic and spontaneous look, check this Tutorial to burn and layer holes in paper by Paper Traders.


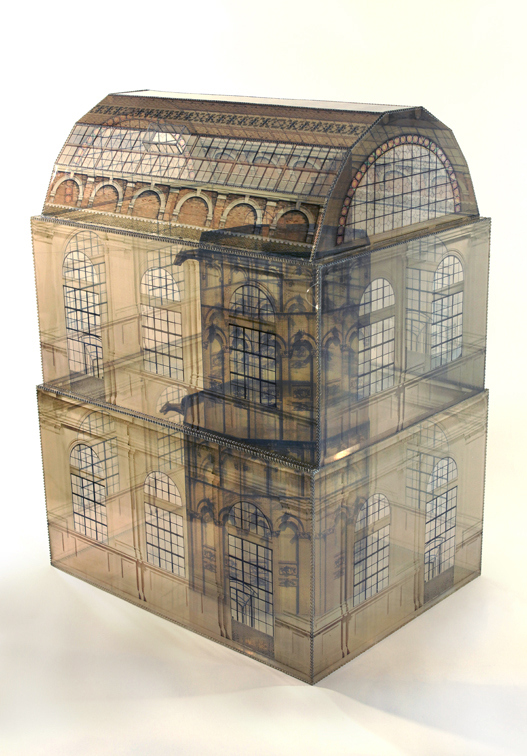
As already hinted at, one of the great aspects of transparency is the opportunity to play with layers: build them, make them interact, chose what to show and what to hide. You can have them carefully match or in the contrary use their differences to create a whole new dimension and question our first impression. For example, Korean artist Koh Myung Keun uses architectural photos printed on transparent panes and build in 3D to give a different experience of space.
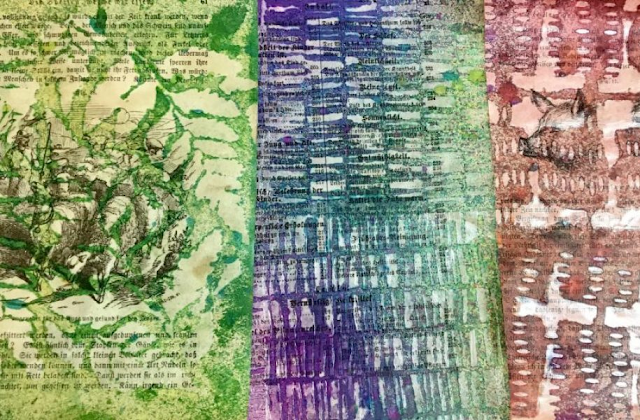
In the section, I would like to offer a few ideas to play with transparency, without much rhyme or reason! When talking about building layers, one cannot forget gel printing! This technique, making monoprinting easily accessible, has exploded in the crafting scene some years ago and there is no coming back (not that we want to)! The possibilities with a gel plate are almost infinite, as exemplified by this Gel Printing Collection by Linda Germain, ranging for the simple to the complex, hours of play in perspective.

Another great way to preserve and reveal underlayers is resists! Protecting your previous layer to not completely cover it is basically a flat version of peak-a-boo! Learn more here in topic 2016 #7: Resists. I presented gels and mediums as great transparent supplies previously, here is an other idea with them: Using Gel medium as a resist by Art Elements with amazing results:
If you want to experiment more with gels, why not try making skins? Mixing gel and colours on a non-stick surface is fun a therapeutic for great results to cut and use in all your projects! For a cheaper option, you can even start with clear PVA glue instead of gel! To step up your game, check this tutorial on How to make transparent acrylic skins by Approachable Art but also this amazing idea of Making Cheesecloth Words Skins by Lynda Haines.

If you want the layers themselves to be transparent, maybe explore glazes and washes as they are fantastic way to add an hint of colour and change the atmosphere of your work. Here is a Glazes and Washes guide by Scott Bennett on Just Paint to get you started. If you dabble in watercolours and inks, you might also want to check the Complete Guide to Wash Techniques on Watercolur Affair.

What about adding already existing images to your project without hiding all your work? Image transfer of course! It is certainly an favourite of our with 2 topics covering them for maximum inspiration: 2018 #12: Transfers and 2016 #4: Image Transfers. They are an incredible way to use all those cuttings you have been hoarding and add whimsy to any project.
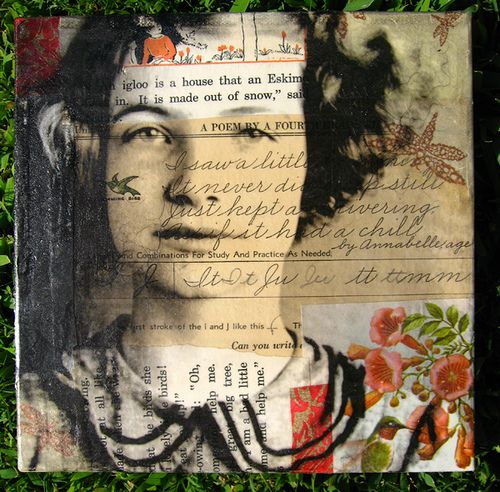
Multiple techniques are possible for a whole range of applications and results. You can check some of them in this Transfer Techniques Collection by Linda Matthews: medium, paint, gel printing... If you prefer not to use a wet medium, maybe try tape transfer, explained here by Balzer Designs to make into jewellery:
Finally for even more inspiration, be sure to check topic 2016 #1: Transparent Art on this blog!
I hope this has given you plenty of food for thought as to a range of ways we can interpret and experiment with this theme TRANSPARENCY. As our bloggers create over the coming 3 months, their posts will touch on this theme alongside the monthly topic.
Perhaps you might like to join us over in our friendly Facebook community 'PaperArtsy People' to see what others are up to with their PaperArtsy products, and maybe also using the content we share on the blog as inspiration.
1 comment:
great theme and some cool reminders of previous projects.
Post a Comment