
2019 Topic 20: A Bit of Sparkle

Etsuko's
experimentation with printing onto shrink plastic is a wonderful
example of combining digital technology with a simple product. Her end
result is really stunning with some gorgeous details!
Hi everyone, it's Etsuko My favorite things with you today, and I'd like to share with you Shaker Ornaments using Ink the dog stamps.
Nearly a year ago, Stephanie Jones Rubiano's
online workshop for printing shrink plastic and making a diorama at the
shrine was very interesting, so I wanted to share it on this project.
How to make this shrine is explained in detail on Stephanie's site.


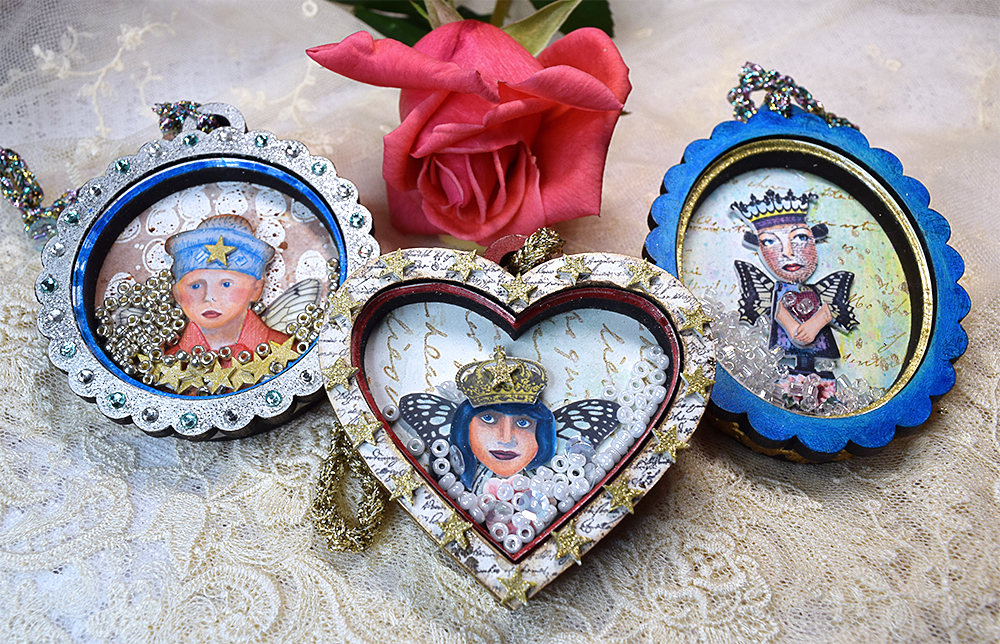
I
have prepared three types of shrines made of MDF; a scalloped circle,
scalloped oval and heart. Although I've not shown them here, I used two
other shapes and they contain a piece acrylic of the same shape for the
windows. I used Ink the dog WW4, WW5,


These Papers are used for the background and the back of the shrine. The colours used are Caribbean Sea, Granny Smith and Eggplant Frescos and some Distress Oxide and white embossing powder on the Smoothy regular A4 white card. I also stamped EM48, MN61 and HP1006.


I painted a silver colour on the top of the scalloped circle and added rhinestones. The shaker element is silver beads.


I used EM48, WW4 EAB14. stamps for the background and the boy.


On the back of the shrine, I used the same paper as the background, stamped the WW4 script by Distress Oxide Vintage Photo, and embossed Alison's new EAB14 quote on the black paper.

I
used Glass Blue and Caribbean Sea for the scalloped oval at the top and
golden Dresden Trim on the side. The MDF in the middle part is painted
gold. Size is 3.14"(8cm) height, 2.55"(6.5cm) width, 0.6"(1.5cm) depth.

Inside the shaker is holographic colour beads.


On the back, I used Alison's new quote stamp 'Happiness' EAB14.

With
the heart-shaped ornament. I've used gold leaf on part of the sides.
Size is 2.55(6.5cm) height, 2.75"(7cm) width, 0.6"(1.5cm) depth.

Stamped with MN75
by Jet Black Archival on the Smoothy white card, cut into a heart shape
and stuck it on top MDF with shrink plastic gold stars added to it.


On the back of the shrine I added a quote from Alison's new set EAB14.

A cord was added so that each ornament could be hung on a wall or tree.
This
is the last topic this year, and I've had a good time this year. I'm
always happy to be able to do what I want by crafting every day although
I'm constantly struggling with things that don't go well.
Huge thanks to Stephanie for these great fun ideas.
Thanks to PaperArtsy too for giving me a great opportunity to create these projects.
Have a great week. Merry Christmas and Happy New Year. Thank you so much for visiting.
Etsuko xxx


9 comments:
Wow - these are amazing Etsuko.
Wow, Etsuko - each one of these is like a little jewel. I love your shrunken characters - tiny and colourful inside their sparkling frames, and I really love that each one has their own hidden quote around the back. As they're hanging on a tree rotating, you'll get words and pictures alternating! Lovely post, thank you.
Alison x
These sweet creations wake up the whimsy in my soul, thanks!
Wow! I love this idea! Guess what I'll be making for ornaments next year...
Your shaker ornaments are spectacular! Linda
Such a beautiful project, Etsuko. I love these! xx
Thank you so much wonderful comment, Miriam, Alison, Connie, Kristy, Artifice and Julie. Hope you have Merry Christmas and a wonderful 2020!! xxx
Gorgeous , Etsuko . Each of your three shrines is so wonderfully created. and I bet there look fabulous hung on the tree with he fairy lights catching the sparkles. Such a great way to show of the products you have used . Tfs. xx
Absolutely amazing, Etsuko! X
Post a Comment