
Hi everyone, Emma Godfrey here to introduce my new stamps and stencils.
Tonight I'm going to show you a few samples I have made with the new stamps, and I have a few other people who have joined me to show you their ideas too, more of that later.
First up here is the video from Leandra, and lots of samples!
First up here is the video from Leandra, and lots of samples!
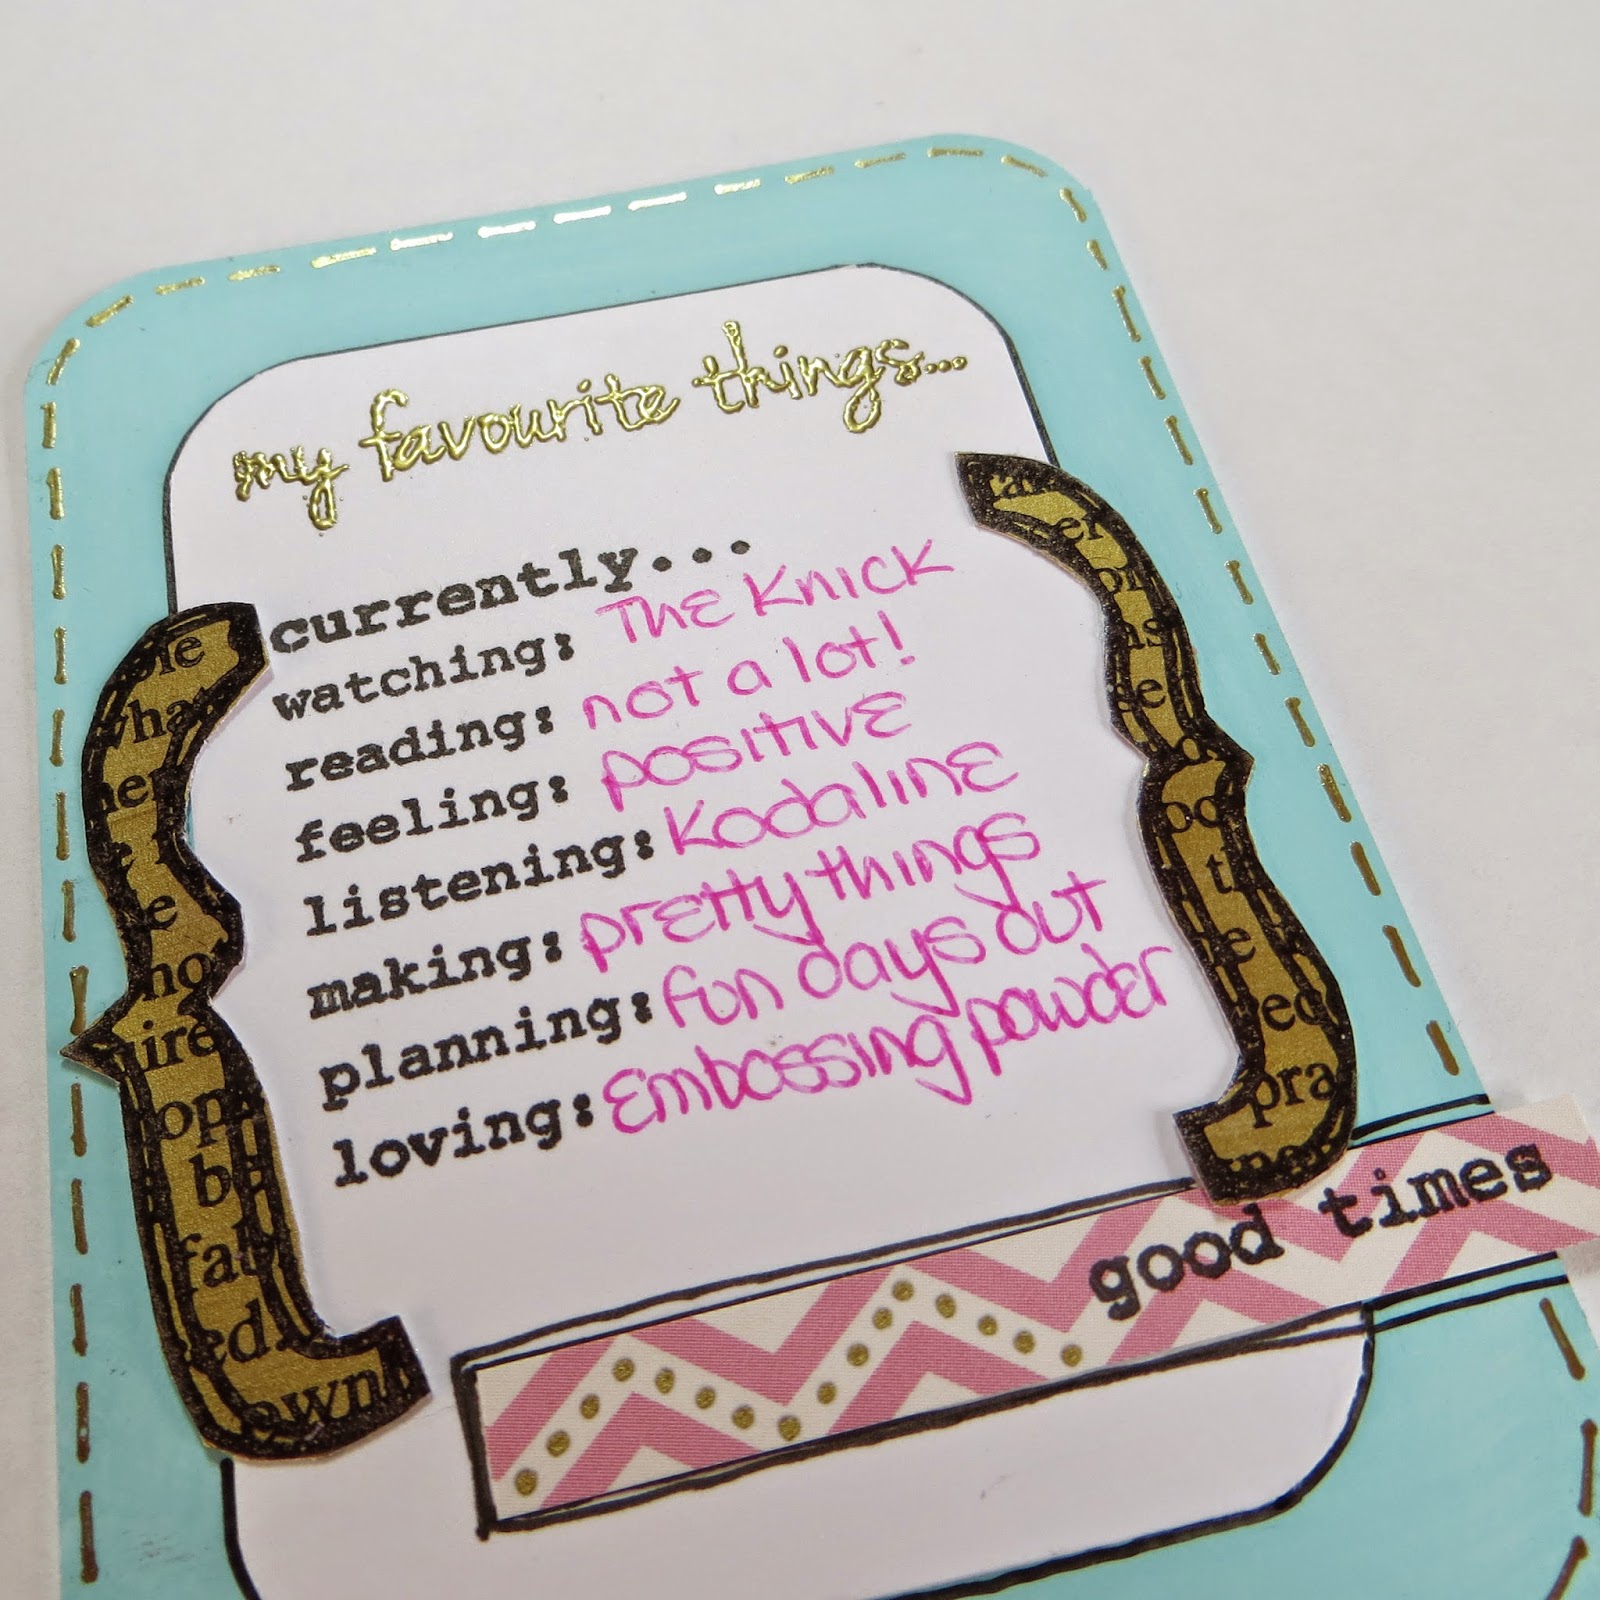
I was inspired to design these stamps as I {love} the current trend for pocket scrapbooking. However, I also wanted to make the stamps versatile so that they could be used for traditional scrapbooking, smash, cards, mini albums and journaling. Each set is loosely themed, and is a collections of words, doodled images (that can be stamped individually or layered up) and of course a journaling type block that fits on a 3"x4" card.
The stamps...
 |
| EEG01 |
 |
| EEG02 |
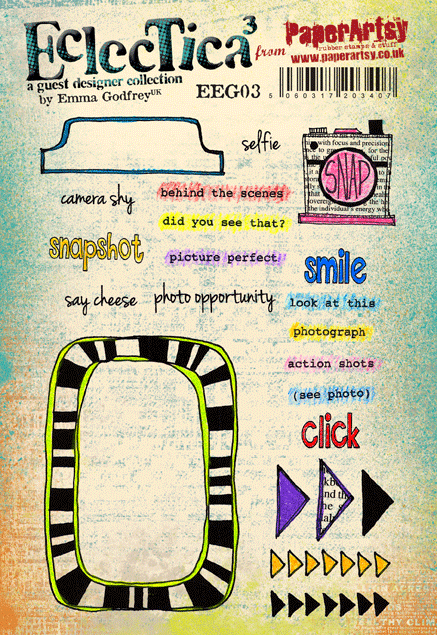 |
EEG03   |


(Please note: all cardstock is Smoothy. Stamping is with Jet Black Archival, or Versamark when embossing).
Project One: Pocket Scrapbooking by Emma Godfrey using EEG01 / EEG02 / EEG03
Step One: Cut up cardstock into four 3"x4" pieces and four 4"x6" pieces (mine were slightly smaller as for display purposes I had to put my cards onto a sheet of 12"x12" card rather than in a pocket page protector). On another piece of cardstock stamp the calendar, and then stamp and pink emboss the circle over the date you need. Stamp and emboss in black and blue the journal cards and tabs. Cut them out. Paint the 4”x6” cards with a wet wipe to create “swipey” backgrounds with Mermaid and

Step Two: When dry, layout the cards with your photos and cut out shapes – I find this helps me decide what I want to do next. I also added small pieces of a co-ordinating patterned paper.

Step Three: I then started to add decorative elements:-
* I used Stencil PS001 and Snowflake Fresco Chalk Acrylic to add interest to the background of the 4"x6" pink cards.
* I painted some cardstock with Old Gold Fresco Chalk Acrylic – which was used to create a background for the stripy journaling card, cut up into strips and also diecut into shapes (stars / number 2)
* I stamped the solid arrows in different colours of Fresco Chalk Acrylics, and then overstamped them with the outline arrows.
* I stamped appropriate words around the cards.
* I coloured in some of the outline words, the journaling cards and the calendar frame with the same Fresco Chalk Acrylics.
* I stamped the alphabet (in black ink, and stamped and embossed in pink), and cut up the letters to make other words.
* I stamped and embossed in gold a few text circles, and cut them out.


Project Two: Birthday Card by Emma Godfrey using EEG02 / EEG04 / EEG05 / EEG06
Step One: Firstly stamp and gold emboss the frame on cardstock, and then cut out the centre. Paint a piece of cardstock with Orchid Fresco Chalk Acrylic. When it is dry, stick it behind the frame and then stamp "hip hip hooray" in the centre. Paint a piece of cardstock with Sherbet Fresco Chalk Acrylic, and then stamp and cut out the flag. Stamp and gold emboss the words "happy" and "birthday" on the flag, and colour in "birthday" with a white Sharpie Extra Fine pen.

Step Two: Cut your card blank (6"x8") and fold in half. Cut a piece of patterned paper 1.5"x2.5" and ink the edges (you could instead paint a piece of cardstock with Mermaid and Bora Bora Fresco Chalk Acrylics for a similiar effect). Stick the piece down, and then gold emboss the solid dotty line underneath. Stamp the outline circles in three places so that they radiate out from the bottom of the blue piece of card (layout the pieces we prepared in Step 1 to see where you need to stamp). If the gaps in the stamping annoy you (they did me!) then fill them in with a black pen.

Step Three: Glue your frame in place, and stick the flag over the top using 3D foam pads. To finish, paint a piece of cardstock with Old Gold Fresco Chalk Acrylic, and then stamp the outline stars onto it. Cut them out and stick them on.

Here's a close up ... I love the additional texture and bling that the gold embossing powder brings.

Step One: Cut a 6.5"x6.5" piece of cardstock (I don't like to waste card, so I cut the centre out leaving a 1" frame all around - but you can leave it whole if you prefer). Paint the background with Mermaid Fresco Chalk Acrylic.

Step Two: Then cut a piece of cardstock 6"x6". Water down some Bora Bora Fresco Chalk Acrylic, and apply to the card with your finger making a chunky "L" shape. Apply Grunge Paste through the block part of Stencil PS016 and dry.

Step Three: Now you need to position where your photo is going to go (don't stick it down yet ... this is just to see where you need to stamp!). Stamp the solid dotty line and the outline small arrows in three areas. Press a bottlecap (I used a Fresco Chalk Acrylics lid) into the black ink pad and then stamp it randomly around the page (you will need to re-ink it each time). Glue a couple of pieces of co-ordinating patterned paper in place.


And here's a close up... I love the way the paintbrush dots stay slightly raised after they've dried.

And here's some more great ideas...
Lythan Nevard (slightlysquiffy.blogspot.co.uk)
A 6"x6" mini book page with lots of layering, and everything inked around the edges. Old Gold Fresco Chalk acrylic was splattered onto some of the layers with a paintbrush.

A 3"x4" journal card using the Fresco Chalk Acrylic paints to create an ombre style background.

A 6"x6" mini book page with lots of layering, and everything inked around the edges. Old Gold Fresco Chalk acrylic was splattered onto some of the layers with a paintbrush.
Keren Baker (kerenbaker.wordpress.com)
Small Scrapbook Page: Paint the background with layers of colour, and dry brush with paint over the top. Paint different colours onto the circle stamps to create multi-coloured images. Stamp sentiments over the top of the circles, and add the journaling card bits on top.

Weekly Planner: Paint stripes on cardstock and stamp the journaling blocks. Stamp the individual elements with paint. Make hinges with Old Gold painted card and attach the journaling cards to a decorated Smoothy base.


Card: Paint stripes onto a small strip of Smoothy. Water down Old Gold to create a spray. Spray top right of card. Stamp journaling block onto bottom left of card as a pattern, and colour in with watered down paints. Add extra stamping and individual letters to spell sentiment.
Nina Burgess (www.adventuresinbugland.blogspot.co.uk)
A 4"x4" page protector - with stamping and paint on the photo and protector to layer up the images and words.


And journal cards with the paints watered down to create watercolour style backgrounds. Grunge Paste on the bottom one to add some texture.

A 6"x6" journal page layering up the stamps with ink and paints, and some extra doodling.

A 4"x6" journal card with lots of layers. Using the rectangular shapes as a background and outlining some of them with a white pen.

A 4"x6" journal card with lots of layers. Using the rectangular shapes as a background and outlining some of them with a white pen.
A mini scrapbook page with a mottled background. The words were stamped onto another piece of paper, cut out and stuck on the background to add another dimension. It was then stamped with the outline circles.

A card using the text circle stamp to create a scalloped border around the journaling card. The heart, flower and sentiment are JOFY stamps.

Two large tags using the arrow stamps to create the background. Some of the arrows were stamped on another piece of card and cut out, before being stuck on.
.


.
Stamping on the ribbon ties everything together. And the journaling cards have been layered up with words and a pointy border (made from stamping an arrow corner around the edge).
A 4"x6" journal card with the journal block stamped in Old Gold Fresco Chalk Acrylic on the mottled background. The "24/7" is stamped on shrink plastic to make a 3D embellishment.

A tag with the outline circle and rectangular shapes stamped to create a background. The solid black border on the left balances the tag with the words stamped on the right.

I would like to say a HUGE thank you to all of these creative ladies who have helped me by making these samples. I knew how "I" wanted to use the stamps when I designed them, but it's brilliant to see other people's take on them. Fabulous jobs ladies. Thank you so much.
I've been teaching for 8 years, and hold regular monthly workshops at my crop in Upminster (Essex). Out next classes (card-making and scrapbooking) are on Saturday 21 February, and both are using my stamps. You can find more information on them here.
I also plan to teach at various shops around the South East (and maybe further afield) this year, and the first of these is a mini album class using my stamps on Sunday 15 March at Birds In The Barn.
If you would like to arrange for me to teach/demo at your shop or event, then please contact me at emmaimaginethatpapercrafts@yahoo.co.uk.
My brand spanking new blog is at imaginethatpapercraft.blogspot.co.uk. I also have a Facebook page here, and you can follow me on Twitter @emmaimaginethat.
I really hope you are going to enjoy using my stamps this year... I can't wait to see what you create with them!
Emma
PS Don't forget that the blog challenge for Topic 2: Shiny Stuff is still open until Sunday Feb 8th, until 5pm. If you'd like to take part, and show us your inner magpie skills, then go right ahead!
Emma
PS Don't forget that the blog challenge for Topic 2: Shiny Stuff is still open until Sunday Feb 8th, until 5pm. If you'd like to take part, and show us your inner magpie skills, then go right ahead!


23 comments:
These stamps are great and I can see myself using them loads:). Great samples everyone:). Xxx.
Love, love, love your new stamps (some have fallen into my basket already!) and the samples are wonderful!!!!
ohhhhh we like these a lot!! Well done Emma!!!
How did I miss the stencils! Awesome! #Smile:)...(I need to do that more!). Xxx.
Well done, Emma, great addition to the PA stable, love the designs and the samples are fab!!
Yay! Fab.u.lous!! well done on a very lovely collection of stamps and stencils!! x
Fabulous designs Emma.... I bought one of the sets and can't wait to play! The samples are wonderful
I find that I'm journaling on 3 different sites so I think these will have to go into my shopping bag ASAP!
Sally
Great stamps for scrapbookers, journallers and cardmakers and terrific samples. Well done! xx
Wow lots of stamps, well done Emma, these are fab, will be getting a couple for my journaling, also love the stencils xx
Love them! XxX
Fantastic samples! Congratulations Emma!
Alison xxx
Love the stencils. Fantastic samples. Hugz
Congratulations, Emma!!! Wonderful stamps, stencils and projects done by you and your team!!!
Fabulous stamps and great stencils!!
Very beautiful collection of timbers ans stencils,they are fabulous, Emma.
Huge congratulations Emma. Fabulous range of stamps and amazing samples from you and your guests. I think I now need to start pocket scrapbooking...I have way too many photos of my grand babies, this will be such a great way to record and enjoy them growing up.
Lin x
Such versatile stamps, Emma - a fab release, and what a lot of great inspiration from your "guys"!
Alison xx
Oh my goodness! And to think I gave these stamps a cursory glance at ATP because I didn't think they were 'me'. How wrong and foolish was I? The video and this fabuloosy blog post has proved how much I need these stamps. All of them. I do make mini scrap books but it didn't register with me at first how perfect they are for this type of project. How clever is Emma? And Paperartsy for going in this direction. Should sell enormously well at Version Scrap. The French peeps will love them. Are you taking Emma with you? Love love love them!
These are all wonderful! I LOVE the versatility of these little stamps.
Can't wait to show you what I've created with them.
~Linda
Fab new stamps. Can see how versatile they are. Very well done Emma x
Thank you everyone for all your lovely comments ... so pleased that you like them!
Wow wow wow Emma's stamps are truly unique and totally awesome, the samples are amazing. I have bought one of the stamps and they are gorgeous. Kezzy :-) xxx
Post a Comment