Saturday, 8 November 2014

Clean and Simple Festive Cards {with Eclectica³ Ellen Vargo Stamps by Designer Ellen Vargo}

Hello!
Ellen Vargo, here... happy to be back to share some very clean and simple (read: easy to mass produce!) Christmas cards.  I wanted to come up with a clean design and came up with a very simple use for one of my petal stamps from EEV09, a little grunge paste, fresco paints, and some Christmas sentiments from Lin Brown.
I started by cutting a sheet of heavyweight smoothy card into quarters - we'll be making four card fronts.  Then I mixed up some grunge paste with a tiny bit of Mermaid fresco paint using a palette knife.

I made a simple wavy stencil by cutting some curves on a piece of manila card, and spread a thin layer of the tinted grunge paste over the stencil, creating a snowy hillside.
Remove the wavy stencil and you have a nice clean line.


Here are all four card fronts.  I moved the position of the stencil slightly for each card to create some variety.


Once the first layer was dried, I mixed some more white grunge paste into the first batch for a lighter shade, shifted the position of the stencil and added another layer to our snowy hillside.


I have to admit, the grunge paste came out a little TOO blue for my taste, but by adding a thin layer of metallic glaze we accomplish two things:  1-it tones down the blue and 2- it adds a shimmery layer to the snow.  Winner, winner!


To create our trees, I used a few shades of green fresco paint (I used guacamole, chartreuse and seaweed) and scraped them onto a sheet of white card using an old credit card.  Then I stamped the leaf/petal from EEV09,now a TREE onto the painted card using black archival ink.  I stamped out eight trees (two per card), and then cut them out. 


EEV09

I wanted to add to the shimmer of the card fronts, so I created some shiny silver paper by embossing a large area on the edge of some white card, and then I cut four 1/4" strips to add to each card front.  


All the was left to do was assemble our cards and stamp some Christmas sentiments from Lin Brown's ELB11 and ELB12.  I popped each tree up a bit with some foam squares behind each tree, and drew a straight line for a tree trunk using a ruler and a fine-line black pen.
Here are the finished cards...

ELB11
ELB12.

Hope you enjoyed these clean and (very) simple cards.  They would be quite easy to make in large quantities for your Christmas mailing lists. Hope you decide to give it a go.  Take care 'til next time.

~ ellen.

A huge thankyou to Ellen from all at PaperArtsy for these gorgeous cards. Simple they may be but oh so effective, just love that frosty blue snow. 

We would love you to join in with our monthly challenge. If you are inspired by any of this month's guests who have blogged between Nov 1st 2014 and Nov 30th 2014 then join in and link up your creativity HERE. You will go in the draw to win a voucher to spend on products of your choice from the PaperArtsy online store. You need to add your link by 19:00 (London time) Nov 30th 2014

Friday, 7 November 2014

Pennant Trio {with Hot Picks Xmas Stamps} By Gillian Simson

Hello everyone, Gillian here. Hope you are all enjoying the wonderful inspiration here on the blog so far this month. I'm delighted to be making another appearance this side of the blog, with a quick fun project. For tonight's project I'm using the new Hot Picks Xmas designs which I adore for their non traditional xmas look ..... (Yes I know Bah Humbug)!


I started out by painting 3 MDF Pennants with Slate, then applied a layer of Crackle Glaze and finally a top layer of Chalk.


What I love about Crackle Glaze is how each piece turns out differently depending on how you apply your layers {I used a Palette Knife and a Paintbrush}.


I stamped the block "Reindeer Names" image from HPXmas05 onto two of the Pennants using Archival Ink Jet Black.

 I then stamped the middle Pennant with a further image from HPXmas05 using Archival Ink Watering Can. Next I used images from EDY03 which I painted with Cherry Red and Turquoise.

EDY03

Finally to finish off I applied Slate to the edges and some Baker's Twine. What to do as I had two different size Pennants left .... waste not want not right! Here's a mini version of the above using the same supplies.


That's it from me for another night, I hope you are able to try this project out for yourself. You could easily use cardstock to create the Pennants, so what are you waiting on:) Don't forget to link up to the November challenge to be in with a chance of winning a £50 voucher to spend online. Until next time.

~Gillian~

A huge thanks to Gillian from all at PaperArtsy. These are gorgeous, the crackling is just so yummy. The colour scheme is bold and makes a great change from traditional festive colours. 


We would love you to join in with our monthly challenge. If you are inspired by any of this month's guests who have blogged between Nov 1st 2014 and Nov 30th 2014 then join in and link up your creativity HERE. You will go in the draw to win a voucher to spend on products of your choice from the PaperArtsy online store. You need to add your link by 19:00 (London time) Nov 30th 2014

Thursday, 6 November 2014

Shabby Heart Garland { with Hot Picks Stamps by Jo Myhill}

Hello again it's Jo here with another decor idea using the lush PaperArtsy products.  

Hearts, I really love hearts all that love and dark secrets, happiness and pain and decisions that are emotionally led not logically driven by our heads!


The PaperArtsy tall heart die is a beautiful shape and I thought Id have a go at making a banner linking the hearts together.  Once you have the basic structure you can decorate it how you like, make it as long as you want and it has a variety of uses from weddings, Christmas, christenings and just to decorate!
So I started with pieces of Heavy Smoothy Card and brayered Cinnamon all over, just roughly as we are adding loads of layers.  Second was a layer of Chutney, not all over just in random places.  Sand this to reveal spots of the base card.

Using the text stamp from HP1304 stamp text in Potting Soil all over.


HP1304

Now a layer of watered down Nougat and Vanilla, keep adding layers but dry in between so you don't get mud.  
Finally a layer of Nougat to soften the yellow of the Vanilla. Sand again.
Now stencil with Chocolate Pudding, with your favourite stencils, I used the Mini Swiss Dot  for this layer, again in random places. Sand to smooth out the paint layer and soften it and then a second stencil I used Mini Brocade in French Roast.  I offset it to look like the repeat pattern of damask fabric.


Sand again and add a final watered down layer of Nougat to bring all the layers together.

Using the first piece of card cut out as many hearts as you want with the pattern facing up.  On the second piece of card cut out a matching number of hearts but this time have the pattern facing down as we are going to stick the hearts together back to back so they are patterned on both sides to make them more robust.


Distress the edges and add Vintage Photo Distress Ink. Use a crackle stamp and add eyelets.  

Now your basic structure is done and you can decorate how you like. I used sari ribbon and a flower, but you could add more stamping, flowers, chipboard letters, small phrases.  Linking together has lots of possibilities as well, I used jump rings but you could use ribbon, string, rusty wire - whatever takes your fancy!


I love the simplicity and the versatility of these hearts to make a banner, I think they also work as individual elements on a tag or card.  
Hope you have a play and create beautiful things!
Jo

A huge thanks to Jo from PaperArtsy, your lovely shabby,vintage style never fails to bring a little peace and serenity. These would look perfect above an old fireplace or above a bedhead. 


We would love you to join in with our monthly challenge. If you are inspired by any of this month's guests who have blogged between Nov 1st 2014 and Nov 30th 2014 then join in and link up your creativity HERE. You will go in the draw to win a voucher to spend on products of your choice from the PaperArtsy online store. You need to add your link by 19:00 (London time) Nov 30th 2014


Wednesday, 5 November 2014

GD: Wanda Hentges Project #3 Peace

Hello everyone,  Wanda back again for my last day this month. Today I'm working with a 4 x 4 box canvas.


along with stamp set ELB12.


and this stencil PS005.


I began by stenciling the large flower with Grunge Paste, letting it dry, sanding it to get any really rough spots of paste off, and painting the whole thing with Chocolate Pudding. 


Then came Treasure Gold, I used my finger to rub Renaissance over all the top and then used my finger to add Ruby just over the flower.


For the sides I used TCW stencil mini climbing vine and stenciled on Nougat using a piece of Cut N Dry Foam. I did one side at a time, drying it with the heat tool and then moving to the next side. When I'd finished with the Nougat, I started over again this time stenciling with Treasure Gold Renaissance using a stencil brush. I was sure to use a different area of the stencil so that I was filling in some of the open areas and also had some overlap of the first stenciling. To clean the stencil after finishing, I sprayed it with 91% rubbing alcohol and wiped it off.  The sides have much more depth with the 2 layers of stenciling!!


I painted a scrap of HeavyWeight Smoothy Stamping Card with Nougat, dried it, tapped an anti-static bag over the painted area, stamped Peace with Archival Ink Jet Black and embossed it with detail black powder.  


I painted in all the little circles with Old Gold.


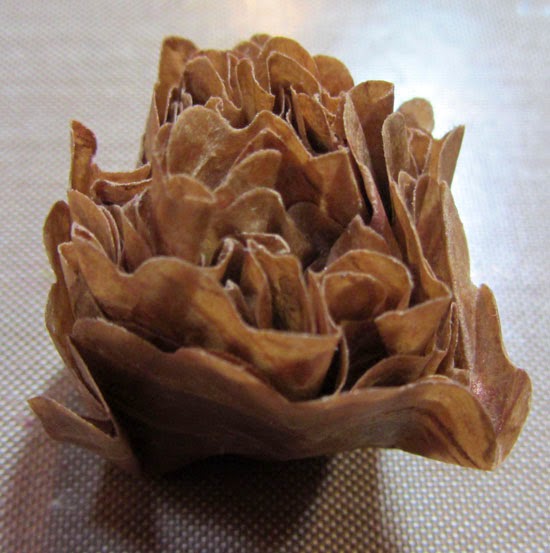
To make a flower I took 1 sheet of Crunchy Waxed Kraft Paper and crumpled it really well - crumple, open, crumple, open, etc until there are lots of wrinkles.


Using my finger I added both Renaissance and Ruby Treasure Gold to the piece on both sides and then heated both sides to be sure it all stayed.  


I die cut some scalloped circles. The large ones are about 2" across and the small ones are about 1 1/2". You don't have to have small circles, I just couldn't fit 2 more large ones from the sheet and wanted at least 8 circles for a nice full flower (10 circles would work also).


I used a craft pick to make a hole in the center of each circle stacking the small ones first and then the larger ones. I just eyeballed the center, it doesn't have to be perfect.


I took the stack off the pick and put a brad in the center.


Next you start scrunching each circle up and to the center, one circle at a time...


until you have all the circles scrunched.


Then you start pulling them back down, but not down all the way..


until you have a nice flower.  


I used a brush and rubbed more Treasure Gold on the edges of the flower.


I took a large silver flower from a pack of Prima Finnabair Vintage Trinkets and added Ruby Treasure Gold over the flower and then used my finger to add Renaisssance to the edges of the petals.  


When I started laying everything on the canvas to decide just what I wanted to do I decided this flower wasn't quite right and using my finger added just a bit of Nougat to the petals, dried it, and then decided it needed a little Chocolate Pudding also.  


I glued everything to the canvas with Golden Medium Matte Gel. To glue on the lace I laid it on the craft sheet, front down, put some gel medium on a piece of foam and pressed it along the lace, picked it up and laid it on the canvas. It worked really well. I cut out the individual letters of Peace and glued them on. I glued on the flower and also glued a pearl to the center.  After it dried a bit I used the stencil brush and pounced a little bit of Renaissance onto the pearl.  


I quite like this canvas!!!  I might glue a couple of buttons to the bottom so it doesn't sit on the lace, unless I put it on an easel ... decisions, decisions!!!  

I hope you've enjoyed the projects this week and, as I mentioned on the other posts, if you are inspired to make something, I hope you link up to the November challenge. I'd love to come visit and see what you've made!!!!  


Have a wonderful month everyone.

~Wanda~

A huge thanks from the PA team this box canvas is simply gorgeous Wanda. The stencilled Grunge Paste centre works amazingly well as a focal piece as does the touches of TG. Love the autumnal effect you have created on the Crunchy Wax Paper flowers ... a fab composition all round. Thank you once again for sharing your creativityb with us all.

We would love you to join in with our monthly challenge. If you are inspired by any of this month's guests who have blogged between Nov 1st 2014 and Nov 30th 2014 then join in and link up your creativity HERE. You will go in the draw to win a £50 voucher to spend on products of your choice from the PaperArtsy online store. You need to add your link by 19:00 (London time) Nov 30th 2014.